2003 TOYOTA 4RUNNER Navigation Manual
-
 1
1 -
 2
2 -
 3
3 -
 4
4 -
 5
5 -
 6
6 -
 7
7 -
 8
8 -
 9
9 -
 10
10 -
 11
11 -
 12
12 -
 13
13 -
 14
14 -
 15
15 -
 16
16 -
 17
17 -
 18
18 -
 19
19 -
 20
20 -
 21
21 -
 22
22 -
 23
23 -
 24
24 -
 25
25 -
 26
26 -
 27
27 -
 28
28 -
 29
29 -
 30
30 -
 31
31 -
 32
32 -
 33
33 -
 34
34 -
 35
35 -
 36
36 -
 37
37 -
 38
38 -
 39
39 -
 40
40 -
 41
41 -
 42
42 -
 43
43 -
 44
44 -
 45
45 -
 46
46 -
 47
47 -
 48
48 -
 49
49 -
 50
50 -
 51
51 -
 52
52 -
 53
53 -
 54
54 -
 55
55 -
 56
56 -
 57
57 -
 58
58 -
 59
59 -
 60
60 -
 61
61 -
 62
62 -
 63
63 -
 64
64 -
 65
65 -
 66
66 -
 67
67 -
 68
68 -
 69
69 -
 70
70 -
 71
71 -
 72
72 -
 73
73 -
 74
74 -
 75
75 -
 76
76 -
 77
77 -
 78
78 -
 79
79 -
 80
80 -
 81
81 -
 82
82 -
 83
83 -
 84
84 -
 85
85 -
 86
86 -
 87
87 -
 88
88 -
 89
89 -
 90
90 -
 91
91 -
 92
92 -
 93
93 -
 94
94 -
 95
95 -
 96
96 -
 97
97 -
 98
98 -
 99
99 -
 100
100 -
 101
101 -
 102
102 -
 103
103 -
 104
104 -
 105
105 -
 106
106 -
 107
107 -
 108
108 -
 109
109 -
 110
110 -
 111
111 -
 112
112 -
 113
113 -
 114
114 -
 115
115 -
 116
116 -
 117
117 -
 118
118 -
 119
119 -
 120
120 -
 121
121 -
 122
122 -
 123
123 -
 124
124 -
 125
125 -
 126
126 -
 127
127 -
 128
128 -
 129
129 -
 130
130 -
 131
131 -
 132
132 -
 133
133 -
 134
134 -
 135
135 -
 136
136 -
 137
137 -
 138
138 -
 139
139 -
 140
140 -
 141
141 -
 142
142 -
 143
143 -
 144
144 -
 145
145 -
 146
146 -
 147
147 -
 148
148 -
 149
149 -
 150
150 -
 151
151 -
 152
152 -
 153
153 -
 154
154 -
 155
155 -
 156
156 -
 157
157 -
 158
158 -
 159
159 -
 160
160 -
 161
161 -
 162
162 -
 163
163 -
 164
164 -
 165
165 -
 166
166 -
 167
167 -
 168
168 -
 169
169 -
 170
170 -
 171
171 -
 172
172 -
 173
173 -
 174
174 -
 175
175 -
 176
176 -
 177
177 -
 178
178 -
 179
179 -
 180
180 -
 181
181 -
 182
182 -
 183
183 -
 184
184 -
 185
185 -
 186
186

1212003 MY 4Runner Navigation from Aug. ’02 Prod. (OM35799U)
OTHER FUNCTIONS
Other functions
Screen adjustment122
. . . . . . . . . . . . . . . . . . . . . . . . . . . . .")

1222003 MY 4Runner Navigation from Aug. ’02 Prod. (OM35799U)
You can adjust the brightness or con-
trast of the screen depending on the
brightness of your surroundings. You")

1232003 MY 4Runner Navigation from Aug. ’02 Prod. (OM35799U)
NZN065
Depending on the position of the head-
light switch, the screen changes to the
day mode or night mode.
T")

1242003 MY 4Runner Navigation from Aug. ’02 Prod. (OM35799U)
NZN045
2. Select “ON” or “OFF” and then touch “OK”.
ON: The previous screen automatically
returns f")

1252003 MY 4Runner Navigation from Aug. ’02 Prod. (OM35799U)")

1262003 MY 4Runner Navigation from Aug. ’02 Prod. (OM35799U)
AUDIO SYSTEM
Audio system
Quick reference for your audio system127
. . . . . . . . . . . . . . . . . . . . . .")

1272003 MY 4Runner Navigation from Aug. ’02 Prod. (OM35799U)
Function switch display screen
Touch the switches displayed on
the screen to control the radio,
cassette tape p")

1282003 MY 4Runner Navigation from Aug. ’02 Prod. (OM35799U)
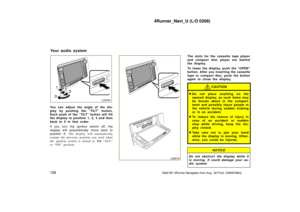
L00004
You can adjust the angle of the dis-
play by pushing the “TILT” button.
Each push of the “TILT”")