Page 228 of 425

Starting and operating
7-7
– CONTINUED –
and states using two-wheel dynamometers in their
emission testing programs have EXEMPTED
Subaru AWD vehicles from the portion of the testing
program that involves a two-wheel dynamometer.
There are some states that use four-wheel
dynamometers in their testing programs. When
properly used, that equipment will not damage an
AWD Subaru vehicle.
Under no circumstances should the rear wheels be
jacked off the ground, nor should the driveshaft be
disconnected for state emission testing.
WARNING
Testing of an All-Wheel Drive vehicle must
NEVER be performed on a single two-wheel
dynamometer. Attempting to do so will result in uncontrolled vehicle movement and may
cause an accident or injuries to persons
nearby.
CAUTION
Resultant vehicle damage due to improper testing is not covered under the SUBARU Lim-
ited Warranty and is the responsibility of the state inspection program or its contractors orlicensees.
The EPA has issued regulations for inspecting the
On-Board Diagnostic (OBD) system as part of the state emissions inspection. The OBD system is de-
signed to detect engine and transmission problemsthat might cause vehicle emissions to exceed allow-able limits. These inspections apply to all 1996 mod-el year and newer passenger cars and light trucks.
Several states plus the District of Columbia have
opted to start the OBD system inspection prior to
the required EPA regulation effective date of January1, 2002. Other states will add OBD system inspec-
tion in 2002. � The inspection of the OBD system consists of a
visual operational check of the “CHECK ENGINE ”
warning light/malfunction indicator lamp (MIL) and
an examination of the OBD system with an electron-ic scan tool while the engine is running. � A vehicle passes
the OBD system inspection if
proper the “CHECK ENGINE ” warning light/MIL illu-
Page 230 of 425

Starting and operating
7-9
– CONTINUED –
Starting the engine
CAUTION
Do not operate the starter motor continuously
for more than ten seconds. If the engine fails to start after operating the starter for five to ten seconds, wait for ten seconds or more be-fore trying again.
� Manual transmission vehicle
1. Apply the parking brake.
2. Turn off unnecessary lights and accessories.
3. Press the clutch pedal to the floor and shift the
shift lever into neutral. Hold the clutch pedal to the
floor while starting the engine.
The starter motor will only operate when the clutch
pedal is pressed fully to the floor.
4. Turn the ignition switch to the “ON” position and
check the operation of the warning and indicatorlights. Refer to the “Warning and indicator light ” sec-
tion (chapter 3).
5. Turn the ignition switch to the “START” position
without depressing the accelerator pedal. Release
the key immediately after the engine has started. If the engine does not start within ten seconds, wait
a while and then turn the ignition switch to the
“START”
position again while depressing the accel-
erator pedal half way down.
6. Confirm that all warning and indicator lights have
gone off after the engine has started. The fuel injec-
tion system automatically lowers the idle speed as
the engine warms up. � Automatic transmission vehicle
1. Apply the parking brake.
2. Turn off unnecessary lights and accessories.
3. Shift the selector lever to the “P” or “N” position
(preferably “P” position).
The starter motor will only operate when the selectlever is at the “P” or “N” position.
4. Turn the ignition switch to the “ON” position and
check the operation of the warning and indicatorlights. Refer to the “Warning and indicator lights ”
section (chapter 3).
5. Turn the ignition switch to the “START” position
without depressing the accelerator pedal. Release
the key immediately after the engine has started.
If the engine does not start within ten seconds, wait
a while and then turn the ignition switch to the
“START” position again while depressing the accel-
Page 232 of 425
Starting and operating
7-11
– CONTINUED –
Stopping the engine
The ignition switch should be turned off only when the engine is idling.
WARNING
Do not stop the engine when the vehicle is moving. This will cause loss of power to the
power steering and the brake booster, makingsteering and braking more difficult. It could also result in accidental activation of the
“LOCK” position on the ignition switch, caus-
ing the steering wheel to lock. Manual transmission
The manual transmission is a fully synchromeshed
5-forward and 1-reverse speed transmission.
The shift pattern is shown on the shift lever knob.
When shifting from 5th gear to reverse gear, first re-
turn the shift lever to the neutral position then shift
into reverse gear.
To change gears, fully depress the clutch pedal,
move the shift lever, and gradually let up on the
clutch pedal.
If it is difficult to shift into gear, put the transmission
Page 233 of 425

Starting and operating
7-12
in neutral, release the clutch pedal momentarily, and
then try again.
WARNING
Do not drive the vehicle with the clutch disen- gaged (i.e., when the clutch pedal is
depressed) or with the shift lever in the neu-tral position. Engine braking has no effect ineither of these conditions and the risk of an
accident is consequently increased.
CAUTION
Shift into reverse ONLY when the vehicle has
completely stopped. It may cause damage tothe transmission to try shifting into reverse when the vehicle is moving.
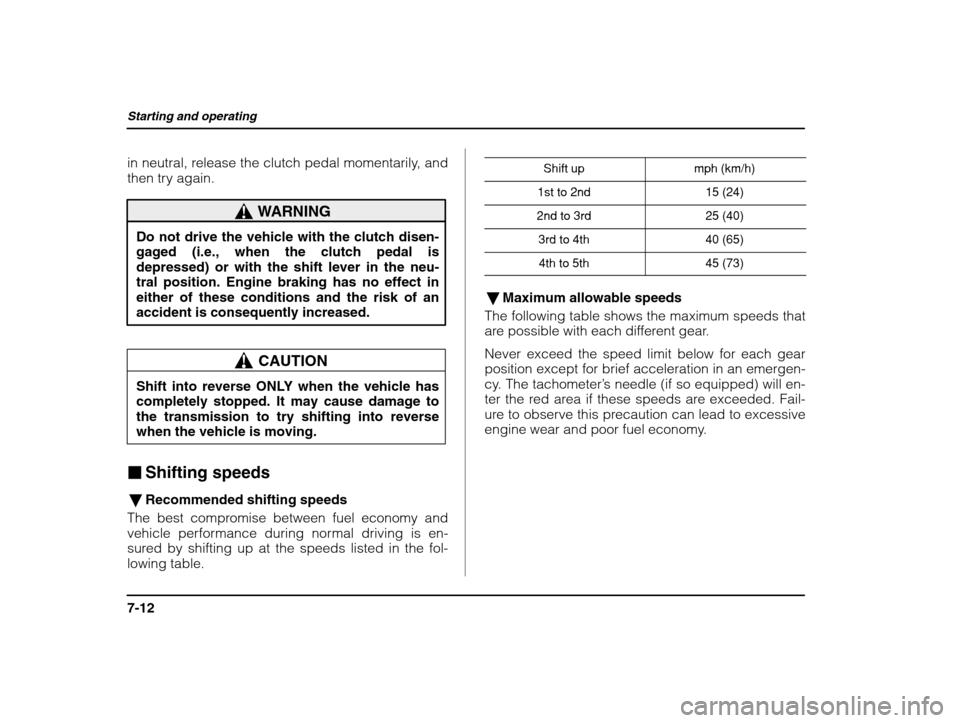
� Shifting speeds
� Recommended shifting speeds
The best compromise between fuel economy and
vehicle performance during normal driving is en-
sured by shifting up at the speeds listed in the fol- lowing table. Shift up
mph (km/h)
1st to 2nd15 (24)
2nd to 3rd25 (40)
3rd to 4th40 (65)
4th to 5th45 (73)
�
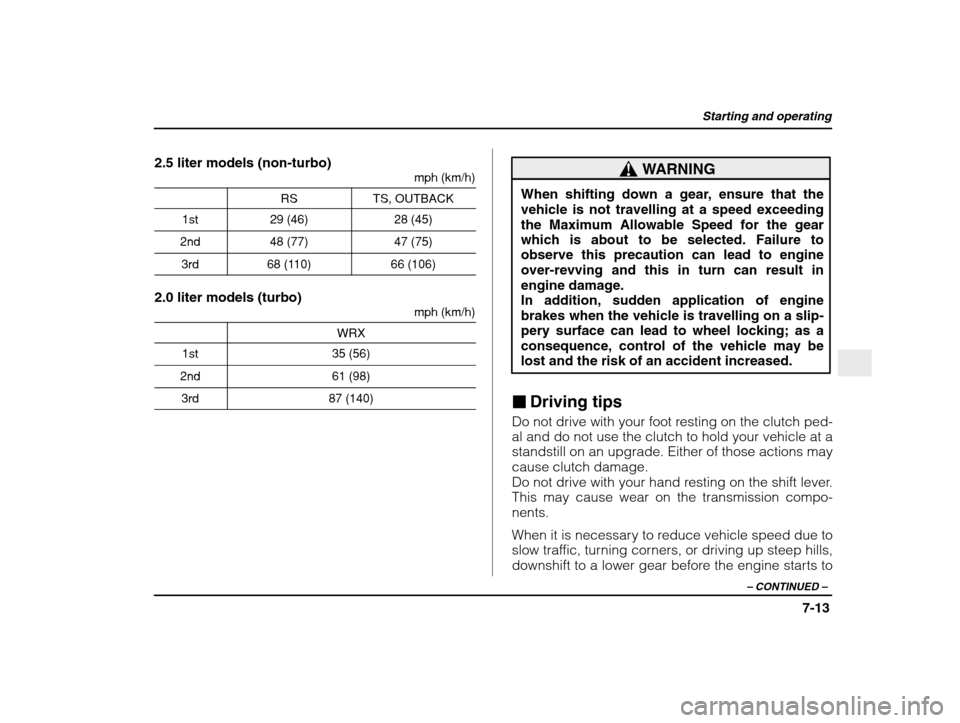
Maximum allowable speeds
The following table shows the maximum speeds that
are possible with each different gear. Never exceed the speed limit below for each gear
position except for brief acceleration in an emergen-
cy. The tachometer ’s needle (if so equipped) will en-
ter the red area if these speeds are exceeded. Fail-
ure to observe this precaution can lead to excessive
engine wear and poor fuel economy.
Page 234 of 425

Starting and operating
7-13
– CONTINUED –
2.5 liter models (non-turbo)
mph (km/h)
RSTS, OUTBACK
1st29 (46)28 (45)
2nd48 (77)47 (75)
3rd68 (110)66 (106)
2.0 liter models (turbo)mph (km/h)
WRX
1st35 (56)
2nd61 (98)
3rd87 (140)
WARNING
When shifting down a gear, ensure that the
vehicle is not travelling at a speed exceedingthe Maximum Allowable Speed for the gearwhich is about to be selected. Failure to observe this precaution can lead to engine
over-revving and this in turn can result inengine damage.In addition, sudden application of engine
brakes when the vehicle is travelling on a slip-pery surface can lead to wheel locking; as a
consequence, control of the vehicle may be lost and the risk of an accident increased.
� Driving tips
Do not drive with your foot resting on the clutch ped- al and do not use the clutch to hold your vehicle at a standstill on an upgrade. Either of those actions maycause clutch damage.
Do not drive with your hand resting on the shift lever.This may cause wear on the transmission compo-nents.
When it is necessary to reduce vehicle speed due to
slow traffic, turning corners, or driving up steep hills,
downshift to a lower gear before the engine starts to
Page 235 of 425

Starting and operating
7-14
labor.
On steep downgrades, downshift the transmission
to 4th, 3rd or 2nd gear as necessary; this helps to
maintain a safe speed and to extend brake pad life.
In this way, the engine provides a braking effect. Re-
member, if you “ride” (over use) the brakes while de-
scending a hill, they may overheat and not work
properly.
The engine may, on rare occasions, knock when the
vehicle rapidly accelerates or rapidly pulls away
from a standstill. This phenomenon does not indi-
cate a fault. Automatic transmission
The automatic transmission is electronically con-
trolled with 4-forward speeds and 1-reverse speed. NOTE
Immediately after a disconnected battery is re-
connected or ATF (automatic transmission fluid) is replaced, you may feel that the automatic
transmission operation is somewhat unusual.
This results from erasure or invalidation of data
the on-board computer has collected and storedin memory to allow the transmission to shift at the most appropriate times for the current condi- tion of your vehicle. Optimized shifting will be re-stored as the vehicle continues to be driven for awhile.
WARNING
Do not shift from the
“P” or “N” position into
the “D”, “3”, “2”, “1” or “R” position while de-
pressing the accelerator pedal. This may
cause the vehicle to jump forward or back- ward.
Page 236 of 425
Starting and operating
7-15
– CONTINUED –
CAUTION
�Shift into the “P” or “R” position only after
the vehicle is completely stopped. Shifting while the vehicle is moving may cause dam- age to the transmission.� Do not race the engine for more than five
seconds in any position except the “N” or “P”
position when the brake is set or the tires areon blocks. This may cause the automatic
transmission fluid to overheat. � Avoid shifting from one of the forward driv-
ing positions into the “R” position or vice
versa until the vehicle has completelystopped. Such shifting may cause damage tothe transmission. �
Selector lever for automatic transmis- sion
Page 237 of 425

Starting and operating
7-16
With the brake pedal depressed, move the lever along the gate.Move the lever along the gate.
The selector lever has seven positions.� P (Park)
This position is for parking the vehicle and starting the engine. In this position, the transmission is mechanically
locked to prevent the vehicle from rolling freely.
When you park the vehicle, first set the parking
brake fully, then shift into the “P” position. Do not
hold the vehicle with only the transmission. A shift interlock function is employed in the automat-
ic transmission system to ensure safe starting of thevehicle.
To shift the selector lever from the
“P” to the any oth-
er position, you have to depress the brake pedal ful-ly when the ignition switch is in the “ON” position.
This prevents the vehicle from lurching when it is
started.
If the shift lever does not move from the “P” position
with the brake pedal depressed, refer to the “Shift
lock release ” section in this chapter.
� R (Reverse)
This position is for backing the vehicle.
To shift from the “N” to “R” position, first stop the ve-
hicle completely then move the lever to the “R” posi-
tion.
� N (Neutral)
This position is for restarting a stalled engine.
In this position the wheels and transmission are not
locked. In this position, the transmission is neutral;
the vehicle will roll freely, even on the slightest
incline unless the parking brake or foot brake is on.