2003 SUBARU FORESTER display
[x] Cancel search: displayPage 124 of 420
3-5
Instruments and controls
–CONTINUED –
Hazard warning flasher
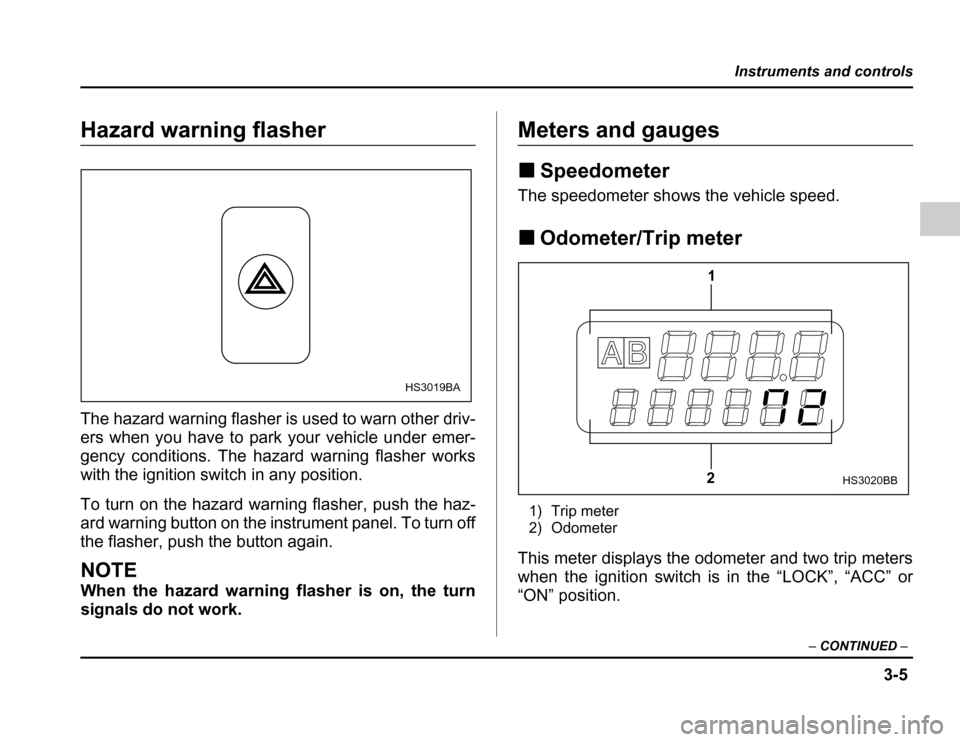
The hazard warning flasher is used to warn other driv-
ers when you have to park your vehicle under emer-
gency conditions. The hazard warning flasher works
with the ignition switch in any position.
To turn on the hazard warning flasher, push the haz-
ard warning button on the instrument panel. To turn off
the flasher, push the button again.
NOTE
When the hazard warning flasher is on, the turn
signals do not work.
Meters and gauges �Speedometer
The speedometer shows the vehicle speed. � Odometer/Trip meter
1) Trip meter
2) Odometer
This meter displays the odometer and two trip meters
when the ignition switch is in the “LOCK”, “ACC” or
“ON” position.
HS3019BA
1
2
HS3020BB
Page 149 of 420

3-30
Instruments and controls
will illuminate. �
By pressing and releasing the right button, the com-
pass display is toggled on or off. When the compass is
on, an illuminated compass reading will appear in the
lower part of the mirror.
Even with the mirror in anti-glare mode, the mirror sur-
face turns bright if the transmission is shifted into re-
verse. This is to ensure good rearward visibility during reversing. � Photosensors
The mirror has a photosensor attached on both the
front and back sides. If the glare from the headlights of
vehicles behind you strikes the mirror, these sensors detect it and make the reflection surface of the mirror
dimmer to help prevent you from being blinded. For
this reason, use care not to cover the sensors with
stickers, or other similar items. Periodically wipe the
sensors clean using a piece of dry soft cotton cloth or
an applicator. �
Compass calibration
1. For optimum calibration, switch off all nonessential
electrical accessories (rear window defogger, heater/
air conditioning system, spotlight, etc.) and ensure all
doors are shut.
2. Drive to an open, level area away from large metal-
lic objects or structures and make certain the ignition
switch is in the “ON” position.
3. Press and hold the left button for 3 seconds then re-
lease, and the compass will enter the calibration
mode. “CAL” and direction will be displayed.
4. Drive slowly in a circle until “CAL” disappears from
the display (about two or three circles).
5. The compass is now calibrated. Further calibration
is not required. The compass will automatically cali-
brate from this point forward.
HS3038BA
Page 150 of 420
3-31
Instruments and controls
–CONTINUED –
�Compass zone adjustment
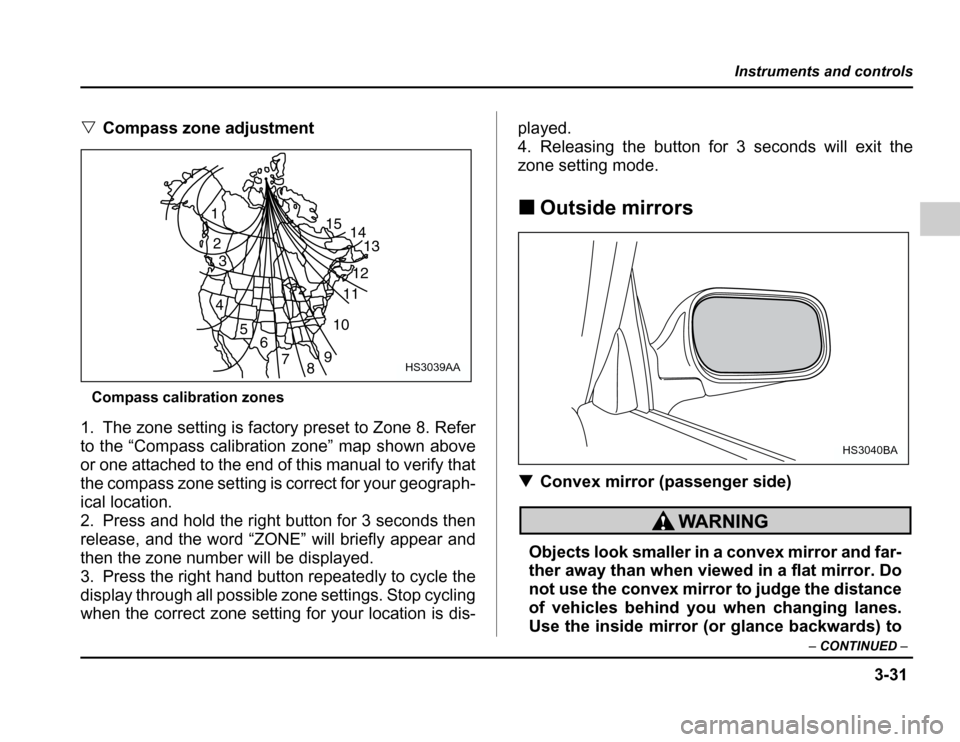
Compass calibration zones
1. The zone setting is factory preset to Zone 8. Refer
to the “Compass calibration zone” map shown above
or one attached to the end of this manual to verify that
the compass zone setting is correct for your geograph-
ical location.
2. Press and hold the right button for 3 seconds then
release, and the word “ZONE” will briefly appear and
then the zone number will be displayed.
3. Press the right hand button repeatedly to cycle the
display through all possible zone settings. Stop cycling
when the correct zone setting for your location is dis- played.
4. Releasing the button for 3 seconds will exit the
zone setting mode.
� Outside mirrors
� Convex mirror (passenger side)
Objects look smaller in a convex mirror and far-
ther away than when viewed in a flat mirror. Do
not use the convex mirror to judge the distance
of vehicles behind you when changing lanes.
Use the inside mirror (or glance backwards) to
1
2 3
4 56
7 8910
11
12 13
14
15
HS3039AA
HS3040BA
Page 165 of 420
4-12
Climate control
Manual mode operation:
If you operate any of the switches and dials on the
control panel other than the “OFF” switch and temper-
ature control dial during automatic mode operation,
the indicator light on the “AUTO” switch goes out. You
can then manually control the system as desired using
the switch or dial you operated.
To change the system back to the AUTO mode, press
the “AUTO” switch. �
OFF switch
The Automatic Climate Control system turns off (the
air conditioner compressor and fan turn off) when the
“OFF” switch is pressed.
When the “OFF” switch is pressed, the outside air in-
troduction mode (air inlet selection OFF) is automati-
cally selected.
NOTE
Display illumination dimness cancellation (BRIGHT):
Setting the light switch to the “ ” or “ ”
position causes the illumination on the display
panel to dim. When traveling with the lights on in
gloomy daylight or in twilight, press the OFF
switch for 1 second or longer if you feel it is too
hard to identify the illumination clearly. The bright-
ness comes back to normal. If you wish to dim the illumination again, hold
down the OFF switch again or if you can safely do
so, turn the light switch OFF and then place it in
the “ ” or “ ” position. �
Temperature control dial
This dial is used to set the desired interior tempera-
ture. With the dial is set your desired temperature, the
system automatically adjusts the temperature of air
supplied from the outlets such that the desired temper-
ature is achieved and maintained.
If the dial is turned fully counterclockwise, the system
gives maximum cooling performance. If the dial is
turned fully clockwise, the system gives maximum
heating performance.
Page 182 of 420
5-7
Audio
– CONTINUED –
Display Control mode
Turn counterclockwise Turn clockwise
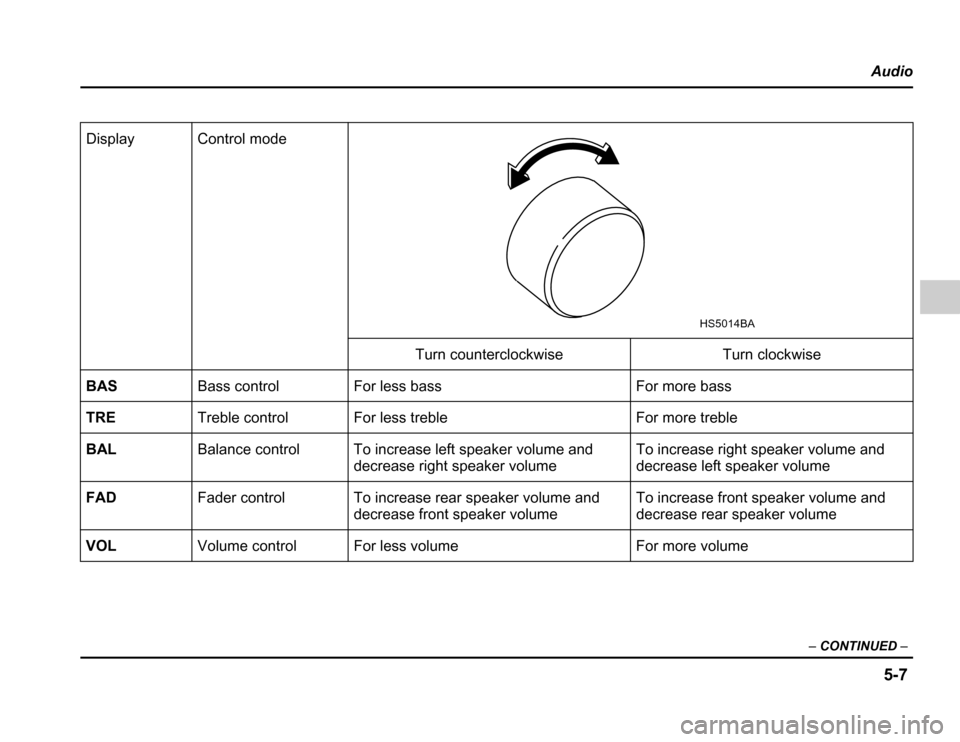
BAS Bass control For less bass For more bass
TRE Treble control For less treble For more treble
BAL Balance control To increase left speaker volume and
decrease right speaker volume To increase right speaker volume and
decrease left speaker volume
FAD Fader control To increase rear speaker volume and
decrease front speaker volume To increase front speaker volume and
decrease rear speaker volume
VOL Volume control For less volume For more volume
HS5014BA
Page 183 of 420
5-8
Audio
�
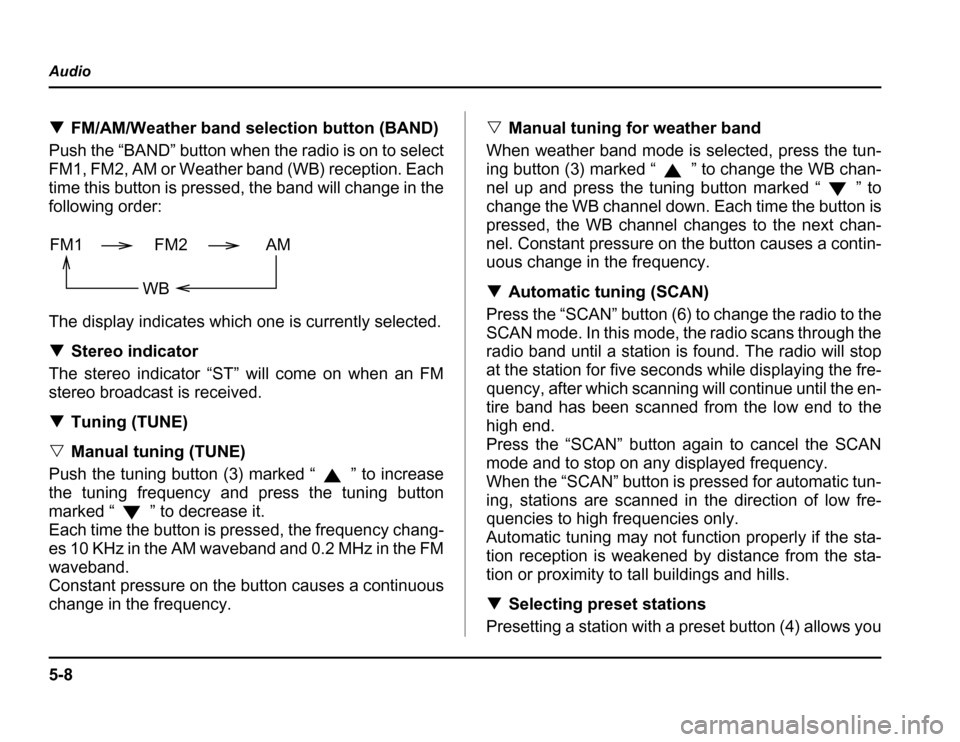
FM/AM/Weather band selection button (BAND)
Push the “BAND” button when the radio is on to select
FM1, FM2, AM or Weather band (WB) reception. Each
time this button is pressed, the band will change in the
following order:
The display indicates which one is currently selected. � Stereo indicator
The stereo indicator “ST” will come on when an FM
stereo broadcast is received. � Tuning (TUNE)
� Manual tuning (TUNE)
Push the tuning button (3) marked “ ” to increase
the tuning frequency and press the tuning button
marked “ ” to decrease it.
Each time the button is pressed, the frequency chang-
es 10 KHz in the AM waveband and 0.2 MHz in the FM
waveband.
Constant pressure on the button causes a continuous
change in the frequency. �
Manual tuning for weather band
When weather band mode is selected, press the tun-
ing button (3) marked “ ” to change the WB chan-
nel up and press the tuning button marked “ ” to
change the WB channel down. Each time the button is
pressed, the WB channel changes to the next chan-
nel. Constant pressure on the button causes a contin-
uous change in the frequency. � Automatic tuning (SCAN)
Press the “SCAN” button (6) to change the radio to the
SCAN mode. In this mode, the radio scans through the
radio band until a station is found. The radio will stop
at the station for five seconds while displaying the fre-
quency, after which scanning will continue until the en-
tire band has been scanned from the low end to the
high end.
Press the “SCAN” button again to cancel the SCAN
mode and to stop on any displayed frequency.
When the “SCAN” button is pressed for automatic tun-
ing, stations are scanned in the direction of low fre-
quencies to high frequencies only.
Automatic tuning may not function properly if the sta-
tion reception is weakened by distance from the sta-
tion or proximity to tall buildings and hills. � Selecting preset stations
Presetting a station with a preset button (4) allows you
FM1 FM2 AM
WB
Page 184 of 420
5-9
Audio
– CONTINUED –
to select that station in a single operation. Up to six
WB, AM, FM1 and FM2 stations each may be preset. �How to preset stations
1. Press the “BAND” selection button to select AM,
FM1, FM2 or WB reception.
2. Press the “SCAN” button (6) or tune the radio man-
ually until the desired station frequency is displayed.
3. Press one of the preset buttons (4) for at least 2
seconds to store the frequency. At this time, there will
momentarily be no sound from the radio. If the button
is pressed for less than 2 seconds, the preceding se-
lection will remain in memory.
NOTE
If the connection between the radio and battery is
broken for any reason such as vehicle mainte-
nance or radio removal, all stations stored in the
preset buttons are cleared. If this occurs, it is nec-
essary to reset the preset buttons.
Page 186 of 420

5-11
Audio
– CONTINUED –
�To play back a compact disc
� When CD is not in the player
Hold a disc with a finger in the center hole while grip-
ping the edge of the disc, then insert it in to the slot
(with the label side up) and the player will automatical-
ly pull the disc into position.
A single CD (8 cm/3 inch CD) may also be used with-
out any adapter.
NOTE � Make sure to always insert a disc with the label
side up. If a disc is inserted with the label side
down, it might be ejected or the player might shutoff. � After the last song finishes, the player will auto-
matically return to track 1 (the first song on the disc). � When CD is in the player
Press the “CD” button (8). The display will show “CD”
and the player will start playback.
NOTE
After the last song finishes, playback will automat-
ically return to track 1 (the first song on the disc). � To stop playback of a CD
When the “PWR” button (15) is pressed during play- back of a CD, the CD stops playing temporarily. To let
the CD resume playing, press the button again. �
To select a song from its beginning
� Forward direction
Brieflypressthe“ ”button(10)toskiptothebe-
ginning of the next track. Each time the button is
pressed, the indicated track number will increase. � Backward direction
Brieflypressthe“ ”button(11)toskiptothebe-
ginning of the current track. Each time the button is
pressed, the indicated truck number will decrease. � Fast forwarding and fast reverse
� Fast forwarding
Press the “ ” button (10) continuously for more
than 1 second to fast forward the disc.
Release the button to stop fast forwarding. � Fast reverse
Press the “ ” button (11) continuously for more
than 1 second to fast reverse the disc.
Release the button to stop fast reverse. � Repeat playback
Press the “RPT” button (13) and release it in less than