Page 692 of 1574
1G3-8 OM600 ENGINE INTAKE & EXHAUST
1 Turbocharger Oil Inlet
2 Turbine Wheel
3 Waste Gate
4 Oil Outlet
5 Compressor Wheel6 Air Inlet
7 Exhaust Gas Outlet
8 Compressed Air Flow
9 Intercooler
10 Cylinder
TURBOCHARGER
CHARGE AIR SYSTEM DIAGRAM
Page 695 of 1574
OM600 ENGINE INTAKE & EXHAUST 1G3-11
TURBOCHARGER ASSEMBLY
1 Oil Supply Line
2 Oil Return Line3 Nuts
4 Turbocharger
Page 696 of 1574
1G3-12 OM600 ENGINE INTAKE & EXHAUST
Removal & Installation Procedure
1. Remove the 2 hoses connected to intercooler.
2. Remove the hose(air cleaner to turbocharger) with blow byhose.
3. Disconnect the oil supply pipe.
4. Remove the oil return pipe.
5. Remove the support assembly.
6. Remove the 3 nuts(arrows).
Page 804 of 1574

HYDRAULIC BRAKES 4A-7
MAINTENANCE AND REPAIRON-VEHICLE SERVICE
BLEEDING THE BRAKES For Master Cylinder Replacement
1. Add oil after master cylinder replacement.
2. Run the engine and depress the brake pedal several times to build pressure and then keep the pedal fully depressed.
3. Loosen the screws of primary and secondary pipe at the master cylinder outlets to bleed air.
4. Repeat above step No.3 several times until there are no more air bubbles.
5. Bleed air in the system at the hydraulic unit outlet pipe and wheel if pressure building is not enough by depressing the pedal only after above air bleeding.
For Caliper and Brake Hose Replacement
1. Check the oil level from the oil reservoir and refill if necessary.
2. Run the engine and depress the pedal several times to build pressure and then keep the pedal fully depressed.
3. Connect a vinyl tube to the caliper breather and prepare a container to coentain brake oil.
4. Loosen the breather screw until there are no more bubbles.
5. Bleed air in the system at four (4) wheels in order as shown in right figure if pressure building is not enough by depressing the pedal after above air bleeding.
Tightening Torque
9 - 14 NmItem
Front Bleeder Screw
Rear Bleeder Screw
Notice
� Do not reuse the bled brake fluid.
� Always bleed the air after replacing brake fluid or
master cylinder, caliper, brake hose and pipe.
� Always operate in normal order.
Page 805 of 1574
4A-8 HYDRAULIC BRAKES
For Hydraulic Unit Replacement
1. Add oil after hydraulic unit replacement.
2. Run the engine and depress the pedal several times tobuild pressure and then keep the pedal fully depressed.
3. Loosen hydraulic pipe screws at the hydraulic unit outlets to bleed air.
4. Repeat above step No.3 several times until there are no more air bubbles.
5. Bleed air in the system from the wheels if pressure building is not enough by pressing the pedal only after above air bleeding.
Page 889 of 1574

5A-30 AUTOMATIC TRANSMISSION
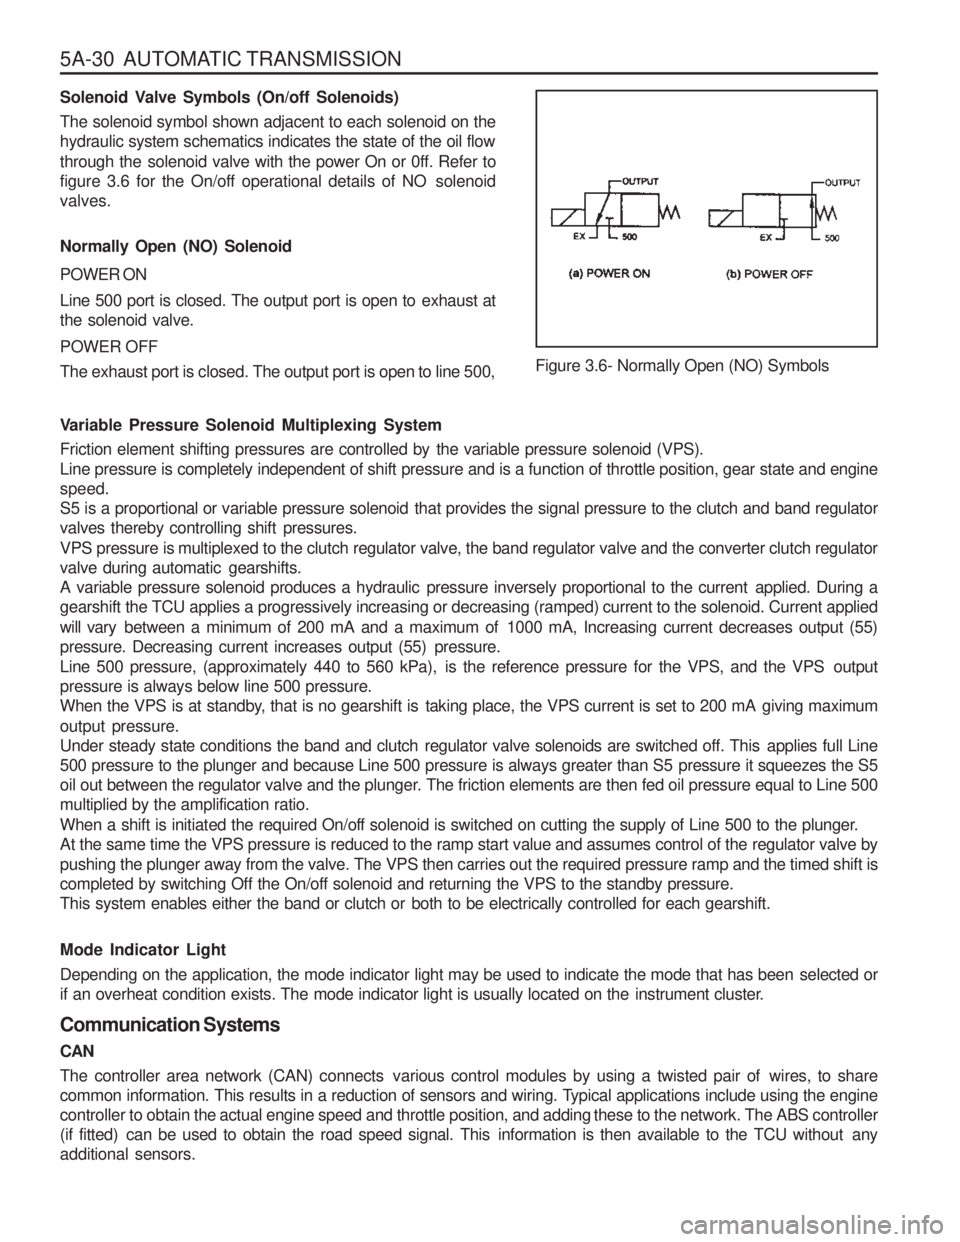
Solenoid Valve Symbols (On/off Solenoids)
The solenoid symbol shown adjacent to each solenoid on the
hydraulic system schematics indicates the state of the oil flow
through the solenoid valve with the power On or 0ff. Refer to
figure 3.6 for the On/off operational details of NO solenoidvalves. Normally Open (NO) Solenoid POWER ON
Line 500 port is closed. The output port is open to exhaust at the solenoid valve. POWER OFF
The exhaust port is closed. The output port is open to line 500,Figure 3.6- Normally Open (NO) Symbols
Variable Pressure Solenoid Multiplexing System
Friction element shifting pressures are controlled by the variable pressure solenoid (VPS).
Line pressure is completely independent of shift pressure and is a function of throttle position, gear state and enginespeed.
S5 is a proportional or variable pressure solenoid that provides the signal pressure to the clutch and band regulator
valves thereby controlling shift pressures.
VPS pressure is multiplexed to the clutch regulator valve, the band regulator valve and the converter clutch regulator
valve during automatic gearshifts.
A variable pressure solenoid produces a hydraulic pressure inversely proportional to the current applied. During a
gearshift the TCU applies a progressively increasing or decreasing (ramped) current to the solenoid. Current applied will vary between a minimum of 200 mA and a maximum of 1000 mA, Increasing current decreases output (55)
pressure. Decreasing current increases output (55) pressure.
Line 500 pressure, (approximately 440 to 560 kPa), is the reference pressure for the VPS, and the VPS outputpressure is always below line 500 pressure.
When the VPS is at standby, that is no gearshift is taking place, the VPS current is set to 200 mA giving maximum output pressure.
Under steady state conditions the band and clutch regulator valve solenoids are switched off. This applies full Line
500 pressure to the plunger and because Line 500 pressure is always greater than S5 pressure it squeezes the S5
oil out between the regulator valve and the plunger. The friction elements are then fed oil pressure equal to Line 500multiplied by the amplification ratio.
When a shift is initiated the required On/off solenoid is switched on cutting the supply of Line 500 to the plunger.
At the same time the VPS pressure is reduced to the ramp start value and assumes control of the regulator valve by
pushing the plunger away from the valve. The VPS then carries out the required pressure ramp and the timed shift is
completed by switching Off the On/off solenoid and returning the VPS to the standby pressure.
This system enables either the band or clutch or both to be electrically controlled for each gearshift. Mode Indicator Light
Depending on the application, the mode indicator light may be used to indicate the mode that has been selected or
if an overheat condition exists. The mode indicator light is usually located on the instrument cluster. Communication Systems CAN
The controller area network (CAN) connects various control modules by using a twisted pair of wires, to share
common information. This results in a reduction of sensors and wiring. Typical applications include using the engine
controller to obtain the actual engine speed and throttle position, and adding these to the network. The ABS controller
(if fitted) can be used to obtain the road speed signal. This information is then available to the TCU without anyadditional sensors.
Page 895 of 1574

5A-36 AUTOMATIC TRANSMISSION
4-3 Sequence Valve
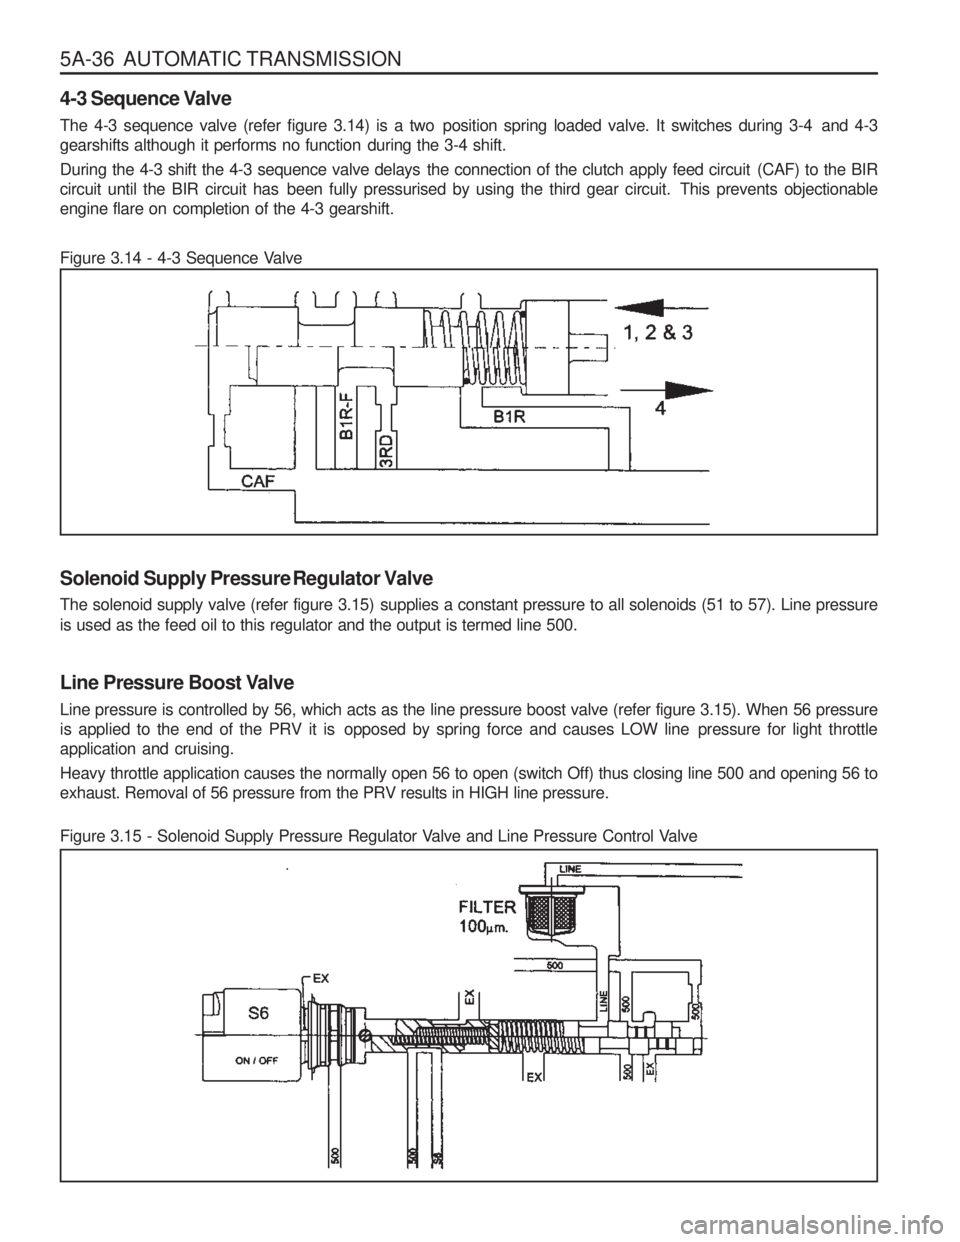
The 4-3 sequence valve (refer figure 3.14) is a two position spring loaded valve. It switches during 3-4 and 4-3
gearshifts although it performs no function during the 3-4 shift.
During the 4-3 shift the 4-3 sequence valve delays the connection of the clutch apply feed circuit (CAF) to the BIR
circuit until the BIR circuit has been fully pressurised by using the third gear circuit. This prevents objectionable
engine flare on completion of the 4-3 gearshift.
Figure 3.14 - 4-3 Sequence Valve
Figure 3.15 - Solenoid Supply Pressure Regulator Valve and Line Pressure Control Valve
Solenoid Supply Pressure Regulator Valve
The solenoid supply valve (refer figure 3.15) supplies a constant pressure to all solenoids (51 to 57). Line pressure
is used as the feed oil to this regulator and the output is termed line 500.
Line Pressure Boost Valve
Line pressure is controlled by 56, which acts as the line pressure boost valve (refer figure 3.15). When 56 pressure
is applied to the end of the PRV it is opposed by spring force and causes LOW line pressure for light throttleapplication and cruising.
Heavy throttle application causes the normally open 56 to open (switch Off) thus closing line 500 and opening 56 to
exhaust. Removal of 56 pressure from the PRV results in HIGH line pressure.
Page 897 of 1574

5A-38 AUTOMATIC TRANSMISSION
Reverse Lockout Valve
The reverse lockout valve (refer figure 3.18) is a two position valve contained in the upper valve body. This valve
uses 51-52 pressure as a signal pressure and controls the application of the rear band (B2).
While the manual valve is in D,3,2, or 1 positions, drive oil is applied to the spring end of the valve, overriding any
signal pressures and holding the valve in the lockout position. This prevents the application of B2 in any of theforward driving gears.
When the manual valve is in P, R or N positions, drive oil is exhausted and the reverse lockout valve may be toggled by S1-S2 pressure.B2 is applied in P, R, and N provided that the following conditions are satisfied:
1. In P or N, roadspeed 3 km/h.
2. In R, road speed 10 km/h.
3. Engine speed 1400 rpm.
4. For diesel vehicles, throttle 25%.
5. For gasoline vehicles, throttle 12%.
Under these conditions, the TCU switches solenoids S1 and S2 to Off. The reverse lockout valve toggles under the
influence of the S1-S2 pressure, to connect the line pressure to the B2 feed. Oil is fed to both the inner and outer
apply areas of the rear servo piston, applying B2.
If any of the above conditions are not satisfied, the TCU switches solenoids S1 and S2 to On. S1- S2 pressure is
exhausted and the valve is held in the lockout position by the spring. In this position, engagement of B2 is prohibited.
This feature protects the transmission from abuse by preventing the undesirable application of B2 at high speed, and
by providing a reverse lockout function.
Note that if the transmission is in failure mode, the rear band will be applied at all times in P, R and N.
Figure 3.18 - Reverse Lockout Valve <
<
<
<
<