2003 SSANGYONG MUSSO Transfer case
[x] Cancel search: Transfer casePage 1137 of 1574
5D2-48 TRANSFER CASE (TOD)
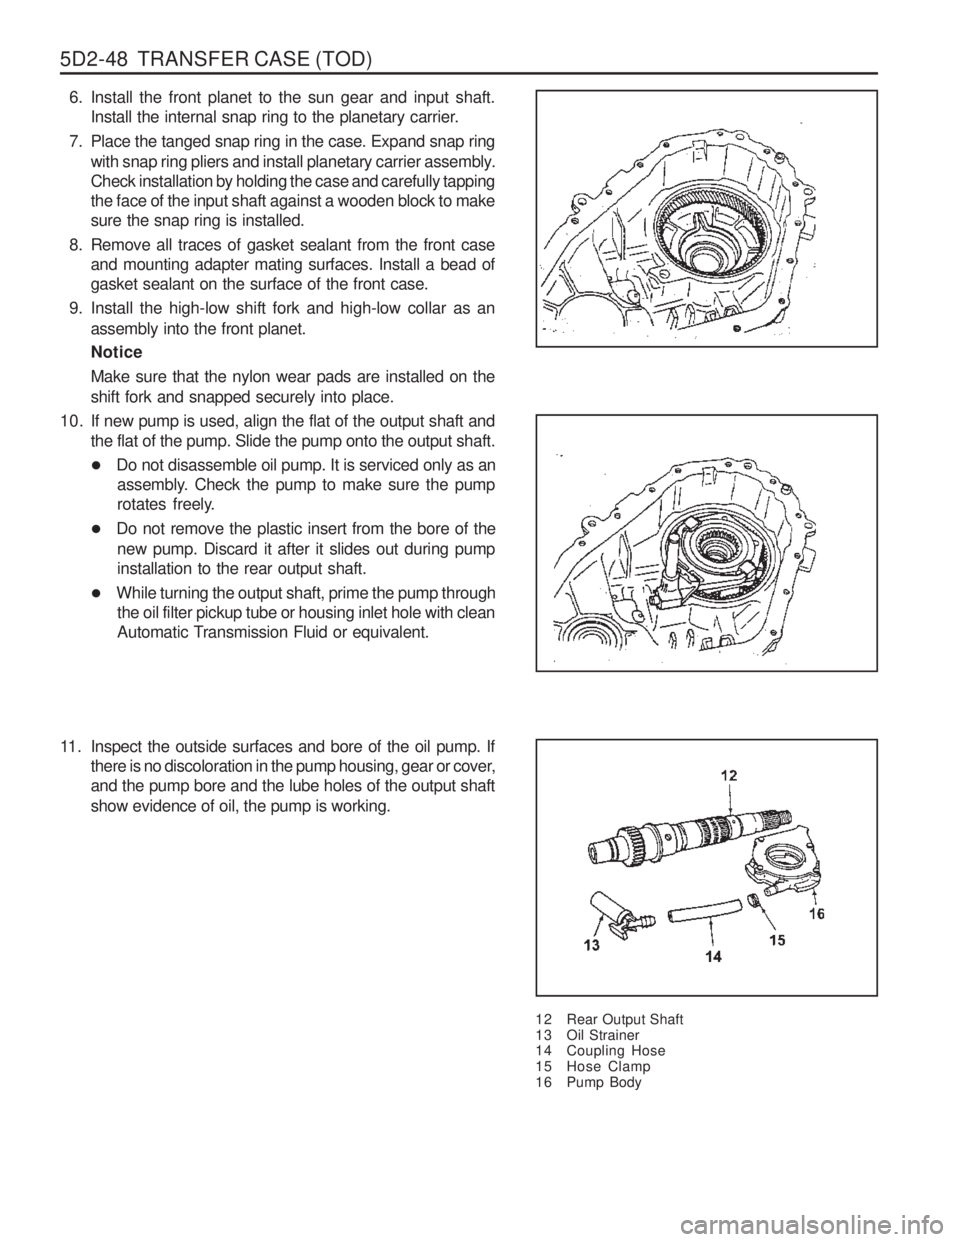
6. Install the front planet to the sun gear and input shaft.Install the internal snap ring to the planetary carrier.
7. Place the tanged snap ring in the case. Expand snap ring with snap ring pliers and install planetary carrier assembly. Check installation by holding the case and carefully tappingthe face of the input shaft against a wooden block to makesure the snap ring is installed.
8. Remove all traces of gasket sealant from the front case and mounting adapter mating surfaces. Install a bead ofgasket sealant on the surface of the front case.
9. Install the high-low shift fork and high-low collar as an assembly into the front planet. Notice Make sure that the nylon wear pads are installed on the shift fork and snapped securely into place.
12 Rear Output Shaft
13 Oil Strainer
14 Coupling Hose
15 Hose Clamp
16 Pump Body
10. If new pump is used, align the flat of the output shaft and
the flat of the pump. Slide the pump onto the output shaft.
�Do not disassemble oil pump. It is serviced only as an
assembly. Check the pump to make sure the pump
rotates freely.
� Do not remove the plastic insert from the bore of the
new pump. Discard it after it slides out during pumpinstallation to the rear output shaft.
� While turning the output shaft, prime the pump through
the oil filter pickup tube or housing inlet hole with clean
Automatic Transmission Fluid or equivalent.
11. Inspect the outside surfaces and bore of the oil pump. If there is no discoloration in the pump housing, gear or cover,and the pump bore and the lube holes of the output shaft show evidence of oil, the pump is working.
Page 1138 of 1574
TRANSFER CASE (TOD) 5D2-49
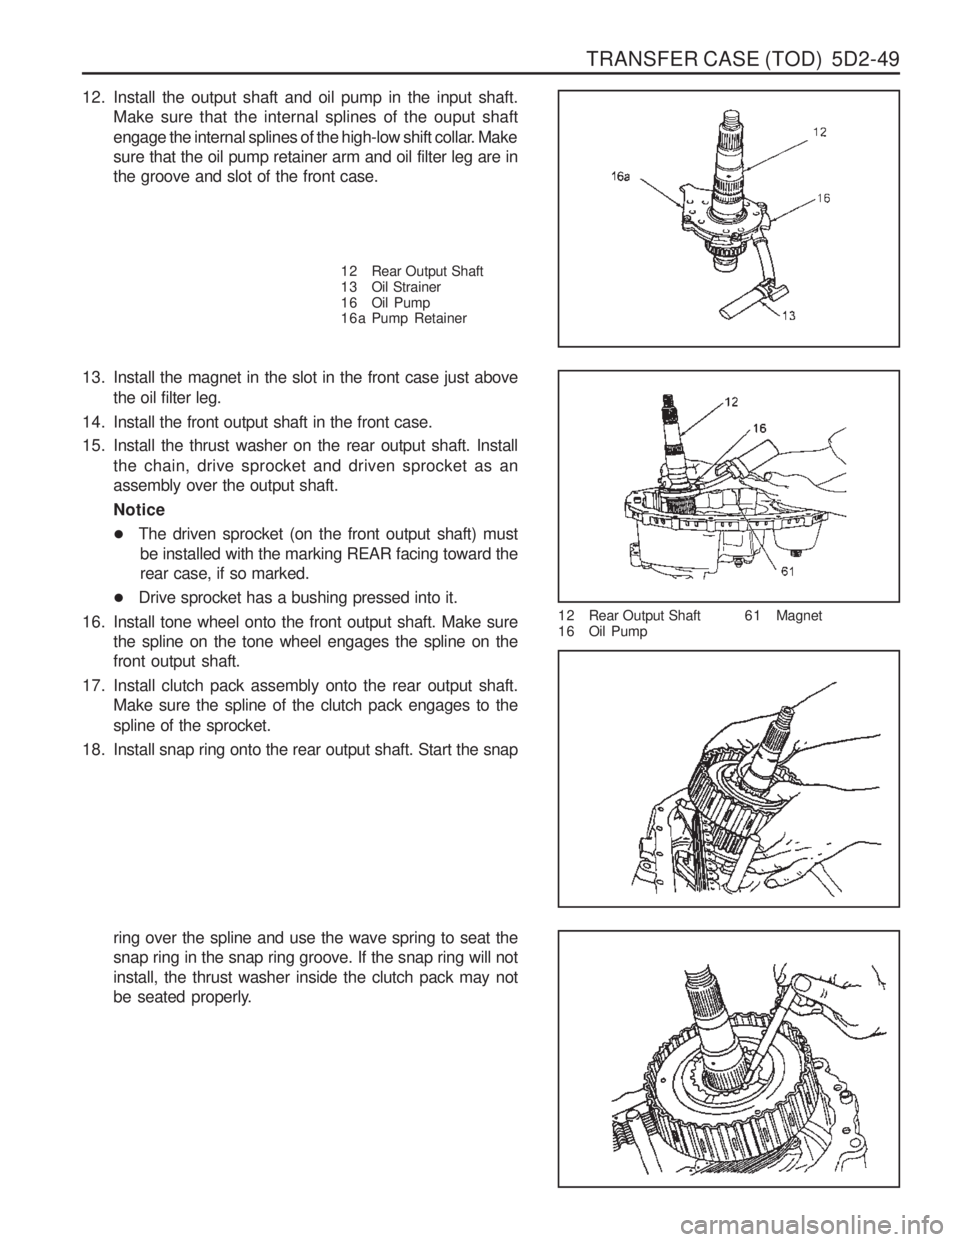
12. Install the output shaft and oil pump in the input shaft.Make sure that the internal splines of the ouput shaft
engage the internal splines of the high-low shift collar. Make sure that the oil pump retainer arm and oil filter leg are inthe groove and slot of the front case.
13. Install the magnet in the slot in the front case just above the oil filter leg.
14. Install the front output shaft in the front case.
15. Install the thrust washer on the rear output shaft. Install the chain, drive sprocket and driven sprocket as an assembly over the output shaft. Notice
�The driven sprocket (on the front output shaft) must
be installed with the marking REAR facing toward the rear case, if so marked.
� Drive sprocket has a bushing pressed into it.
16. Install tone wheel onto the front output shaft. Make sure the spline on the tone wheel engages the spline on thefront output shaft.
17. Install clutch pack assembly onto the rear output shaft. Make sure the spline of the clutch pack engages to the spline of the sprocket.
18. Install snap ring onto the rear output shaft. Start the snap
ring over the spline and use the wave spring to seat the snap ring in the snap ring groove. If the snap ring will notinstall, the thrust washer inside the clutch pack may not
be seated properly. 1 2 Rear Output Shaft
1 6 Oil Pump
6 1 Magnet
1 2 Rear Output Shaft
1 3 Oil Strainer
1 6 Oil Pump
1 6 a Pump Retainer
Page 1139 of 1574
5D2-50 TRANSFER CASE (TOD)
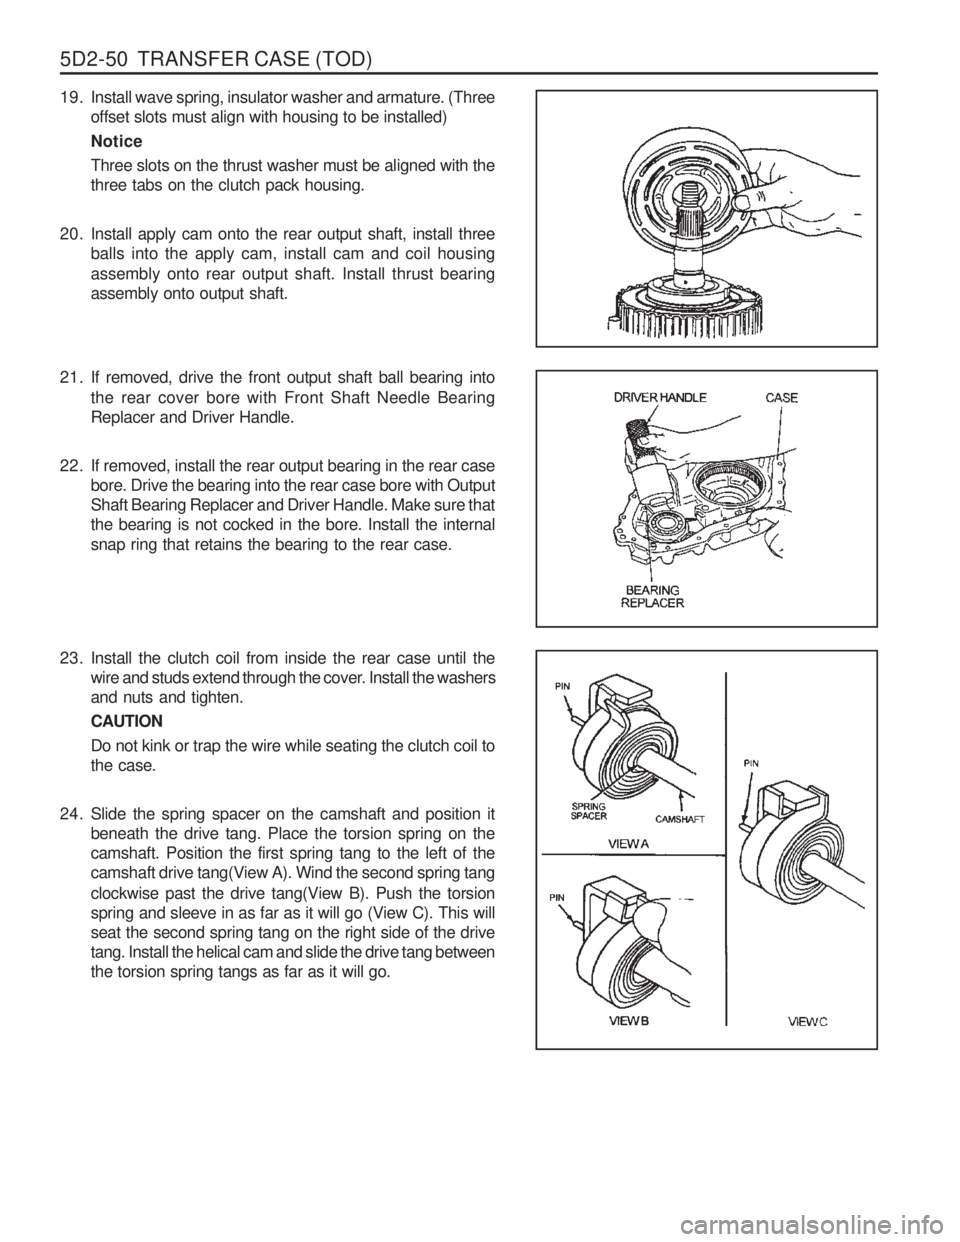
19. Install wave spring, insulator washer and armature. (Threeoffset slots must align with housing to be installed) NoticeThree slots on the thrust washer must be aligned with the three tabs on the clutch pack housing.
20. Install apply cam onto the rear output shaft, install three balls into the apply cam, install cam and coil housing assembly onto rear output shaft. Install thrust bearing assembly onto output shaft.
21. If removed, drive the front output shaft ball bearing into
the rear cover bore with Front Shaft Needle Bearing Replacer and Driver Handle.
22. If removed, install the rear output bearing in the rear case bore. Drive the bearing into the rear case bore with OutputShaft Bearing Replacer and Driver Handle. Make sure thatthe bearing is not cocked in the bore. Install the internalsnap ring that retains the bearing to the rear case.
23. Install the clutch coil from inside the rear case until the wire and studs extend through the cover. Install the washersand nuts and tighten. CAUTIONDo not kink or trap the wire while seating the clutch coil to the case.
24. Slide the spring spacer on the camshaft and position it beneath the drive tang. Place the torsion spring on thecamshaft. Position the first spring tang to the left of thecamshaft drive tang(View A). Wind the second spring tang clockwise past the drive tang(View B). Push the torsion spring and sleeve in as far as it will go (View C). This willseat the second spring tang on the right side of the drivetang. Install the helical cam and slide the drive tang betweenthe torsion spring tangs as far as it will go.
Page 1140 of 1574
TRANSFER CASE (TOD) 5D2-51
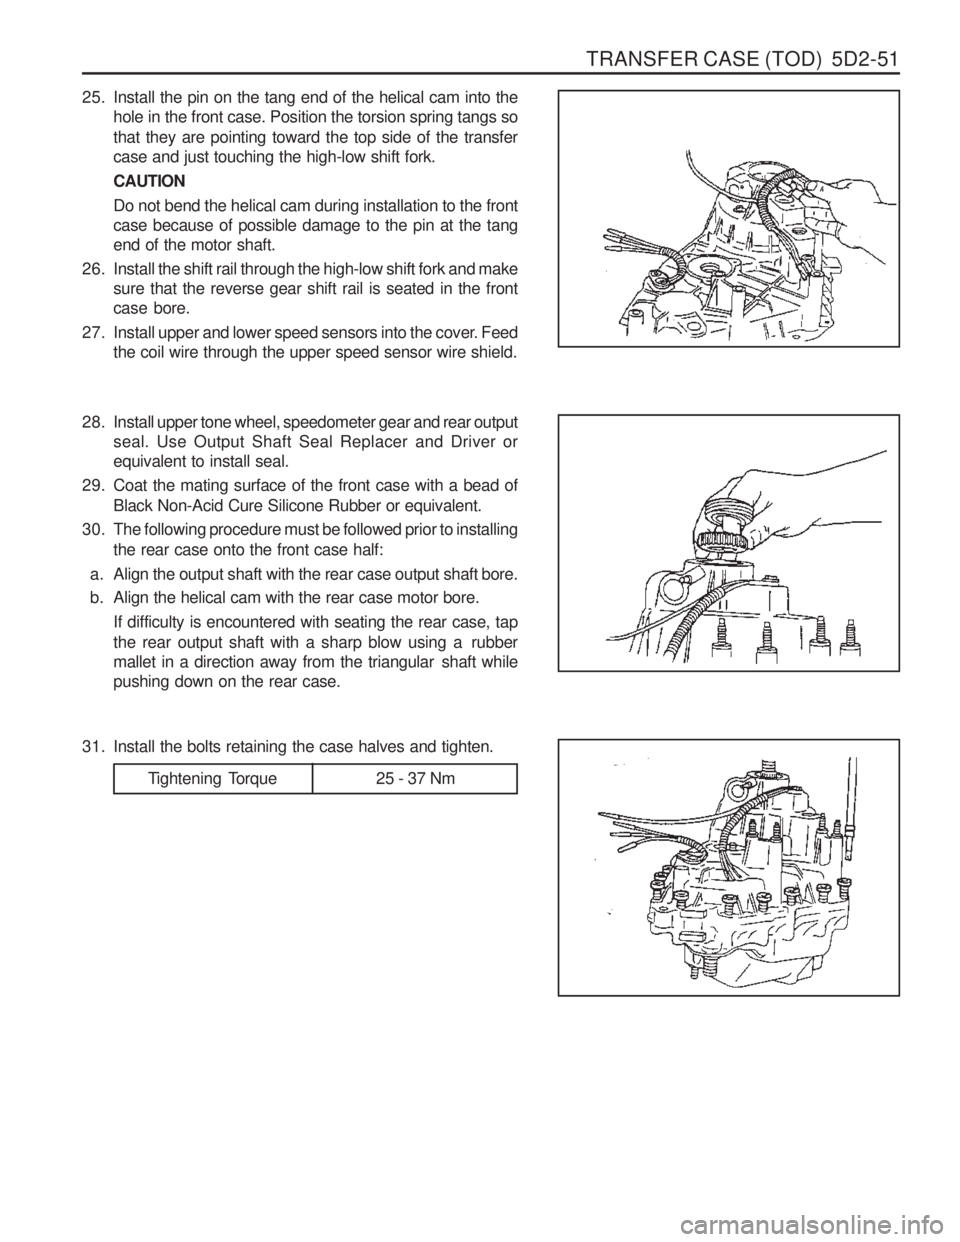
25. Install the pin on the tang end of the helical cam into thehole in the front case. Position the torsion spring tangs so that they are pointing toward the top side of the transfer case and just touching the high-low shift fork. CAUTIONDo not bend the helical cam during installation to the front case because of possible damage to the pin at the tangend of the motor shaft.
26. Install the shift rail through the high-low shift fork and make sure that the reverse gear shift rail is seated in the frontcase bore.
27. Install upper and lower speed sensors into the cover. Feed the coil wire through the upper speed sensor wire shield.
2 8. Install upper tone wheel, speedometer gear and rear output seal. Use Output Shaft Seal Replacer and Driver orequivalent to install seal.
29. Coat the mating surface of the front case with a bead of Black Non-Acid Cure Silicone Rubber or equivalent.
30. The following procedure must be followed prior to installing the rear case onto the front case half:
a. Align the output shaft with the rear case output shaft bore.
b. Align the helical cam with the rear case motor bore. If difficulty is encountered with seating the rear case, tap
the rear output shaft with a sharp blow using a rubber
mallet in a direction away from the triangular shaft whilepushing down on the rear case.
Tightening Torque 25 - 37 Nm
31. Install the bolts retaining the case halves and tighten.
Page 1141 of 1574
5D2-52 TRANSFER CASE (TOD)
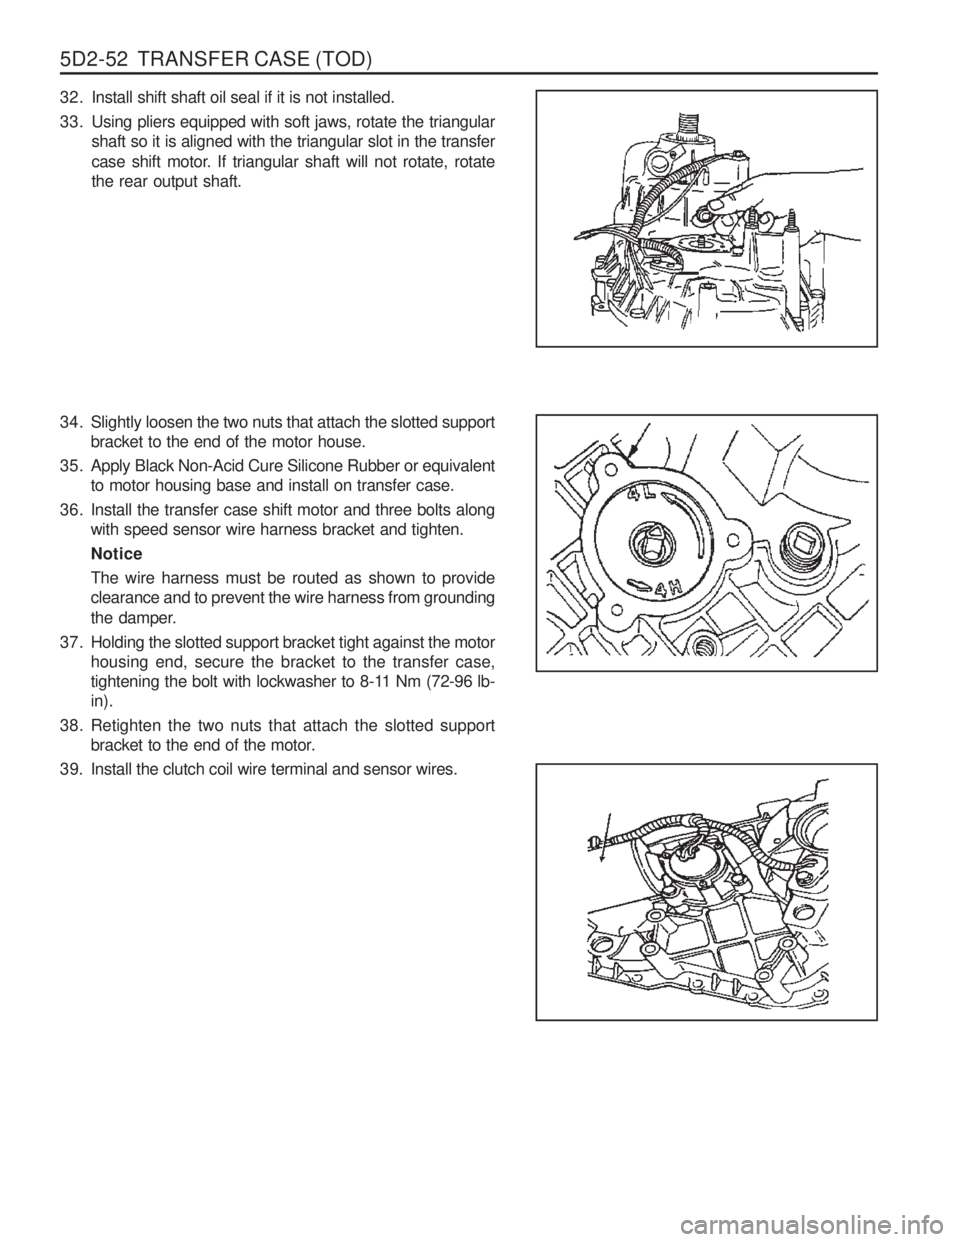
32. Install shift shaft oil seal if it is not installed.
33. Using pliers equipped with soft jaws, rotate the triangularshaft so it is aligned with the triangular slot in the transfer
case shift motor. If triangular shaft will not rotate, rotate the rear output shaft.
34. Slightly loosen the two nuts that attach the slotted support bracket to the end of the motor house.
35. Apply Black Non-Acid Cure Silicone Rubber or equivalent to motor housing base and install on transfer case.
36. Install the transfer case shift motor and three bolts along with speed sensor wire harness bracket and tighten. NoticeThe wire harness must be routed as shown to provide clearance and to prevent the wire harness from grounding
the damper.
37. Holding the slotted support bracket tight against the motor housing end, secure the bracket to the transfer case,
tightening the bolt with lockwasher to 8-11 Nm (72-96 lb-in).
38. Retighten the two nuts that attach the slotted support bracket to the end of the motor.
39. Install the clutch coil wire terminal and sensor wires.
Page 1142 of 1574
TRANSFER CASE (TOD) 5D2-53
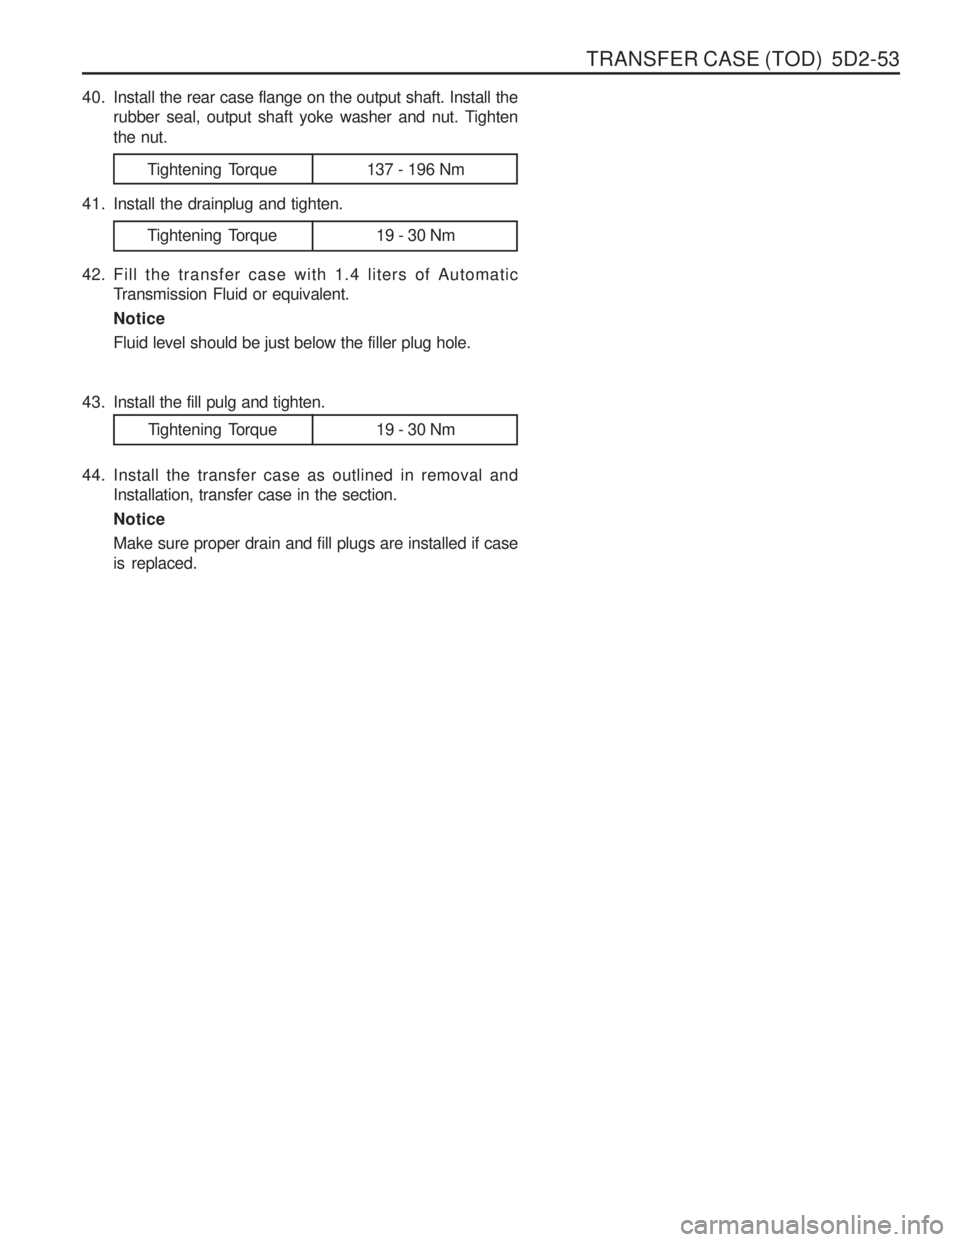
40. Install the rear case flange on the output shaft. Install therubber seal, output shaft yoke washer and nut. Tighten the nut.
Tightening Torque 137 - 196 Nm
41. Install the drainplug and tighten.
42. Fill the transfer case with 1.4 liters of Automatic Transmission Fluid or equivalent. NoticeFluid level should be just below the filler plug hole.
Tightening Torque 19 - 30 Nm
Tightening Torque 19 - 30 Nm
43. Install the fill pulg and tighten.
44. Install the transfer case as outlined in removal and
Installation, transfer case in the section. NoticeMake sure proper drain and fill plugs are installed if case is replaced.
Page 1211 of 1574
BODY WIRING SYSTEM 9A-9
44 Joint Connector.................................................... Ground
45 Door Unlock Switch
46 Front Fog Lamp Switch
47 Rear Defogger Switch
4 8 ECS Switch
49 Rear Fog Lamp Switch ........................................Rear Fog Lamp
50 Digital Clock
51 Thermo Amplifier
52 Glove Box Lamp Switch
53 Air Conditioner Wiring Connetor
54 Glove Box Lamp
55 Ground 6
56 Ground 6 ............................................................. Gasoline E/G
57 Ground 7 ............................................................. Gasoline E/G
58 Wheel Speed Sensor (FR) ..................................ABS 5.0 or ABD 5.0
59 O 2 Sensor
............................................................ E32 Gasoline E/G
60 Engine Main Wiring Connector ............................Gasoline E/G with MSE ECU
61 HFM ..................................................................... Gasoline E/G with HFM ECU
61-1 MSE ..................................................................... Gasoline E/G with MSE ECU
62 Front Door Wiring Connector (Passenger Side)
63 Front door Wiring Connector (Passenger Side)
64 Joint Connector (B+)
65 Audio
66 Audio
67 Air Bag Wiring Connector
68 Chime Bell
6 9 Buzzer
70 Kick Down Switch ................................................. Automatic Transmission
71 Diode 2 ................................................................ Manual Transmission
72 Ground 3
73 Ground 4
74 Front Cigarette Lighter
75 Diode 3 ................................................................ Automatic Transmission, MB
76 S/E Mode Selector Switch ....................................Automatic Transmission
76-1 Mode Switch ........................................................ Automatic Transmission
77 “B” Position Switch .............................................. Automatic Transmission
78 “P” Position Switch .............................................. Automatic Transmission
79 Shift Lock Solenoid Valve .....................................Automatic Transmission
8 0 TCCU
81 Ground 5 ............................................................. Gasoline E/G
81-1 Ground 7 ............................................................. Diesel E/G
82 Seat Extension Wiring Connector
83 Transmission Extension Wiring Connector ...........E23 & E32 Gasoline E/G with Manual Transmission
83-1 T ransmission Extension Wiring Connector ...........Diesel E/G with MB A/T
84 Transmission Extension Wiring Connector ...........Gasoline E/G with Manual Transmission
84-1 T ransmission Extension Wiring Connector ...........Diesel E/G with Manual Transmission or BTRE A/T
85 Transmission Extension Wiring Connector ...........E23 & E32 Gasoline E/G with A/T
85-1 T ransmission Extension Wiring Connector ...........Diesel E/G with BTRE A/T
86 Transfer Case Motor
87 Transfer Case Motor
88 Vehicle Speed Sensor
89 Fuel Gauge
90 Acceleration Sensor ............................................. ABS 5.0
91 Seat Belt Switch (Passenger)
92 Seat Heater Switch
93 Head Lamp Leveling Device Switch .....................Leveling Device
Page 1212 of 1574
9A-10 BODY WIRING SYSTEM94 Seat Belt Switch (Driver)
95 Seat Belt Switch (Dirver)
96 Parking Brake Switch
97 Rear Cigarette Lighter
9 8 OVPR ................................................................. Gasoline E/G
99 LH Side Repeater ............................................... Rear Fog Lamp
100 Engine Wiring Connector
101 Engine Joint Connector
102 Engine Joint Connector ......................................Gasoline E/G
103 ECS Engine Wiring Connector ...........................Diesel E/G & Gasoline E/G with HFM ECU
104 ABD Engine Wiring Connector ...........................ABD 5.0
105 ABD Engine Wiring Connector ...........................ABD 5.0
105-1 ABS Engine Wiring Connector ............................ABS 5.0
106 Canister Purge Solenoid Valve ...........................Gasoline E/G with MSE ECU
106-1 Canister Purge Solenoid Valve ...........................E20 & E23 Gasoline E/G with FHM ECU
107 Econo/Standard Solenoid Valve .........................Gasoline E/G with Automatic Transmission
108 CO Potentio Meter .............................................. Gasoline E/G with HFM ECU & CO Potentio Meter
109 Front Wiper Motor 11 0 O 2 Sensor
........................................................... E20 or E23 Gasoline E/G
111 RH Side Repeater
112 Engine Wiring Connector
113 Vertical Sensor
114 Lateral Sensor
115 Diagnosis
11 6 Joint Box ............................................................. Gasoline E/G (E32)
117 Canister Purge Solenoid Valve ...........................E32 Gasoline E/G with HFM ECU
118 Led Antenna ...................................................... Rolling code type Immobilizer
119 E-key Connector ................................................ Gasoline E/G with Rolling Code Type Immobilizer
120 Receiver Unit ...................................................... Gasoline E/G with Rolling Code Type Immobilizer
121 Receiver Unit ...................................................... Gasoline E/G with Rolling Code Type Immobilizer
122 Receiver Antenna .............................................. Gasoline E/G with Rolling Code Type Immobilizer
123 Receiver Connector ........................................... Gasoline E/G with Rolling Code Type Immobilizer
124 ICU Connector .................................................... Gasoline E/G with Rolling Code Type Immobilizer
125 ICU ..................................................................... Gasoline E/G with TOD (MSE ECU 3.2 Engine Only)
126 CAN Line ............................................................ Gasoline E/G with TOD (MSE ECU 3.2 Engine Only)
127 TOD ................................................................... Gasoline E/G with TOD (MSE ECU 3.2 Engine Only)
128 TOD ................................................................... Gasoline E/G with TOD (MSE ECU 3.2 Engine Only)
129 Transfer Case Speed Sensor .............................Gasoline E/G with TOD (MSE ECU 3.2 Engine Only)
130 Engine Main Wiring Connector ...........................Gasoline E/G with MSE ECU
131 Remote Engine Start .......................................... Diesel E/G with A/T & Black Out Lamp
132 Remote Engine Start .......................................... Diesel E/G with A/T & Black Out Lamp
133 TCU .................................................................... Diesel E/G with BTRE A/T
134 TCU .................................................................... Diesel E/G with BTRE A/T
135 Ground 5 ............................................................ Diesel E/G
136 Start Protection Relay .........................................Diesel E/G with Rolling Code Type Immobilizer
137 EGR control unit ................................................. Diesel E/G
1 3 8 ICU 1 .................................................................. Diesel E/G with Rolling Code Type Immobilizer
1 3 9 ICU 2 .................................................................. Diesel E/G with Rolling Code Type Immobilizer
140 Injection Pump Valve Extension ..........................Diesel E/G with Rolling Code Type Immobilizer
141 Injection Pump Valve Extension ..........................Diesel E/G with Rolling Code Type Immobilizer
142 EGR Solenoid .................................................... Diesel E/G
143 ICU led ................................................................ Diesel E/G with Rolling Code Type Immobilizer
144 Immobilizer Solenoid Valve ..................................Diesel E/G with Crypto Type Immobilizer
147 Immobilizer Unit ................................................... Diesel E/G with Crypto Type Immobilizer