Page 969 of 1574

5A-110 AUTOMATIC TRANSMISSION C1 Clutch Overdrive Shaft and Input Shaft Assembly Notice
1. Ensure that the snap rings are fitted correctly.
2. Check pistons for cracks, especially the C1 piston.
3. Do not mix clutch piston return springs.
4. If the C1/C2 clutch packs separate from the C3 clutch pack,make sure the No. 6 bearing doesn ’t drop out of the bearing
retainer.
To assemble the C1 clutch overdrive shaft and input shaft
assembly, proceed as follows:
1. Check the overdrive shaft grooves for any defect.
2. Coat the sealing rings, large and small, with petroleum jelly and fit them to the overdrive shaft. The sealing rings may
be held in place with a small amount of petroleum jelly.
3. Assemble the clutch plate and disc into the cylinder in the following sequence:
� steel plate
� friction disc
� steel plate
� friction disc
� steel plate
� steel plate - 0574-GOOGOl, 0574-000003, 0574-000004, 0574-000005, 0574-000020,
0574-000021, or friction disc -0574-000002
� steel plate (selective)
� friction disc
� steel plate (selective)
� friction disc
4. Check the clutch pack clearance using special tool No.0555- 331900. Refer to figure 8.31.Use selective plates to achieve the correct specification.NoticeThe clutch pack supporting a 2 kg weight, the dimension from the input shaft locating stop to the friction disc mustbe 0.70-0.90 mm.
5. If new friction plates are being fitted, remove the clutch pack and soak the friction elements in automatic transmission
fluid for a minimum of five minutes prior to assembly. NoticeThe clutch pack clearance must be taken before elements are soaked in automatic transmission fluid.
6. Check the fit of the C1 clutch hub on the overdrive shaft. If it is loose, the hub and shaft assembly must be replaced. Figure 8.31 - Typical C1 Clutch Assembly
Clearance
Page 970 of 1574
AUTOMATIC TRANSMISSION 5A-111
7. Coat the small nylon thrust spacer with petroleum jelly andinstall it over the overdrive shaft. Refer to figure 8.19.
8. Carefully fit the overdrive shaft into the C1 cylinder so as not to damage the sealing ring.
9. Fit the small bronze C1 hub thrust washer in place with petroleum jelly. Refer to figure 8.19.
10. Check the input shaft for any defect. Fit the input shaft into the cylinder and secure it with the circlip, ensuring
that the circlip is completely seated in the groove.
11. Coat the sealing rings with petroleum jelly and fit onto the input shaft.
12. Assemble the C1/C2/C4 clutch assembly to the C3 clutch and sun gear assembly. Refer to figures 8.32 and 8.33.
13. Install this assembly in the transmission case.
Page 997 of 1574

5B-8 MANUAL TRANSMISSION1 Shift Hop-out 2 Shift Gear Crash 3 Shift Block-out 4 Hard Shift 5 Noise in Reverse Gear6 Noise in 5th Gear 7 Noise in 4th Gear 8 Noise in 3rd Gear 9 Noise in 2nd Gear 10 Noise in 1st Gear
11 Noise in All Speeds 12 Leak at Transmission Rear Part 13 Leak at Transmission Center Part 14 Leak at Transmission Front
DIAGNOSIS TABLE
Condition
Possible Faulty Part
Transmission Case Extension HousingShift Cover / Shift ShiftShift Control LeverInput Bearing RetainerInput Gear Set3rd Speed Gear Set2nd Speed Gear SetReverse Speed Gear Set1st Speed Gear Set5th Speed Gear SetClutch Housing and Release DeriveCrankshaft Pilot Bushing and Release BearingInput BearingMain Shaft Input BearingMain Shaft Thrust Bearing3rd Speed Gear Bearing2nd Speed Gear Bearing1st Speed Gear BearingReverse Idler Gear BushingCounter Shaft Front BearingCounter Shaft Rear BearingCounter Shaft Thrust Bearing5th Speed Drive Gear Bearing
Slip Yoke Bushing
Slip Yoke SealSpeedometer Drive / Driven GearsSpeedometer Driven Gear HousingInput Shaft Seal1 - 2 Synchronizer Assembly3 - 4 Synchronizer Assembly5th Synchronizer AssemblyRing Oil SealT/C Front Face
�
�
�
�
�
�
�
�
�
�
�
�
�
�
�
�
�
�
�
�
�
�
�
�
�
� �
�
�
� �
�
�
�
�
�
�
�
�
��
�
�
�
�
�
�
�
� �
�
�
�
�
�
�
�
�
�
�
�
�
�
�
�
�
�
�
�
Page 999 of 1574

5B-10 MANUAL TRANSMISSION1 Filler/Drain Plug
2 Shift Mechanism Cover
3 Shift Shaft Lever
4 Outer Select Lever
5 Inner Select Lever
6 Offset Control Lever
7 Bias Spring
8 Bolt
9 Pin
10 Washer
11 Bolt
12 Bolt
13 Extension and Plate Assembly
14 O-Ring & Steel Ring
15 Oiling Funnel
16 Bolt
17 Alignment Bolt
18 Pin
19 Shift Shaft
20 3/4 Shift Fork
21 1/2 Shift Fork
22 Insert
23 Selector Arm Assembly
24 Interlock Plate Assembly
25 Selector Plate
26 O-ring
27 Plug
28 Case Cover
29 Retaining Ring
30 Pivot Pin
31 Back-up Switch
32 5/Reverse Shift Lever
33 Snap Ring
34 5th Synchronizer Retainer
35 5th Synchronizer Assembly
36 Synchronizer Spring
37 Synchronizer Assembly 38 Insert
39 Synchronizer Hub
40 Roll Pin
41 5th Shift Fork
42 Insert
43 Shift Rail Assembly
44 Blocking Ring
45 5th Speed Drive Gear
46 Snap Ring
47 Speed Gear
48 Speed Gear Clip
49 Bolt
50 Input Bearing Retainer
51 Oil Seal
5 2 Shim
53 Bearing Cup
54 Bearing Cone
55 Input Shaft
56 Roller Bearing
57 Spacer
58 Thrust Bearing
59 Thrust Bearing Race
60 5th Speed Driven Gear
61 Bearing Cup
62 Bearing Cone
63 1st Speed Gear
64 Bearing Sleeve Assembly
65 A. Bearing
65 B. Bearing
65 C. Spacer
66 Sleeve
67 Blocking Ring Assembly
68 3/4 synchronizer Assembly
69 Synchronizer Spring
70 Synchronizer Sleeve
71 Insert
72 Synchronizer Sleeve 73 3rd Speed Gear
74 Needle Bearing
75 Spacer
76 Snap Ring
77 Thrust Washer
78 2nd Speed Gear
79 2nd Speed Gear Bearing
80 Spacer
81 Output Shaft Assembly
82 Retaining Ring
83 Thrust Washer
84 Inner Cone
85 Outer Cone Race
86 1/2 Blocking Ring
87 Spring Gear
88 Reverse Sliding Gear
89 Insert Gear
90 Pin
91 Shaft and Hub Assembly
92 Spring
93 Pin Fork and Reverse Roller
Assembly
94 Bolt
95 Rear Bearing Retainer
9 6 Shim
97 Roll Pin
98 Reverse Idler Shaft
99 Reverse Idler Gear Assembly
100 O-ring
101 Bearing Cup
102 Bearing Cup Assembly
103 O-ring
104 Bearing Cup
105 Bearing Cone
106 Counter Shaft Gear
107 Transmission Case Assembly
Page 1009 of 1574
5B-20 MANUAL TRANSMISSION
18. Remove the slip yoke snap ring from the main shaft.
19. Remove the 5th speed drive gear snap ring from the mainshaft.
20. Make alignment marks on the case and input bearing retainer and remove the 4 input shaft bearing retainer bolts, using a 13 mm wrench. Notice
Apply sealer on these bolts during assembly.Remove the input bearing retainer with the bearing outer race and shim.
21. Remove the input shaft from the case by rotating it until the flat surface appears.
22. Remove the following parts from the input shaft. �4th speed gear blocking ring.
� Main shaft thrust race and bearing.
� Main shaft pilot bearing rollers (15 rollers).
Notice Be careful not to dissipate the pilot bearing rollers.
Page 1013 of 1574

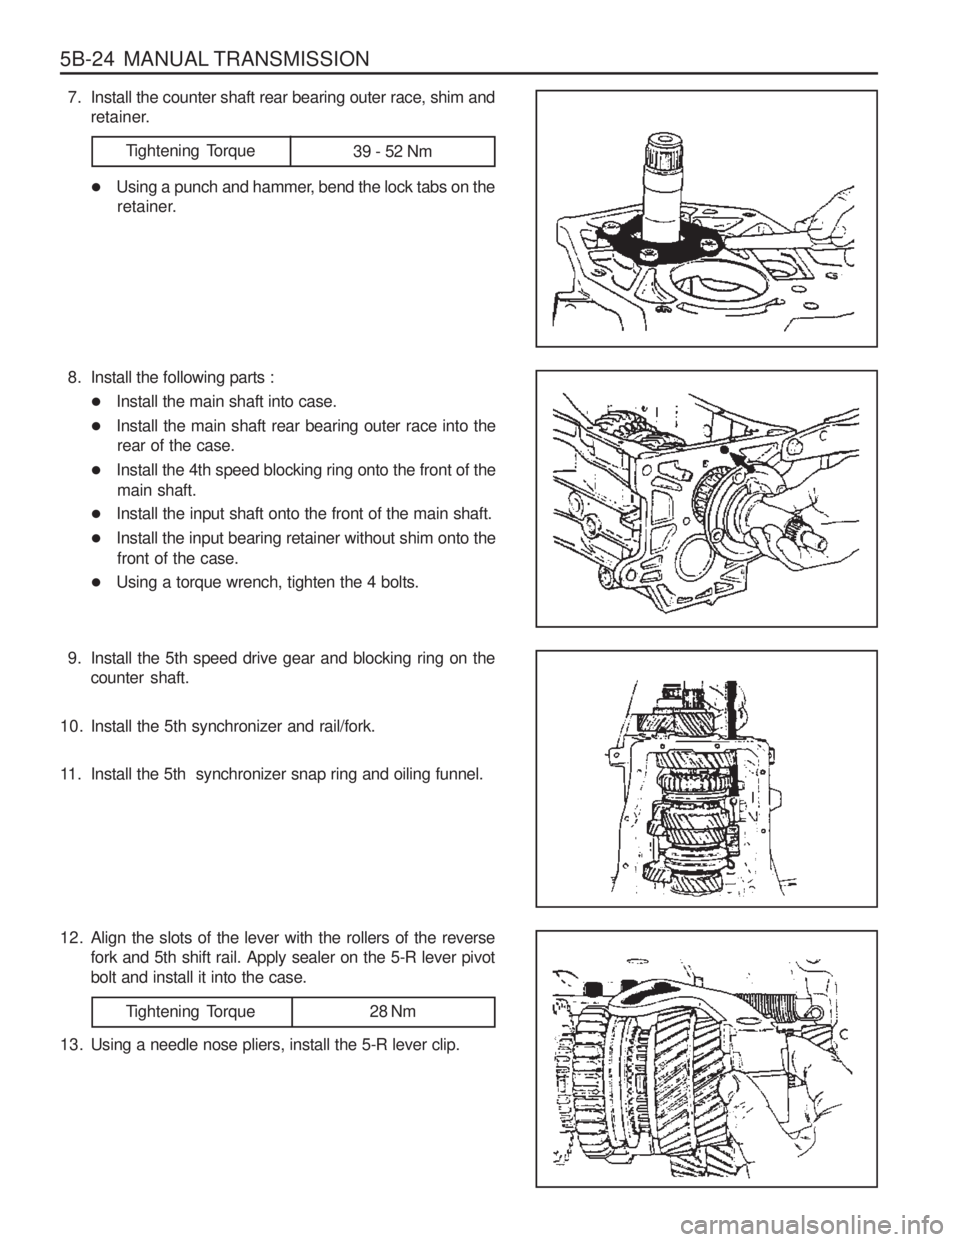
5B-24 MANUAL TRANSMISSION
7. Install the counter shaft rear bearing outer race, shim andretainer.
Tightening Torque 39 - 52 Nm
� Using a punch and hammer, bend the lock tabs on the
retainer.
8. Install the following parts : � Install the main shaft into case.
� Install the main shaft rear bearing outer race into the
rear of the case.
� Install the 4th speed blocking ring onto the front of the
main shaft.
� Install the input shaft onto the front of the main shaft.
� Install the input bearing retainer without shim onto the
front of the case.
� Using a torque wrench, tighten the 4 bolts.
9. Install the 5th speed drive gear and blocking ring on the counter shaft.
10. Install the 5th synchronizer and rail/fork.
11. Install the 5th synchronizer snap ring and oiling funnel.
12. Align the slots of the lever with the rollers of the reverse fork and 5th shift rail. Apply sealer on the 5-R lever pivot bolt and install it into the case.
Tightening Torque 28 Nm
13. Using a needle nose pliers, install the 5-R lever clip.
Page 1017 of 1574
5B-28 MANUAL TRANSMISSION
7. Using a screwdriver, remove the spiral retaining ring.
8. Remove the thrust washer and three-piece 2nd speedblocking ring assembly.
9. For correct reassembly, place an alignment mark on the 1-2 synchronizer hub and sleeve.
10. Remove the 1-2 synchronizer sleeve from the hub with following parts :
�The anti-rattle ball and spring.
� The three keys.
� One of the 3 springs.
11. Using a hydraulic press and puller plate, remove the 5th speed driven gear from the main shaft.
Page 1019 of 1574

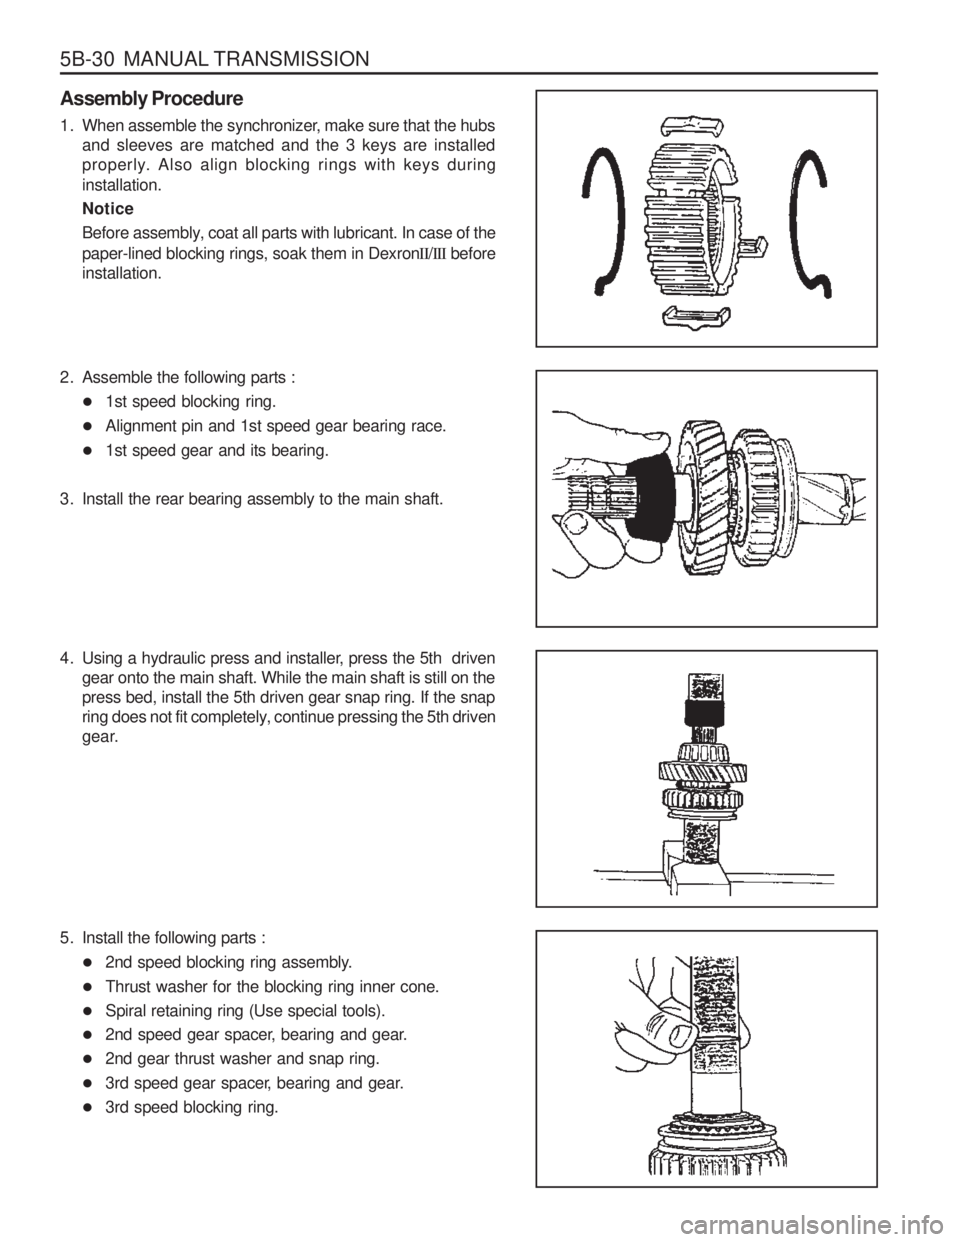
5B-30 MANUAL TRANSMISSION
Assembly Procedure
1. When assemble the synchronizer, make sure that the hubsand sleeves are matched and the 3 keys are installed
properly. Also align blocking rings with keys during installation. Notice
Before assembly, coat all parts with lubricant. In case of the paper-lined blocking rings, soak them in Dexron II/III before
installation.
2. Assemble the following parts : � 1st speed blocking ring.
� Alignment pin and 1st speed gear bearing race.
� 1st speed gear and its bearing.
3. Install the rear bearing assembly to the main shaft.
4. Using a hydraulic press and installer, press the 5th driven gear onto the main shaft. While the main shaft is still on the press bed, install the 5th driven gear snap ring. If the snap
ring does not fit completely, continue pressing the 5th driven
gear.
5. Install the following parts : � 2nd speed blocking ring assembly.
� Thrust washer for the blocking ring inner cone.
� Spiral retaining ring (Use special tools).
� 2nd speed gear spacer, bearing and gear.
� 2nd gear thrust washer and snap ring.
� 3rd speed gear spacer, bearing and gear.
� 3rd speed blocking ring.