Page 5 of 1574
GENERAL INFORMATION 0B-5
Application
Overall Length (mm) Overall Width (mm)Overall Height (mm)Wheel Base (mm)
Tread : Front (mm)Rear (mm)
VEHICLE DIMENSIONS AND WEIGHTS
Vehicle Dimensions
Application
Manual : Curb Weight (kg)
Gross Vehicle Weight (kg)
Automatic : Curb Weight (kg)
Gross Vehicle Weight (kg)
Passenger Capacity
Vehicle Weights
Application
4656 18641735263015101520
661LA1860 2520 1916 2520 5 662NA
19682520 1989 2520 5 662LA
18902520 2005 2520 5 2.0L DOHC
19372520
--
5 2.3L DOHC
18502520 1942 25205 3.2L DOHC
19302520 2025 25205
Page 85 of 1574

M162 ENGINE MECHANICAL 1B1-49
Selection of Crankshaft Main Bearing
1. Crankcase SideThere are seven punching marks on the mating surface to oil pan. This mark is correspondent to the bearing
distinguished by color. Select the relevant bearing according to the punching mark when repaired.
2. Crankshaft Bearing Cap Side Select the crankshaft main bearing according to the markingletter on the crankshaft main journal when repaired.
Color Dot Marking
Blue
Yellow
Red
White VioletCrankshaft Journal Diameter (mm)
57.960 - 57.965 57.955 - 57.960 57.950 - 57.95557.945 - 57.95057.940 - 57.945
Punching Mark
Bearing Color Selected
Blue
Yellow
Red
Marking Letter
B Y
R
W VBearing Color Selected
Blue
Yellow
Red
White Violet
Service Data Unit : mm
Crankshaft
Bearing Jour- nal Diameter Crankshaft
Bearing
Diameter Crankshaft
Journal Width at fit bearing Connecting Rod
Bearing Journal Diameter Connecting
Rod Bearing
Jourmal Width
Standard size
1st repair size
2nd repair size 3rd repair size4th repair size 57.950-57.965 57.700-57.71557.450-57.46557.200-57.215
56.950-56.965 58 24.50-24.533
-47.94-47.96
47.7547.5047.25 47.00 27.958-28.042
-
Crankshaft Standard
and Repair Size
Page 124 of 1574

1B1-88 M162 ENGINE MECHANICAL
CONNECTING ROD Preceding Work : Removal of piston
1 Connecting Rod Bushing
2 Oil Gallery
3 Balance Weight
4 Connecting Rod Bolt(M9 x 52, 12 m pieces) .. 1st step 40+5 Nm 2nd step 90°+10 °
5 Fit Sleeve
6 Upper Connecting Rod Bearing
7 Lower Connecting Rod Bearing
8 BearingShell Lug
9 Marking [Indication(//) or Numbers]
Service Data Standard
Distance (L) from The Connecting Rod Bearing Bore Center to The Bushing Bore Center Width of The Connecting Rod (B) at Bearing BoreWidth of The Connecting Rod (b) at Bushing BoreBasic Bore at The Bearing Shell (D1)Basic Bore at The Bushing (d1) Bushing Inner Diameter (d) Clearance Between The Piston Pin and The BushingPeak-to-valley Height of Connecting Rod Bushing on Inside
Permissible Wwist of Connecting Rod Bearing Bore to Connecting Rod Bushing BorePermissible Deviation of Axial Paralleism of Connecting Rod Bearing Bore to Connecting Rod Bushing Core
Permissible Deviation of Connecting Rod Bearing Bore from Concentricity
Permissible Difference of Each Connecting Rod in Weight 145 ± 0.05 mm
21.940 - 22.000 mm
21.940 - 22.000 mm
51.600 - 51.614 mm
24.500 - 24.571 mm
22.007 - 22.013 mm 0.007 - 0.018 mm 0.005 mm0.15 mm
0.07 mm
0.01 mm
0.4 g
Page 208 of 1574

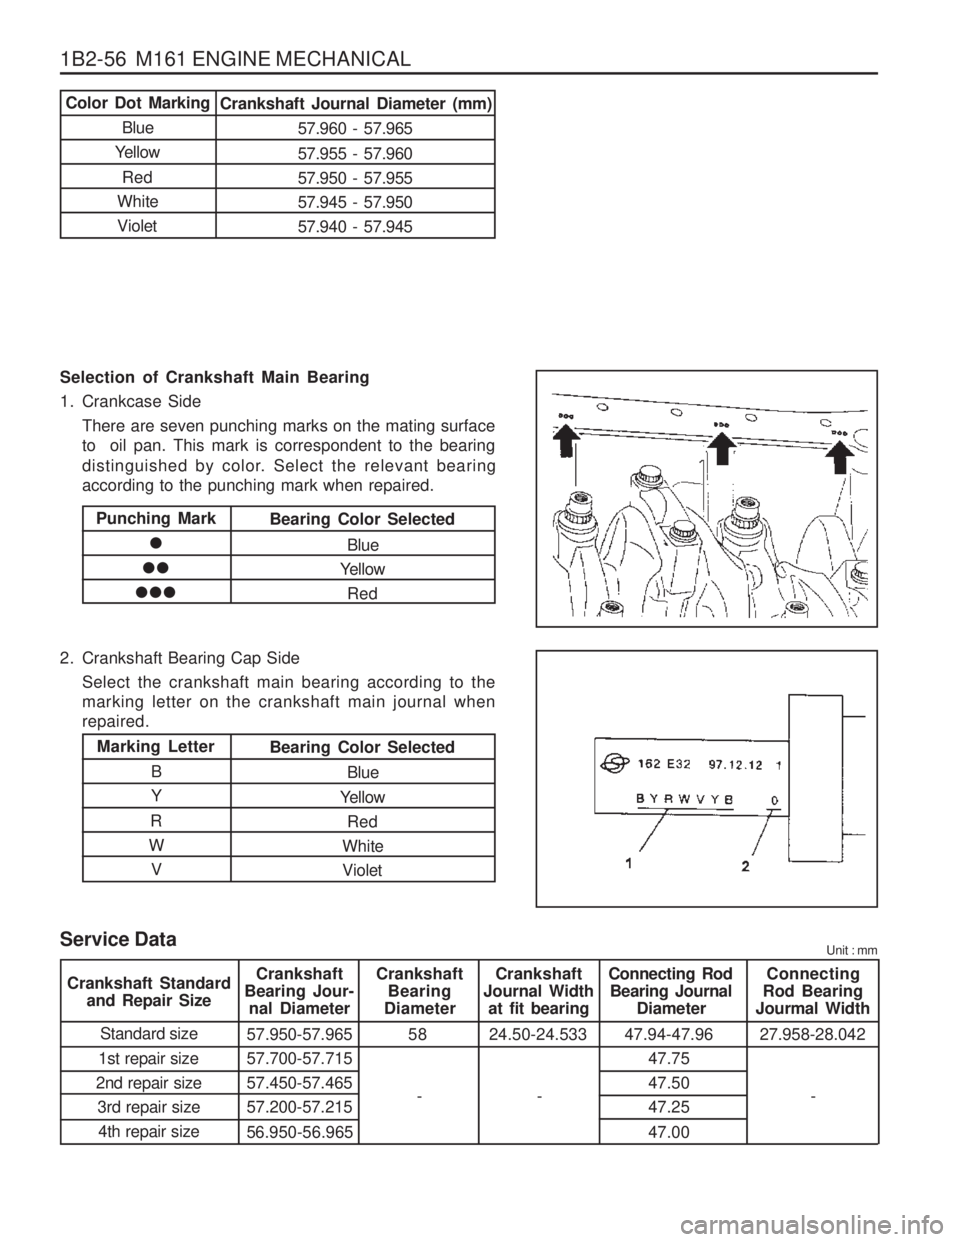
1B2-56 M161 ENGINE MECHANICAL Selection of Crankshaft Main Bearing
1. Crankcase SideThere are seven punching marks on the mating surface to oil pan. This mark is correspondent to the bearing
distinguished by color. Select the relevant bearing according to the punching mark when repaired.
2. Crankshaft Bearing Cap Side Select the crankshaft main bearing according to themarking letter on the crankshaft main journal whenrepaired.
Color Dot Marking
Blue
Yellow
Red
White VioletCrankshaft Journal Diameter (mm)
57.960 - 57.965 57.955 - 57.960 57.950 - 57.95557.945 - 57.95057.940 - 57.945
Punching Mark
Bearing Color Selected
Blue
Yellow
Red
Marking Letter
B Y
R
W VBearing Color Selected
Blue
Yellow Red
White Violet
Service Data Unit : mm
Crankshaft
Bearing Jour- nal Diameter Crankshaft
Bearing
Diameter Crankshaft
Journal Width at fit bearing Connecting Rod
Bearing Journal Diameter Connecting
Rod Bearing
Jourmal Width
Standard size
1st repair size
2nd repair size 3rd repair size4th repair size 57.950-57.965 57.700-57.71557.450-57.46557.200-57.215
56.950-56.965 58 24.50-24.533 47.94-47.96
47.75 47.5047.25 47.0027.958-28.042
Crankshaft Standard
and Repair Size
-
--
Page 245 of 1574

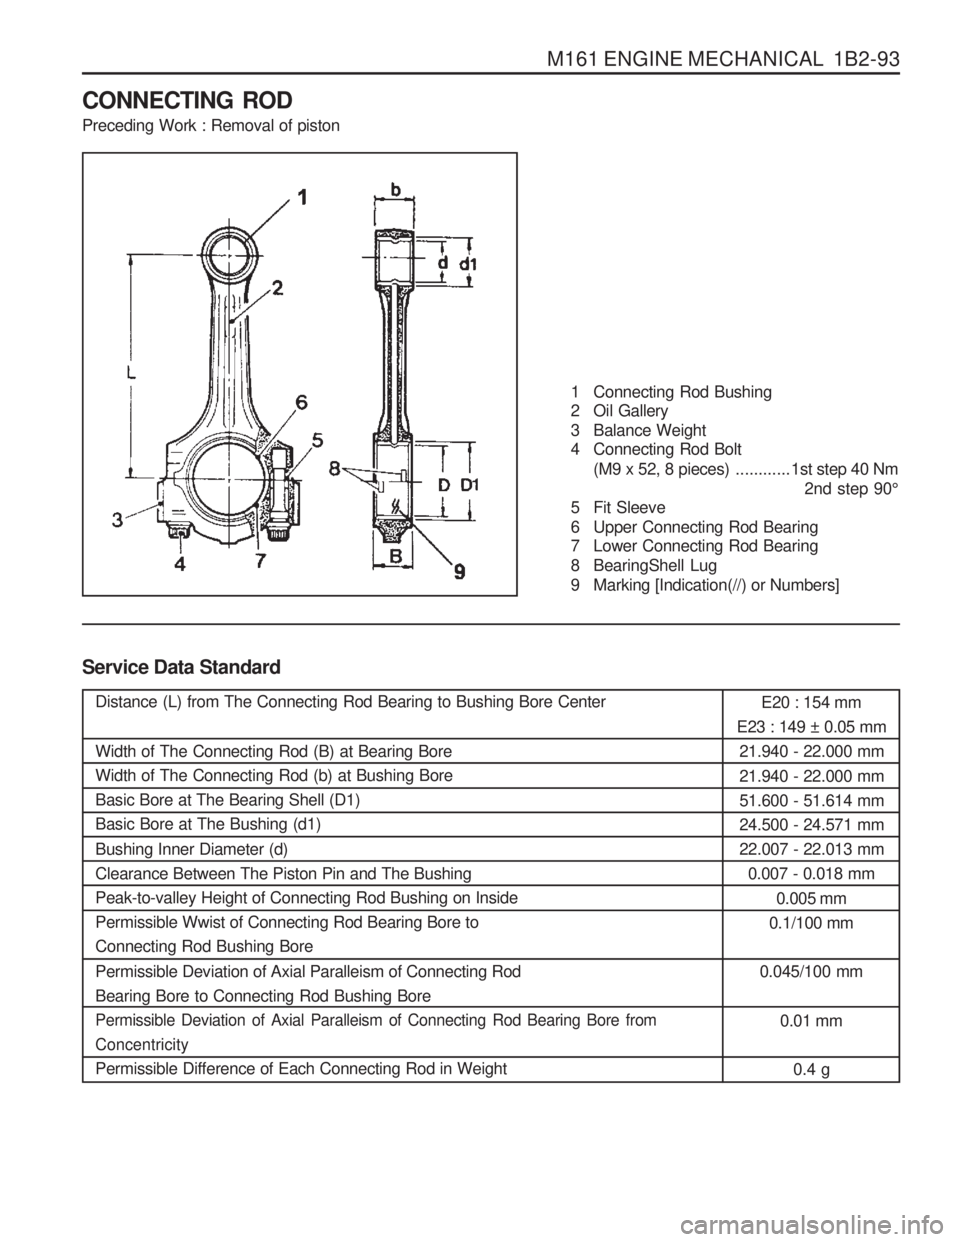
M161 ENGINE MECHANICAL 1B2-93
CONNECTING ROD Preceding Work : Removal of piston
1 Connecting Rod Bushing
2 Oil Gallery
3 Balance Weight
4 Connecting Rod Bolt(M9 x 52, 8 pieces) ............1st step 40 Nm
2nd step 90 °
5 Fit Sleeve
6 Upper Connecting Rod Bearing
7 Lower Connecting Rod Bearing
8 BearingShell Lug
9 Marking [Indication(//) or Numbers]
Service Data Standard
Distance (L) from The Connecting Rod Bearing to Bushing Bore Center Width of The Connecting Rod (B) at Bearing Bore Width of The Connecting Rod (b) at Bushing BoreBasic Bore at The Bearing Shell (D1)Basic Bore at The Bushing (d1) Bushing Inner Diameter (d) Clearance Between The Piston Pin and The BushingPeak-to-valley Height of Connecting Rod Bushing on InsidePermissible Wwist of Connecting Rod Bearing Bore toConnecting Rod Bushing Bore Permissible Deviation of Axial Paralleism of Connecting Rod Bearing Bore to Connecting Rod Bushing Bore
Permissible Deviation of Axial Paralleism of Connecting Rod Bearing Bore fromConcentricity
Permissible Difference of Each Connecting Rod in Weight E20 : 154 mm
E23 : 149 ± 0.05 mm 21.940 - 22.000 mm 21.940 - 22.000 mm 51.600 - 51.614 mm24.500 - 24.571 mm22.007 - 22.013 mm 0.007 - 0.018 mm
0.005 mm
0.1/100 mm
0.045/100 mm
0.01 mm0.4 g
Page 351 of 1574

1B3-86 OM600 ENGINE MECHANICAL
24.500 - 24.533 24.600 - 24.633 24.700 - 24.733 24.900 - 24.93325.000 - 25.033New
Limit New
Limit
Radial clearances Axial clearances Crankshaft bearing
journal diameter
Crankshaft Standard and Repair Sizes
Standard size 50.950 - 57.965
journal width
24.500 - 24.533 24.600 - 24.63324.700 - 24.73324.900 - 24.93325.000 - 25.033
-Thrust bearing journal diameter
47.950 - 47.965
Thrust bearing
47.700 - 47.715 47.450 - 47.650 47.200 - 47.215 46.950 - 46.965
57.500 - 57.71557.450 - 57.465 57.200 - 57.215 56.950 - 56.965
Repair size 1Repair size 2 Repair size 3 Repair size 4
Bearing Clearances
Thrust bearingCrankshaft bearing
0.026 - 0.068 Max. 0.080 - -
0.027 - 0.051
Max. 0.070
0.100 - 0.254
Max. 0.300
Matching Fit Bearing Journal Width to Thrust Bearings
Fit bearing journal width Thrust bearings thickness
2.15 2.202.252.352.40
Notice
� Measure crankshaft axial clearance and adjust with proper thrust Bearing.
� The same thickness of washer must be installed on both sides of the fit bearing. mm mm mm
Page 355 of 1574
1B3-90 OM600 ENGINE MECHANICAL
15. Measure radial clearance of crankshaft bearing (G).
Clearance ‘G’ 0.027 - 0.051mm
Notice If ‘G’ is out of standard, replace the bearing shells and
adjust the radial clearance of crankshaft bearing.Example) Measured value ‘E’ = 57.700mm
Measured value ‘F’ = 57.659mm
Clearance ‘G’ = 0.041mm
16. Remove the crankshaft bearing cap.
17. Measure width of thrust bearing journal (H) and adjust with
proper thrust bearings (see table). Notice The same thickness of thrust washers should be installed on both sides of the thrust bearing.
18. Coat the upper thrust bearing (4) with oil and insert intothe crankcase so that the oil grooves are facing the crank webs (arrow).
19. Coat the lower thrust bearing (7) with oil and insert into the crankshaft bearing cap so that the oil grooves are facingthe crank webs (arrow). Notice The retaining lugs should be positioned in the grooves (arrow).
Page 399 of 1574
1B3-134 OM600 ENGINE MECHANICAL
Machining ProcedureValve machining is required : - When the valve is leaking.- When replacing the valve.- When replacing the valve guide.- When replacing the valve seat or valve seat ring.
1. Machine the valve seat (a=45 °).
2. Measure valve seat width ‘b’.
Valve seat
width ‘b’1.2 - 1.7 mm 1.5 - 2.0 mm
Intake
Exhaust
3. If the specification is exceeded, the valve seat width has to be corrected at the lower free angle of ‘� ’=65 °.
4. Measure radial runout.
Runout Max. 0.03mm