2003 PONTIAC BONNEVILLE alarm
[x] Cancel search: alarmPage 71 of 418
Remote Keyless Entry System
Operation
If your vehicle has this feature, you can lock and unlock
your doors or unlock your trunk from about
3 feet (1 m) up
to
30 feet (9 m) away using the remote keyless entry
transmitter supplied with your vehicle.
The numbers on the back
of the transmitters correspond
to DRIVER
#1 and DRIVER #2 on the DIC (if equipped).
See
Driver Information Center (DIC) on page 3-57 for
more information.
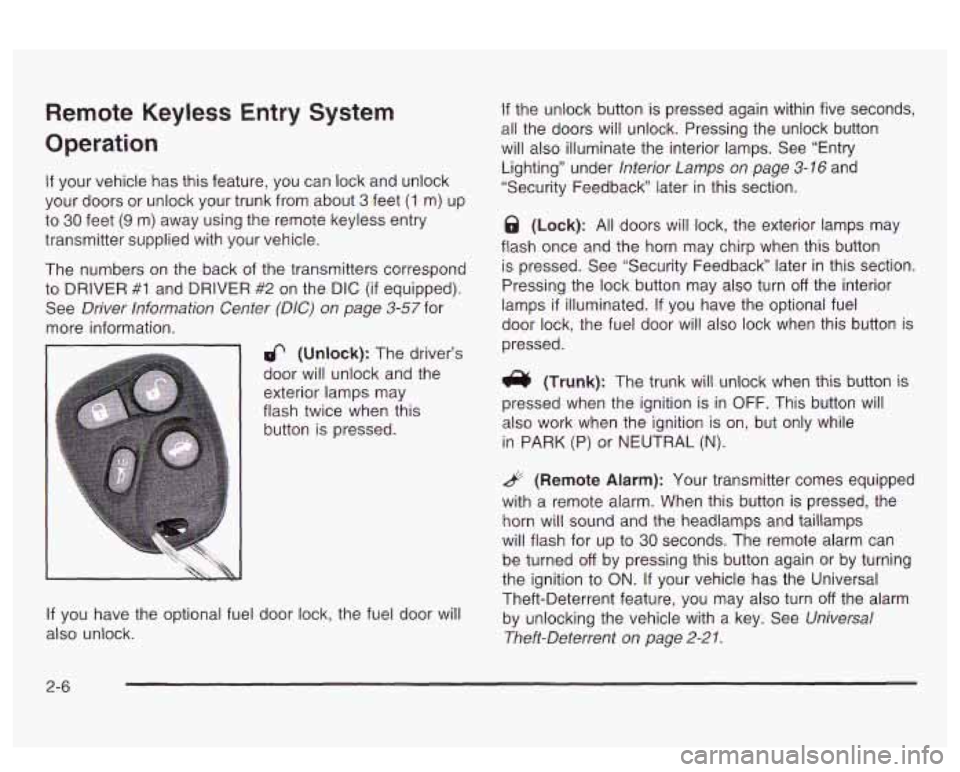
6 (Unlock): The driver’s
door will unlock and the
exterior lamps may
flash twice when this
button is pressed.
If you have the optional fuel door lock, the fuel door will
also unlock.
If the unlock button is pressed again within five seconds,
all the doors will unlock. Pressing the unlock button
will also illuminate the interior lamps. See “Entry
Lighting” under
Interior Lamps on page 3-16 and
“Security Feedback later in this section.
@ (Lock): All doors will lock, the exterior lamps may
flash once and the horn may chirp when this button
is pressed. See “Security Feedback” later in this section.
Pressing the lock button may also turn
off the interior
lamps
if illuminated. If you have the optional fuel
door lock, the fuel door will also lock when this button is
pressed.
(Trunk): The trunk will unlock when this button is
pressed when the ignition is in
OFF. This button will
also work when the ignition is on, but only while
in
PARK (P) or NEUTRAL (N).
& (Remote Alarm): Your transmitter comes equipped
with a remote alarm. When this button
is pressed, the
horn will sound and the headlamps and taillamps
will flash for up to
30 seconds. The remote alarm can
be turned
off by pressing this button again or by turning
the ignition to ON. If your vehicle has the Universal
Theft-Deterrent feature, you may also turn
off the alarm
by unlocking the vehicle with a key. See
Universal
Theft-Deterrent on page
2-21.
2-6
Page 75 of 418
Doors and Locks
Door Locks
Unlc,.
easily open the doors and fall out of a moving vehicle. When a door
is locked, the
handle won’t open
it. You increase the
chance of being thrown out of the vehicle
in a crash if the doors aren’t locked. So,
wear safety belts properly and lock the
doors whenever you drive.
CAUTION: (Continued)
Young children who get into unlocked
vehicles may be unable to get out.
A child
can be overcome by extreme heat and can
suffer permanent injuries or even death
from heat stroke. Always lock your vehicle
whenever you leave
it.
unlocked door when you slow down or
stop your vehicle. Locking your doors can
help prevent this from happening.
Outsiders can easily enter through an
There are several ways to lock and unlock your vehicle.
If your vehicle has a theft-deterrent system and it is
activated, unlock the doors only with the key or remote
keyless entry system. This will avoid setting
off the
alarm. See
Universal Theft-Deterrent on page 2-27 for
more information.
2-1 0
Page 86 of 418
Theft-Deterrent Systems
Vehicle theft is big business, especially in some cities.
Although your vehicle has a number of theft-deterrent
features, we know that nothing we put on it can make it
impossible to steal.
Universal Theft-Deterrent
If your vehicle has this feature, it has a theft-deterrent
alarm system. With this system, the SECURITY light will
flash
as you open the door if your ignition is in OFF.
SECURITY
This light on the instrument
panei cluster reminds
you
to activate the
theft-deterrent system when leaving your vehicle.
To activate the system, do the following:
1. Open the door.
2. Lock the door with the power door lock switch while
the door is open, or use the remote keyless entry
transmitter
(if equipped). The SECURITY light
should come on and stay on.
3. Close all doors. The SECURITY light should go off
after about 30 seconds and the system will then be
armed.
If the SECURITY light comes on for one minute and
then shuts
off while the ignition is on, the security
system has detected a problem. See your dealer for
service.
If a door is opened without the key or remote keyless
entry transmitter, or
if the door key cylinders are
damaged, the alarm will go
off. The exterior lamps will
flash and the horn will sound for
30 seconds, then will go
off in order to save battery power.
Remember, the theft-deterrent system won’t activate
if
YQL! !ock the doors with a key or manual door lock.
It activates only
if you use a power door lock switch
while the door is open, or the remote keyless entry
transmitter.
Avoid setting
off the alarm by accident.
Always unlock a door with a key, or use the remote
keyless entry transmitter. Unlocking a door any
other way will set
off the alarm.
If you set off the alarm by accident, unlock the driver’s
door with your key. You can also turn
off the alarm
by pressing the button with the unlock symbol on the
remote keyless entry transmitter. The alarm won’t stop
if
you try to uniock a door any other Way.
2-2 1
Page 87 of 418
Testing the Alarm
1. From inside the vehicle, roll down the window.
2. Activate the system by locking the doors with the
power door lock switch while the door is open, or
with the remote keyless entry transmitter.
3. Get out of the vehicle, close the door and wait for
the SECURITY light to go out.
4. Then, reach in through the window, unlock the door
with the manual door lock and open the door. This
should set
off the alarm.
If the alarm does not sound when it should, check to
see
if the horn works. The horn fuse may be blown.
To replace the fuse, see
Fuses and Circuit Breakers on
page 5-92.
If the alarm does not sound, or the exterior lamps do
not flash, see your dealer.
Content Theft-Deterrent
If your vehicle has this option, it has a content
theft-deterrent alarm system.
A light located in your Twilight Sentinel@ cluster, above
the fog lamp button, will begin to flash
30 seconds
after the vehicle ignition is turned
off to let you know the
system has been armed.
While armed, the doors will not unlock with the power
door lock switch. Once armed,
the alarm will go
off if someone tries to
enter the vehicle without using the remote keyless entry
transmitter or a key, breaks a window, tries to damage
the vehicle or turns the ignition to
ON. If any of these do
occur, the horn will sound and the parking lamps will
flash for up to two minutes.
PASS-Key@ 111
Your PASS-Key@ Ill system operates on a radio
frequency subject to Federal Communications
Commission (FCC) Rules and with Industry Canada.
This device complies with Part
15 of the FCC Rules.
Operation is subject to the following two conditions:
(1)
this device may not cause harmful interference, and
(2) this device must accept any interference received,
including interference that may cause undesired
operation.
This device complies with RSS-210 of Industry Canada
Operation is subject to the following two conditions:
(1) this device may not cause interference, and (2) this
device must accept any interference received,
including interference that may cause undesired
operation of the device.
Changes
or modifications to this system by other than
an authorized service facility could void authorization to
use this equipment.
PASS-Key@
Ill uses a radio frequency transponder in
the key that matches
a decoder in your vehicle.
2-22
Page 133 of 418
Personal Choice Programming
This feature can be programmed in the on or off mode
for each transmitter.
If your vehicle is equipped with the Driver Information
Center (DIC), you must program this feature through the
DIC. See DIC Vehicle Personalization on page 3-62.
To turn the feature off do the following:
1. Keep all doors closed, the vehicle in PARK (P) and
the ignition on throughout this procedure.
2. Press and hold LOCK on the power door lock
switch throughout this procedure. All the doors
will lock.
3. Press the instant alarm on the transmitter. Perimeter
lighting remains
on at this time and the horn will
chirp twice.
4. Press the instant alarm on the transmitter again.
Perimeter lighting is disabled and the horn will
chirp once.
feature is now
off.
5. Release the door lock switch. The perimeter lighting
To turn the feature on do the following:
1. Keep all doors closed, the vehicle in PARK (P) and
the ignition on throughout this procedure.
2. Press and hold LOCK on the power door lock
switch throughout this procedure. All the doors
will lock.
3. Press the instant alarm on the transmitter. Perimeter
lighting remains
off at this time and the horn will
chirp once.
4. Press the instant alarm on the transmitter again.
Perimeter lighting is now enabled and the horn
will chirp twice.
5. Release the door lock switch. The perimeter lighting
feature is now on.
This procedure only changes the mode for the
transmitter used to change this setting. The procedure
will need to be repeated for the second transmitter.
3-1 8
Page 149 of 418
Warning Lights, Gages and
Indicators
This part describes the warning lights and gages that
may be on your vehicle. The pictures will help you
locate them.
Warning lights and gages can signal that something is
wrong before it becomes serious enough to cause
an expensive repair or replacement. Paying attention to
your warning lights and gages could also save you
or others from injury.
Warning lights come on when there may be or is a
problem with one of your vehicle’s functions.
As you will
see
in the details on the next few pages, some
warning lights come on briefly when you start the
engine just to let you know they’re working.
If you are
familiar with this section, you should not be alarmed
when this happens. Gages
can indicate when there may be or
is a problem
with one
of your vehicle’s functions. Often gages
and warning lights work together to let you know when
there’s a problem with your vehicle.
When one of the warning lights comes on and stays on
when you are driving,
or when one of the gages
shows there may be a problem, check the section that
tells you what to do about
it. Please follow this
manual’s advice. Waiting to
do repairs can be
costly
- and even dangerous. So please get to know
your warning lights and gages. They’re
a big help.
Your vehicle may also have a
DIG that works along with
the warning lights and gages. See
Driver lnformation
Center
(DIC) on page 3-57.
The volume of your vehicle’s warning chimes can be
adjusted. For information see
Chime Level Adjustment
on page 3- 10 1.
3-34
Page 175 of 418
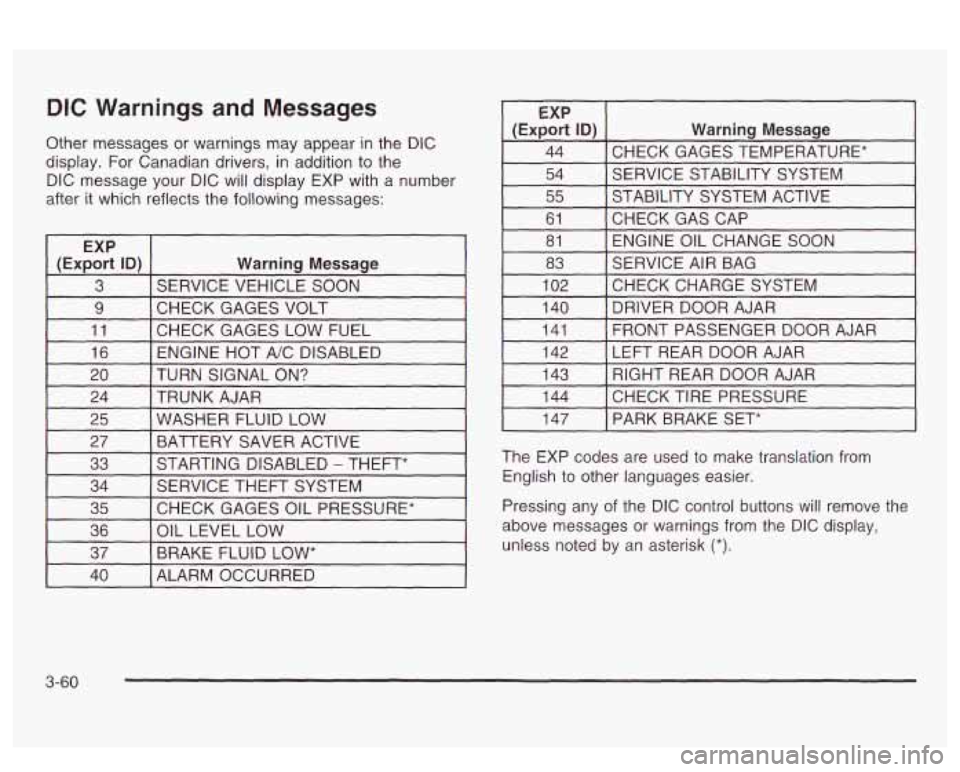
DIC Warnings and Messages
Other messages or warnings may appear in the DIC
display. For Canadian drivers, in addition to the
DIC message your DIC will display EXP with a number
after it which reflects the following messages:
~
EXP
(Export
ID) Warning Message
3 SERVICE VEHICLE SOON
9 I CHECK GAGES VOLT I I
11 [CHECK GAGES LOW FUEL 1
16 I ENGINE HOT A/C DISABLED I
EXP
(Export
ID) Warning Message
44 CHECK GAGES TEMPERATURE* ~~ ~
54 SERVICE STABILITY SYSTEM
55 STABILITY SYSTEM ACTIVE
61 ENGINE OIL CHANGE SOON
81
CHECKGASCAP
83
CHECKCHARGESYSTEM
102 SERVICE
AIR BAG
I 140 I DRIVER DOOR AJAR I
141
LEFT REAR DOOR AJAR
142 FRONT PASSENGER
DOOR AJAR
20 TRUNK AJAR
24 TURN SIGNAL
ON? 143
CHECK TIRE PRESSURE 144 RIGHT REAR DOOR AJAR
25 BATTERY SAVER ACTIVE
27
WASHER FLUID LOW
33
CHECK GAGES OIL PRESSURE*
35 SERVICE
THEFT SYSTEM
34 STARTING DISABLED
- THEFT*
36
BRAKE FLUID
LOW* 37
OIL
LEVEL LOW
I 147 I PARK BRAKE SET*
The EXP codes are used to make translation from
English to other languages easier.
Pressing any of the DIC control buttons
will remove the
above messages or warnings from the DIC display,
unless noted by an asterisk
(*).
40 I ALARM OCCURRED
3-60
Page 412 of 418
Service Bulletins .............................. ..... 7-9
Service Engine Soon Light
............................... 3-46
Service Manuals
............................................... 7-9
Setting Preset PTY Stations (RDS Only)
............ 3-86
Setting Preset PTYs (RDS Only)
....................... 3-76
Setting Preset Stations
............................ 3-74, 3-84
Setting the Tone (Bass/Treble)
.................. 3-74, 3-84
Shifting Into Park (P)
....................................... 2-32
Setting the Time
............................................. 3-71
Sheet Metal Damage
....................................... 5-87
Shifting Out of Park (P)
................................... 2-35
Short Trip/City Definition
.................................... 6-5
Short Trip/City Scheduled Maintenance
................ 6-6
Skidding
........................................................ 4-1 5
Some Other Rainy Weather Tips ....................... 4-19
Special Fabric Cleaning Problems
................. 5-83
Specifications, Capacities
............................ 5-1 00
Speedometer .................................................. 3-38
Starter Switch Check
....................................... 6-20
Steering
........................................................ 4-1 1
Steering in Emergencies .................................. 4-12
Boot and Seal Inspection
.............................. 6-22
Steering Wheel Controls, Audio
......................... 3-98
Short Trip/City
Intervals
..................................... 6-5
Starting Your Engine
....................................... 2-26
Steering
&urrlrl 31111~ ieveI L-JL
Steering, Suspension and Front Drive Axle
Steering Tips
.................................................. 4-1 1
A -I .I. r) r)r) .............................
Storage Areas
Center Console Storage Area
........................ 2-46
Convenience Net
......................................... 2-46
Front Storage Area
...................................... 2-46
Glove Box .............................................. 2-46
Storing the Spare Tire and Tools
....................... 5-80
Sun Visors
..................................................... 2-20
Sunroof
......................................................... 2-47
Systems Monitor
.......................................... 3-55
Storing the Flat Tire
and Tools
...................... 5-80
Stuck in Sand, Mud, Ice or Snow ...................... 4-30
..... 3-39
Tachometer ................................ ~ ~ ~ ~ ~
Taillamps
Turn Signal. Stoplamps and Back-up Lamps
.... 5-59
TCS Warning Light
.......................................... 3-43
Testing the Alarm
............................................ 2-22
Theater Dimming
............................................ 3-17
Theft-Deterrent, Radio
..................................... 3-98
Theft-Deterrent Svstems
................................... 2-21
Content Theft-Deterrent
................................ 2-22
PASS-Key@
Ill ............................................. 2-22
PASS-Key@
Ill Operation .............................. 2-23
Universal Theft-Deterrent
.............................. 2-21
Throttle System Inspection
............................... 6-23
13