Page 1 of 181
Pages
Access 110 - 112
Fuel filler flap 112
Seats, bench seat 98 - 104
Changing a bulb 138 - 140
Changing a wheel 136 - 137
YOUR BOXER AT A GLANCE1
Pages
Heating, air conditioning 91 - 97
Steering wheel controls 113 - 114
Instrument dials 28
Mirrors 116
Checks 134 - 135
Each model may only be fitted with some of the equipment shown, according to its specification and the technical requirements in the country of first registration of the vehicle.
17-11-2003
Page 144 of 181
17-11-2003
PRACTICAL INFORMATION
136
CHANGING A WHEEL Parking the vehicle �
Whenever possible, park the vehicle on level, stable and non-slippery ground.
� Apply the handbrake, switch offthe ignition and engage first orreverse gear (position Pfor the
automatic gearbox).
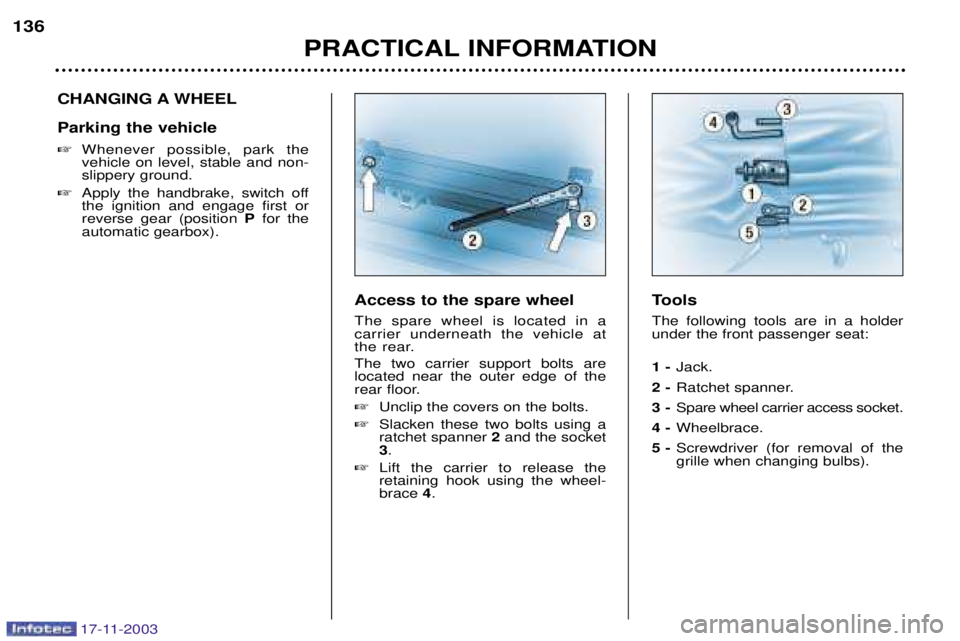
Tools The following tools are in a holder under the front passenger seat: 1 -Jack.
2 - Ratchet spanner.
3 - Spare wheel carrier access socket.
4 - Wheelbrace.
5 - Screwdriver (for removal of the grille when changing bulbs).
Access to the spare wheel The spare wheel is located in a carrier underneath the vehicle at
the rear. The two carrier support bolts are located near the outer edge of the
rear floor. �
Unclip the covers on the bolts.
� Slacken these two bolts using a ratchet spanner 2and the socket
3 .
� Lift the carrier to release theretaining hook using the wheel-brace 4.
Page 146 of 181

17-11-2003
PRACTICAL INFORMATION
138
CHANGING A BULB Front lights Removing a headlamp unit:
Ð Open the bonnet,
Ð Unscrew the bolts
Afrom the grille
to gain access to the unit 1,
Ð Unscrew the nuts Busing a wrench
and pull the unit 1outwards,
Ð Unclip the two strips C,
Ð Unclip the rubber protector D,
Ð Disconnect the connector. Note: handle the bulbs with a dry
cloth. 1 - Dipped beam headlamps
(H7-60 W),
� Press and release the spring G,
� Extract the bulb holder Hto
change the bulb.
2 - Main beam headlamps (H1-60 W),
� Press and release the spring E,
� Extract the bulb holder Fto
change the bulb.
3 - Front fog lamps (H1-60 W). � Contact a PEUGEOT dealer.When fitting the new bulb, ensure that the direction notches are posi-tioned correctly and the securing clip
is fixed properly. Carry out the operations in the reverse order to refit. The headlamp units are fitted with polycarbonate glass with a protec-tive coating. Do not clean them
with a dry or abrasive cloth, norwith a detergent or solvent prod-uct. Use a sponge and soapy water.
Page 147 of 181
17-11-2003
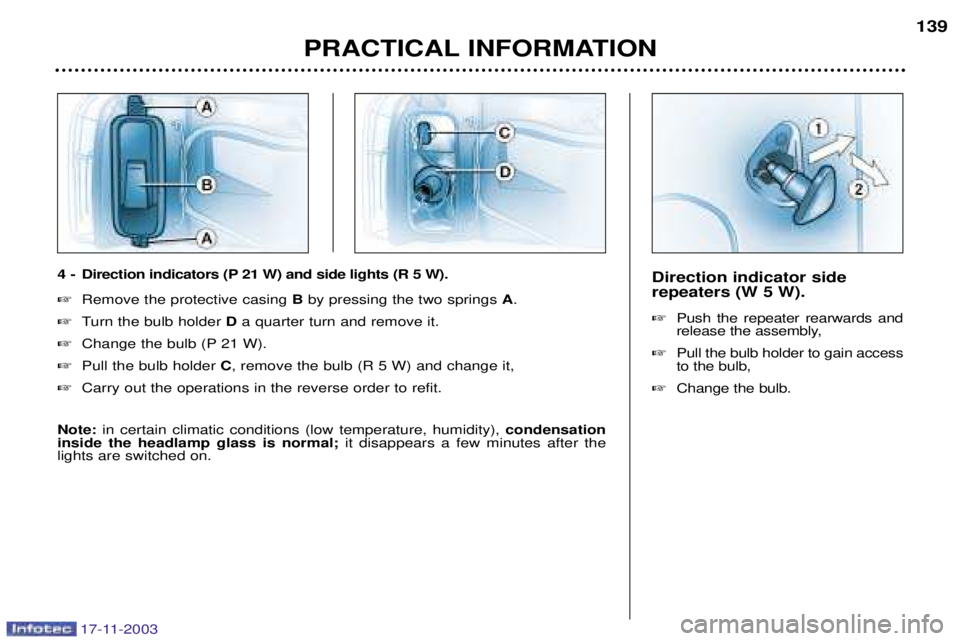
Direction indicator side repeaters (W 5 W). �Push the repeater rearwards and
release the assembly,
� Pull the bulb holder to gain accessto the bulb,
� Change the bulb.
PRACTICAL INFORMATION 139
4 - Direction indicators (P 21 W) and side lights (R 5 W). �
Remove the protective casing Bby pressing the two springs A.
� Turn the bulb holder Da quarter turn and remove it.
� Change the bulb (P 21 W).
� Pull the bulb holder C, remove the bulb (R 5 W) and change it,
� Carry out the operations in the reverse order to refit.
Note: in certain climatic conditions (low temperature, humidity), condensation
inside the headlamp glass is normal; it disappears a few minutes after the
lights are switched on.
Page 148 of 181
17-11-2003
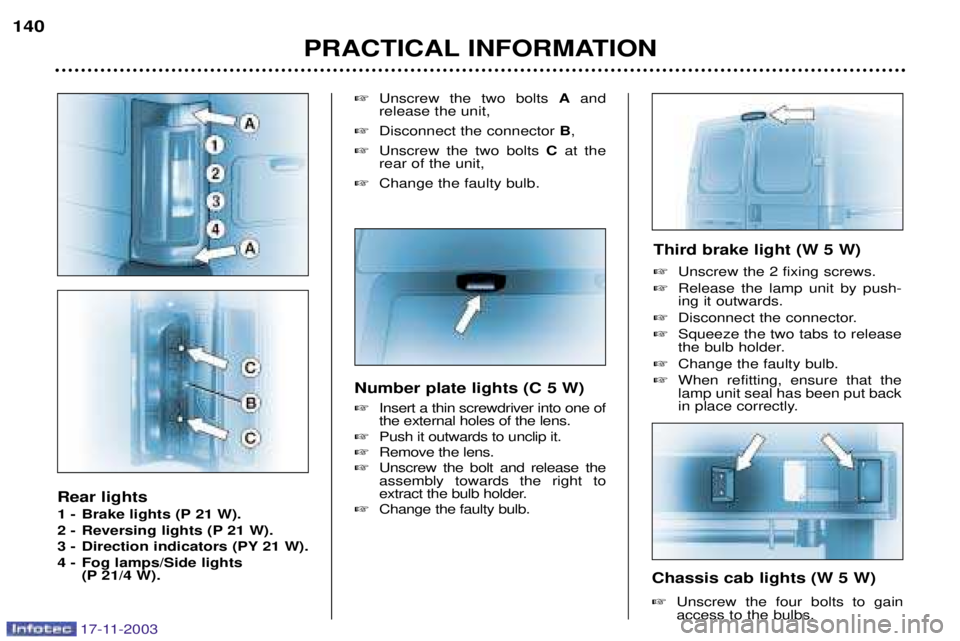
Rear lights
1 - Brake lights (P 21 W).
2 - Reversing lights (P 21 W).
3 - Direction indicators (PY 21 W).
4 - Fog lamps/Side lights (P 21/4 W). �
Unscrew the two bolts Aand
release the unit,
� Disconnect the connector B,
� Unscrew the two bolts Cat the
rear of the unit,
� Change the faulty bulb.
PRACTICAL INFORMATION
140
Number plate lights (C 5 W) �Insert a thin screwdriver into one of the external holes of the lens.
� Push it outwards to unclip it.
� Remove the lens.
� Unscrew the bolt and release theassembly towards the right to
extract the bulb holder.
� Change the faulty bulb.
Chassis cab lights (W 5 W) �Unscrew the four bolts to gain access to the bulbs.
Third brake light (W 5 W) �
Unscrew the 2 fixing screws.
� Release the lamp unit by push- ing it outwards.
� Disconnect the connector.
� Squeeze the two tabs to release
the bulb holder.
� Change the faulty bulb.
� When refitting, ensure that thelamp unit seal has been put back
in place correctly.