2003 Oldsmobile Alero light
[x] Cancel search: lightPage 257 of 354
Jump Starting
If your battery has run down, you may want to use
another vehicle and some jumper cables to start your
vehicle. Be sure to follow the steps below to do it safely.
I- Ba..,ries can hi.- - you. ’_ --?y cal. Je c-.lgerous
because:
They contain acid that can burn you.
They contain gas that can explode or
They contain enough electricity to
ignite.
burn you.
If you don’t follow these steps exactly, some
or all of these things can hurt you.
Notice: Ignoring these steps could result in costly
damage to your vehicle that wouldn’t be covered
by your warranty.
Trying to start your vehicle by pushing or pulling
it
won’t work, and it could damage your vehicle.
1. Check the other vehicle. It must have a 12-volt
battery with a negative ground system.
Notice: If the other system isn’t a 12-volt system
with a negative ground, both vehicles can be
damaged.
2. Get the vehicles close enough so the jumper cables
can reach, but be sure the vehicles aren’t touching
each other.
If they are, it could cause a ground
connection you don’t want.
You wouldn’t be able to
start your vehicle, and the bad grounding could
damage the electrical systems.
To avoid the possibility of the vehicles rolling, set
the parking brake firmly on both vehicles involved in
the jump start procedure. Put an automatic
transaxle in PARK (P) or a manual transaxle in
NEUTRAL before setting the parking brake.
Notice: If you leave your radio on, it could be badly
damaged. The repairs wouldn’t be covered by
your warranty.
3. Turn off the ignition on both vehicles. Unplug
unnecessary accessories plugged into the cigarette
lighter. Turn
off the radio and all lamps that aren’t
needed. This will avoid sparks and help save
both batteries. And it could save your radio!
4. Open the hoods and locate the batteries. Find the
positive
(+) and negative (-) terminal locations on
each vehicle. See
Engine Compartment Overview
on page
5-12 for more information on location.
5-42
Page 258 of 354
An electric fan can start up even wt.-.r the
engine
is not running and can injure you. Keep
hands, clothing and tools away from any
underhood electric fan.
m rn
Using a match near a battery can cause battery
gas to explode. People have been hurt doing
this, and some have been blinded. Use a
flashlight if you need more
light.
Be sure the battery has enough water. You
don’t need to add water tsthe ACDelco@
battery installed
in your new vehicle. But if a
battery has filler caps, be sure the right
amount of fluid
is there. If it is low, add water
to take care of that first. If you don’t, explosive
gas could be present.
CAUTION: (Continued) Battery fluid contains acid that can
burn you.
Don’t get
it on you. If you accidentally get it in
your eyes or on your skin, flush the place with
water and get medical help immediately.
I Fans or other moving el,,,ne parts can ..., ure
you badly. Keep your hands away from moving
parts once the engine
is running.
5. Check that the jumper cables don’t have loose or
missing insulation.
If they do, you could get a
SI Iucln. I I IC VCIIICIIG~ UWUIU UG UCAIIIUY~U CUW. -L--I- TI-- ..-L.:-1-,. mA,,lA Lm An-mmr.P4 tnn
Before you connect the cables, here are some
basic things you should know. Positive
(+) will go to
positive
(+) or to a remote positive (+) terminal if
the vehicle has one. Negative (-) will go to a heavy,
unpainted metal engine part or to a remote
negative
(-) terminal if the vehicle with the dead
battery has one.
5-43
Page 272 of 354
Uniform Tire Quality Grading
Mixing tires could cause you to lose control
while driving. If you mix tires of different sizes or types (radial and bias-belted tires), the
vehicle may not handle properly, and you could have a crash. Using tires
of different
sizes may also cause damage to your vehicle.
Be sure to use the same size and type tires on
all wheels.
It's all right to drive with your
compact spare, though.
It was developed for
use on your vehicle.
I If you use bias-ply tires on your vehicle. the I
wheel rim flanges could develop cracks after
many miles of driving.
A tire and/or wheel
could fail suddenly, causing a crash. Use only
radial-ply tires with the wheels on your vehicle. Quality grades can
be found where applicable on the
tire sidewall between tread shoulder and maximum
section width. For example:
Treadwear 200 Traction AA Temperature A
The following information relates to the system
developed by the United States National Highway
Traffic Safety Administration, which grades tires by
treadwear, traction and temperature performance. (This
applies only to vehicles sold in the United States.)
The grades are molded on the sidewalls of most
passenger car tires. The Uniform Tire Quality Grading
system does not apply to deep tread, winter-type
snow tires, space-saver or temporary use spare tires,
tires with nominal rim diameters of 10 to 12 inches
(25 to
30 cm), or to some limited-production tires.
While the tires available
on General Motors passenger
cars and light trucks may vary with respect to these
grades, they must also conform to federal safety
Performance Criteria (TPC) standards.
,t=yuj,.e!i-l-,-i-lis &;-,d dddiiisi-,a; &-,erd; ;";otsrs TiTG
5-57
Page 294 of 354
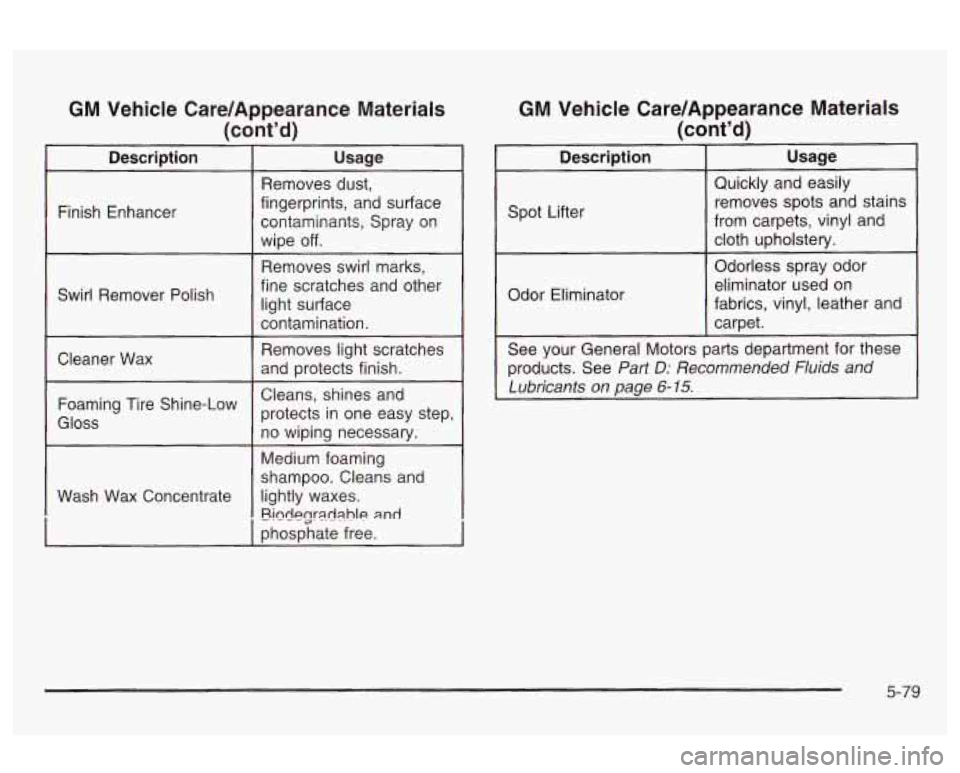
GM Vehicle Care/Appearance Materials
(cont’d) GM
Vehicle Care/Appearance Materials
kont’d)
Description Usage
Finish Enhancer Removes dust,
fingerprints, and surface
contaminants, Spray on
wipe
off.
Removes swirl marks,
fine scratches and other
light surface
contamination.
Swirl Remover Polish
Cleaner Wax
I
Removes light scratches
and protects finish.
Medium foaming
shampoo. Cleans and
~i~cjmr~rJ~hle and
Wash Wax Concentrate lightly waxes.
I phosphate free. Description
Usage
Quickly and easily
removes spots and stains
from carpets, vinyl and
cloth upholstery.
Odorless spray odor
Spot
Lifter
Odor Eliminator eliminator
used on
fabrics, vinyl, leather and
carDet.
See your General Motors parts department for these
products. See
Part D: Recommended fluids and
Lubricants on page 6- 15.
5-79
Page 300 of 354
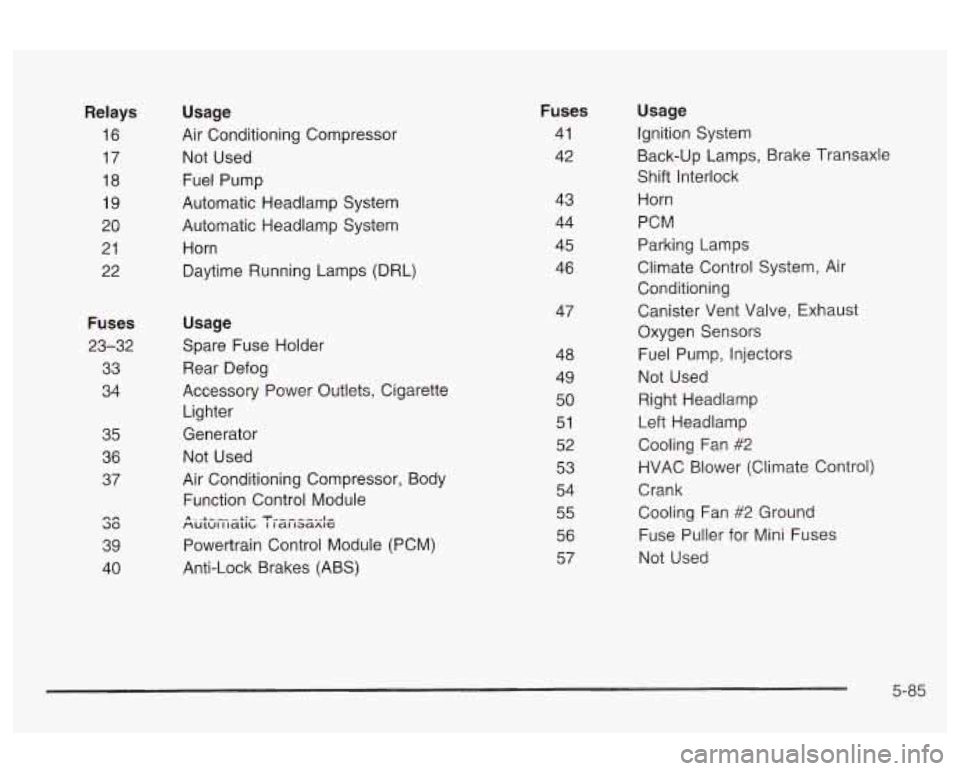
Relays 16
17
18
19
20 21
22
Fuses
23-32 33
34
35
36
37
36
39
40 Usage
Air Conditioning Compressor
Not Used
Fuel Pump
Automatic Headlamp System
Automatic Headlamp System
Horn
Daytime Running Lamps (DRL)
Usage
Spare Fuse Holder
Rear Defog
ACC~SSGP~ Power Outlets, Cigarette
Lighter
Generator Not Used
Air Conditioning Compressor, Body
Function Control Module
Powertrain Control Module (PCM)
Anti-Lock Brakes (ABS)
A ..I -._-- +:- T --.---., I, r\ULUI I Idllb I I C€l13C€AlG
Fuses 41
42
43
44
45
46 47
48 49
50
51
52
53
54
55
56
57 Usage
Ignition System
Back-up Lamps, Brake Transaxle
Shift Interlock
Horn
PCM
Parking Lamps
Climate Control System, Air
Conditioning
Canister Vent Valve, Exhaust
Oxygen Sensors
Fuel Pump, Injectors
Not Used
Right Headlamp
Left Headlamp
Cooling Fan
#2
HVAC Blower (Climate Control)
Crank Cooling Fan
#2 Ground
Fuse Puller for Mini Fuses
Not Used
5-85
Page 308 of 354
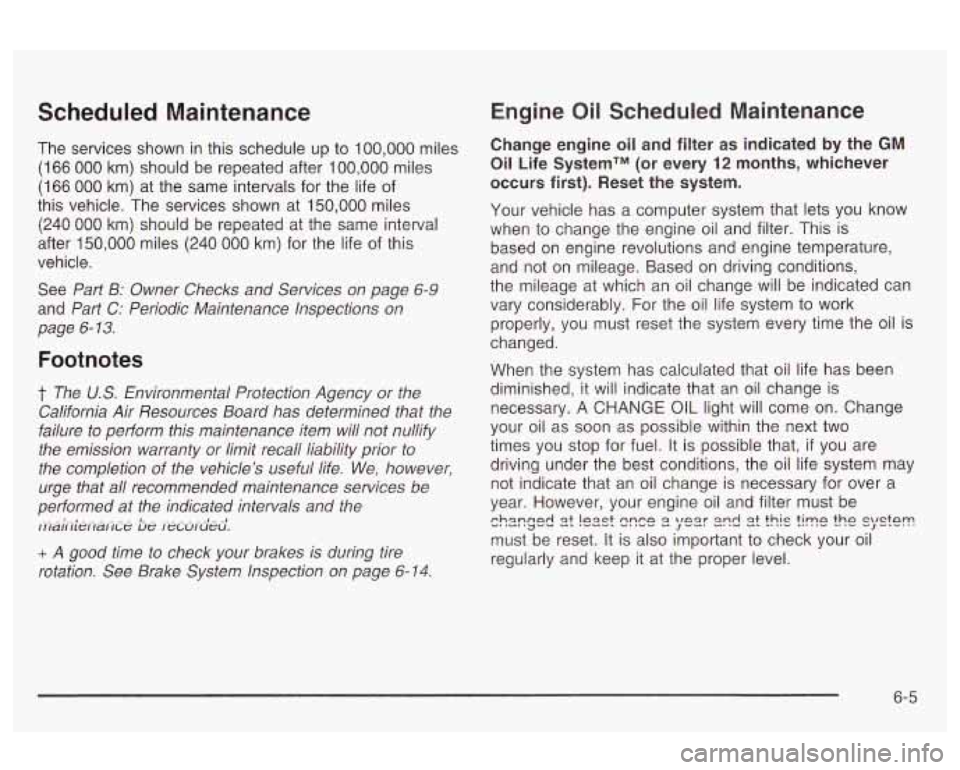
Scheduled Maintenance
The services shown in this schedule up to 100,000 miles
(1
66 000 km) should be repeated after 100,000 miles
(1
66 000 km) at the same intervals for the life of
this vehicle. The services shown at 150,000 miles
(240 000 km) should be repeated at the same interval
after 150,000 miles
(240 000 km) for the life of this
vehicle.
See
Part B: Owner Checks and Services on page 6-9
and Part C: Periodic Maintenance Inspections on
page
6- 13.
Footnotes
t The U.S. EfMrmmef%al Prdectim Agency or the
California Air Resources Board has determined that the
failure to perform this maintenance item will not nullify
the emission warranty or limit recall liability prior to
the completion of the vehicle's useful life. We, however,
urge that all recommended maintenance services be
performed at the indicated intervals and the
,iia;ii;eiiaiic.e be ,.ec.ui.u'eu'.
+ A good time to check your brakes is during tire
rotation. See Brake System Inspection on page
6-14.
Engine Oil Scheduled Maintenance
Change engine oil and filter as indicated by the GM
Oil Life SystemTM (or every 12 months, whichever
occurs first). Reset the system.
Your vehicle has a computer system that lets you know
when to change the engine oil and filter. This
is
based on engine revolutions and engine temperature,
and not on mileage. Based on driving conditions,
the mileage at which an oil change will be indicated can
vary considerably. For the oil life system to work
properly, you must reset the system every time the oil is
changed.
When the system has calculated that
oil life has been
diminished, it
wi!! indicate that an oil change is
necessary. A CHANGE OIL light will come on. Change
your oil as soon as possible within the next two
times you stop for fuel. It is possible that,
if you are
driving under the best conditions, the oil life system may
not indicate that an oil change is necessary for over a
year. However, your engine oil and filter must
be
must be reset. It is also important to check your oil
regularly and keep it at the proper level.
chs-mgd
!ezst s-ve 2 ye2r 2nd 2t this ?im,e the cwctam 'J -*-* ' *
6-5
Page 313 of 354
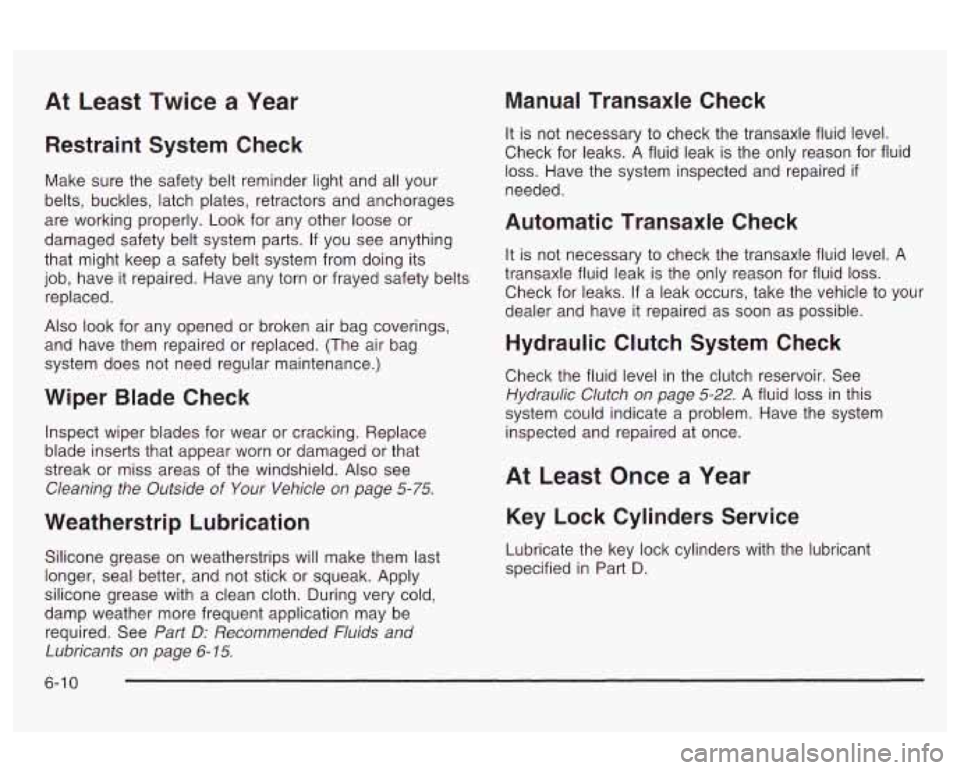
At Least Twice a Year
Restraint System Check
Make sure the safety belt reminder light and all your
belts, buckles, latch plates, retractors and anchorages
are working properly. Look for any other loose or
damaged safety belt system parts. If you see anything
that might keep a safety belt system from doing its
job, have it repaired. Have any torn or frayed safety belts
replaced.
Also look for any opened or broken air bag coverings,
and have them repaired or replaced. (The air bag
system does not need regular maintenance.)
Wiper Blade Check
Inspect wiper blades for wear or cracking. Replace
blade inserts that appear worn or damaged or that
streak or miss areas of the windshield.
Also see
Cleaning the Outside of Your Vehicle on page 5-75.
Weatherstrip Lubrication
Silicone grease on weatherstrips will make them last
longer, seal better, and not stick or squeak. Apply
silicone grease with a clean cloth. During very cold,
damp weather more frequent application may be
required. See
Part D: Recommended Fluids and
Lubricants on page 6-15.
Manual Transaxle Check
It is not necessary to check the transaxle fluid level.
Check for leaks.
A fluid leak is the only reason for fluid
loss. Have the system inspected and repaired if
needed.
Automatic Transaxle Check
It is not necessary to check the transaxle fluid level. A
transaxle fluid leak is the only reason for fluid loss.
Check for leaks. If a leak occurs, take the vehicle to your
dealer and have it repaired as soon as possible.
Hydraulic Clutch System Check
Check the fluid level in the clutch reservoir. See
Hydraulic Clutch on page 5-22. A fluid loss in this
system could indicate a problem. Have the system
inspected and repaired at once.
At Least Once a Year
Key Lock Cylinders Service
Lubricate the key lock cylinders with the lubricant
specified in Part
D.
6-1 0
Page 334 of 354
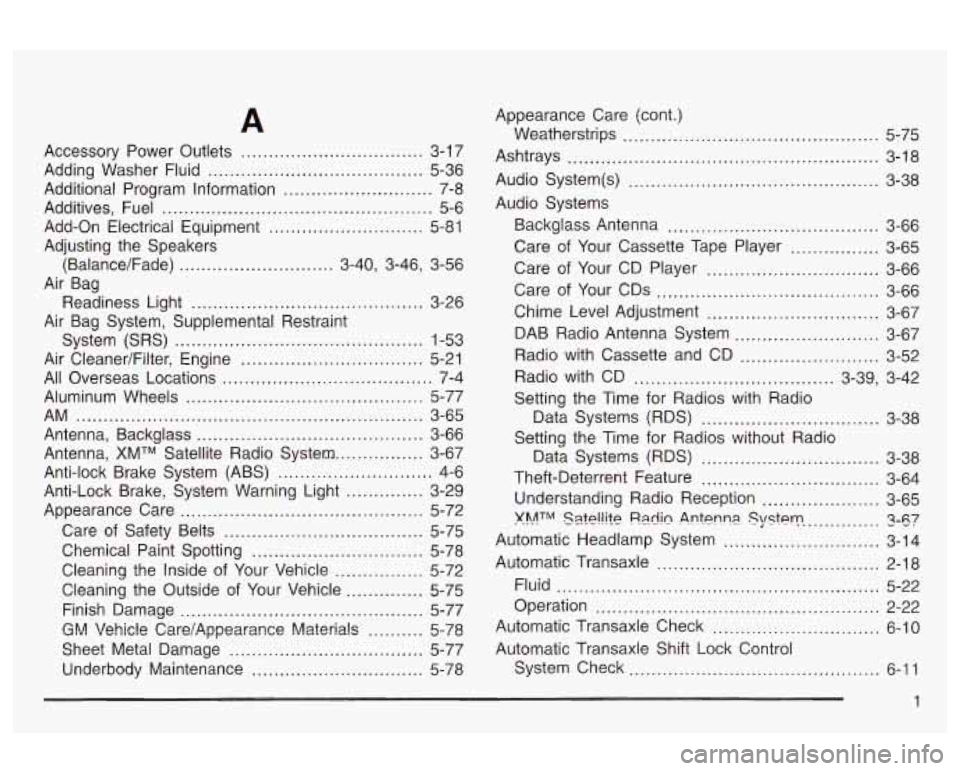
A
Accessory Power Outlets .............................. 3-17
Adding Washer Fluid
....................................... 5-36
Additional Program Information
........................... 7-8
Additives, Fuel
................................................. 5-6
Adjusting the Speakers
Air Bag
Air Bag System, Supplemental Restraint Add-On Electrical Equipment
............................ 5-81
(Balance/Fade)
............................ 3-40, 3-46, 3-56
Readiness Light
.......................................... 3-26
System (SRS)
............................................. 1-53
Air CleanedFiIter, Engine
................................. 5-21
All Overseas Locations ...................................... 7-4
Aluminum Wheels
........................................... 5-77
AM ................................................ ....... 3-65
Antenna, XMTM Satellite Radio System
................ 3-67
Anti-lock Brake System (ABS)
............................ 4-6
Anti-Lock Brake, System Warning Light
.............. 3-29
Care of Safety Belts
.................................... 5-75
Chemical Paint Spotting
............................... 5-78
Antenna, Backglass
......................................... 3-66
Appearance Care
............................................ 5-72
Cleaning the Inside of Your Vehicle
................ 5-72
Cleaning the Outside of Your Vehicle
.............. 5-75
Finish Damage
............................................ 5-77
G!.! Vehicle CarelAppearmce Materials .......... 5-78
Sheet Metal Damage ................................... 5-77
Underbody Maintenance
............................... 5-78 Appearance Care (cont.)
Weatherstrips
........... ........................ 5-75
Ashtrays
........................................................ 3-18
Audio System(s)
......................................... 3-38
Backglass Antenna
...................................... 3-66
Care of Your Cassette Tape Player
................ 3-65
Care of Your CD Player
............................... 3-66
Care of Your CDs
........................................ 3-66
Chime Level Adjustment
............................... 3-67
DAB Radio Antenna System
.......................... 3-67
Radio with Cassette and CD
......................... 3-52
Radio with CD
.................................... 3-39, 3-42
Setting the Time for Radios with Radio
Data Systems (RDS)
................................ 3-38
Setting the Time for Radios without Radio
Data Systems (RDS)
................................ 3-38
Theft-Deterrent Feature
................................ 3-64
Understanding Radio Reception
..................... 3-65
KhATM %?P!!ifP Radln Antenna . Sysf9t-p .............. 1-87
Automatic Headlamp System ............................ 3-14
Automatic Transaxle
........................................ 2-18
Fluid
.......................................................... 5-22
Operation
................................................... 2-22
Automatic Transaxle Check
.............................. 6-10
Automatic Transaxle Shift Lock Control
System Check
............................................. 6-11
Audio Systems