Page 281 of 354
. Asing your vehic- ..____ __._ jal--- impropc -r
positioned can damage the vehicle and even
make the vehicle fall. To help avoid personal
injury and vehicle damage, be sure
to fit the
jack lift head into the proper location before
raising the vehicle.
6. Raise the vehicle by turning the wheel wrench
clockwise. Raise the vehicle far enough
off the
ground
so there is enough room for the compact
spare tire to fit underneath the wheel well.
7. Remove all of the wheel nuts.
8. Remove the flat tire.
5-66
Page 282 of 354
9. Remove any rust or dirt
from the wheel bolts,
mounting surfaces
and spare wheel.
R---t OL Art on the wheel, or on the parts to
which
it is fastened, can make the wheel nuts
become loose after a time. The wheel could
come
off and cause an accident. When you
change a wheel, remove any rust or dirt from
ine piaces wnere ine wneei aiiaches io ihe
vehicle. In an emergency, you can use a cloth
or a paper towel to do
this; but be sure to use
a scraper or wire brush later, if you need to, to
get all the rust or dirt
off.
Never use c or grease on studs or nl If
you do, the nuts might come loose. Your wheel
could fall
off, causing a serious accident.
10. Install the compact spare tire.
11. Put the wheel nuts back on with the rounded end of
the nuts toward the wheel. Tighten each nut by
hand until the wheel is held against the hub.
5-67
Page 283 of 354

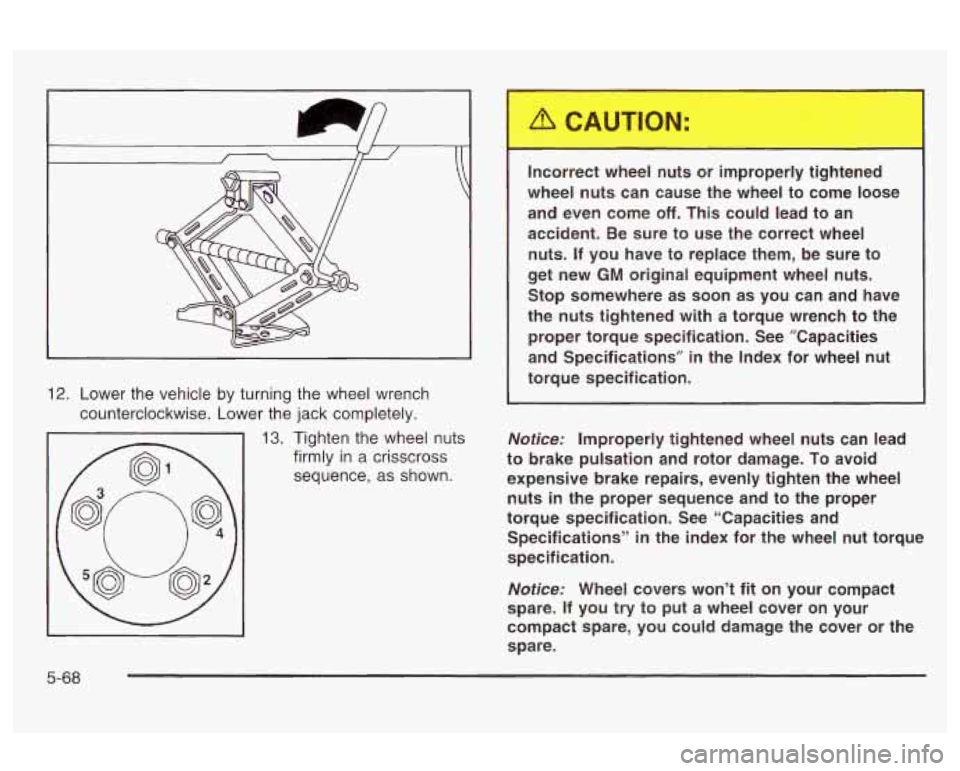
12. Lower the vehicle by turning the wheel wrench
counterclockwise. Lower the jack completely.
13. Tighten the wheel nuts
firmly
in a crisscross
sequence,
as shown. Incorrect wheel nuts or improperly tightened
wheel nuts can cause the wheel to come loose
and even come
off. This could lead to an
accident. Be sure to use the correct wheel
nuts. If you have to replace them, be sure to
get new GM original equipment wheel nuts.
Stop somewhere as soon as you can and have
the nuts tightened with a torque wrench to the proper torque specification. See ”Capacities
and Specifications’’ in the Index for wheel nut
torque specification.
Notice: Improperly tightened wheel nuts can lead
to brake pulsation and rotor damage.
To avoid
expensive brake repairs, evenly tighten the wheel
nuts in the proper sequence and to the proper
torque specification. See “Capacities and
Specifications”
in the index for the wheel nut torque
specification.
Notice: Wheel covers won’t fit on your compact
spare. If you try
to put a wheel cover on your
compact spare, you could damage the cover or the
spare.
5-68
Page 286 of 354

Compact Spare Tire
Although the compact spare tire was fully inflated when
your vehicle was new, it can lose air after a time.
Check the inflation pressure regularly.
It should be
60 psi (420 kPa).
After installing the compact spare on your vehicle, you
should
stop as soon as possible and make sure
your spare tire is correctly inflated. The compact spare
is made
to perform well at speeds up to 65 mph
(1 05 km/h) for distances up to 3,000 miles (5 000 km),
so you can finish your trip and have your full-size
tire repaired or replaced where you want. Of course, it’s
best to replace your spare with a full-size tire as
soon as you can. Your spare will
last longer and be in
good shape in case you need it again.
Nofice: When the compact spare is installed, don’t
take your vehicle through an automatic car wash
with guide rails. The compact spare can get caught
on the rails. That can damage the tire and wheel,
and maybe other parts
of your vehicle.
Don’t use your compact spare on other vehicles.
And don’t mix your compact spare tire or wheel with
other wheels or tires. They won’t fit. Keep your spare tire
and its wheel together.
Notice: Tire chains won’t fit your compact spare.
Using them can damage your vehicle and can
damage the chains too. Don’t use tire chains on
your compact spare.
5-7 1
Page 292 of 354

Aluminum Wheels
Keep your wheels clean using a soft clean cloth with
mild soap and water. Rinse with clean water. After
rinsing thoroughly, dry with a soft clean towel.
A wax
may then be applied.
The surface of these wheels is similar to the painted
surface of your vehicle. Don’t use strong soaps,
chemicals, abrasive polishes, abrasive cleaners,
cleaners with acid, or abrasive cleaning brushes on
them because you could damage the surface. Do not
use chrome polish on aluminum wheels.
Don’t take your vehicle through an automatic car wash
that has silicone carbide tire cleaning brushes. These
brushes
cm also damage the surface of these whee!s.
Tires
To clean your tires, use a stiff brush with tire cleaner
Notice: When applying a tire dressing, always take
care to wipe
off any overspray or splash from all
pairlreu sur la~es VI I ule LJUUY VI V~lltGla btI=
vehicle. Petroleum-based products may damage the
paint finish and tires.
. . .I --- *I-- I--J.- _” ...L--l- +Lm
Sheet Metal Damage
If your vehicle is damaged and requires sheet metal
repair or replacement, make sure the body repair shop
applies anti-corrosion material to parts repaired or
replaced to restore corrosion protection.
Original manufacturer replacement parts will provide the
corrosion protection while maintaining the warranty.
Finish Damage
Any stone chips, fractures or deep scratches in the
finish should be repaired right away. Bare metal
will corrode quickly and may develop into major repair
expense;
Minor chips and scratches can be repaired with touch-up
materials avaliable from your dealer or other service
outlets. Larger areas of finish damage can be corrected
in your dealer’s body and paint shop.
5-77
Page 293 of 354

Underbody Maintenance
Chemicals used for ice and snow removal and dust
control can collect on the underbody. If these are not
removed, accelerated corrosion (rust) can occur on
the underbody parts such as fuel lines, frame, floor pan
and exhaust system even though they have corrosion
protection.
At least every spring, flush these materials from the
underbody with plain water. Clean any areas where mud
and debris can collect.
Dirt packed in close areas of
the frame should be loosened before being flushed.
Your dealer or an underbody car washing system can
do this for you.
Chemical Paint Spotting
Some weather and atmospheric conditions can create a
chemical fallout. Airborne pollutants can fall upon and
attack painted surfaces on your vehicle. This damage
can take two forms; blotchy, ringlet-shaped
discolorations, and small irregular dark spots etched into
the paint surface.
Although no defect in the paint job causes this,
GM will
repair, at no charge to the owner, the surfaces of
new vehicles damaged by this fallout condition within
12 months or 12,000 miles (20 000 km) of purchase,
whichever occurs first.
GM Vehicle Care/Appearance
Materials
See your GM dealer for more information on purchasing
the following products.
GM Vehicle Care/Appearance Materials
Description Usage
Polishing Cloth
polishing cloth.
Wax-Treated Interior
and exterior
~ ~ ~ ~~~
Removes tar, road oil and
Chrome Cleaner and Use on
chrome or
Polish stainless steel.
I
White Sidewall Tire Removes soil and black
Cleaner marks from whitewalls.
Vinyl Cleaner Cleans vinyl tops,
upholstery and
convertible tops.
1 Glass Cleaner I
Removes dirt, grime,
smoke and fingerprints.
Chrome and Wire Wheel from chrome wheels and
Cleaner Removes dirt and grime
wire wheel covers.
5-78
Page 298 of 354
Instrument Panel Fuse Block
(Passenger’s Side)
SEE OTHER END CAF FOR FUSE PULLER &SPARE FUSES
A) INST LPS
C) CRUISE
SW B) CRUISE SW LPS
0) HVAC BLOWER E) CRUISE F) FOG LPS G) INT LPS H) RADIO BATr I) SUNROOF
* SEE OWNERS MANUAL /
1’
Fuse
INST LPS
CRUISE SW LPS
CRUISE SW Usage
Interior Lamp Dimming
Steering Wheel Cruise Control
Switch Lamps
Steering Wheel Cruise Control
Switches
HVAC Blower Motor
HVAC
BLOWER
CRUISE Cruise Control
FOG LPS
Fog Lamps
INT LPS Interior Courtesy Lamps
RADIO BAT Radio, XMTM Satellite Radio/DAB
SUNROOF Power Sunroof
Circuit Breaker Usage
PWR WNDW Power Windows
Relay
FOG LFS
Usage
Fog iarnps
5-83
Page 302 of 354
Capacities (cont’d)
Manual Transaxle Complete Overhaul 1.8
quarts 1.7
L
I
Wheel Nut Torque
*ACDelco@ part number. 1
00 Ib-ft
tECOTECTM I 140 Nom
See Part D: Recommended Fluids and Lubricants on page 6-15.
Engine Specidicatians
I
3400 V6 E Automatic 0.060 inch
Manual
(1.52 mm) 1-2-3-4-5-6
5-87