2003 Oldsmobile Alero ignition
[x] Cancel search: ignitionPage 156 of 354
Playing a Compact Disc
With the ignition on, insert a disc partway into the slot,
label side up. The player will pull it in and the disc
should begin playing. If you want to insert a CD when
the ignition is
off, first press the eject button or the RCL
knob.
If you insert a CD with the radio off and the
ignition on,
it will start to play.
When the disc is inserted, the CD symbol will be
displayed.
If you select an EQ setting for your CD, it will
be activated each time you play a CD.
As each new track starts to play, the track number will
appear on the display.
If an error appears on the display, see “Compact Disc
Messages’’ later in this section.
1 REV (Reverse): Press and hold this pushbutton to
reverse quickly within a track. You will hear sound at a
reduced volume. Release it to play the passage. The
display will show elapsed time.
2 Fwn {Fw!!!!zrt!): Press 2nd hn!d fhk pnchh!ttC)r? t!
advance quickly within a track. You will hear sound at a
reduced volume. Release it to play the passage. The
display will show elapsed time.
4 RDM (Random): Press this pushbutton to hear the
tracks in random, rather than sequential,
order.
RDM and the track number will appear on the display.
AUTO EQ (Automatic Equalizer): Press AUTO EQ to
select the desired equalization setting while playing
a compact disc. The equalization will be automatically
set whenever you play a compact disc. See “AUTO
EQ”
listed previously for more information.
< SEEK > : Press the left arrow to go to the start of
the current track
if more than eight seconds have
played. Press the right arrow to
go to the next track. If
you hold either button or press it more than once,
the player will continue moving backward or forward
through the disc.
< SCAN > : Press and hold either arrows for more
than two seconds until SCAN and the track number
appear on the display and you hear a beep. The disc will
go to the next track, play for
a few seconds, th-an go
on to the next track. Press either arrow again to
stop scanning.
RCL (Recall): Push this knob to see how long the
current track has been playing. To change the default
knob until you see the display you want, then hold the
knob until the display flashes. The selected display
will now be the default. While elapsed time is showing,
EL TM will appear on the display.
BAND: Press this buttm tG liste:: tG the radio when a
CD is playing. The inactive CD will remain safely
inside the radio for future listening.
n_ +Ln .J:-”.1-., {+“--I, ^I ^I,,,,A a:-- .-..-I- at-- VI I 11 IG ulaplay \LI acIn VI c1apr;u 111 I IG), pu31 I 11 IG
3-5 1
Page 157 of 354
CD: Press this button to play a CD when listening to
the radio. The CD symbol will appear on the display.
A (Eject): Press this button to eject a CD. Eject may
be activated with either the ignition or radio
off. CDs
may be loaded with the radio and ignition
off if this
button is pressed first.
Compact Disc Messages
CHECK CD: If this message appears on the radio
display and the disc comes out, it could be for one of
the following reasons:
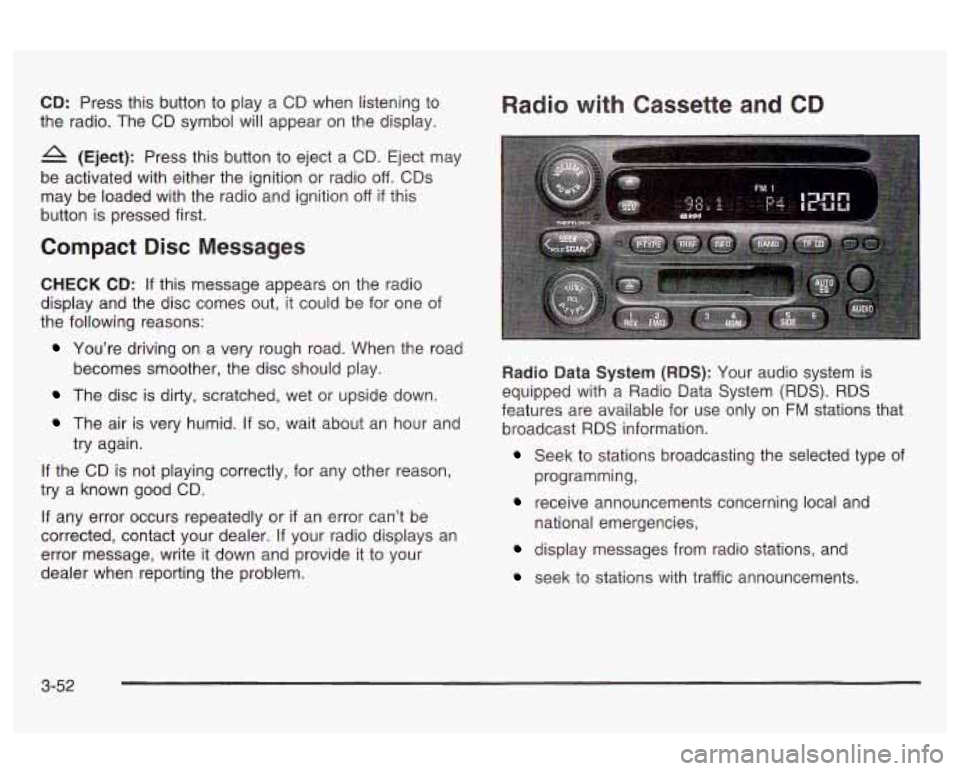
Radio with Cassette and CD
You’re driving on a very rough road. When the road
The disc is dirty, scratched, wet or upside down.
becomes
smoother, the disc should play.
The air is very humid. If so, wait about an hour and
try again.
If the CD is not playing correctly, for any other reason,
try a known good CD.
If any error occurs repeatedly or
if an error can’t be
corrected, contact your dealer.
If your radio displays an
error message, write it down and provide it to your
dealer when reporting the problem. Radio Data
System (RDS): Your audio system is
equipped with a Radio Data System
(RDS). RDS
features are available for use only on
FM stations that
broadcast
RDS information.
Seek to stations broadcasting the selected type of
receive announcements concerning local and
programming,
national emergencies,
display messages from radio stations, and
seek to stations with traffic announcements.
3-52
Page 159 of 354

RCL (Recall): Push this knob to switch the display
between the radio station frequency and the time.
Pushing this knob with the ignition off
Will display
the time.
For XMTM (USA only,
if your radio is equipped with
XMTM Satellite Radio Service), pressing this button while
in XMTM mode to retrieve various pieces of information
related to the current song or channel. By pressing
and releasing the RCL button, you may retrieve
four different categories of information: Artist,
Song Title, Category or PTY, Channel
NumberEhannel Name.
For DAB (Canada only,
if your radio is equipped with
DAB), pushing this knob switches the display between
channel name and PTY name.
To change the default on the display, push the knob
until you see the display you want, then hold the knob
until the display flashes. The selected display will
now be the default.
Finding a Station
BAND: Press this button to switch between AM, FM,
FM2, or XMI
, XM2 (USA only, if your radio is equipped
with XMTM Satellite Radio Service) or DABI, DAB2
(Canada only,
if your radio is equipped with DAB). The
display will show your selection.
TUNE: Turn this knob to select radio stations.
For DAB (Canada only,
if your radio is equipped with
DAB), the TUNE knob allows you to navigate the
DAB frequency range. Turning this knob will tune up or
tune down the range. The radio will display the letter
L with a number next to it (1 through 23). Each L number
refers to a frequency and there can be multiple
stations contained in one frequency. It may also take a
few seconds, once you have tuned to a frequency,
for that frequency
to gather all of the stations.
Depending on how many stations are within a frequency,
with every tune up or down, you may be tuning to
another station or to another frequency. The display will
show your selections.
< SEEK > : Press the right or the left arrow to go to
the next or to the previous station and stay there.
The radio will seek only to stations that are
in the
selected band and only to those with a strong signal.
3-54
Page 166 of 354
Playing a Cassette Tape
Your tape player is built to work best with tapes that are
up to
30 to 45 minutes long on each side. Tapes
longer than that are
so thin they may not work well in
this player. The longer side with the tape visible should
face to the right.
If the ignition is on, but the radio is
off, the tape can be inserted and will begin playing. If
you hear nothing but a garbled sound, the tape may not
be in squarely. Press the eject button, located next to
the cassette tape slot, to remove the tape and start over.
While the tape is playing, use the VOLUME, POWER,
AUDIO, AUTO EQ, and the SEEK controls just as
you do for the radio. The display will show TAPE and
an arrow showing which side of the tape is playing. The
tape player automatically begins playing the other
side when it reaches the end of the tape.
Your tape bias is set automatically when a metal or
chrome tape is inserted.
If you want to insert a
tape while the ignition
is off, first press the button with
the eject symbol on it or the RCL knob.
ii an error appears on tne rauio uispiay, the tape won’t
play because of an error. See “Cassette Tape
Messages” later in this section.
1 REV (Reverse): Press this pushbutton to reverse the
tape rapidly. Press it again to return to playing speed.
The radio will play while the tape reverses. You
may select stations during reverse operation by using
TUNE, SEEK and SCAN.
2 FWD (Forward): Press this pushbutton to advance
quickly to another part of the tape. Press this pushbutton
again to return to playing speed. The radio will play
while the tape advances. You may select stations during
reverse operation by using TUNE, SEEK and SCAN.
5 SIDE: Press this pushbutton to play the other side of
the tape.
AUTO EQ (Automatic Equalizer): Press AUTO EQ to
select the desired equalization setting while playing
a cassette tape. The equalization will be automatically
set whenever you play a cassette tape. See “AUTO EQ”
listed previously for more information.
< SEEK > : Your tape must have at least three
seconds
of silence between each selection for seek to
the next or the previous selection on the tape. You can
skip as many as nine selections up or down on the
tape. Choose how many selections you want to skip,
then press the right or left SEEK arrows that many
times. The number of selections to be skipped
wiii appear on the dispiay.
,l,Arl, rnee thm .-;-ht +h,, I.4t --I-... +- ---,-L. C-- mnwl I\. Prbad La aci I ryt II uI u IC 1Gl1 altuvv tu at;alu I IuI
3-61
Page 167 of 354

< SCAN > : Press and hold either arrow for more
than two seconds until you hear a beep and SCAN
appears on the display. The tape will go to the next
selection, play for a few seconds, then go on to the next
selection. Press this button again to stop scanning.
BAND: Press this button
to listen to the radio when a
cassette tape is playing. The tape will stop but remain in
the player.
TP
CD (TAPE): Press this button to play a cassette
tape or a CD when listening to the radio. Press TP CD
to switch between the tape and compact disc
if both
are loaded. The inactive tape or CD will remain safely
inside the radio for future listening. The display will
show the TAPE and CD symbols.
A (Eject): Press this button, located next to the
cassette tape slot, to eject
a tape. Eject may be
activated with either the ignition or radio
off. Cassettes
may be loaded with the radio and ignition
off if this
button is pressed first.
Cassette Tape Messages
If an error occurs while trying to play a cassette tape, it
could be for one of the following reasons:
TIGHT TAPE: When this message is displayed, the
tape is tight and the player can’t turn the tape hubs.
Remove the tape. Hold the tape with the open end down
and try to turn the right hub counterclockwise with a
pencil. Turn the tape over and repeat. If the hubs do not
turn easily, your tape may be damaged and should
not be used in the player. Try a new tape to make sure
your player is working properly.
BROKEN TAPE:
If this message is displayed, the tape
is broken. Try a new tape.
WRAPPED: When this message is displayed, the tape
is wrapped around the tape head. Attempt to get the
cassette out. Try a new tape.
CLEAN PLAYR (Clean Player): This message may
also appear on the radio display to indicate that
the cassette tape player needs to be cleaned. It will still
play tapes, but you should clean it as soon
as possible
to prevent damage to the tapes and player. For
additional information see
Care of Your Cassette Tape
Player on page
3-65.
If any error occurs repeatedly or if an error can’t be
corrected, contact your dealer.
If your radio displays an
error message, write it down and provide it to your
dealer when reporting the problem.
3-62
Page 168 of 354

Playing a Compact Disc
With the ignition on, insert a disc partway into the slot,
label side up. The player will pull it in and the disc
should begin playing. If you want to insert a CD when
the ignition is
off, first press the eject button or the
RCL knob.
When the disc is inserted, the CD symbol will be
displayed.
If you select an EQ setting for your CD, it will
be activated each time you play a CD.
As each new track starts to play, the track number will
appear on the display.
If an error appears on the display, see “Compact Disc
Messages” later in this section.
1 REV (Reverse): Press and hold this pushbutton to
reverse quickly within a track.
You will hear sound at a
reduced volume. Release it to play the passage. The
display will show elapsed time.
2 FWD (Forward): Press and hold this pushbutton to
advance quickly within a track. You will hear sound at a
reduced voiume. Helease
it to play the passage. The
display
will show elapsed time.
4 RDM (Random): Press this pushbutton to hear the
tracks in random, rather than sequential, order.
RDM and the track number will appear on the display.
Press this pushbution again io turn off ranciom mode. AUTO
EQ (Automatic
Equalizer): Press this button to
select the desired equalization setting while playing a
compact disc. The equalization will be automatically set
whenever you play a compact disc. See “AUTO
EQ”
listed previously for more information.
< SEEK > : Press the left arrow to go to the start of
the current track
if more than eight seconds have
played. Press the right arrow to go to the next track.
If
you hold this button or press it more than once, the
player will continue moving backward or forward through
the disc.
< SCAN > : Press and hold either arrow for more
than two seconds until you hear a beep and SCAN
appears on the display. The disc will go to the next
track, play for a few seconds, then go on to the
next track. SCAN and the track number will appear on
the display. Press this button again to stop scanning.
RCL (Recall): Press this knob to see how long the
current track has been playing.
To change the default
on the display (track
or elapsed time), push the
knob until you see the display you want, then hold the
knob until the display flashes. The selected display
will now be the default. While elapsed time is showing,
EL TM will appear on the display.
BAND: Press this button to listen to the radio when a
CD is piaying.
3-63
Page 169 of 354
TP CD (Tape): Press this button to play a cassette
tape or a CD when listening to the radio. Press TP CD
to switch between the tape and compact disc
if both
are loaded. The inactive tape or CD will remain safely
inside the radio for future listening. The display will
show the
TAPE and CD symbols.
4 (Eject): Press this button to eject a CD. Eject may
be activated with either the ignition or radio
off. CDs
may be loaded with the radio and ignition
off if this
button is pressed first.
Compact Disc Messages
CHECK CD: If this message appears on the radio
display and the disc comes out,
it could be one of the
following reasons:
You’re driving on a very rough road. When the road
The disc is dirty, scratched, wet or upside down.
0 The air is very humid. If so, wait about an hour and
becomes
smoother, the disc should play.
try again.
If the CD is not playing correctly, for any other reason,
try a known good CD.
If any error occurs repeatedly or
if an error can’t be
corrected, contact your dealer.
If your radio displays an
error message, write it down and provide it to your
dealer when reporting the problem.
Theft-Deterrent Feature
(Non-RDS Radios)
THEFTLOCK@ is designed to discourage theft of your
radio. The feature works automatically by learning
a portion of the Vehicle Identification Number (VIN).
If
the radio is moved to a different vehicle, it will not
operate and LOC will be displayed.
With THEFTLOCK@ activated, your radio will not operate
if stolen.
Theft-Deterrent Feature
(RDS Radios)
THEFTLOCK@ is designed to discourage theft of your
radio. The feature works automatically by learning
a portion of the Vehicle Identification Number (VIN).
It
the radio is moved to a different vehicle, it will not
operate and LOCKED will be displayed.
When the radio and vehicle are turned off, the blinking
red light indicates that THEFTLOCK@ is armed.
With THEFTLOCK@ activated, your radio will not operate
if stolen.
3-64
Page 171 of 354
The cut tape detection feature of your cassette tape
player may identify the cleaning cassette as a damaged
tape, in error. To prevent the cleaning cassette from
being ejected, use the following steps.
1. Turn the ignition on.
2. Turn the radio off.
3. Press and hold the TP CD button for five seconds.
4. Insert the scrubbing action cleaning cassette.
5. Eject the cleaning cassette after the manufacturer’s
recommended cleaning time.
You may also choose a non-scrubbing action, wet-type
cleaner which uses a cassette with a fabric belt to
clean the tape head. This type
of cleaning cassette will
not eject on its own. A non-scrubbing action cleaner
may not clean as thoroughly as the scrubbing type
cleaner. The use of a non-scrubbing action, dry-type
cleaning cassette is not recommended.
After you clean the player, press and hold the eject
button for five seconds to reset the CLEAN PLAYR
indicator. The radio will display CLEANED to show the
indicator was reset.
Cassettes are subject to wear and the sound quality
may degrade over time. Always make sure the cassette
tape is in good condition before you have your tape
player serviced.
Care of Your CDs
Handle discs carefully. Store them in their original cases
or other protective cases and away from direct sunlight
and dust.
If the surface of a disc is soiled, dampen
a clean, soft cloth in a mild, neutral detergent solution
and clean
it, wiping from the center to the edge.
Be sure never to touch the side without writing when
handling discs. Pick up discs by grasping the outer
edges or the edge of the hole and the outer edge.
Care of Your CD Player
The use of CD lens cleaner discs is not advised, due to
the risk of contaminating the lens of the CD optics
with lubricants internal to the CD mechanism.
Backglass Antenna
Your AM-FM antenna is integrated with your rear
window defogger, located in the rear window. Be sure
that the inside surface of the rear window is not
scratched and that the lines on the glass are not
damaged.
If the inside surface is damaged, it could
interfere with radio reception.
3-66