Page 3306 of 4179

EI-8
SQUEAK AND RATTLE TROUBLE DIAGNOSES
TRUNK
Trunk noises are often caused by a loose jack or loose items put into the trunk by the owner.
In addition look for:
1. Trunk lid dumpers out of adjustment
2. Trunk lid striker out of adjustment
3. Trunk lid torsion bars knocking together
4. A loose license plate or bracket
Most of these incidents can be repaired by adjusting, securing or insulating the item(s) or component(s) caus-
ing the noise.
SUNROOF/HEADLINING
Noises in the sunroof/headlining area can often be traced to one of the following:
1. Sunroof lid, rail, linkage or seals making a rattle or light knocking noise
2. Sunvisor shaft shaking in the holder
3. Front or rear windshield touching headlining and squeaking
Again, pressing on the components to stop the noise while duplicating the conditions can isolate most of these
incidents. Repairs usually consist of insulating with felt cloth tape.
SEATS
When isolating seat noise it's important to note the position the seat is in and the load placed on the seat when
the noise is present. These conditions should be duplicated when verifying and isolating the cause of the
noise.
Cause of seat noise include:
1. Headrest rods and holder
2. A squeak between the seat pad cushion and frame
3. Rear seat back lock and bracket
These noises can be isolated by moving or pressing on the suspected components while duplicating the con-
ditions under which the noise occurs. Most of these incidents can be repaired by repositioning the component
or applying urethane tape to the contact area.
UNDERHOOD
Some interior noise may be caused by components under the hood or on the engine wall. The noise is then
transmitted into the passenger compartment.
Causes of transmitted underhood noise include:
1. Any component mounted to the engine wall
2. Components that pass through the engine wall
3. Engine wall mounts and connectors
4. Loose radiator mounting pins
5. Hood bumpers out of adjustment
6. Hood striker out of adjustment
These noise can be difficult to isolate since they cannot be reached from the interior of the vehicle. The best
method is to secure, move or insulate one component at a time and test drive the vehicle. Also, engine RPM
or load can be changed to isolate the noise. Repairs can usually be made by moving, adjusting securing, or
insulating the component causing the noise.
Page 3325 of 4179
ROOF RAIL
EI-27
C
D
E
F
G
H
J
K
L
MA
B
EI
ROOF RAILPFP:73820
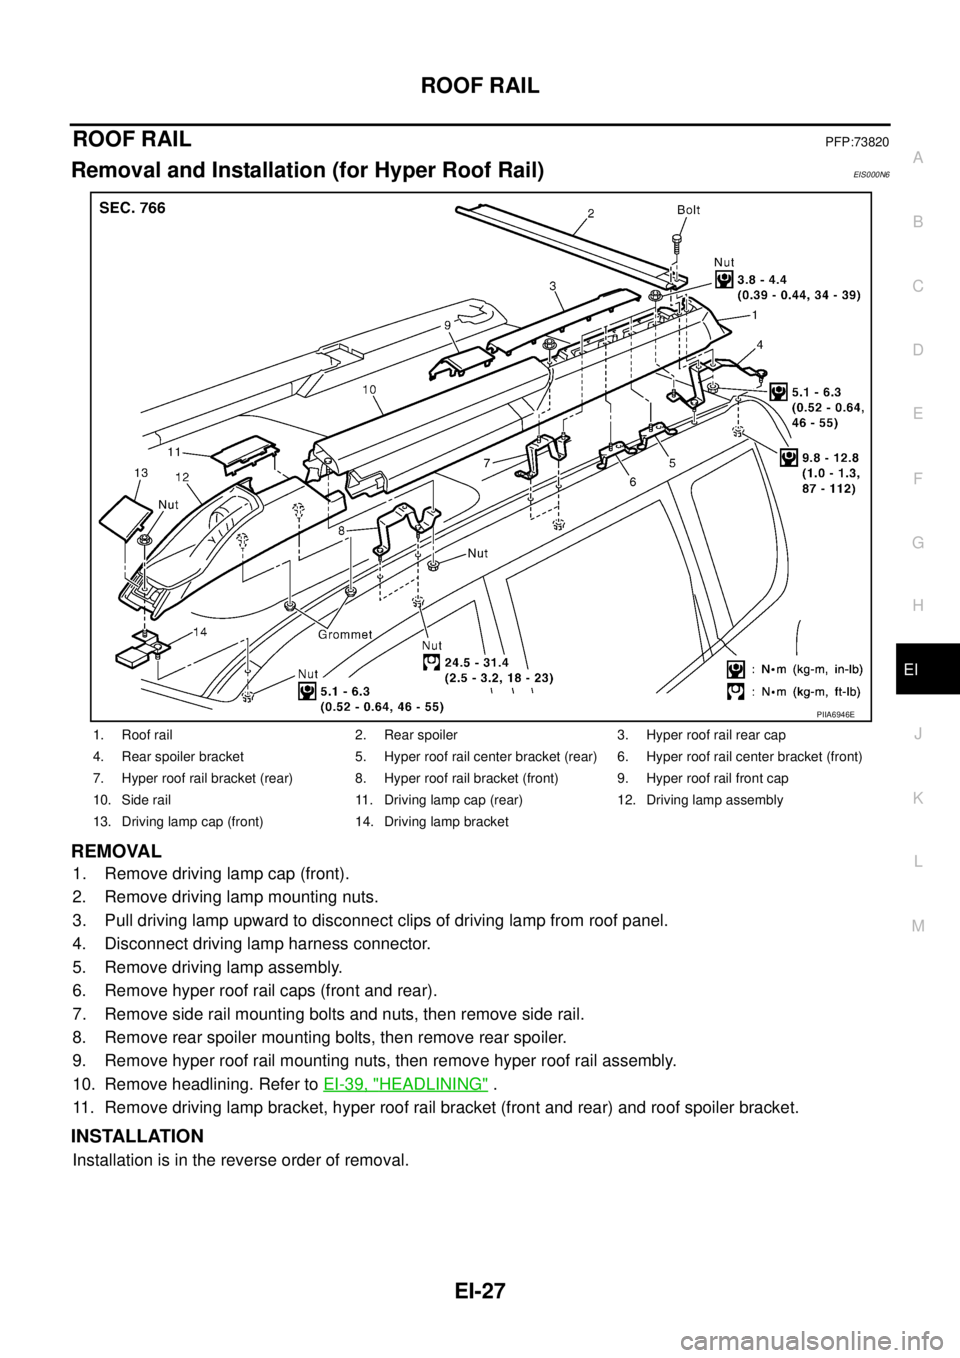
Removal and Installation (for Hyper Roof Rail)EIS000N6
REMOVAL
1. Remove driving lamp cap (front).
2. Remove driving lamp mounting nuts.
3. Pull driving lamp upward to disconnect clips of driving lamp from roof panel.
4. Disconnect driving lamp harness connector.
5. Remove driving lamp assembly.
6. Remove hyper roof rail caps (front and rear).
7. Remove side rail mounting bolts and nuts, then remove side rail.
8. Remove rear spoiler mounting bolts, then remove rear spoiler.
9. Remove hyper roof rail mounting nuts, then remove hyper roof rail assembly.
10. Remove headlining. Refer to EI-39, "
HEADLINING" .
11. Remove driving lamp bracket, hyper roof rail bracket (front and rear) and roof spoiler bracket.
INSTALLATION
Installation is in the reverse order of removal.
1. Roof rail 2. Rear spoiler 3. Hyper roof rail rear cap
4. Rear spoiler bracket 5. Hyper roof rail center bracket (rear) 6. Hyper roof rail center bracket (front)
7. Hyper roof rail bracket (rear) 8. Hyper roof rail bracket (front) 9. Hyper roof rail front cap
10. Side rail 11. Driving lamp cap (rear) 12. Driving lamp assembly
13. Driving lamp cap (front) 14. Driving lamp bracket
PIIA6946E
Page 3326 of 4179
EI-28
ROOF RAIL
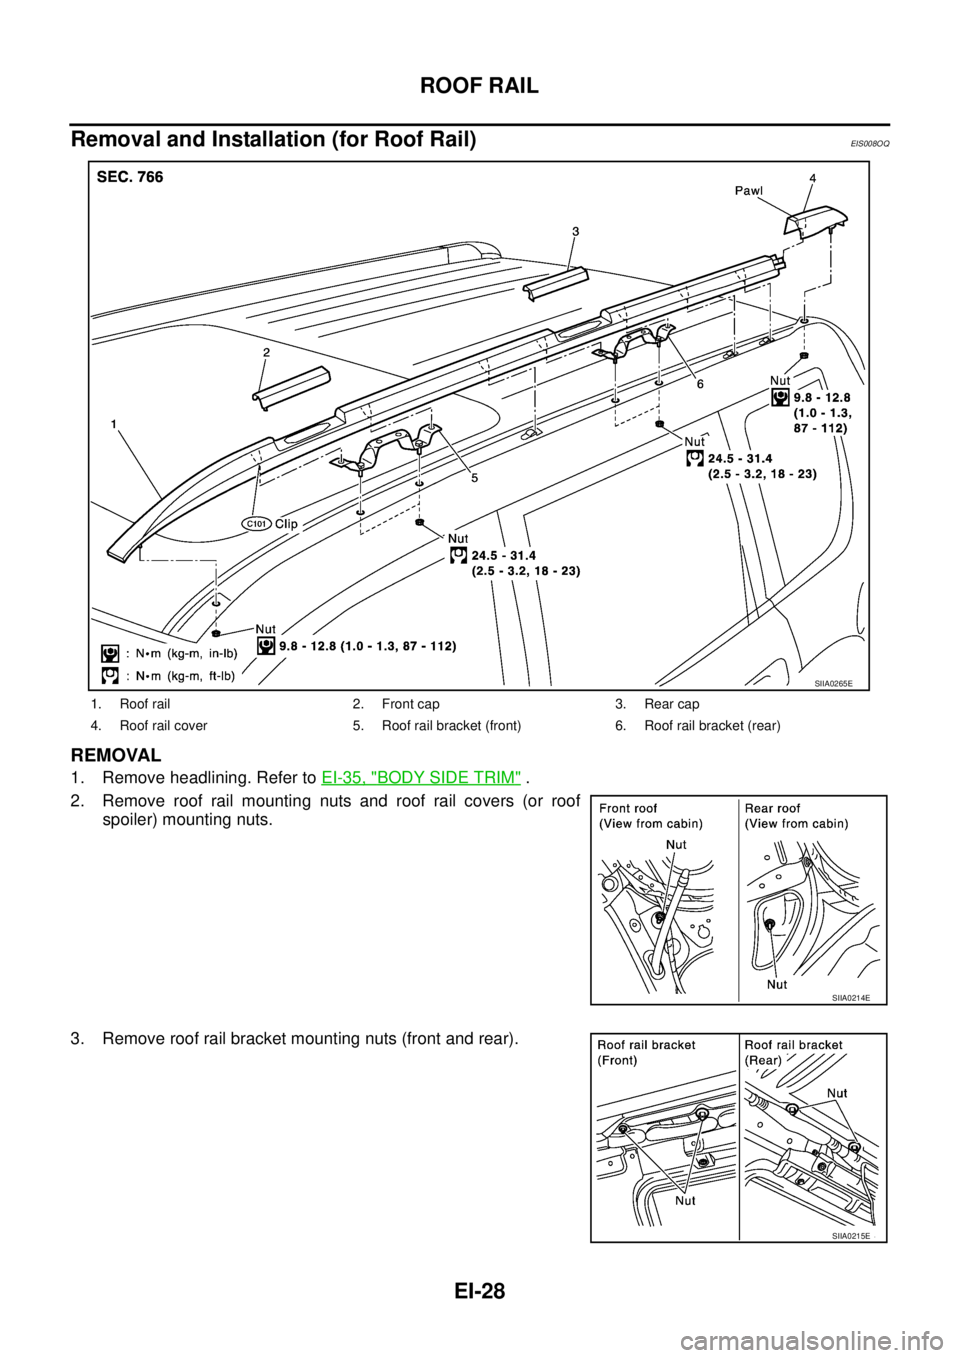
Removal and Installation (for Roof Rail)EIS008OQ
REMOVAL
1. Remove headlining. Refer to EI-35, "BODY SIDE TRIM" .
2. Remove roof rail mounting nuts and roof rail covers (or roof
spoiler) mounting nuts.
3. Remove roof rail bracket mounting nuts (front and rear).
1. Roof rail 2. Front cap 3. Rear cap
4. Roof rail cover 5. Roof rail bracket (front) 6. Roof rail bracket (rear)
SIIA0265E
SIIA0214E
SIIA0215E
Page 3327 of 4179
ROOF RAIL
EI-29
C
D
E
F
G
H
J
K
L
MA
B
EI
4. Remove roof rail covers (or roof spoiler). For removal of roof spoiler,refer to EI-30, "ROOF SPOILER" .
5. Remove roof rail mounting clips, and remove roof rails.
INSTALLATION
Installation is in the reverse order of removal.
Page 3328 of 4179
EI-30
ROOF SPOILER
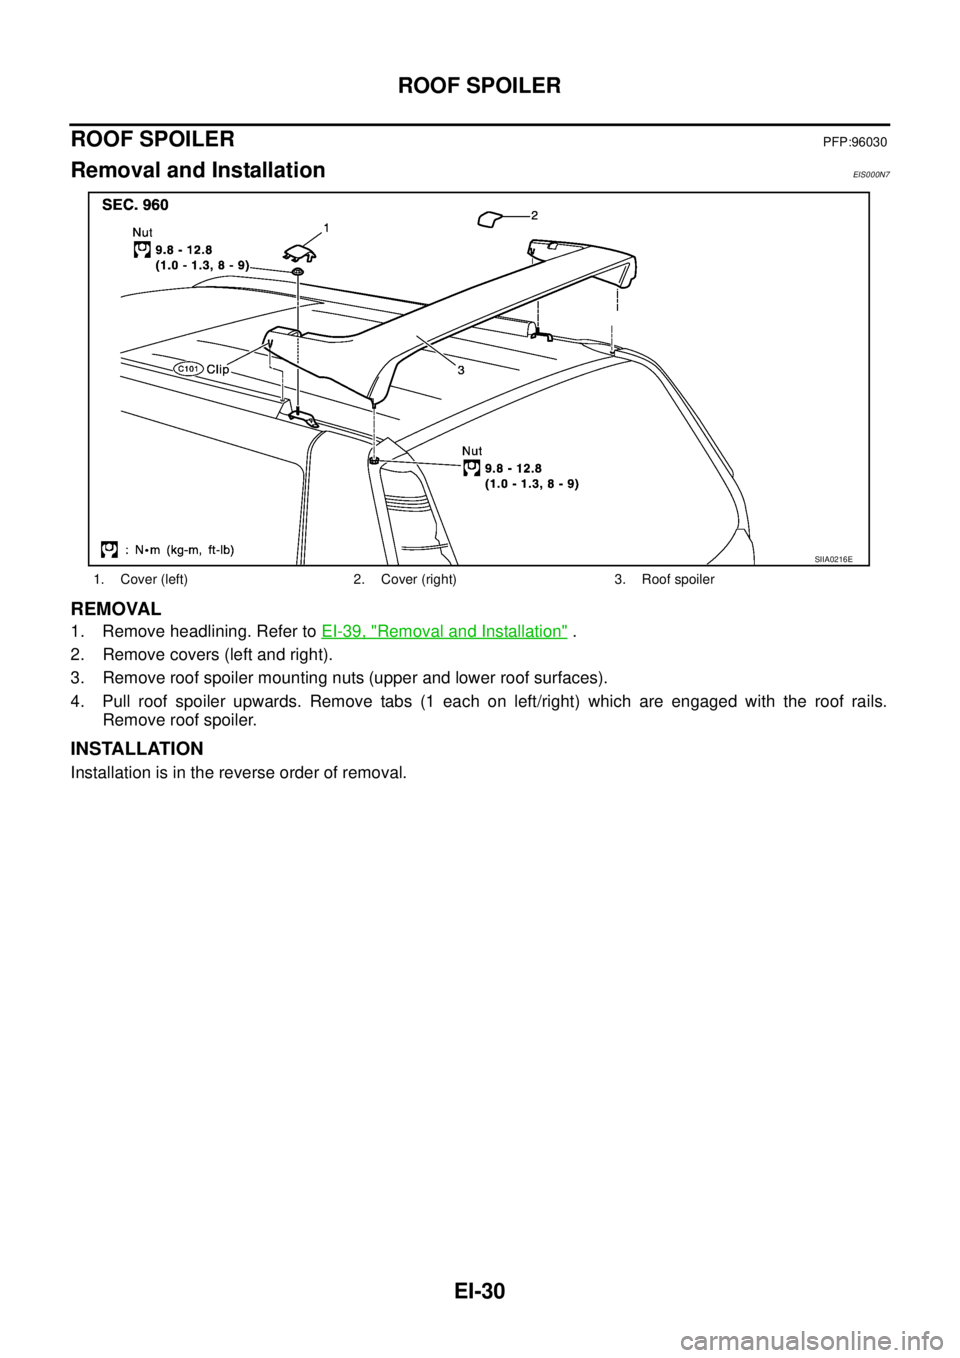
ROOF SPOILERPFP:96030
Removal and InstallationEIS000N7
REMOVAL
1. Remove headlining. Refer to EI-39, "Removal and Installation" .
2. Remove covers (left and right).
3. Remove roof spoiler mounting nuts (upper and lower roof surfaces).
4. Pull roof spoiler upwards. Remove tabs (1 each on left/right) which are engaged with the roof rails.
Remove roof spoiler.
INSTALLATION
Installation is in the reverse order of removal.
1. Cover (left) 2. Cover (right) 3. Roof spoiler
SIIA0216E
Page 3337 of 4179
HEADLINING
EI-39
C
D
E
F
G
H
J
K
L
MA
B
EI
HEADLININGPFP:73910
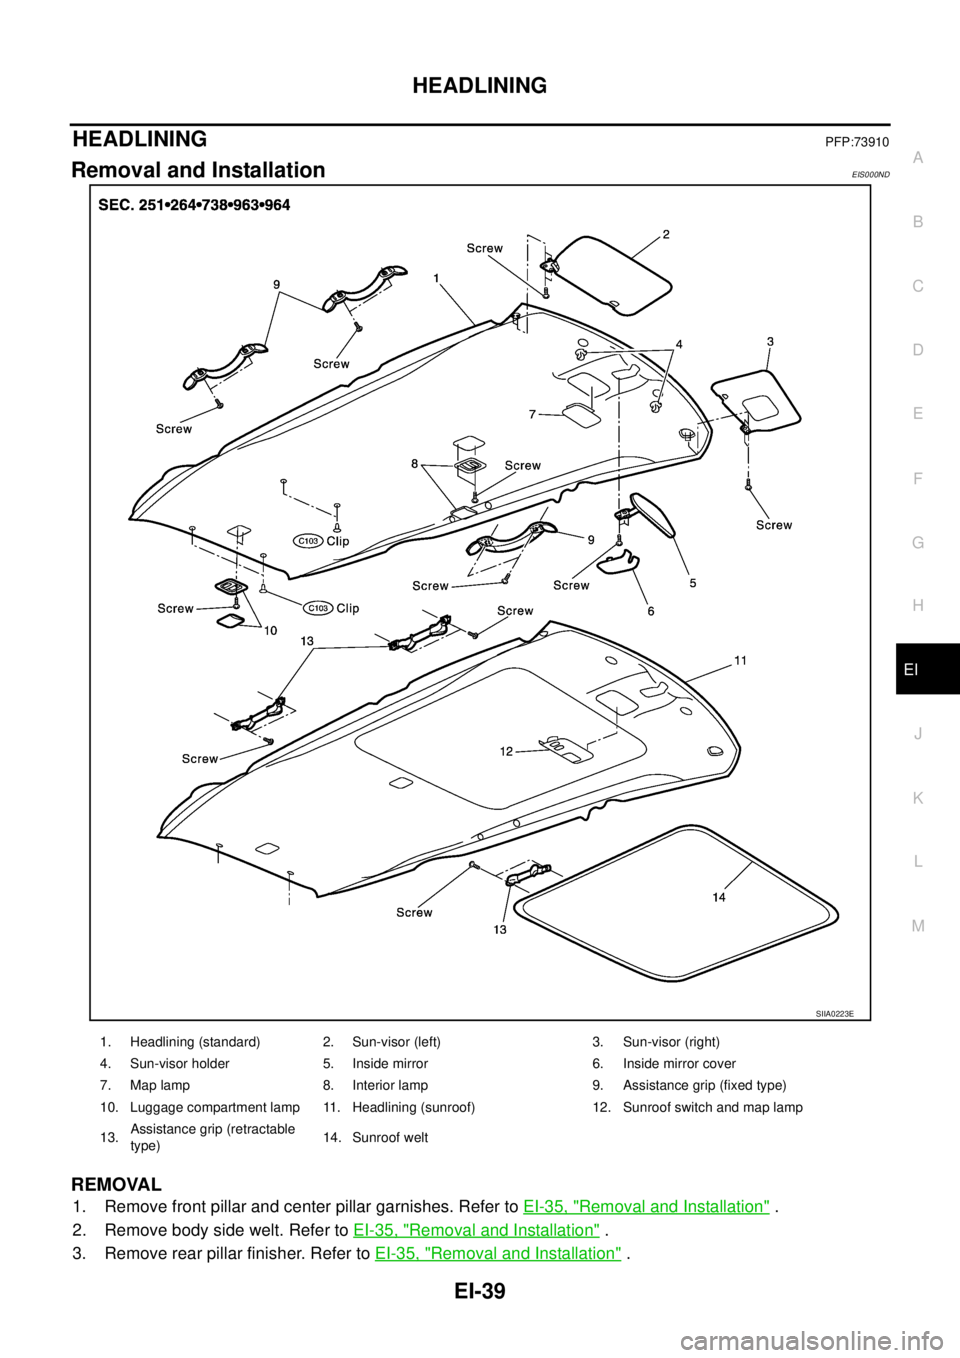
Removal and InstallationEIS000ND
REMOVAL
1. Remove front pillar and center pillar garnishes. Refer to EI-35, "Removal and Installation" .
2. Remove body side welt. Refer to EI-35, "
Removal and Installation" .
3. Remove rear pillar finisher. Refer to EI-35, "
Removal and Installation" .
SIIA0223E
1. Headlining (standard) 2. Sun-visor (left) 3. Sun-visor (right)
4. Sun-visor holder 5. Inside mirror 6. Inside mirror cover
7. Map lamp 8. Interior lamp 9. Assistance grip (fixed type)
10. Luggage compartment lamp 11. Headlining (sunroof) 12. Sunroof switch and map lamp
13.Assistance grip (retractable
type)14. Sunroof welt
Page 3338 of 4179
EI-40
HEADLINING
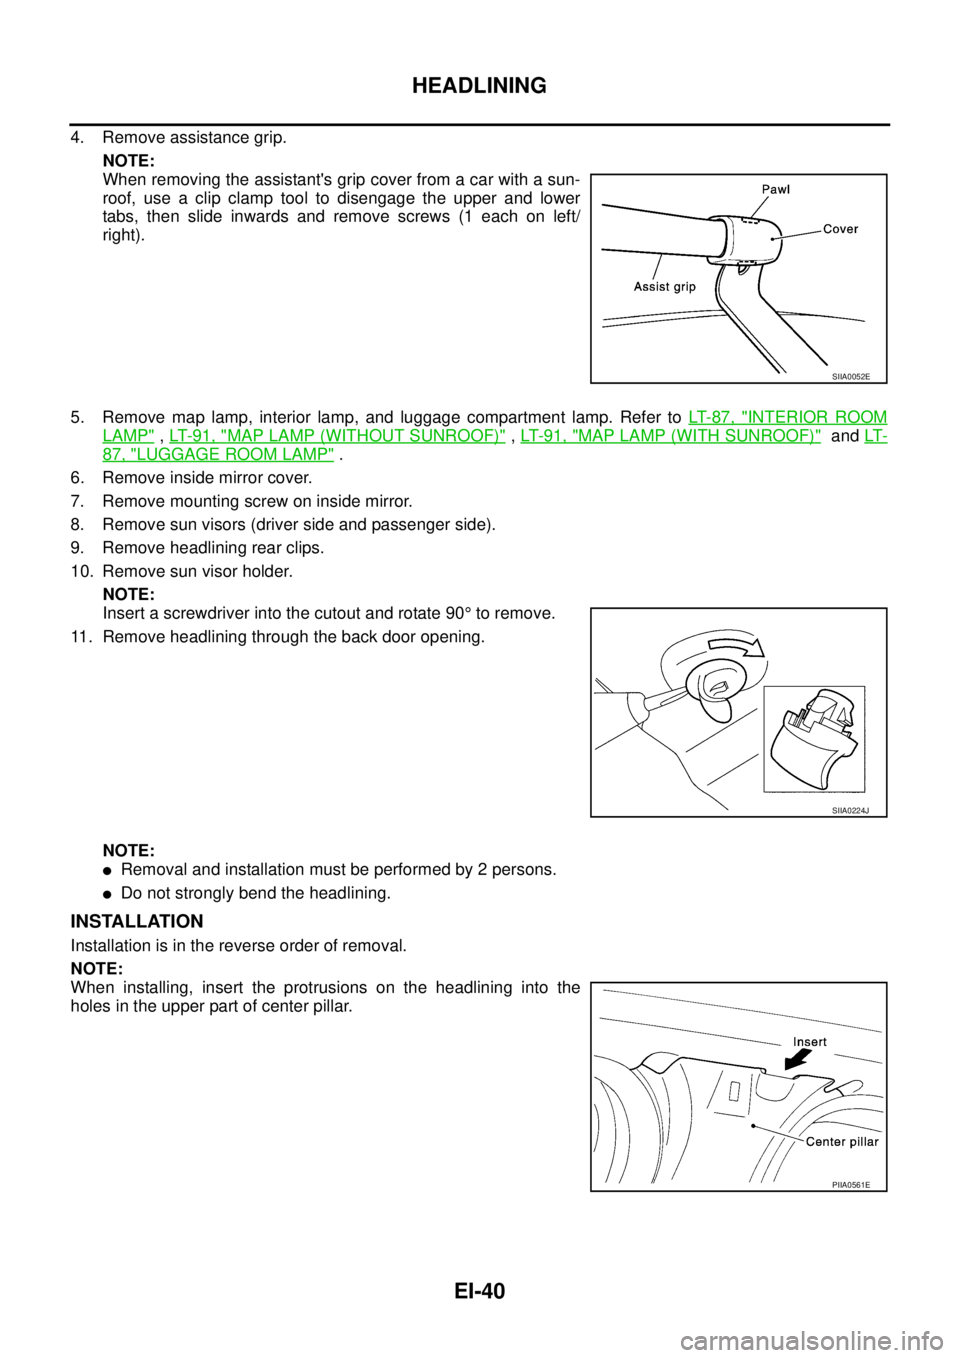
4. Remove assistance grip.
NOTE:
When removing the assistant's grip cover from a car with a sun-
roof, use a clip clamp tool to disengage the upper and lower
tabs, then slide inwards and remove screws (1 each on left/
right).
5. Remove map lamp, interior lamp, and luggage compartment lamp. Refer to LT- 8 7 , "
INTERIOR ROOM
LAMP" , LT- 9 1 , "MAP LAMP (WITHOUT SUNROOF)" , LT- 9 1 , "MAP LAMP (WITH SUNROOF)" and LT-
87, "LUGGAGE ROOM LAMP" .
6. Remove inside mirror cover.
7. Remove mounting screw on inside mirror.
8. Remove sun visors (driver side and passenger side).
9. Remove headlining rear clips.
10. Remove sun visor holder.
NOTE:
Insert a screwdriver into the cutout and rotate 90° to remove.
11. Remove headlining through the back door opening.
NOTE:
�Removal and installation must be performed by 2 persons.
�Do not strongly bend the headlining.
INSTALLATION
Installation is in the reverse order of removal.
NOTE:
When installing, insert the protrusions on the headlining into the
holes in the upper part of center pillar.
SIIA0052E
SIIA0224J
PIIA0561E
Page 3339 of 4179

IP-1
INSTRUMENT PANEL
I BODY
CONTENTS
C
D
E
F
G
H
J
K
L
M
SECTION
A
B
IP
INSTRUMENT PANEL
PRECAUTIONS .......................................................... 2
Precautions for Supplemental Restraint System
(SRS) “AIR BAG” and “SEAT BELT PRE-TEN-
SIONER” .................................................................. 2
Precautions .............................................................. 2
PREPARATION ........................................................... 3
Commercial Service Tools ........................................ 3
SQUEAK AND RATTLE TROUBLE DIAGNOSES ..... 4
Work Flow ................................................................ 4
CUSTOMER INTERVIEW ..................................... 4
DUPLICATE THE NOISE AND TEST DRIVE ....... 5
CHECK RELATED SERVICE BULLETINS ........... 5
LOCATE THE NOISE AND IDENTIFY THE
ROOT CAUSE ...................................................... 5
REPAIR THE CAUSE ........................................... 5
CONFIRM THE REPAIR ....................................... 6
Generic Squeak and Rattle Troubleshooting ........... 6INSTRUMENT PANEL .......................................... 6
CENTER CONSOLE ............................................. 6
DOORS ................................................................. 6
TRUNK .................................................................. 7
SUNROOF/HEADLINING ..................................... 7
SEATS ................................................................... 7
UNDERHOOD ....................................................... 7
Diagnostic Worksheet ............................................... 8
INSTRUMENT PANEL ASSEMBLY ......................... 10
Component Parts Location ..................................... 10
Removal and Installation ........................................ 11
WORK ITEM TABLE ............................................ 11
REMOVAL ........................................................... 12
INSTALLATION ................................................... 18
Disassembly and Assembly .................................... 19
CENTER CONSOLE ........................................... 19
INSTRUMENT CENTER LOWER PANEL .......... 21