Page 259 of 4179
CYLINDER HEAD
EM-207
[YD22DDTi]
C
D
E
F
G
H
I
J
K
L
MA
EM
6. Using compound, perform valve fitting.
7. Check again to make sure that contacting status is satisfactory.
For details, Refer to EM-205, "
Valve Seat Contact" .
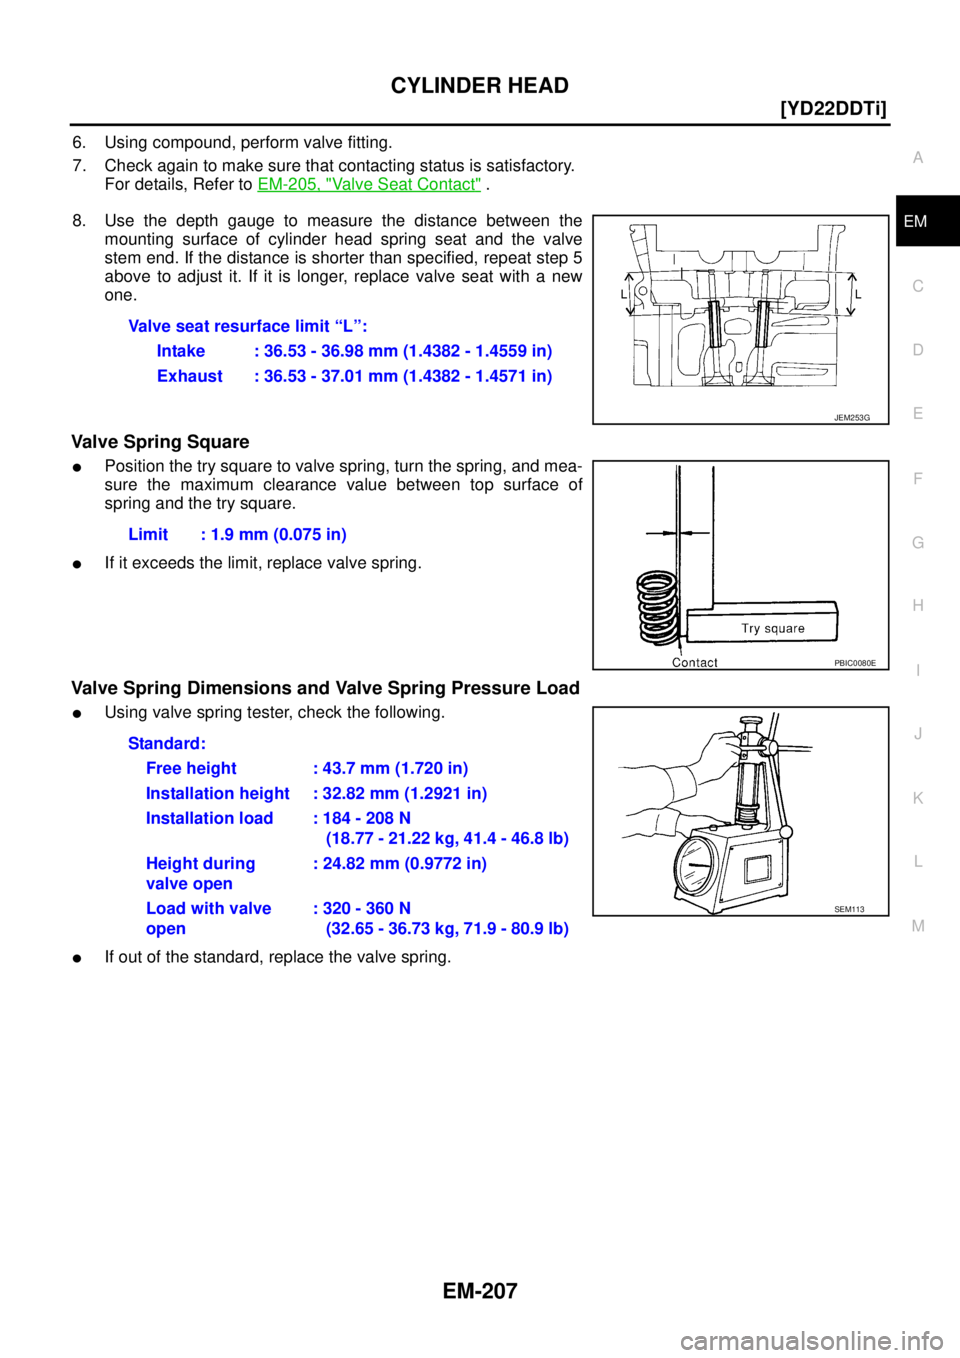
8. Use the depth gauge to measure the distance between the
mounting surface of cylinder head spring seat and the valve
stem end. If the distance is shorter than specified, repeat step 5
above to adjust it. If it is longer, replace valve seat with a new
one.
Valve Spring Square
�Position the try square to valve spring, turn the spring, and mea-
sure the maximum clearance value between top surface of
spring and the try square.
�If it exceeds the limit, replace valve spring.
Valve Spring Dimensions and Valve Spring Pressure Load
�Using valve spring tester, check the following.
�If out of the standard, replace the valve spring.Valve seat resurface limit “L”:
Intake : 36.53 - 36.98 mm (1.4382 - 1.4559 in)
Exhaust : 36.53 - 37.01 mm (1.4382 - 1.4571 in)
JEM253G
Limit : 1.9 mm (0.075 in)
PBIC0080E
Standard:
Free height : 43.7 mm (1.720 in)
Installation height : 32.82 mm (1.2921 in)
Installation load : 184 - 208 N
(18.77 - 21.22 kg, 41.4 - 46.8 lb)
Height during
valve open: 24.82 mm (0.9772 in)
Load with valve
open: 320 - 360 N
(32.65 - 36.73 kg, 71.9 - 80.9 lb)
SEM113
Page 285 of 4179
CYLINDER BLOCK
EM-233
[YD22DDTi]
C
D
E
F
G
H
I
J
K
L
MA
EM
MAIN BEARING OIL CLEARANCE
Method by Measurement
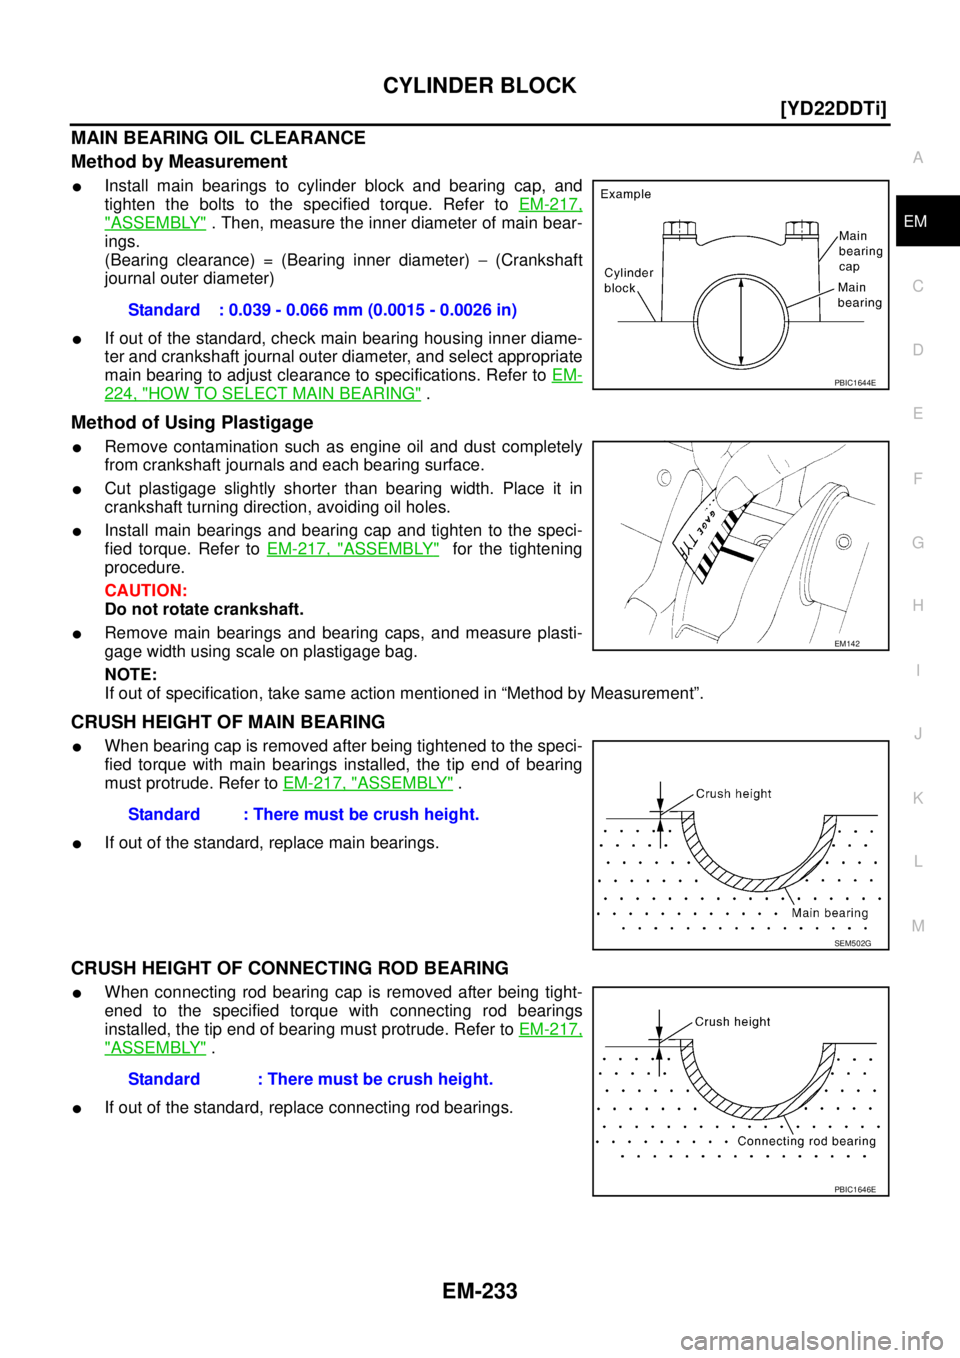
�Install main bearings to cylinder block and bearing cap, and
tighten the bolts to the specified torque. Refer to EM-217,
"ASSEMBLY" . Then, measure the inner diameter of main bear-
ings.
(Bearing clearance) = (Bearing inner diameter) − (Crankshaft
journal outer diameter)
�If out of the standard, check main bearing housing inner diame-
ter and crankshaft journal outer diameter, and select appropriate
main bearing to adjust clearance to specifications. Refer to EM-
224, "HOW TO SELECT MAIN BEARING" .
Method of Using Plastigage
�Remove contamination such as engine oil and dust completely
from crankshaft journals and each bearing surface.
�Cut plastigage slightly shorter than bearing width. Place it in
crankshaft turning direction, avoiding oil holes.
�Install main bearings and bearing cap and tighten to the speci-
fied torque. Refer to EM-217, "
ASSEMBLY" for the tightening
procedure.
CAUTION:
Do not rotate crankshaft.
�Remove main bearings and bearing caps, and measure plasti-
gage width using scale on plastigage bag.
NOTE:
If out of specification, take same action mentioned in “Method by Measurement”.
CRUSH HEIGHT OF MAIN BEARING
�When bearing cap is removed after being tightened to the speci-
fied torque with main bearings installed, the tip end of bearing
must protrude. Refer to EM-217, "
ASSEMBLY" .
�If out of the standard, replace main bearings.
CRUSH HEIGHT OF CONNECTING ROD BEARING
�When connecting rod bearing cap is removed after being tight-
ened to the specified torque with connecting rod bearings
installed, the tip end of bearing must protrude. Refer to EM-217,
"ASSEMBLY" .
�If out of the standard, replace connecting rod bearings.Standard : 0.039 - 0.066 mm (0.0015 - 0.0026 in)
PBIC1644E
EM142
Standard : There must be crush height.
SEM502G
Standard : There must be crush height.
PBIC1646E
Page 291 of 4179
SERVICE DATA AND SPECIFICATIONS (SDS)
EM-239
[YD22DDTi]
C
D
E
F
G
H
I
J
K
L
MA
EM
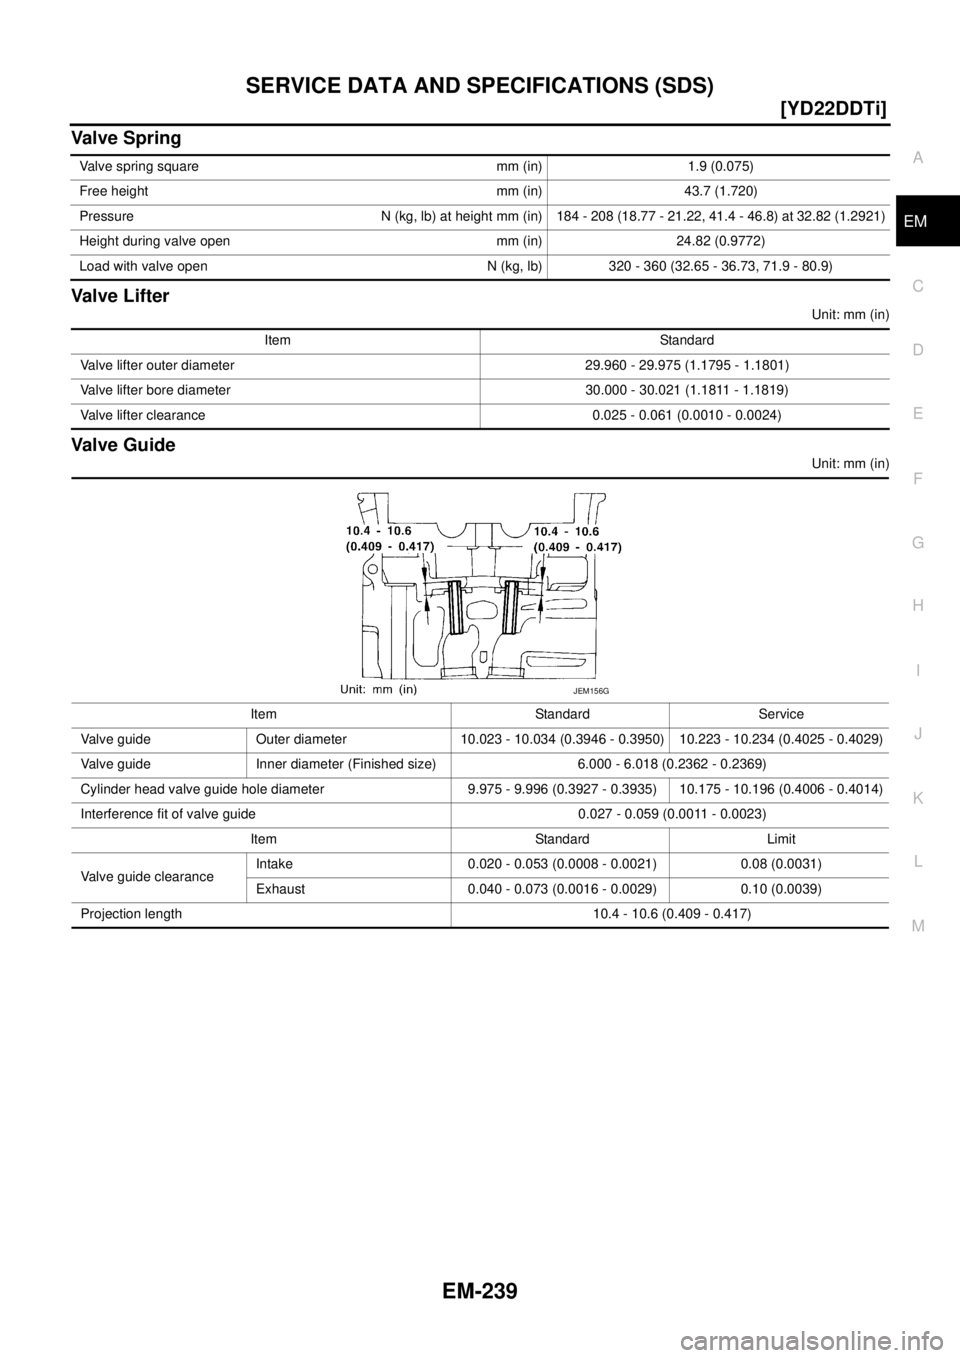
Valve Spring
Valve Lifter
Unit: mm (in)
Valve Guide
Unit: mm (in) Valve spring square mm (in) 1.9 (0.075)
Free height mm (in) 43.7 (1.720)
Pressure N (kg, lb) at height mm (in) 184 - 208 (18.77 - 21.22, 41.4 - 46.8) at 32.82 (1.2921)
Height during valve open mm (in) 24.82 (0.9772)
Load with valve open N (kg, lb) 320 - 360 (32.65 - 36.73, 71.9 - 80.9)
Item Standard
Valve lifter outer diameter 29.960 - 29.975 (1.1795 - 1.1801)
Valve lifter bore diameter 30.000 - 30.021 (1.1811 - 1.1819)
Valve lifter clearance 0.025 - 0.061 (0.0010 - 0.0024)
Item Standard Service
Valve guide Outer diameter 10.023 - 10.034 (0.3946 - 0.3950) 10.223 - 10.234 (0.4025 - 0.4029)
Valve guide Inner diameter (Finished size) 6.000 - 6.018 (0.2362 - 0.2369)
Cylinder head valve guide hole diameter 9.975 - 9.996 (0.3927 - 0.3935) 10.175 - 10.196 (0.4006 - 0.4014)
Interference fit of valve guide 0.027 - 0.059 (0.0011 - 0.0023)
Item Standard Limit
Valve guide clearanceIntake 0.020 - 0.053 (0.0008 - 0.0021) 0.08 (0.0031)
Exhaust 0.040 - 0.073 (0.0016 - 0.0029) 0.10 (0.0039)
Projection length 10.4 - 10.6 (0.409 - 0.417)
JEM156G
Page 292 of 4179
EM-240
[YD22DDTi]
SERVICE DATA AND SPECIFICATIONS (SDS)
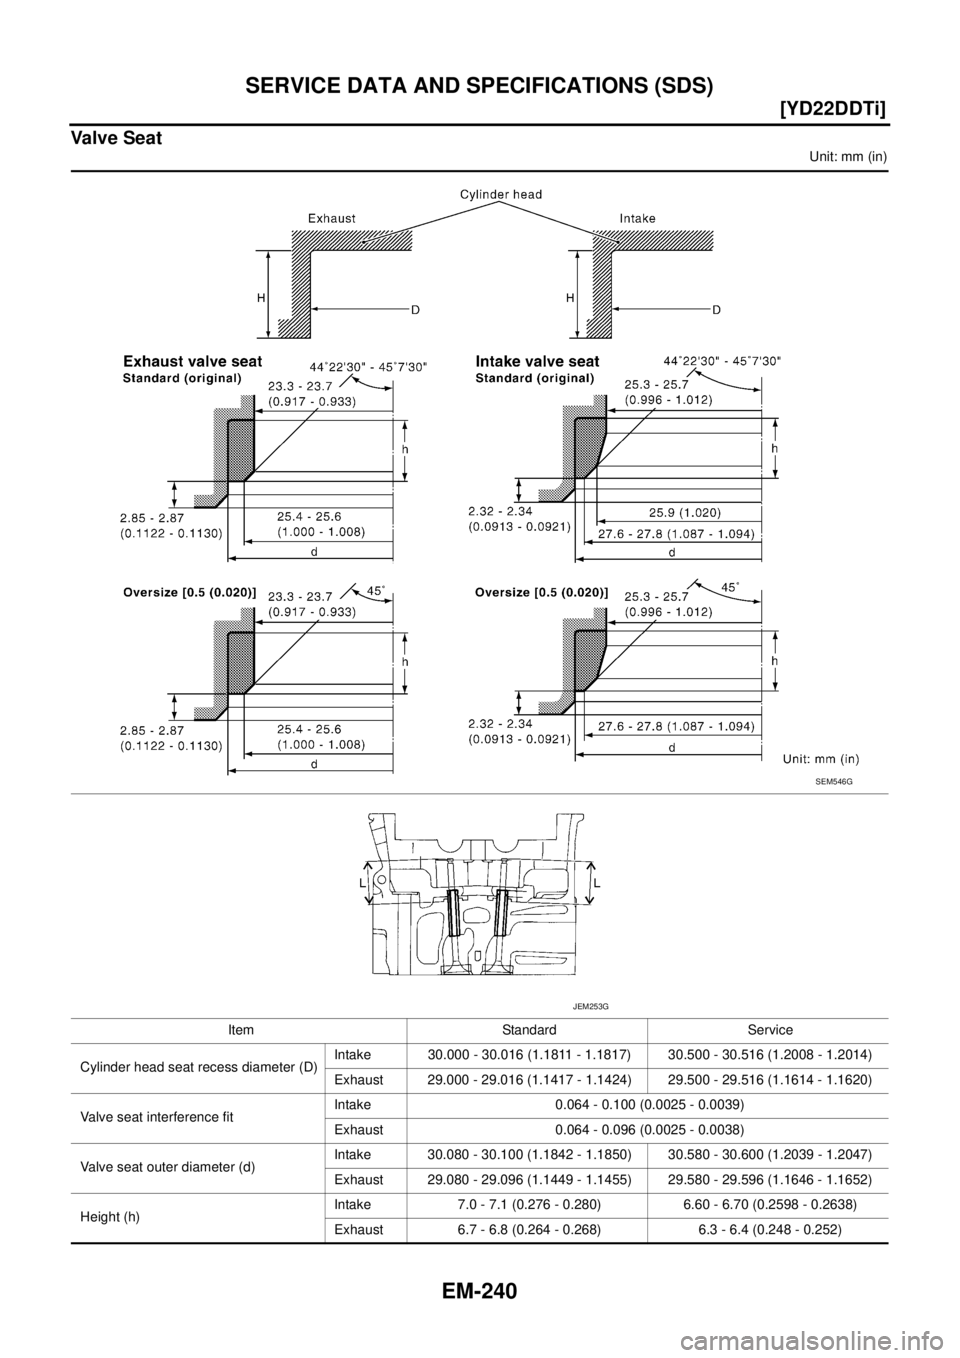
Valve Seat
Unit: mm (in)
Item Standard Service
Cylinder head seat recess diameter (D)Intake 30.000 - 30.016 (1.1811 - 1.1817) 30.500 - 30.516 (1.2008 - 1.2014)
Exhaust 29.000 - 29.016 (1.1417 - 1.1424) 29.500 - 29.516 (1.1614 - 1.1620)
Valve seat interference fitIntake 0.064 - 0.100 (0.0025 - 0.0039)
Exhaust 0.064 - 0.096 (0.0025 - 0.0038)
Valve seat outer diameter (d)Intake 30.080 - 30.100 (1.1842 - 1.1850) 30.580 - 30.600 (1.2039 - 1.2047)
Exhaust 29.080 - 29.096 (1.1449 - 1.1455) 29.580 - 29.596 (1.1646 - 1.1652)
Height (h)Intake 7.0 - 7.1 (0.276 - 0.280) 6.60 - 6.70 (0.2598 - 0.2638)
Exhaust 6.7 - 6.8 (0.264 - 0.268) 6.3 - 6.4 (0.248 - 0.252)
SEM546G
JEM253G
Page 293 of 4179
SERVICE DATA AND SPECIFICATIONS (SDS)
EM-241
[YD22DDTi]
C
D
E
F
G
H
I
J
K
L
MA
EM
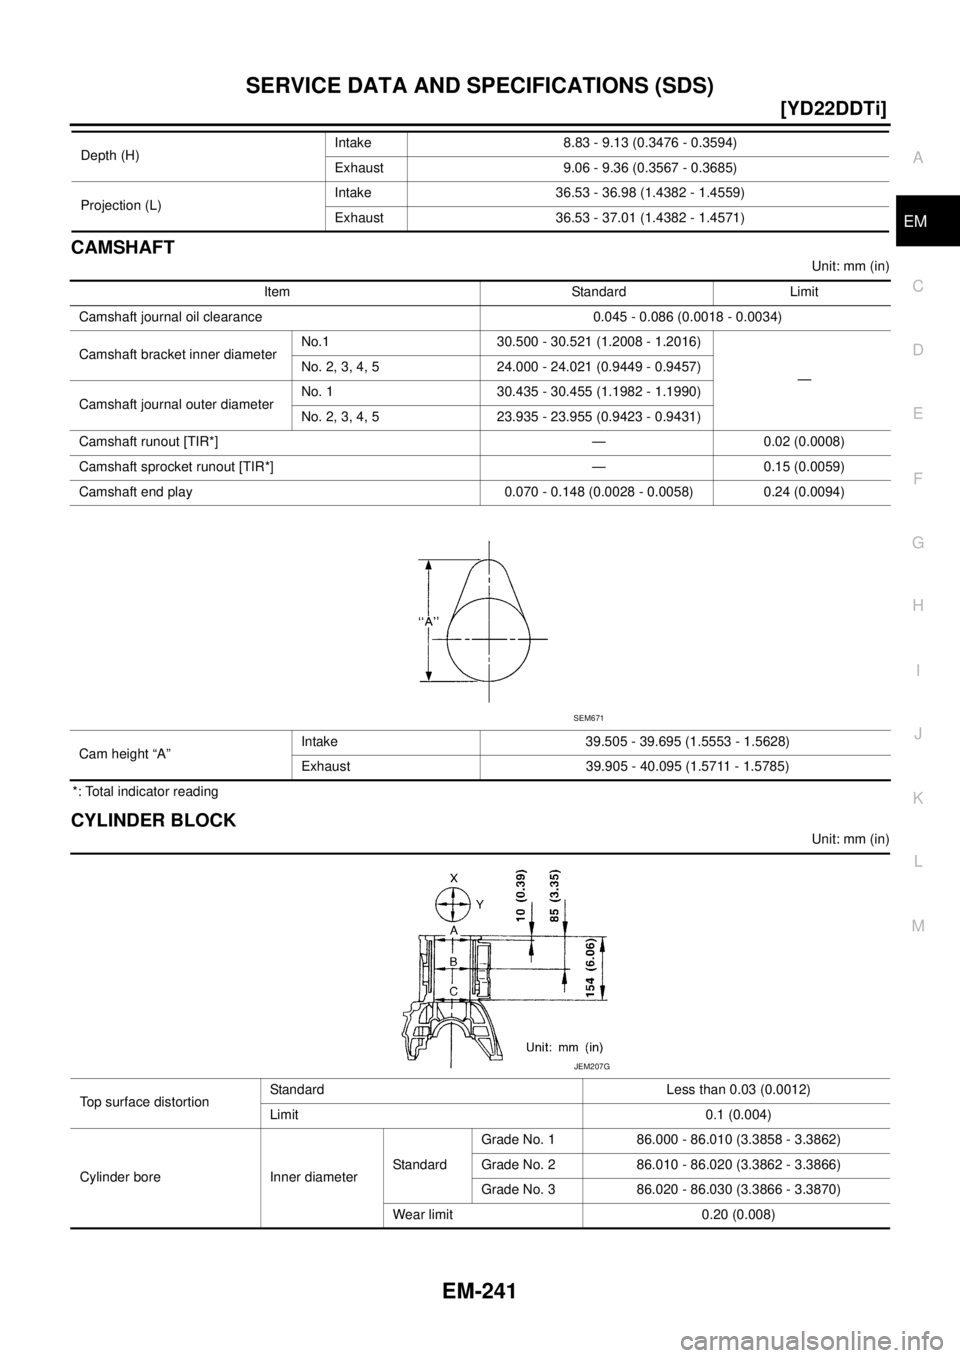
CAMSHAFT
Unit: mm (in)
*: Total indicator reading
CYLINDER BLOCK
Unit: mm (in) Depth (H)Intake 8.83 - 9.13 (0.3476 - 0.3594)
Exhaust 9.06 - 9.36 (0.3567 - 0.3685)
Projection (L)Intake 36.53 - 36.98 (1.4382 - 1.4559)
Exhaust 36.53 - 37.01 (1.4382 - 1.4571)
Item Standard Limit
Camshaft journal oil clearance 0.045 - 0.086 (0.0018 - 0.0034)
Camshaft bracket inner diameterNo.1 30.500 - 30.521 (1.2008 - 1.2016)
— No. 2, 3, 4, 5 24.000 - 24.021 (0.9449 - 0.9457)
Camshaft journal outer diameterNo. 1 30.435 - 30.455 (1.1982 - 1.1990)
No. 2, 3, 4, 5 23.935 - 23.955 (0.9423 - 0.9431)
Camshaft runout [TIR*] — 0.02 (0.0008)
Camshaft sprocket runout [TIR*] — 0.15 (0.0059)
Camshaft end play 0.070 - 0.148 (0.0028 - 0.0058) 0.24 (0.0094)
Cam height “A”Intake 39.505 - 39.695 (1.5553 - 1.5628)
Exhaust 39.905 - 40.095 (1.5711 - 1.5785)
SEM671
Top surface distortionStandard Less than 0.03 (0.0012)
Limit 0.1 (0.004)
Cylinder bore Inner diameterStandardGrade No. 1 86.000 - 86.010 (3.3858 - 3.3862)
Grade No. 2 86.010 - 86.020 (3.3862 - 3.3866)
Grade No. 3 86.020 - 86.030 (3.3866 - 3.3870)
Wear limit 0.20 (0.008)
JEM207G
Page 349 of 4179
RADIATOR (ALUMINUM TYPE)
CO-17
[QR]
C
D
E
F
G
H
I
J
K
L
MA
CO
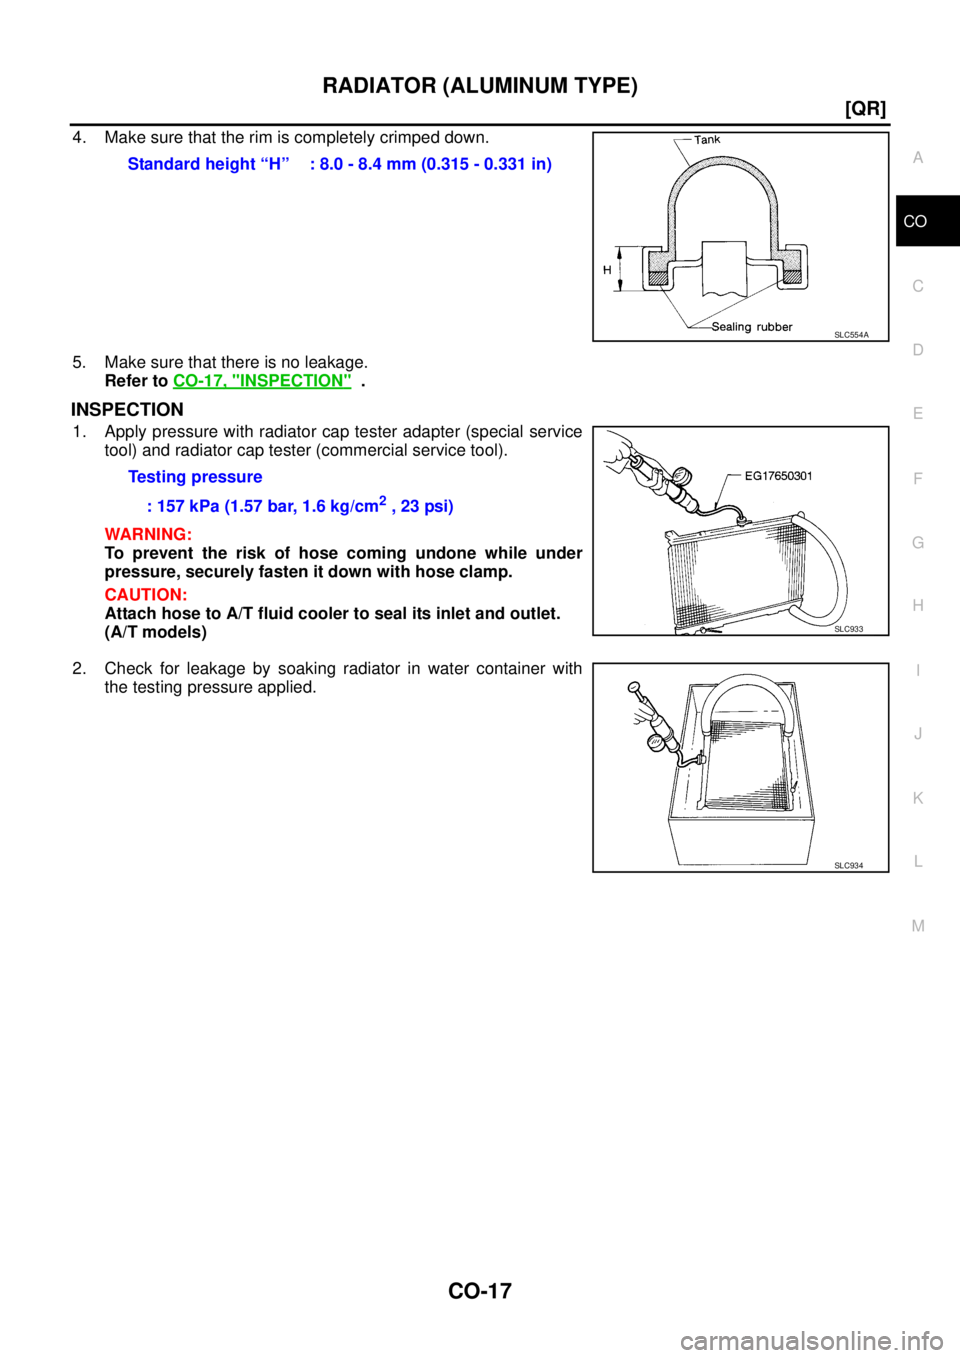
4. Make sure that the rim is completely crimped down.
5. Make sure that there is no leakage.
Refer to CO-17, "
INSPECTION" .
INSPECTION
1. Apply pressure with radiator cap tester adapter (special service
tool) and radiator cap tester (commercial service tool).
WARNING:
To prevent the risk of hose coming undone while under
pressure, securely fasten it down with hose clamp.
CAUTION:
Attach hose to A/T fluid cooler to seal its inlet and outlet.
(A/T models)
2. Check for leakage by soaking radiator in water container with
the testing pressure applied.Standard height “H” : 8.0 - 8.4 mm (0.315 - 0.331 in)
SLC554A
Testing pressure
: 157 kPa (1.57 bar, 1.6 kg/cm
2 , 23 psi)
SLC933
SLC934
Page 372 of 4179
CO-40
[YD22DDTi]
RADIATOR (ALUMINUM TYPE)
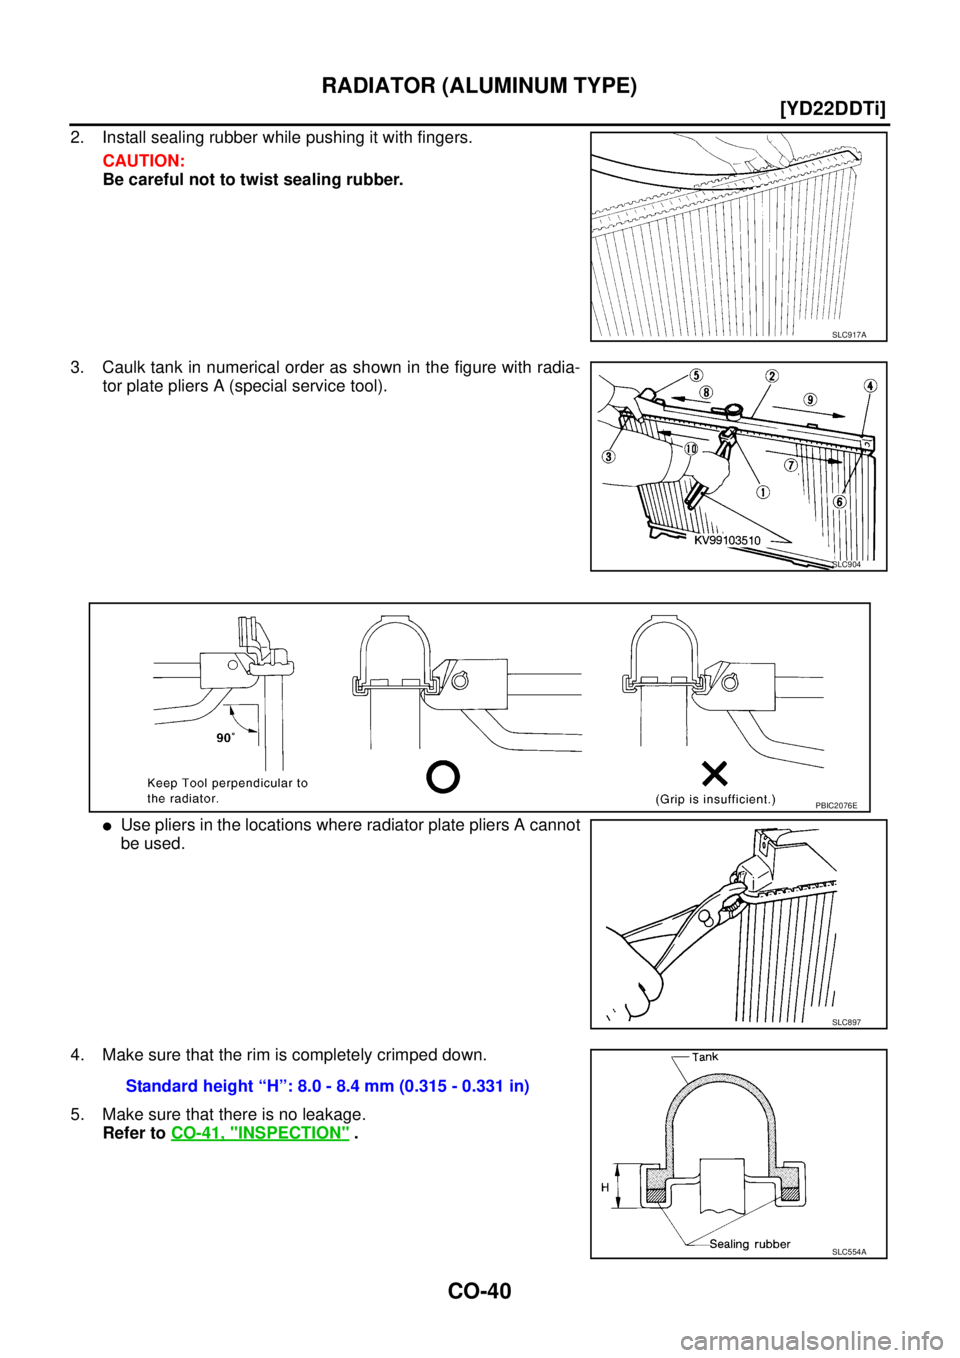
2. Install sealing rubber while pushing it with fingers.
CAUTION:
Be careful not to twist sealing rubber.
3. Caulk tank in numerical order as shown in the figure with radia-
tor plate pliers A (special service tool).
�Use pliers in the locations where radiator plate pliers A cannot
be used.
4. Make sure that the rim is completely crimped down.
5. Make sure that there is no leakage.
Refer to CO-41, "
INSPECTION" .
SLC917A
SLC904
PBIC2076E
SLC897
Standard height “H”: 8.0 - 8.4 mm (0.315 - 0.331 in)
SLC554A
Page 521 of 4179
DTC P0031, P0032 HO2S1 HEATER
EC-143
[QR (WITH EURO-OBD)]
C
D
E
F
G
H
I
J
K
L
MA
EC
Component InspectionEBS010MR
HEATED OXYGEN SENSOR 1 HEATER
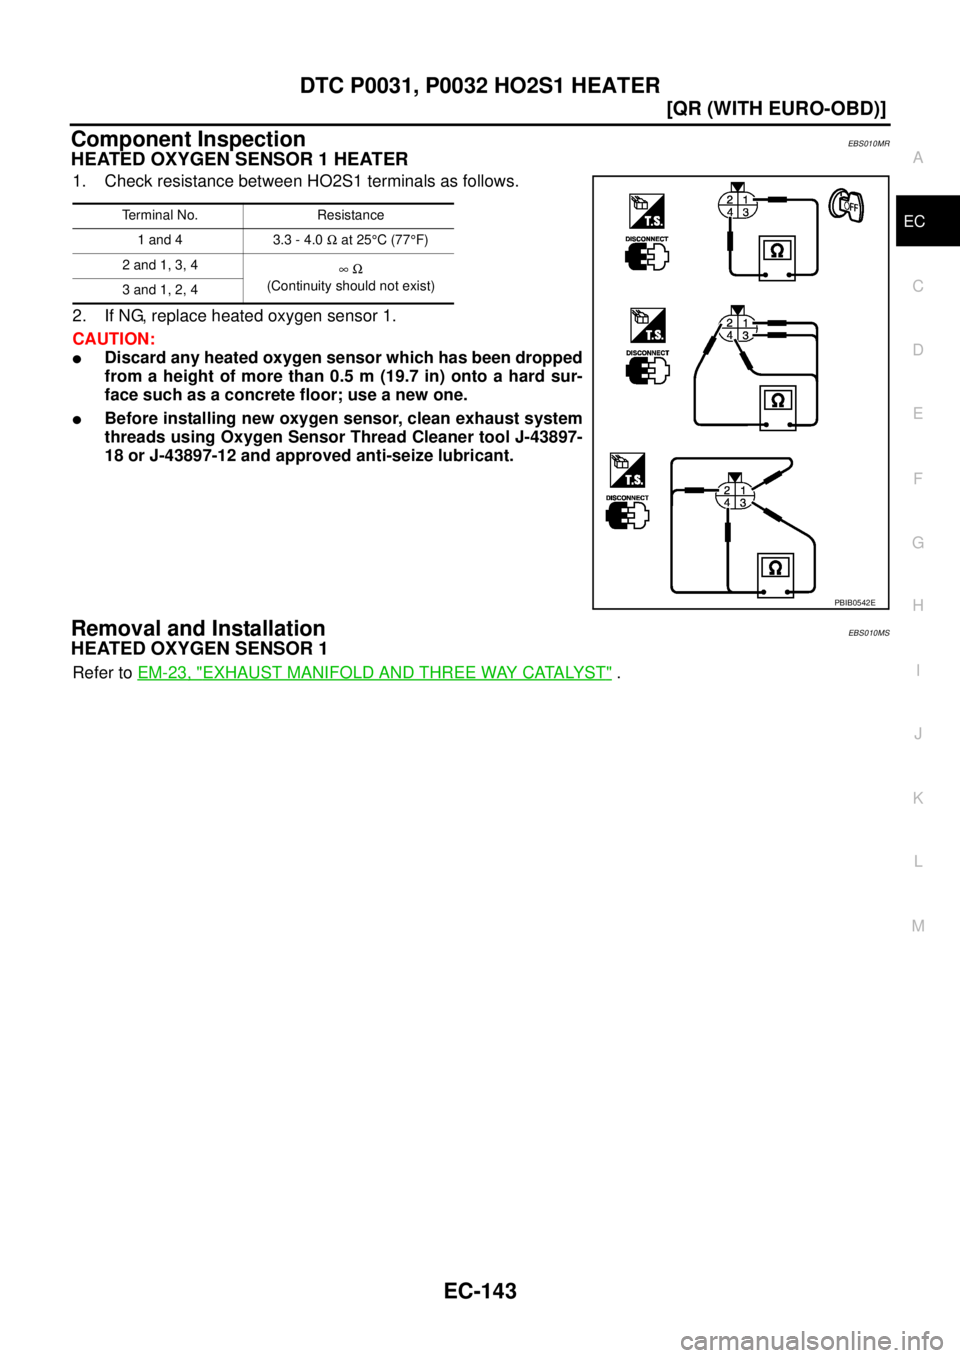
1. Check resistance between HO2S1 terminals as follows.
2. If NG, replace heated oxygen sensor 1.
CAUTION:
�Discard any heated oxygen sensor which has been dropped
from a height of more than 0.5 m (19.7 in) onto a hard sur-
face such as a concrete floor; use a new one.
�Before installing new oxygen sensor, clean exhaust system
threads using Oxygen Sensor Thread Cleaner tool J-43897-
18 or J-43897-12 and approved anti-seize lubricant.
Removal and InstallationEBS010MS
HEATED OXYGEN SENSOR 1
Refer to EM-23, "EXHAUST MANIFOLD AND THREE WAY CATALYST" .
Terminal No. Resistance
1 and 4 3.3 - 4.0 Ω at 25°C (77°F)
2 and 1, 3, 4
∞ Ω
(Continuity should not exist)
3 and 1, 2, 4
PBIB0542E