Page 2521 of 4179
REPAIR FOR COMPONENT PARTS
AT-485
[ALL]
D
E
F
G
H
I
J
K
L
MA
B
AT
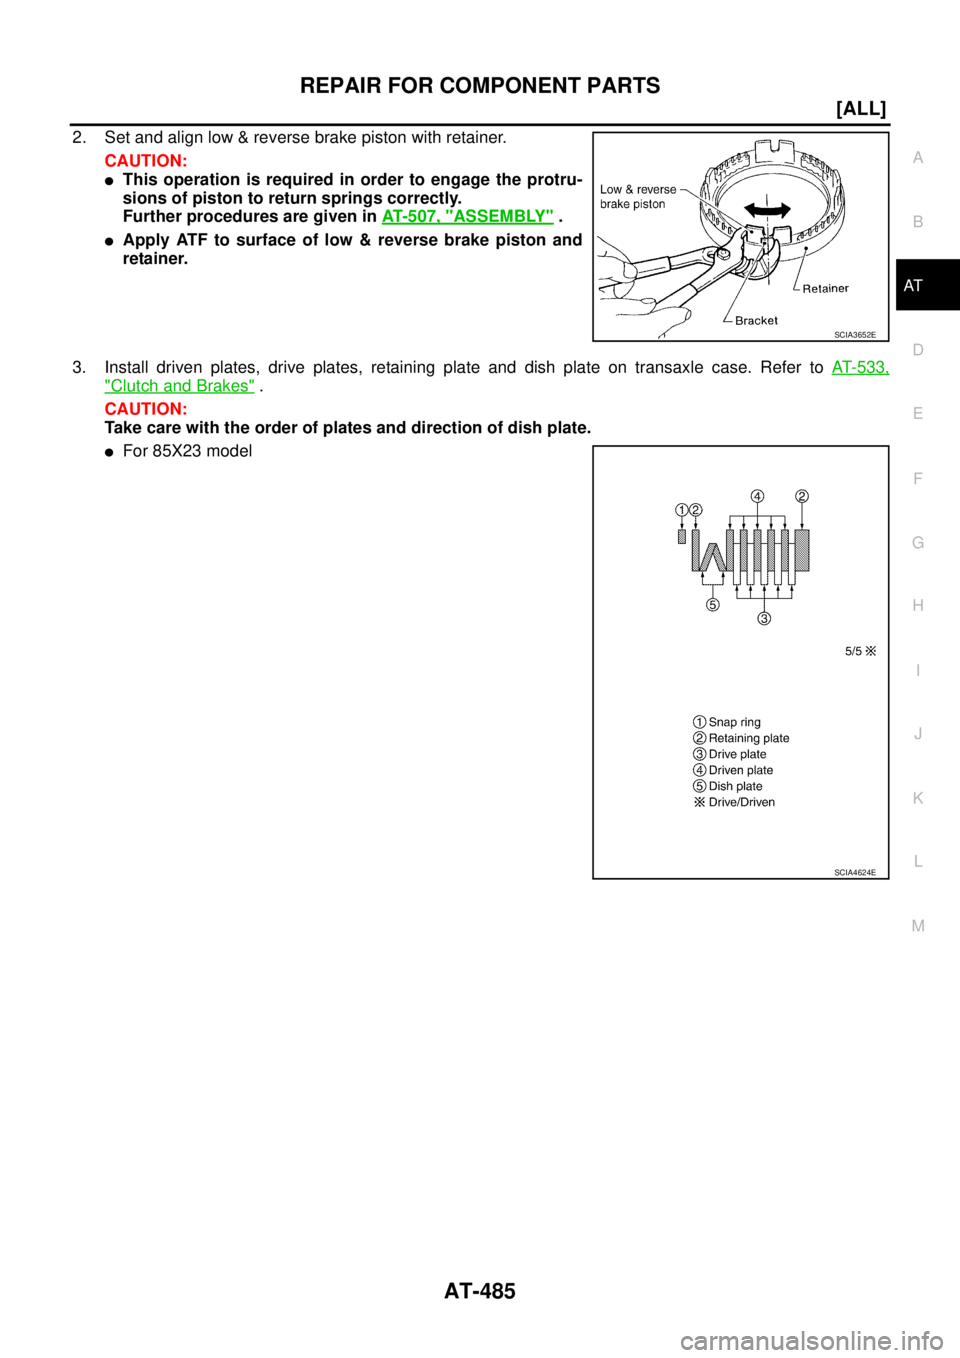
2. Set and align low & reverse brake piston with retainer.
CAUTION:
�This operation is required in order to engage the protru-
sions of piston to return springs correctly.
Further procedures are given in AT- 5 0 7 , "
ASSEMBLY" .
�Apply ATF to surface of low & reverse brake piston and
retainer.
3. Install driven plates, drive plates, retaining plate and dish plate on transaxle case. Refer to AT- 5 3 3 ,
"Clutch and Brakes" .
CAUTION:
Take care with the order of plates and direction of dish plate.
�For 85X23 model
SCIA3652E
SCIA4624E
Page 2523 of 4179
REPAIR FOR COMPONENT PARTS
AT-487
[ALL]
D
E
F
G
H
I
J
K
L
MA
B
AT
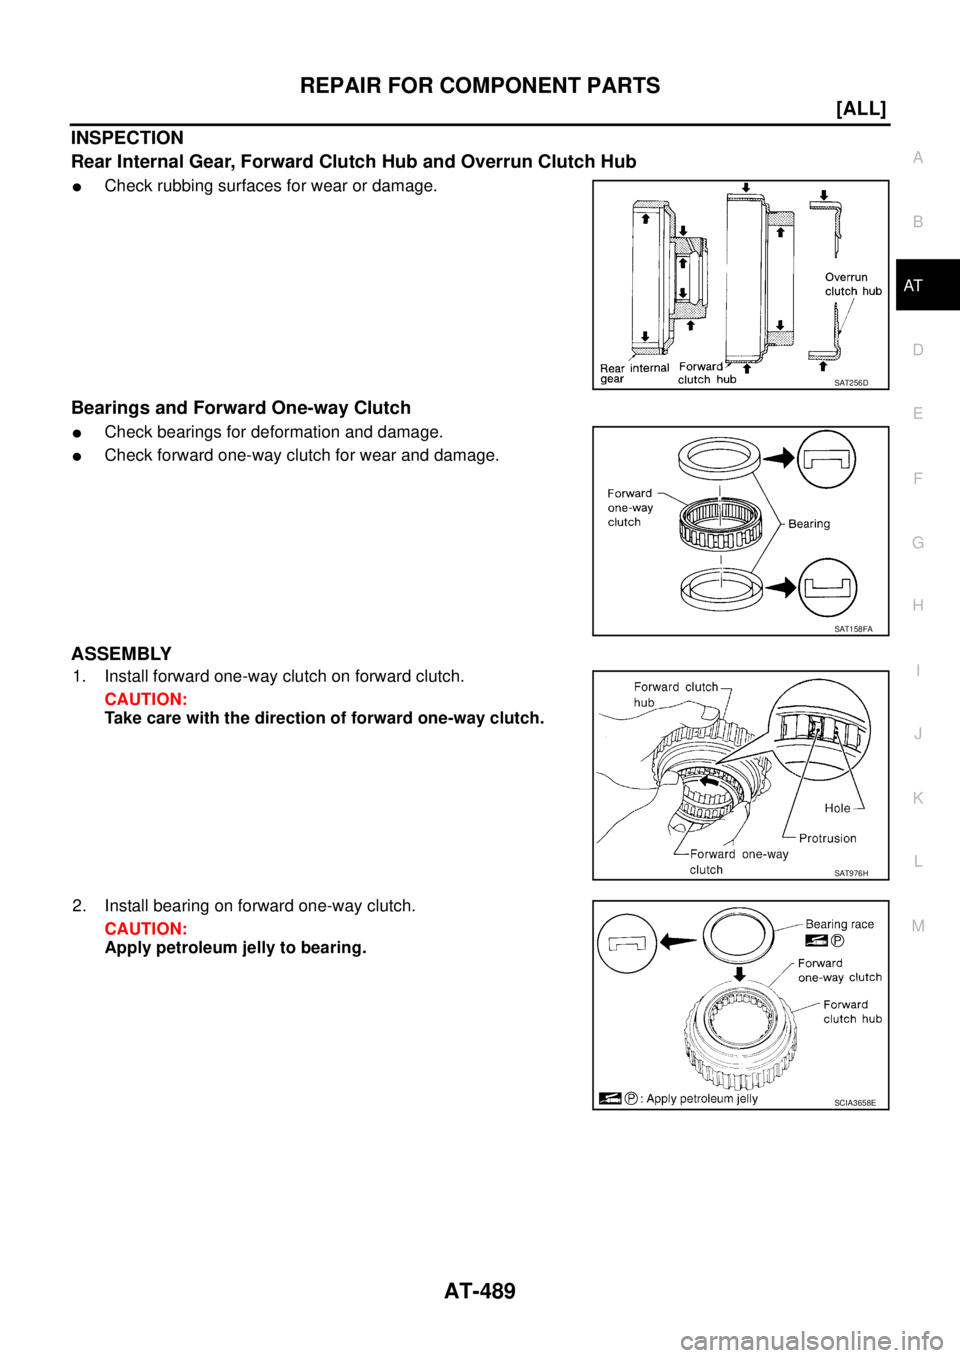
Rear Internal Gear, Forward Clutch Hub and Overrun Clutch HubECS00EC8
COMPONENTS
DISASSEMBLY
1. Remove overrun clutch hub and thrust washer from forward
clutch hub.
2. Remove forward clutch hub from rear internal gear.
1. Overrun clutch hub 2. Thrust washer 3. Bearing race
4. Forward one-way clutch 5. Forward clutch hub 6. Thrust washer
7. Rear internal gear
SCIA4051E
SCIA3692E
SAT251D
Page 2524 of 4179
AT-488
[ALL]
REPAIR FOR COMPONENT PARTS
3. Remove bearing from rear internal gear.
4. Remove thrust washer from rear internal gear.
5. Remove bearing from forward one-way clutch.
6. Remove forward one-way clutch from forward clutch hub.
SAT252DA
SCIA3691E
SAT254DA
SAT255D
Page 2525 of 4179
REPAIR FOR COMPONENT PARTS
AT-489
[ALL]
D
E
F
G
H
I
J
K
L
MA
B
AT
INSPECTION
Rear Internal Gear, Forward Clutch Hub and Overrun Clutch Hub
�Check rubbing surfaces for wear or damage.
Bearings and Forward One-way Clutch
�Check bearings for deformation and damage.
�Check forward one-way clutch for wear and damage.
ASSEMBLY
1. Install forward one-way clutch on forward clutch.
CAUTION:
Take care with the direction of forward one-way clutch.
2. Install bearing on forward one-way clutch.
CAUTION:
Apply petroleum jelly to bearing.
SAT256D
SAT158FA
SAT976H
SCIA3658E
Page 2526 of 4179
AT-490
[ALL]
REPAIR FOR COMPONENT PARTS
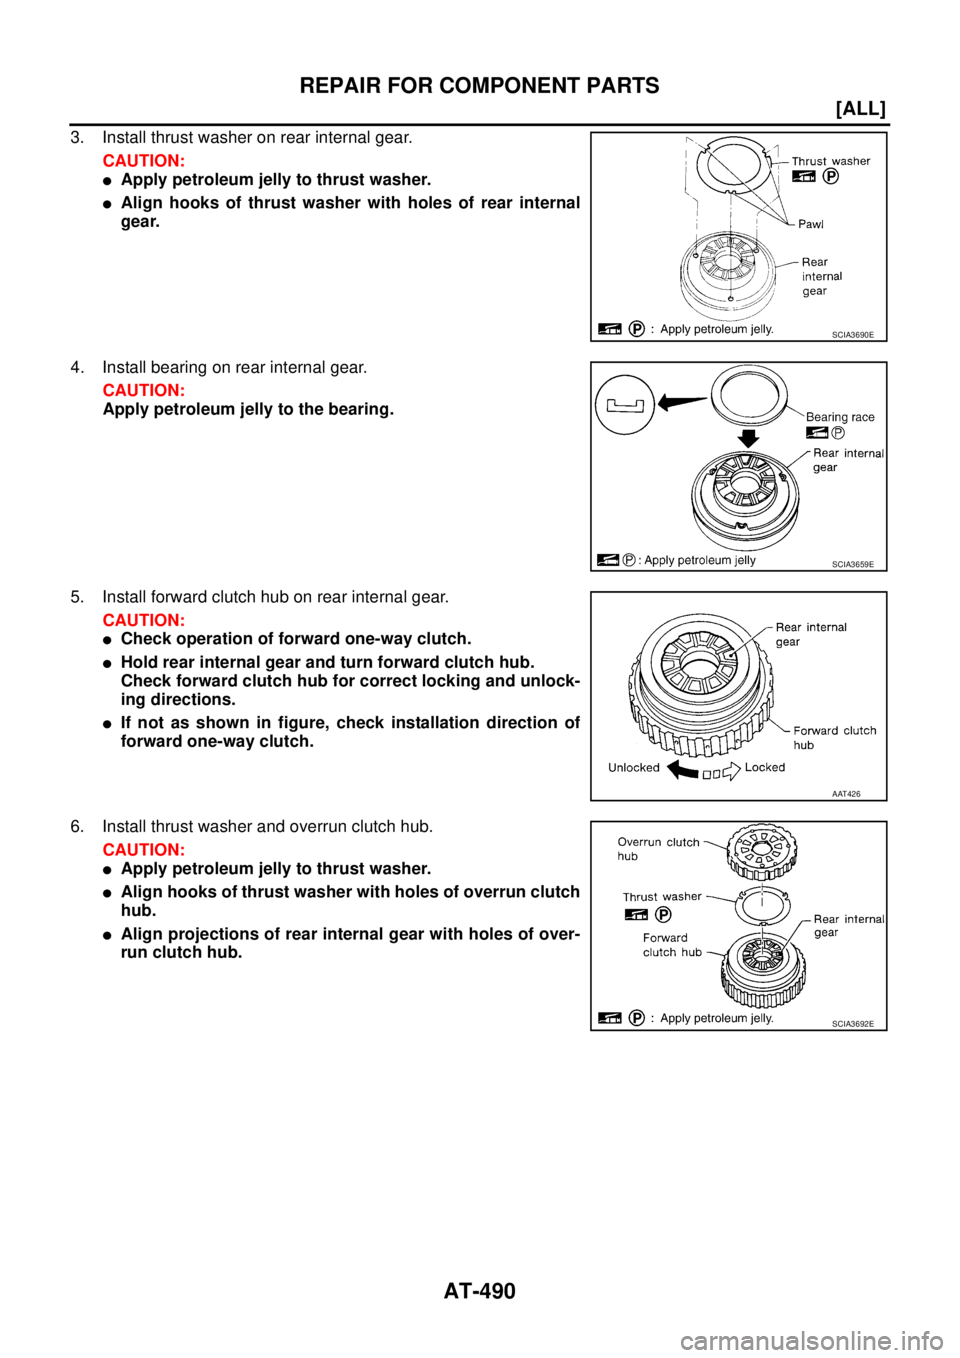
3. Install thrust washer on rear internal gear.
CAUTION:
�Apply petroleum jelly to thrust washer.
�Align hooks of thrust washer with holes of rear internal
gear.
4. Install bearing on rear internal gear.
CAUTION:
Apply petroleum jelly to the bearing.
5. Install forward clutch hub on rear internal gear.
CAUTION:
�Check operation of forward one-way clutch.
�Hold rear internal gear and turn forward clutch hub.
Check forward clutch hub for correct locking and unlock-
ing directions.
�If not as shown in figure, check installation direction of
forward one-way clutch.
6. Install thrust washer and overrun clutch hub.
CAUTION:
�Apply petroleum jelly to thrust washer.
�Align hooks of thrust washer with holes of overrun clutch
hub.
�Align projections of rear internal gear with holes of over-
run clutch hub.
SCIA3690E
SCIA3659E
AAT426
SCIA3692E
Page 2550 of 4179
AT-514
[ALL]
ASSEMBLY
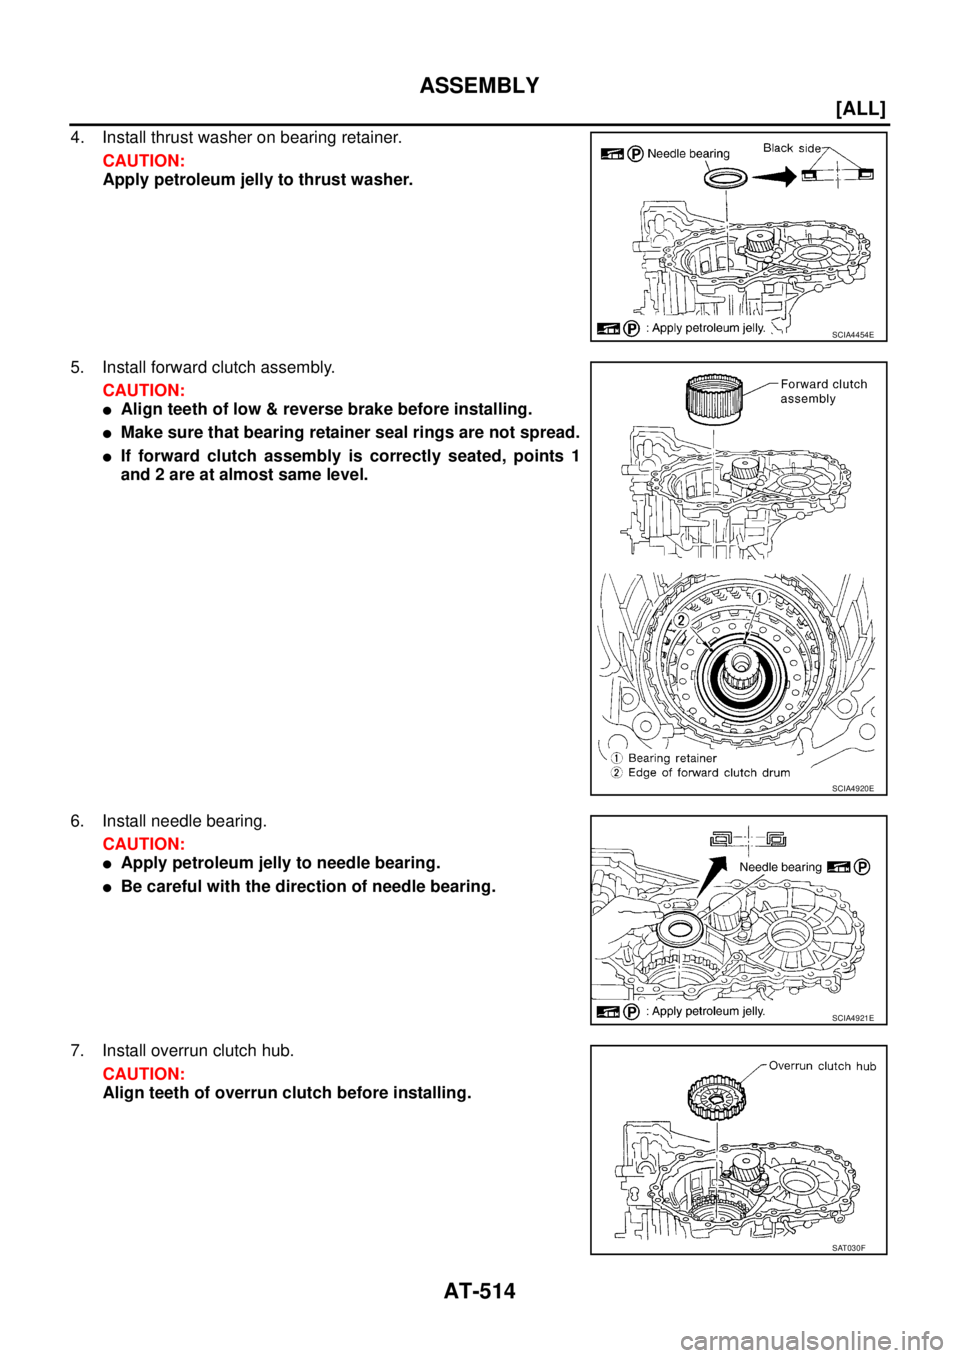
4. Install thrust washer on bearing retainer.
CAUTION:
Apply petroleum jelly to thrust washer.
5. Install forward clutch assembly.
CAUTION:
�Align teeth of low & reverse brake before installing.
�Make sure that bearing retainer seal rings are not spread.
�If forward clutch assembly is correctly seated, points 1
and 2 are at almost same level.
6. Install needle bearing.
CAUTION:
�Apply petroleum jelly to needle bearing.
�Be careful with the direction of needle bearing.
7. Install overrun clutch hub.
CAUTION:
Align teeth of overrun clutch before installing.
SCIA4454E
SCIA4920E
SCIA4921E
SAT030F
Page 2551 of 4179
ASSEMBLY
AT-515
[ALL]
D
E
F
G
H
I
J
K
L
MA
B
AT
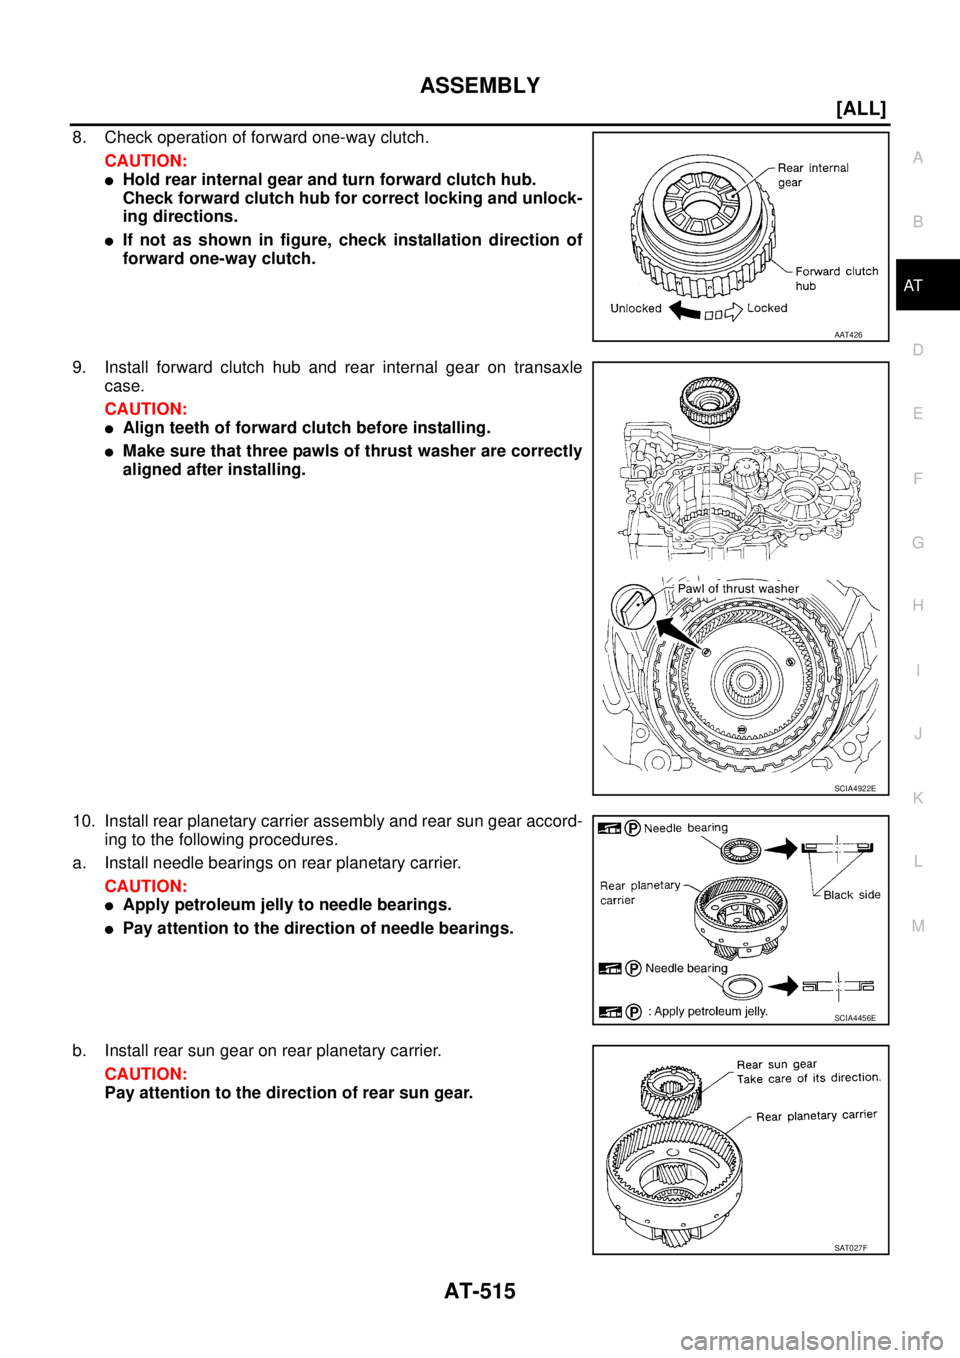
8. Check operation of forward one-way clutch.
CAUTION:
�Hold rear internal gear and turn forward clutch hub.
Check forward clutch hub for correct locking and unlock-
ing directions.
�If not as shown in figure, check installation direction of
forward one-way clutch.
9. Install forward clutch hub and rear internal gear on transaxle
case.
CAUTION:
�Align teeth of forward clutch before installing.
�Make sure that three pawls of thrust washer are correctly
aligned after installing.
10. Install rear planetary carrier assembly and rear sun gear accord-
ing to the following procedures.
a. Install needle bearings on rear planetary carrier.
CAUTION:
�Apply petroleum jelly to needle bearings.
�Pay attention to the direction of needle bearings.
b. Install rear sun gear on rear planetary carrier.
CAUTION:
Pay attention to the direction of rear sun gear.
AAT426
SCIA4922E
SCIA4456E
SAT027F
Page 2553 of 4179
ASSEMBLY
AT-517
[ALL]
D
E
F
G
H
I
J
K
L
MA
B
AT
c. Install low & reverse brake piston and retainer on transaxle
case.
CAUTION:
Align bracket to specified gutter as indicated in the figure.
d. Make sure that each protrusion of low & reverse brake piston is
correctly set to corresponding return spring as follows.
�Push low & reverse brake piston and retainer evenly and
confirm they move smoothly.
�If they cannot move smoothly, remove low & reverse
brake piston and retainer and align return spring cor-
rectly as instructed in step “a”.
e. Push down low & reverse brake piston and retainer and install
snap ring.
13. Install low one-way clutch to front planetary carrier by turning
carrier in the direction of the arrow shown.
SCIA5653E
SCIA5654E
SCIA3675E
SAT206F
![NISSAN X-TRAIL 2003 Service Repair Manual REPAIR FOR COMPONENT PARTS
AT-487
[ALL]
D
E
F
G
H
I
J
K
L
MA
B
AT
Rear Internal Gear, Forward Clutch Hub and Overrun Clutch HubECS00EC8
COMPONENTS
DISASSEMBLY
1. Remove overrun clutch hub and thrust](/manual-img/5/57404/w960_57404-2522.png "NISSAN X-TRAIL 2003 Service Repair Manual REPAIR FOR COMPONENT PARTS
AT-487
[ALL]
D
E
F
G
H
I
J
K
L
MA
B
AT
Rear Internal Gear, Forward Clutch Hub and Overrun Clutch HubECS00EC8
COMPONENTS
DISASSEMBLY
1. Remove overrun clutch hub and thrust")
![NISSAN X-TRAIL 2003 Service Repair Manual AT-488
[ALL]
REPAIR FOR COMPONENT PARTS
3. Remove bearing from rear internal gear.
4. Remove thrust washer from rear internal gear.
5. Remove bearing from forward one-way clutch.
6. Remove forward o](/manual-img/5/57404/w960_57404-2523.png "NISSAN X-TRAIL 2003 Service Repair Manual AT-488
[ALL]
REPAIR FOR COMPONENT PARTS
3. Remove bearing from rear internal gear.
4. Remove thrust washer from rear internal gear.
5. Remove bearing from forward one-way clutch.
6. Remove forward o")
![NISSAN X-TRAIL 2003 Service Repair Manual ASSEMBLY
AT-517
[ALL]
D
E
F
G
H
I
J
K
L
MA
B
AT
c. Install low & reverse brake piston and retainer on transaxle
case.
CAUTION:
Align bracket to specified gutter as indicated in the figure.
d. Make s](/manual-img/5/57404/w960_57404-2552.png "NISSAN X-TRAIL 2003 Service Repair Manual ASSEMBLY
AT-517
[ALL]
D
E
F
G
H
I
J
K
L
MA
B
AT
c. Install low & reverse brake piston and retainer on transaxle
case.
CAUTION:
Align bracket to specified gutter as indicated in the figure.
d. Make s")