Page 77 of 4179
OIL PAN AND OIL STRAINER
EM-25
[QR]
C
D
E
F
G
H
I
J
K
L
MA
EM
OIL PAN AND OIL STRAINERP F P : 1111 0
Removal and InstallationEBS00KNE
REMOVAL
WARNING:
To avoid the danger of being scalded, do not drain the engine oil when the engine is hot.
1. Remove RH and LH undercovers.
2. Drain engine oil. Refer to LU-8, "
Changing Engine Oil" .
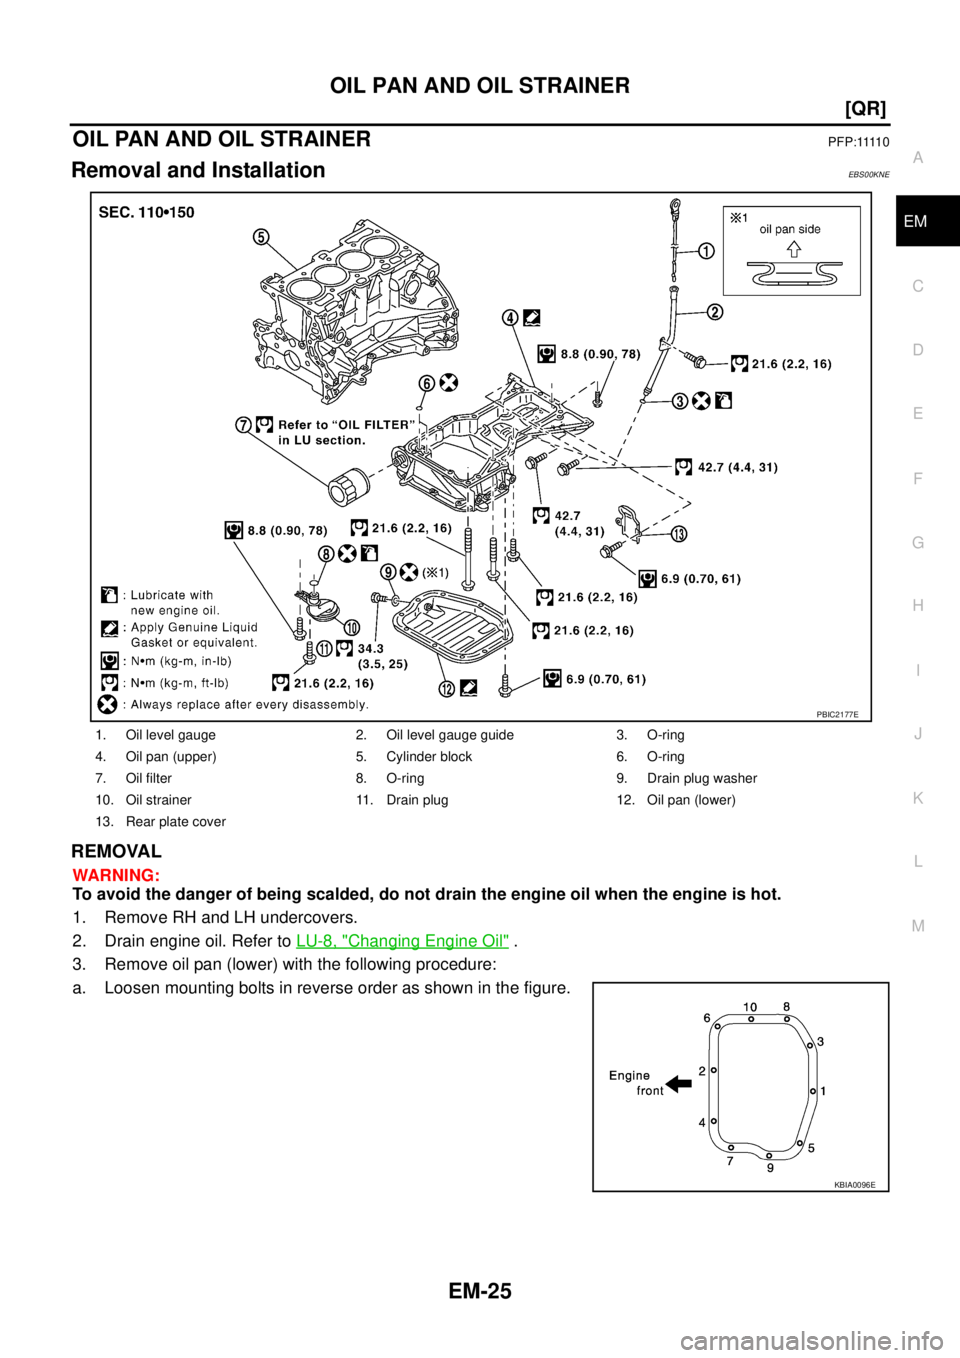
3. Remove oil pan (lower) with the following procedure:
a. Loosen mounting bolts in reverse order as shown in the figure.
1. Oil level gauge 2. Oil level gauge guide 3. O-ring
4. Oil pan (upper) 5. Cylinder block 6. O-ring
7. Oil filter 8. O-ring 9. Drain plug washer
10. Oil strainer 11. Drain plug 12. Oil pan (lower)
13. Rear plate cover
PBIC2177E
KBIA0096E
Page 130 of 4179

EM-78
[QR]
ENGINE ASSEMBLY
ENGINE ASSEMBLYPFP:10001
Removal and InstallationEBS00KNT
WARNING:
�Situate vehicle on a flat and solid surface.
�Place chocks at front and back of rear wheels.
�For engines not equipped with engine slingers, attach proper slingers and bolts described in
PARTS CATALOG.
CAUTION:
�Always be careful to work safely, avoid forceful or uninstructed operations.
�Do not start working until exhaust system and engine coolant are cool enough.
�If items or work required are not covered by the engine section, refer to the applicable sections.
�Always use the support point specified for lifting.
�Use either 2-pole lift type or separate type lift as best you can. If board-on type is used for
unavoidable reasons, support at the rear axle jacking point with transmission jack or similar tool
before starting work, in preparation for the backward shift of center of gravity.
�For supporting points for lifting and jacking point at rear axle, refer to GI-36, "Garage Jack and
Safety Stand" .
REMOVAL
Outline
Remove engine, transaxle and transfer assembly with front suspension member from vehicle downward. Sep-
arate front suspension member, and then separate engine and transaxle.
1. Rear engine mounting insulator 2. Rear engine mounting bracket 3. RH engine mounting insulator
4. RH engine mounting bracket 5. Front engine mounting bracket 6. Front engine mounting insulator
7. Center member 8. LH engine mounting insulator 9. LH engine mounting bracket
10. Stopper 11. Grommet
PBIC2392E
Page 188 of 4179
EM-136
[YD22DDTi]
INTAKE MANIFOLD
INTAKE MANIFOLDPFP:14003
Removal and InstallationEBS00LRF
REMOVAL
WARNING:
To avoid the danger of being scalded, do not drain engine coolant when engine is hot.
1. Drain engine coolant. Refer to CO-31, "
Changing Engine Coolant" .
2. Remove air duct. Refer to EM-133, "
Removal and Installation" .
3. Remove charge air cooler. Refer to EM-135, "
Removal and Installation" .
4. Remove air inlet pipes. Refer to EM-141, "
Removal and Installation" .
5. Remove exhaust manifold insulator. Refer to EM-141, "
EXHAUST MANIFOLD AND TURBOCHARGER" .
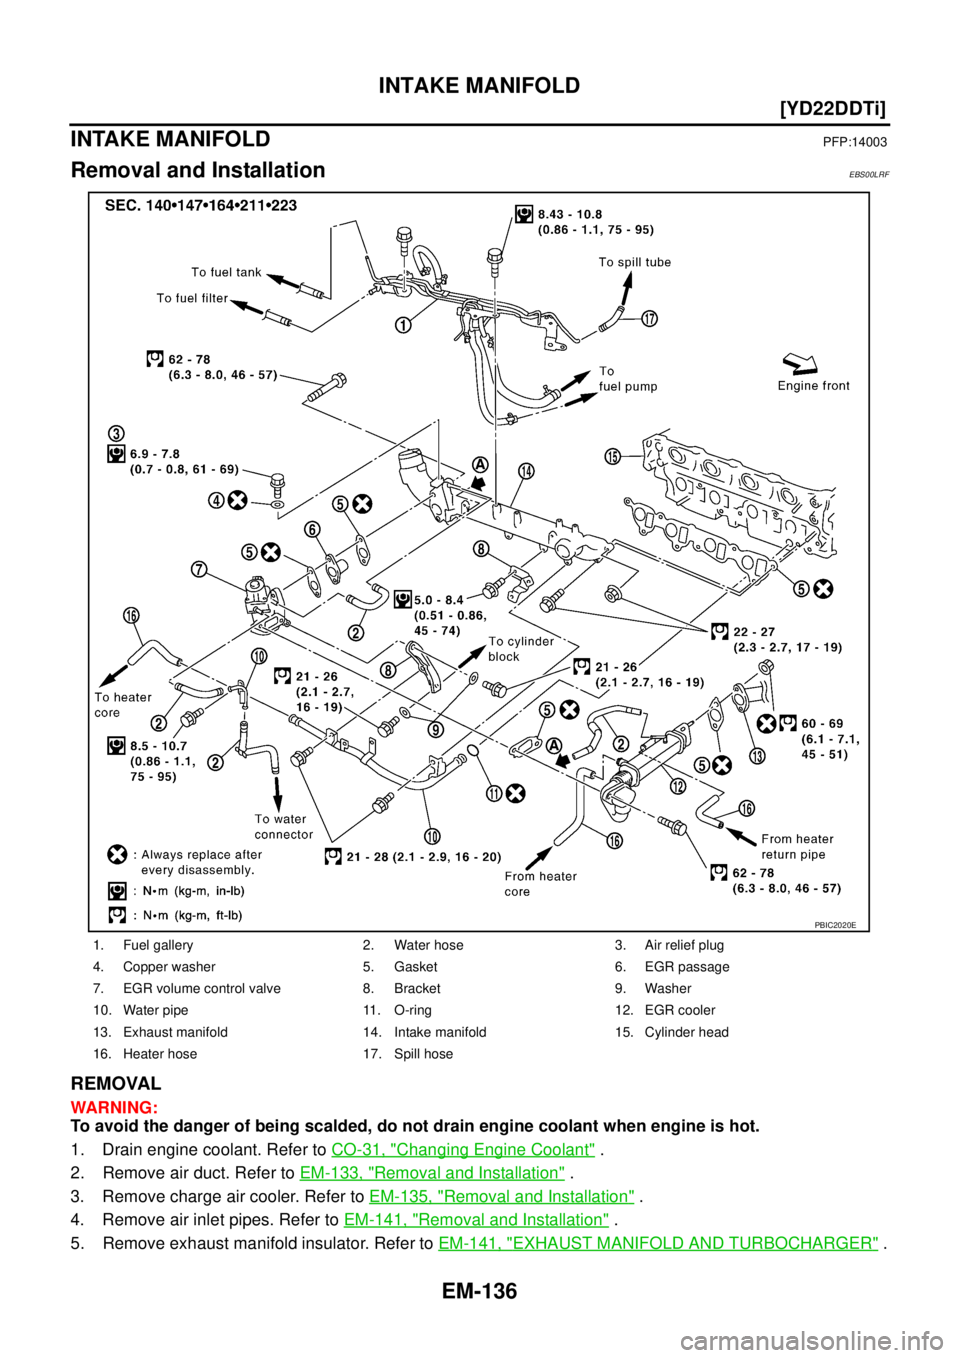
1. Fuel gallery 2. Water hose 3. Air relief plug
4. Copper washer 5. Gasket 6. EGR passage
7. EGR volume control valve 8. Bracket 9. Washer
10. Water pipe 11. O-ring 12. EGR cooler
13. Exhaust manifold 14. Intake manifold 15. Cylinder head
16. Heater hose 17. Spill hose
PBIC2020E
Page 199 of 4179
OIL PAN AND OIL STRAINER
EM-147
[YD22DDTi]
C
D
E
F
G
H
I
J
K
L
MA
EM
OIL PAN AND OIL STRAINERP F P : 1111 0
Removal and InstallationEBS00LRK
REMOVAL
WARNING:
To avoid the danger of being scalded, do not drain engine oil when engine is hot.
1. Remove engine undercover.
2. Drain engine oil. Refer to LU-21, "
Changing Engine Oil" .
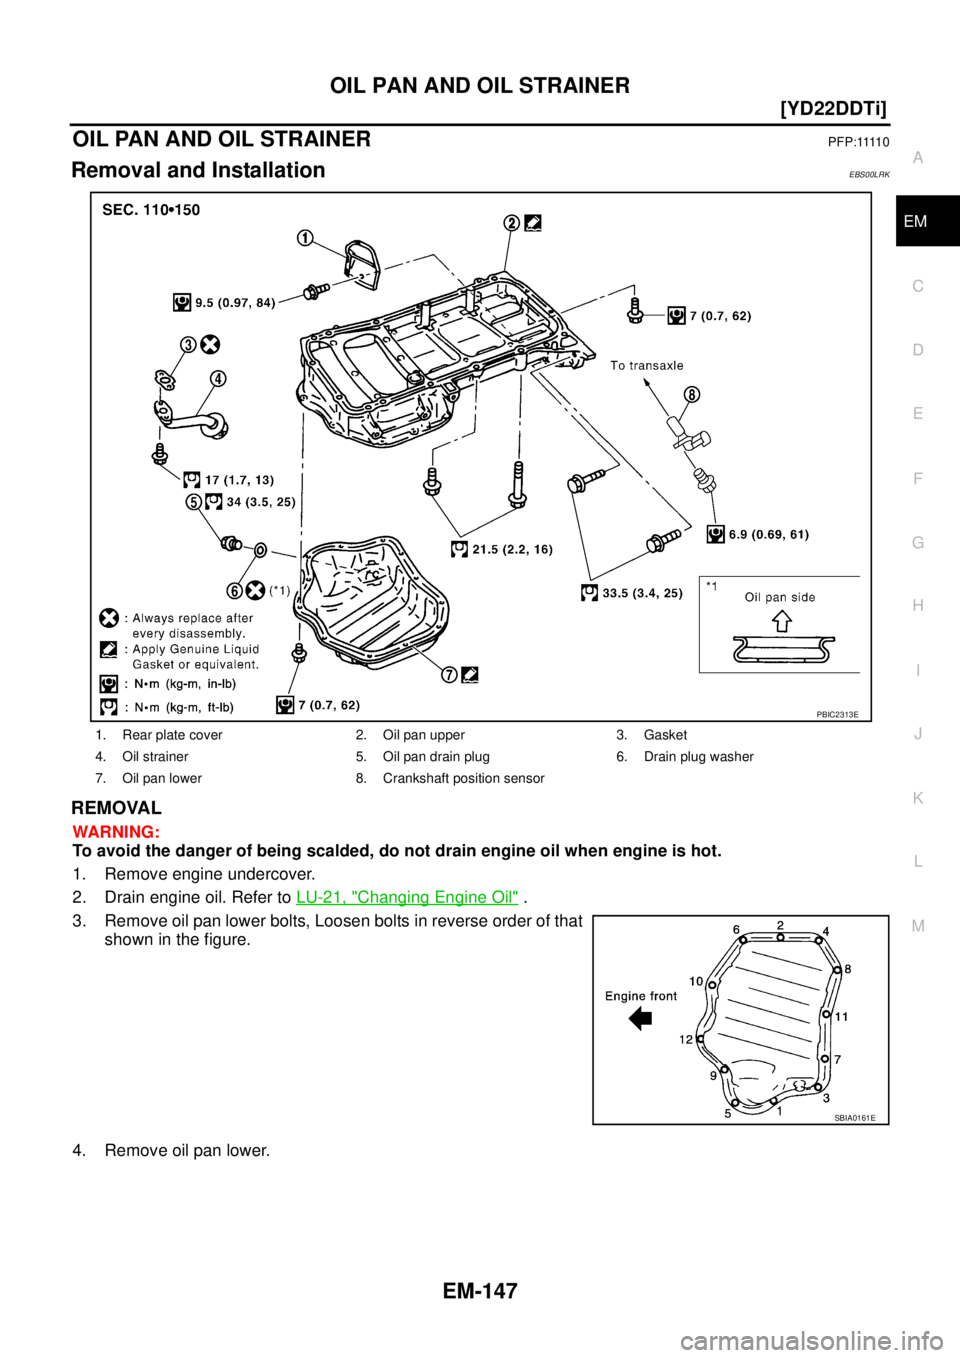
3. Remove oil pan lower bolts, Loosen bolts in reverse order of that
shown in the figure.
4. Remove oil pan lower.
1. Rear plate cover 2. Oil pan upper 3. Gasket
4. Oil strainer 5. Oil pan drain plug 6. Drain plug washer
7. Oil pan lower 8. Crankshaft position sensor
PBIC2313E
SBIA0161E
Page 260 of 4179

EM-208
[YD22DDTi]
ENGINE ASSEMBLY
ENGINE ASSEMBLYPFP:10001
Removal and InstallationEBS00LRY
WARNING:
�Situate vehicle on a flat and solid surface.
�Place chocks at front and back of rear wheels.
�For engines not equipped with engine slingers, attach proper slingers and bolts described in
PARTS CATALOG.
CAUTION:
�Always be careful to work safely, avoid forceful or uninstructed operations.
�Do not start working until exhaust system and engine coolant are cool enough.
�If items or work required are not covered by the engine main body section, refer to the applicable
sections.
�Always use the support point specified for lifting.
�Use either 2-pole lift type or separate type lift as best you can. If board-on type is used for
unavoidable reasons, support at the rear axle jacking point with transmission jack or similar tool
before starting work, in preparation for the backward shift of center of gravity.
�For supporting points for lifting and jacking point at rear axle, refer to GI-36, "Garage Jack and
Safety Stand" .
1. Rear engine mounting insulator 2. Rear engine mounting bracket 3. RH engine mounting insulator
4. RH engine mounting bracket 5. Front engine mounting bracket 6. Front engine mounting insulator
7. Center member 8. LH engine mounting insulator 9. LH engine mounting bracket
10. Stopper 11. Grommet (2pcs)
PBIC1257E
Page 305 of 4179
ENGINE OIL
LU-7
[QR]
C
D
E
F
G
H
I
J
K
L
MA
LU
ENGINE OILPFP:KLA92
InspectionEBS00KO3
ENGINE OIL LEVEL
NOTE:
Before starting engine, put vehicle horizontally and check the engine oil level. If engine is already started, stop
it and allow 10 minutes before checking.
1. Pull out oil level gauge and wipe it clean.
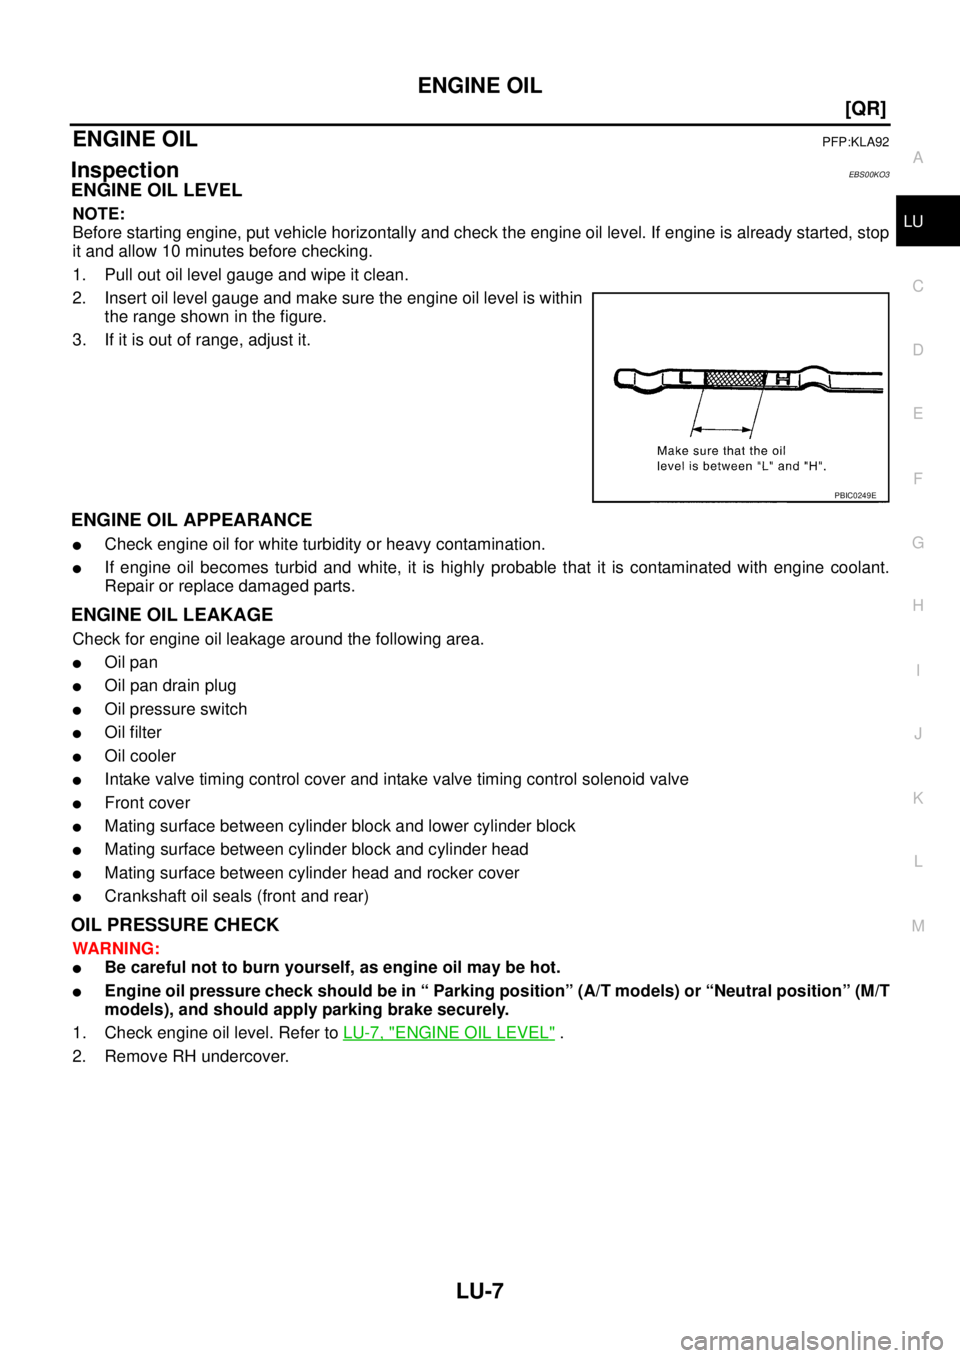
2. Insert oil level gauge and make sure the engine oil level is within
the range shown in the figure.
3. If it is out of range, adjust it.
ENGINE OIL APPEARANCE
�Check engine oil for white turbidity or heavy contamination.
�If engine oil becomes turbid and white, it is highly probable that it is contaminated with engine coolant.
Repair or replace damaged parts.
ENGINE OIL LEAKAGE
Check for engine oil leakage around the following area.
�Oil pan
�Oil pan drain plug
�Oil pressure switch
�Oil filter
�Oil cooler
�Intake valve timing control cover and intake valve timing control solenoid valve
�Front cover
�Mating surface between cylinder block and lower cylinder block
�Mating surface between cylinder block and cylinder head
�Mating surface between cylinder head and rocker cover
�Crankshaft oil seals (front and rear)
OIL PRESSURE CHECK
WARNING:
�Be careful not to burn yourself, as engine oil may be hot.
�Engine oil pressure check should be in “ Parking position” (A/T models) or “Neutral position” (M/T
models), and should apply parking brake securely.
1. Check engine oil level. Refer to LU-7, "
ENGINE OIL LEVEL" .
2. Remove RH undercover.
PBIC0249E
Page 306 of 4179
LU-8
[QR]
ENGINE OIL
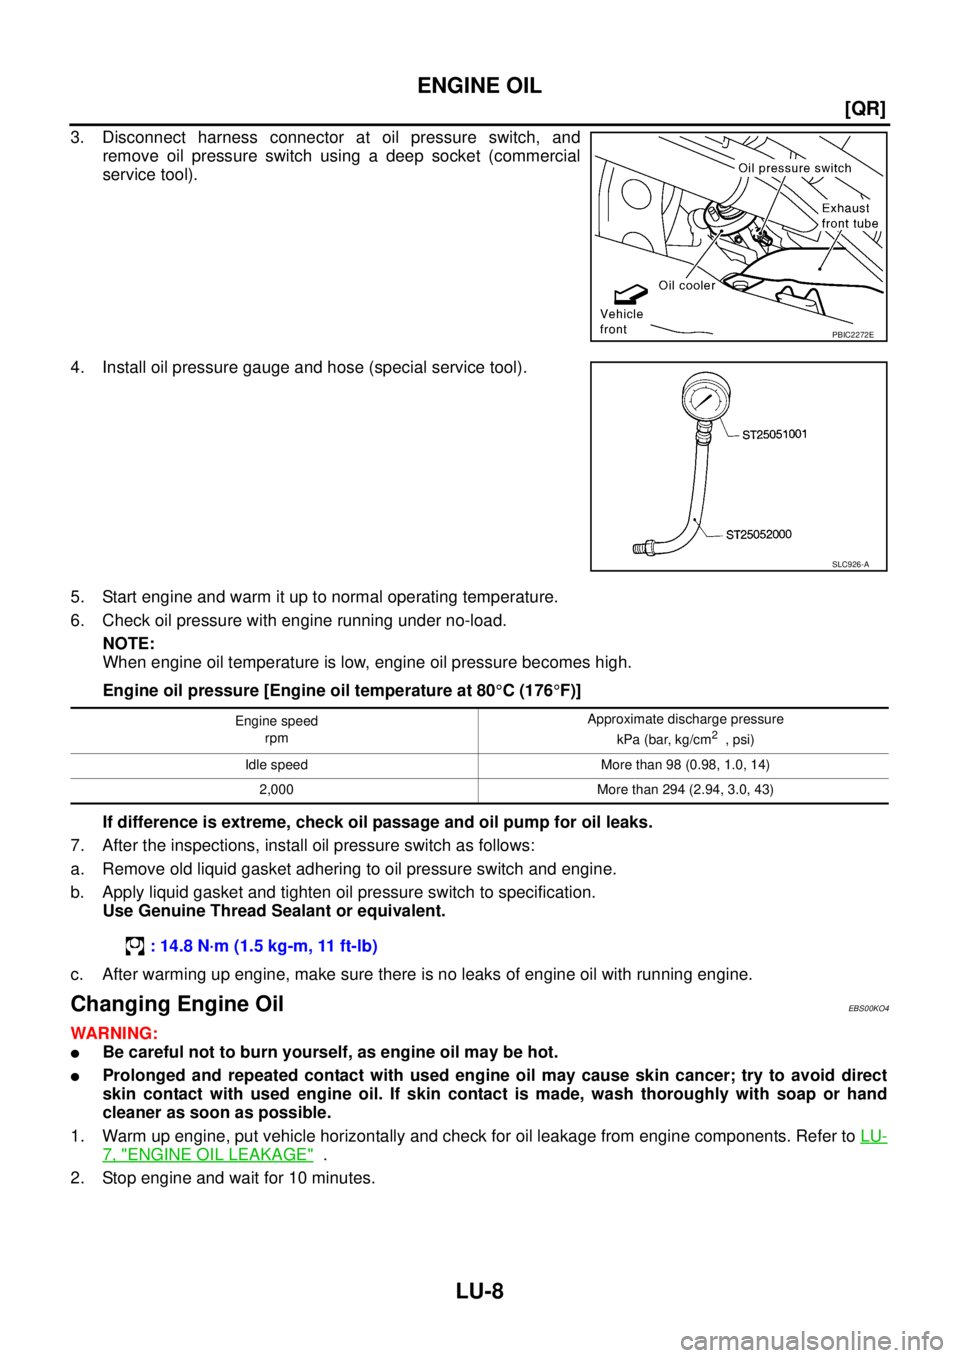
3. Disconnect harness connector at oil pressure switch, and
remove oil pressure switch using a deep socket (commercial
service tool).
4. Install oil pressure gauge and hose (special service tool).
5. Start engine and warm it up to normal operating temperature.
6. Check oil pressure with engine running under no-load.
NOTE:
When engine oil temperature is low, engine oil pressure becomes high.
Engine oil pressure [Engine oil temperature at 80°C (176°F)]
If difference is extreme, check oil passage and oil pump for oil leaks.
7. After the inspections, install oil pressure switch as follows:
a. Remove old liquid gasket adhering to oil pressure switch and engine.
b. Apply liquid gasket and tighten oil pressure switch to specification.
Use Genuine Thread Sealant or equivalent.
c. After warming up engine, make sure there is no leaks of engine oil with running engine.
Changing Engine OilEBS00KO4
WARNING:
�Be careful not to burn yourself, as engine oil may be hot.
�Prolonged and repeated contact with used engine oil may cause skin cancer; try to avoid direct
skin contact with used engine oil. If skin contact is made, wash thoroughly with soap or hand
cleaner as soon as possible.
1. Warm up engine, put vehicle horizontally and check for oil leakage from engine components. Refer to LU-
7, "ENGINE OIL LEAKAGE" .
2. Stop engine and wait for 10 minutes.
PBIC2272E
SLC926-A
Engine speed
rpm Approximate discharge pressure
kPa (bar, kg/cm2 , psi)
Idle speed More than 98 (0.98, 1.0, 14)
2,000 More than 294 (2.94, 3.0, 43)
: 14.8 N·m (1.5 kg-m, 11 ft-lb)
Page 309 of 4179
OIL COOLER
LU-11
[QR]
C
D
E
F
G
H
I
J
K
L
MA
LU
OIL COOLERPFP:21305
Removal and InstallationEBS00KO8
WARNING:
Be careful not to get burned when engine and engine oil may be hot.
CAUTION:
�When removing oil cooler and oil cooler bracket, prepare a shop cloth to absorb any engine oil
leakage or spillage.
�Completely wipe off any engine oil that adhere to engine and vehicle.
REMOVAL
1. Remove RH front road wheel and tyre and RH undercover.
2. Drain engine coolant by removing water drain plug on cylinder block and radiator drain plug. Refer to EM-
82, "CYLINDER BLOCK" and CO-9, "Changing Engine Coolant" .
3. Disconnect water hoses from oil cooler.
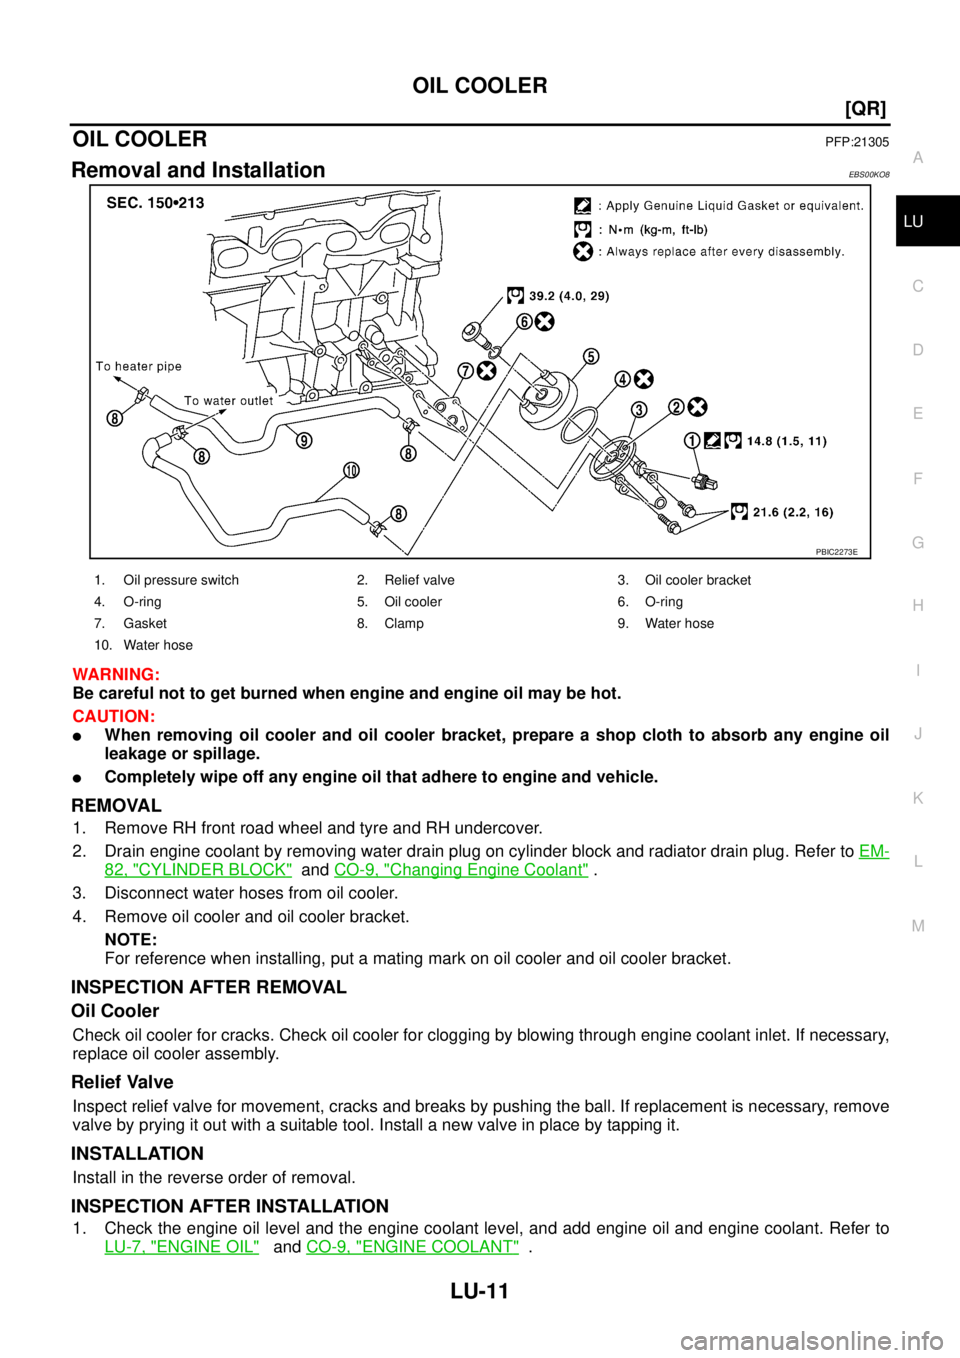
4. Remove oil cooler and oil cooler bracket.
NOTE:
For reference when installing, put a mating mark on oil cooler and oil cooler bracket.
INSPECTION AFTER REMOVAL
Oil Cooler
Check oil cooler for cracks. Check oil cooler for clogging by blowing through engine coolant inlet. If necessary,
replace oil cooler assembly.
Relief Valve
Inspect relief valve for movement, cracks and breaks by pushing the ball. If replacement is necessary, remove
valve by prying it out with a suitable tool. Install a new valve in place by tapping it.
INSTALLATION
Install in the reverse order of removal.
INSPECTION AFTER INSTALLATION
1. Check the engine oil level and the engine coolant level, and add engine oil and engine coolant. Refer to
LU-7, "
ENGINE OIL" and CO-9, "ENGINE COOLANT" .
PBIC2273E
1. Oil pressure switch 2. Relief valve 3. Oil cooler bracket
4. O-ring 5. Oil cooler 6. O-ring
7. Gasket 8. Clamp 9. Water hose
10. Water hose