2003 NISSAN X-TRAIL low oil pressure
[x] Cancel search: low oil pressurePage 659 of 3066
TROUBLE DIAGNOSIS
ATC-81
C
D
E
F
G
H
I
K
L
MA
B
AT C
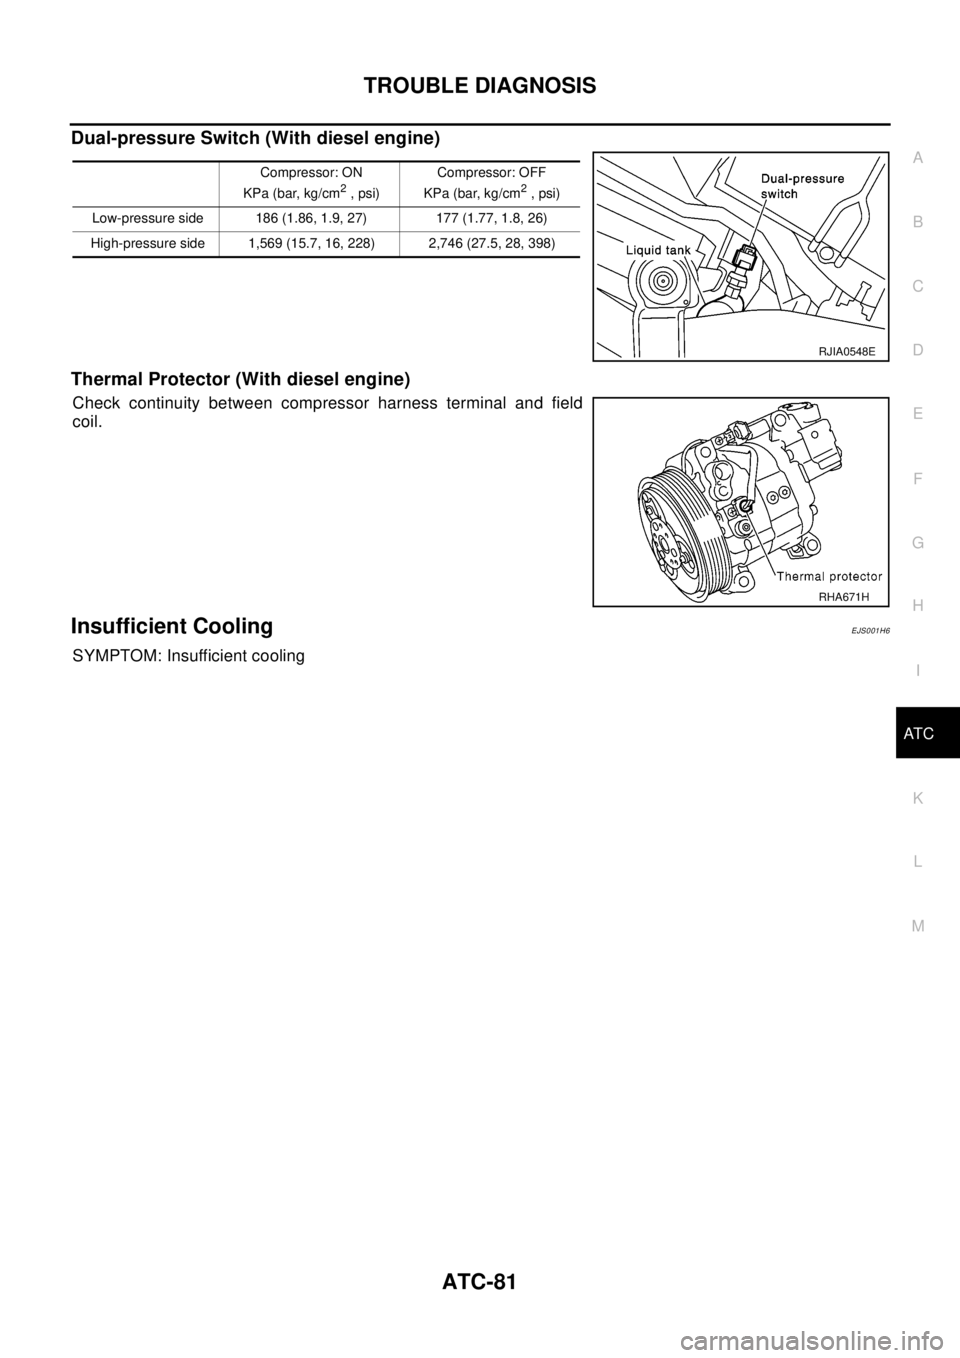
Dual-pressure Switch (With diesel engine)
Thermal Protector (With diesel engine)
Check continuity between compressor harness terminal and field
coil.
Insufficient CoolingEJS001H6
SYMPTOM: Insufficient cooling
Compressor: ON
KPa (bar, kg/cm2,psi)Compressor: OFF
KPa (bar, kg/cm2,psi)
Low-pressure side 186 (1.86, 1.9, 27) 177 (1.77, 1.8, 26)
High-pressure side 1,569 (15.7, 16, 228) 2,746 (27.5, 28, 398)
RJIA0548E
RHA671H
Page 706 of 3066
ATC-128
REFRIGERANT LINES
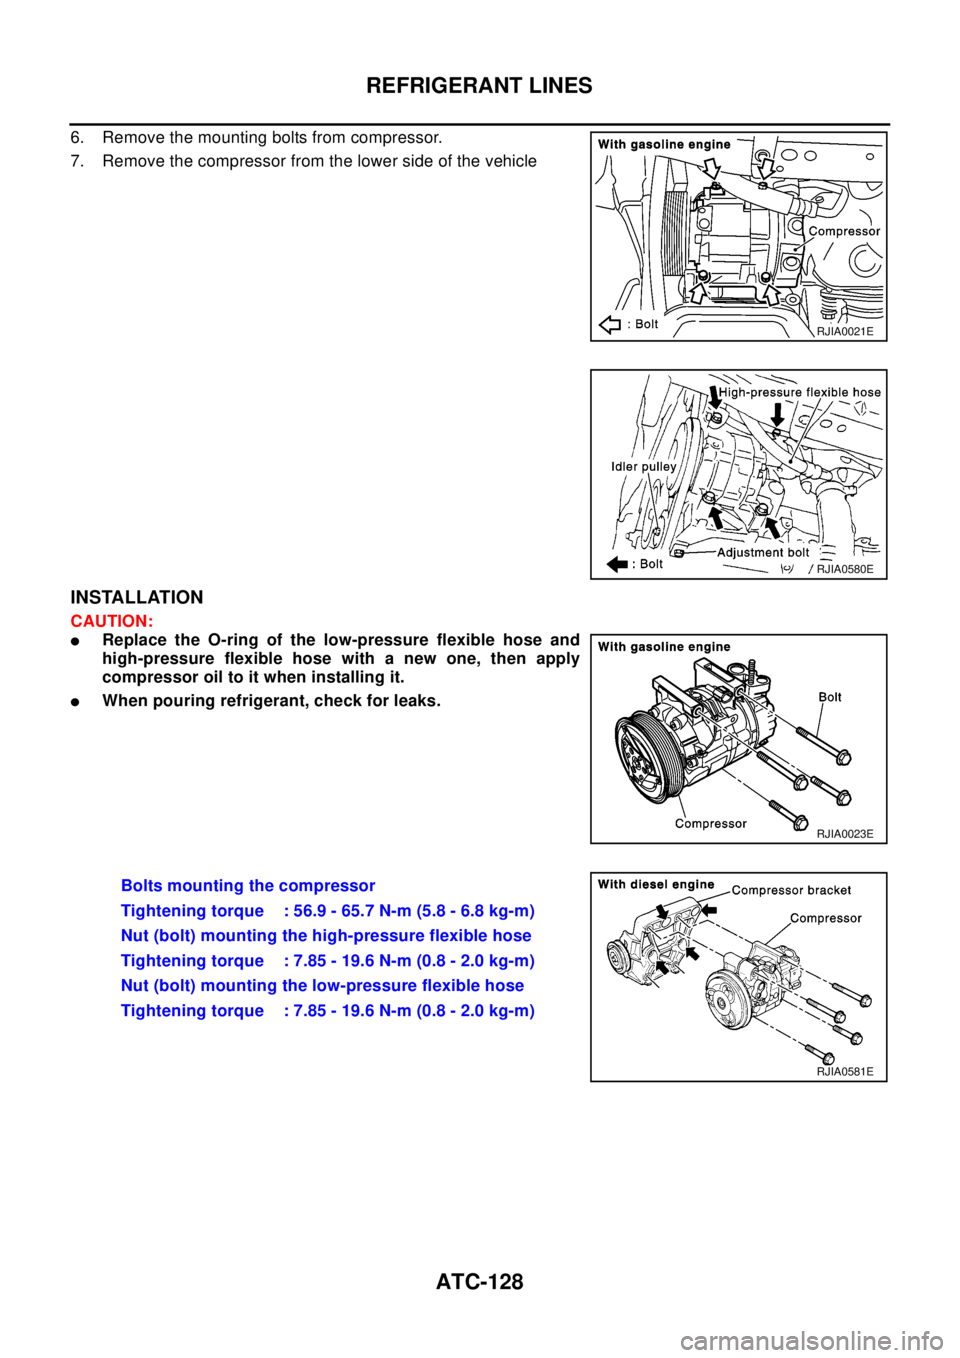
6. Remove the mounting bolts from compressor.
7. Remove the compressor from the lower side of the vehicle
INSTALLATION
CAUTION:
lReplace the O-ring of the low-pressure flexible hose and
high-pressure flexible hose with a new one, then apply
compressor oil to it when installing it.
lWhen pouring refrigerant, check for leaks.
RJIA0021E
RJIA0580E
RJIA0023E
Bolts mounting the compressor
Tightening torque : 56.9 - 65.7 N-m (5.8 - 6.8 kg-m)
Nut (bolt) mounting the high-pressure flexible hose
Tightening torque : 7.85 - 19.6 N-m (0.8 - 2.0 kg-m)
Nut (bolt) mounting the low-pressure flexible hose
Tightening torque : 7.85 - 19.6 N-m (0.8 - 2.0 kg-m)
RJIA0581E
Page 714 of 3066
ATC-136
REFRIGERANT LINES
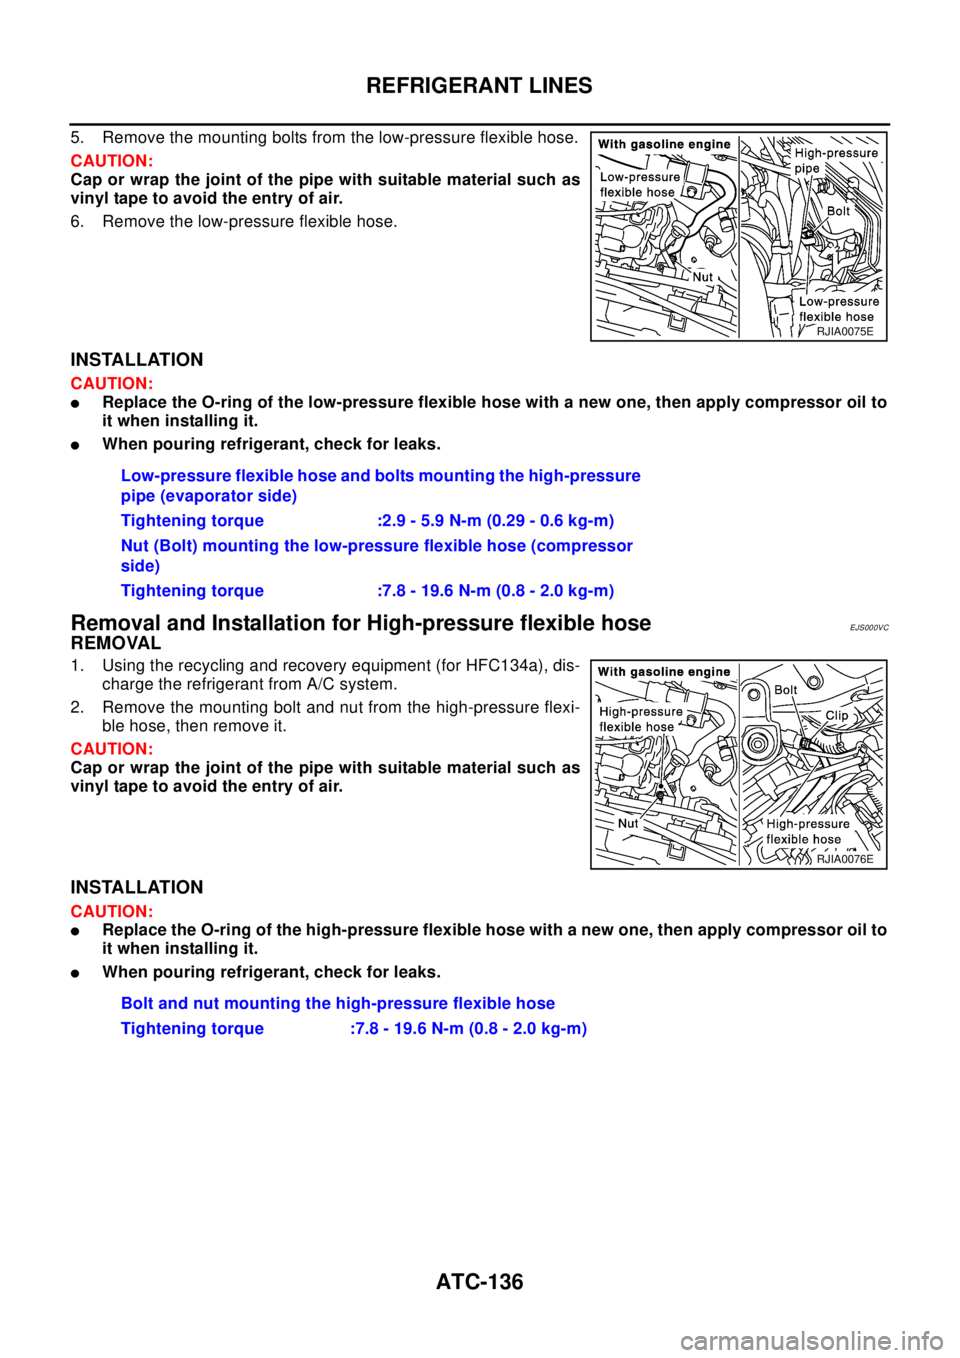
5. Remove the mounting bolts from the low-pressure flexible hose.
CAUTION:
Cap or wrap the joint of the pipe with suitable material such as
vinyl tape to avoid the entry of air.
6. Remove the low-pressure flexible hose.
INSTALLATION
CAUTION:
lReplace the O-ring of the low-pressure flexible hose with a new one, then apply compressor oil to
it when installing it.
lWhen pouring refrigerant, check for leaks.
Removal and Installation for High-pressure flexible hoseEJS000VC
REMOVAL
1. Using the recycling and recovery equipment (for HFC134a), dis-
charge the refrigerant from A/C system.
2. Remove the mounting bolt and nut from the high-pressure flexi-
ble hose, then remove it.
CAUTION:
Cap or wrap the joint of the pipe with suitable material such as
vinyl tape to avoid the entry of air.
INSTALLATION
CAUTION:
lReplace the O-ring of the high-pressure flexible hose with a new one, then apply compressor oil to
it when installing it.
lWhen pouring refrigerant, check for leaks.
RJIA0075E
Low-pressure flexible hose and bolts mounting the high-pressure
pipe (evaporator side)
Tightening torque :2.9 - 5.9 N-m (0.29 - 0.6 kg-m)
Nut (Bolt) mounting the low-pressure flexible hose (compressor
side)
Tightening torque :7.8 - 19.6 N-m (0.8 - 2.0 kg-m)
RJIA0076E
Bolt and nut mounting the high-pressure flexible hose
Tightening torque :7.8 - 19.6 N-m (0.8 - 2.0 kg-m)
Page 715 of 3066
REFRIGERANT LINES
ATC-137
C
D
E
F
G
H
I
K
L
MA
B
AT C
Removal and Installation for High-pressure pipeEJS000VD
REMOVAL
1. Using the recycling and recovery equipment (for HFC134a), dis-
charge the refrigerant from A/C system.
2. Remove the low-pressure flexible hose.
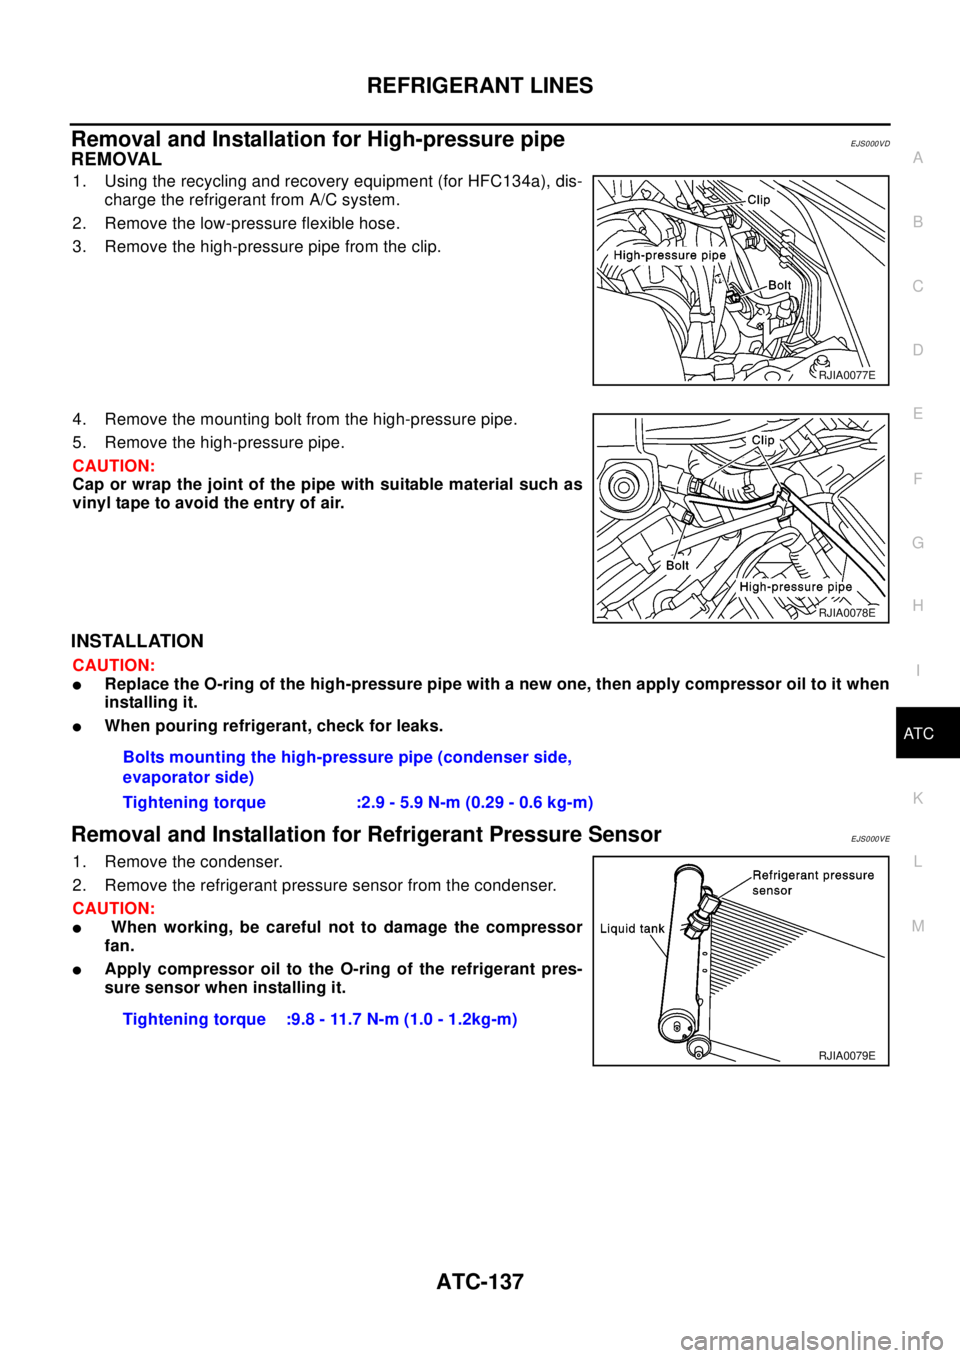
3. Remove the high-pressure pipe from the clip.
4. Remove the mounting bolt from the high-pressure pipe.
5. Remove the high-pressure pipe.
CAUTION:
Cap or wrap the joint of the pipe with suitable material such as
vinyl tape to avoid the entry of air.
INSTALLATION
CAUTION:
lReplace the O-ring of the high-pressure pipe with a new one, then apply compressor oil to it when
installing it.
lWhen pouring refrigerant, check for leaks.
Removal and Installation for Refrigerant Pressure SensorEJS000VE
1. Remove the condenser.
2. Remove the refrigerant pressure sensor from the condenser.
CAUTION:
lWhen working, be careful not to damage the compressor
fan.
lApply compressor oil to the O-ring of the refrigerant pres-
sure sensor when installing it.
RJIA0077E
RJIA0078E
Bolts mounting the high-pressure pipe (condenser side,
evaporator side)
Tighteningtorque :2.9-5.9N-m(0.29-0.6kg-m)
Tightening torque :9.8 - 11.7 N-m (1.0 - 1.2kg-m)
RJIA0079E
Page 716 of 3066
ATC-138
REFRIGERANT LINES
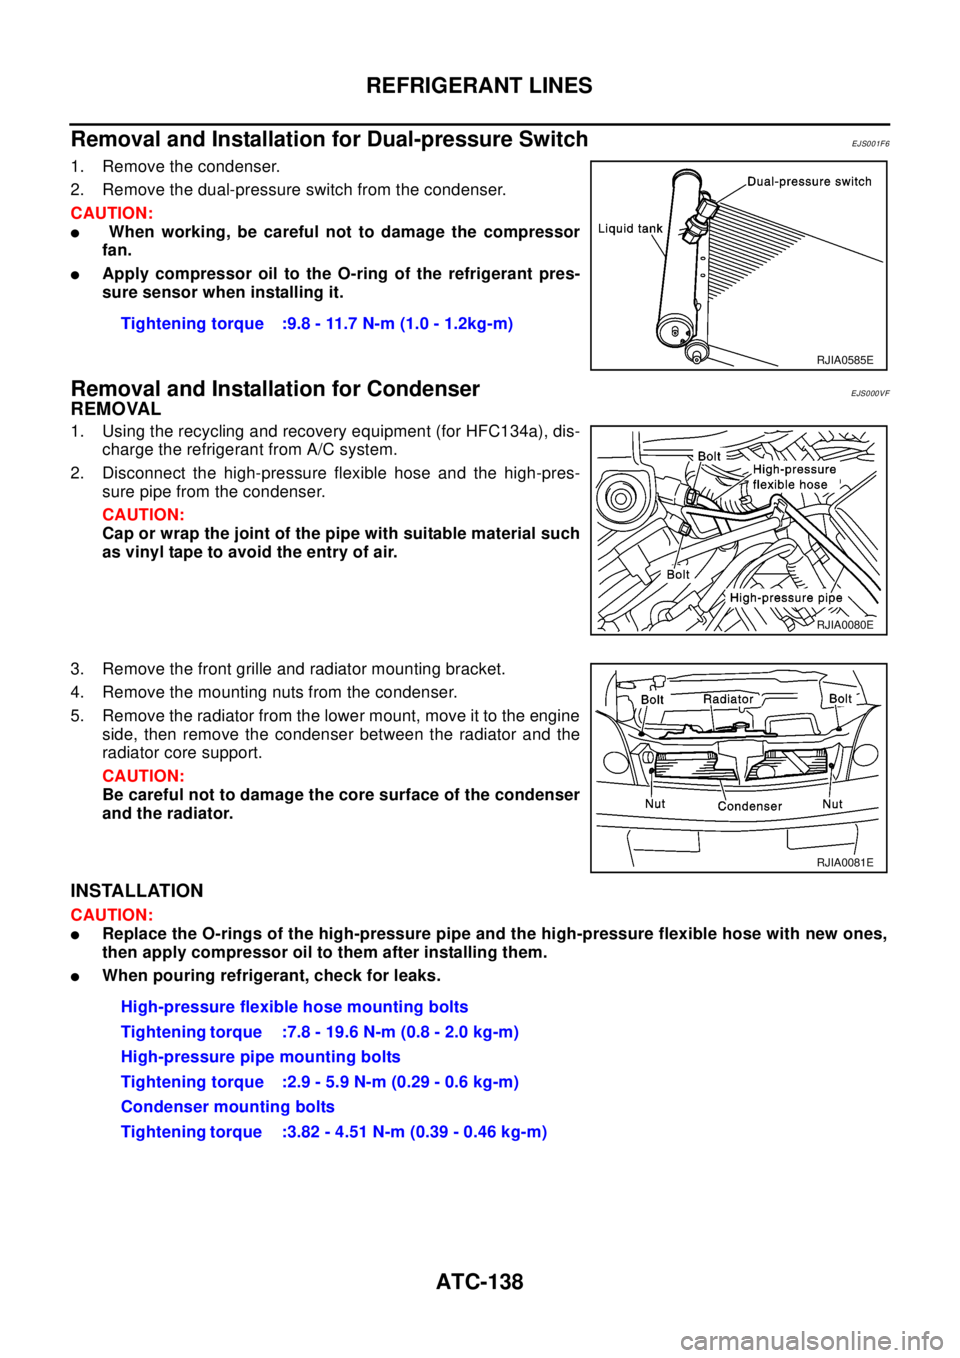
Removal and Installation for Dual-pressure Switch
EJS001F6
1. Remove the condenser.
2. Remove the dual-pressure switch from the condenser.
CAUTION:
lWhen working, be careful not to damage the compressor
fan.
lApply compressor oil to the O-ring of the refrigerant pres-
sure sensor when installing it.
Removal and Installation for CondenserEJS000VF
REMOVAL
1. Using the recycling and recovery equipment (for HFC134a), dis-
charge the refrigerant from A/C system.
2. Disconnect the high-pressure flexible hose and the high-pres-
sure pipe from the condenser.
CAUTION:
Cap or wrap the joint of the pipe with suitable material such
as vinyl tape to avoid the entry of air.
3. Remove the front grille and radiator mounting bracket.
4. Remove the mounting nuts from the condenser.
5. Remove the radiator from the lower mount, move it to the engine
side, then remove the condenser between the radiator and the
radiator core support.
CAUTION:
Be careful not to damage the core surface of the condenser
and the radiator.
INSTALLATION
CAUTION:
lReplace the O-rings of the high-pressure pipe and the high-pressure flexible hose with new ones,
then apply compressor oil to them after installing them.
lWhen pouring refrigerant, check for leaks.Tightening torque :9.8 - 11.7 N-m (1.0 - 1.2kg-m)
RJIA0585E
RJIA0080E
RJIA0081E
High-pressure flexible hose mounting bolts
Tightening torque :7.8 - 19.6 N-m (0.8 - 2.0 kg-m)
High-pressure pipe mounting bolts
Tightening torque :2.9 - 5.9 N-m (0.29 - 0.6 kg-m)
Condenser mounting bolts
Tightening torque :3.82 - 4.51 N-m (0.39 - 0.46 kg-m)
Page 717 of 3066
REFRIGERANT LINES
ATC-139
C
D
E
F
G
H
I
K
L
MA
B
AT C
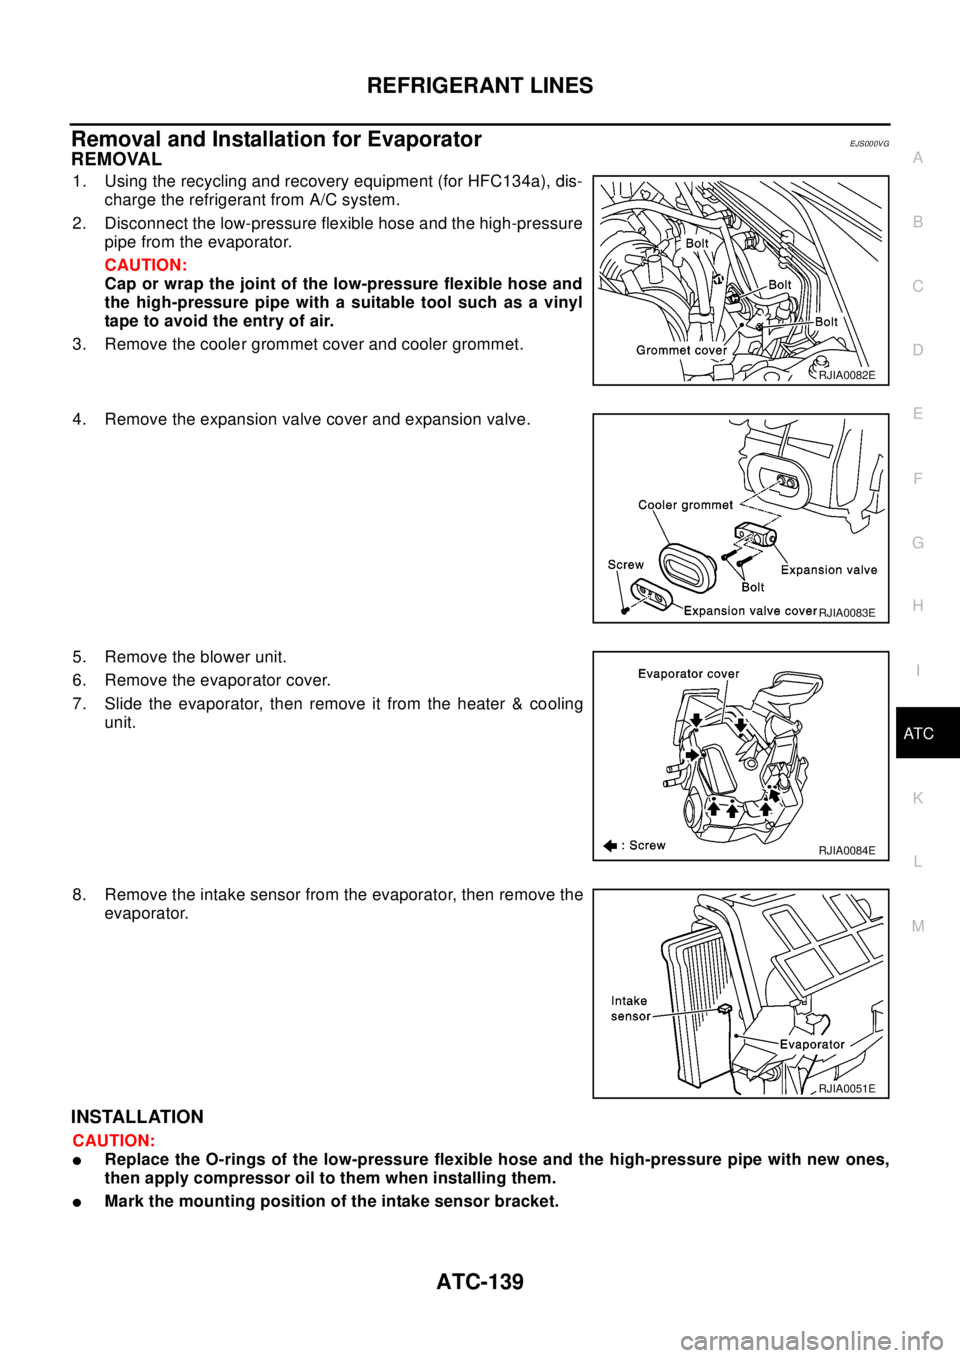
Removal and Installation for EvaporatorEJS000VG
REMOVAL
1. Using the recycling and recovery equipment (for HFC134a), dis-
charge the refrigerant from A/C system.
2. Disconnect the low-pressure flexible hose and the high-pressure
pipe from the evaporator.
CAUTION:
Cap or wrap the joint of the low-pressure flexible hose and
the high-pressure pipe with a suitable tool such as a vinyl
tape to avoid the entry of air.
3. Remove the cooler grommet cover and cooler grommet.
4. Remove the expansion valve cover and expansion valve.
5. Remove the blower unit.
6. Remove the evaporator cover.
7. Slide the evaporator, then remove it from the heater & cooling
unit.
8. Remove the intake sensor from the evaporator, then remove the
evaporator.
INSTALLATION
CAUTION:
lReplace the O-rings of the low-pressure flexible hose and the high-pressure pipe with new ones,
then apply compressor oil to them when installing them.
lMark the mounting position of the intake sensor bracket.
RJIA0082E
RJIA0083E
RJIA0084E
RJIA0051E
Page 718 of 3066
ATC-140
REFRIGERANT LINES
Removal and Installation for Expansion Valve
EJS000VH
1. Using the recycling and recovery equipment (for HFC-134a),
discharge the refrigerant.
2. Disconnect the low-pressure flexible hose and high-pressure
pipe from the evaporator.
CAUTION:
Cap or wrap the joint of the low-pressure flexible hose and
the high-pressure pipe with a suitable tool such as a vinyl
tape to avoid the entry of air.
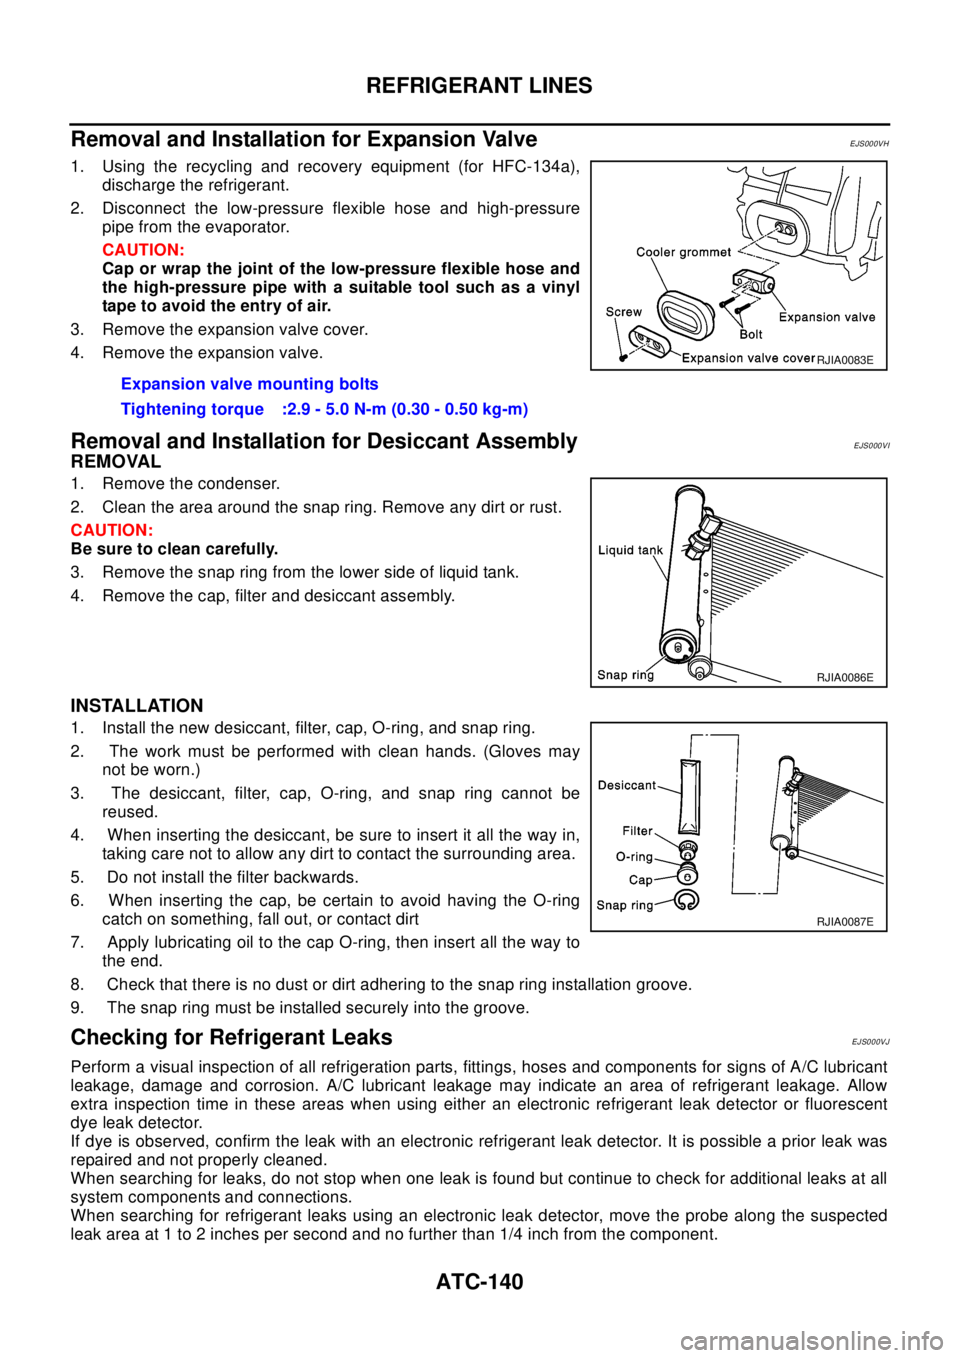
3. Remove the expansion valve cover.
4. Remove the expansion valve.
Removal and Installation for Desiccant AssemblyEJS000VI
REMOVAL
1. Remove the condenser.
2. Clean the area around the snap ring. Remove any dirt or rust.
CAUTION:
Be sure to clean carefully.
3. Remove the snap ring from the lower side of liquid tank.
4. Remove the cap, filter and desiccant assembly.
INSTALLATION
1. Install the new desiccant, filter, cap, O-ring, and snap ring.
2. The work must be performed with clean hands. (Gloves may
not be worn.)
3. The desiccant, filter, cap, O-ring, and snap ring cannot be
reused.
4. When inserting the desiccant, be sure to insert it all the way in,
taking care not to allow any dirt to contact the surrounding area.
5. Do not install the filter backwards.
6. When inserting the cap, be certain to avoid having the O-ring
catch on something, fall out, or contact dirt
7. Apply lubricating oil to the cap O-ring, then insert all the way to
the end.
8. Check that there is no dust or dirt adhering to the snap ring installation groove.
9. The snap ring must be installed securely into the groove.
Checking for Refrigerant LeaksEJS000VJ
Perform a visual inspection of all refrigeration parts, fittings, hoses and components for signs of A/C lubricant
leakage, damage and corrosion. A/C lubricant leakage may indicate an area of refrigerant leakage. Allow
extra inspection time in these areas when using either an electronic refrigerant leak detector or fluorescent
dye leak detector.
If dye is observed, confirm the leak with an electronic refrigerant leak detector. It is possible a prior leak was
repaired and not properly cleaned.
When searching for leaks, do not stop when one leak is found but continue to check for additional leaks at all
system components and connections.
When searching for refrigerant leaks using an electronic leak detector, move the probe along the suspected
leak area at 1 to 2 inches per second and no further than 1/4 inch from the component.Expansion valve mounting bolts
Tightening torque :2.9 - 5.0 N-m (0.30 - 0.50 kg-m)
RJIA0083E
RJIA0086E
RJIA0087E
Page 719 of 3066
REFRIGERANT LINES
ATC-141
C
D
E
F
G
H
I
K
L
MA
B
AT C
CAUTION:
Moving the electronic leak detector probe slower and closer to the suspected leak area will improve
the chances of finding a leak.
Checking System for Leaks Using the Fluorescent Leak DetectorEJS000VK
1. Check A/C system for leaks using the UV lamp and safety glasses (J-42220) in a low sunlight area (area
without windows preferable). Illuminate all components, fittings and lines. The dye will appear as a bright
green/yellow area at the point of leakage. Fluorescent dye observed at the evaporator drain opening indi-
cates an evaporator core assembly (tubes, core or TXV) leak.
2. If the suspected area is difficult to see, use an adjustable mirror or wipe the area with a clean shop rag or
cloth, with the UV lamp for dye residue.
3. After the leak is repaired, remove any residual dye using dye cleaner (J-43872) to prevent future misdiag-
nosis.
4. Perform a system performance check and verify the leak repair with an approved electronic refrigerant
leak detector.
NOTE:
Other gases in the work area or substances on the A/C components, for example, anti-freeze, windshield
washer fluid, solvents and lubricants, may falsely trigger the leak detector. Make sure the surfaces to be
checked are clean.
Clean with a dry cloth or blow off with shop air.
Do not allow the sensor tip of the detector to contact with any substance. This can also cause false readings
and may damage the detector.
Dye InjectionEJS000VL
(This procedure is only necessary when recharging the system or when the compressor has seized and was
replaced.)
1. Check A/C system static (at rest) pressure. Pressure must be at least 345 kPa (50 psi).
2. Pour one bottle (1/4 ounce / 7.4 cc) of the A/C refrigerant dye into the injector tool (J-41459).
3. Connect the injector tool to the A/C LOW PRESSURE side service fitting.
4. Start engine and switch A/C ON.
5. When the A/C operating (compressor running), inject one bottle (1/4 ounce / 7.4 cc) of fluorescent dye
through the low-pressure service valve using dye injector tool J-41459 (refer to the manufacture's operat-
ing instructions).
6. With the engine still running, disconnect the injector tool from the service fitting.
CAUTION:
Be careful the A/C system or replacing a component, pour the dye directly into the open system con-
nection and proceed with the service procedures.
7. Operate the A/C system for a minimum of 20 minutes to mix the dye with the system oil. Depending on the
leak size, operating conditions and location of the leak, it may take from minutes to days for the dye to
penetrate a leak and become visible.
Electronic Refrigerant Leak DetectorEJS000VM
PRECAUTIONS FOR HANDLING LEAK DETECTOR
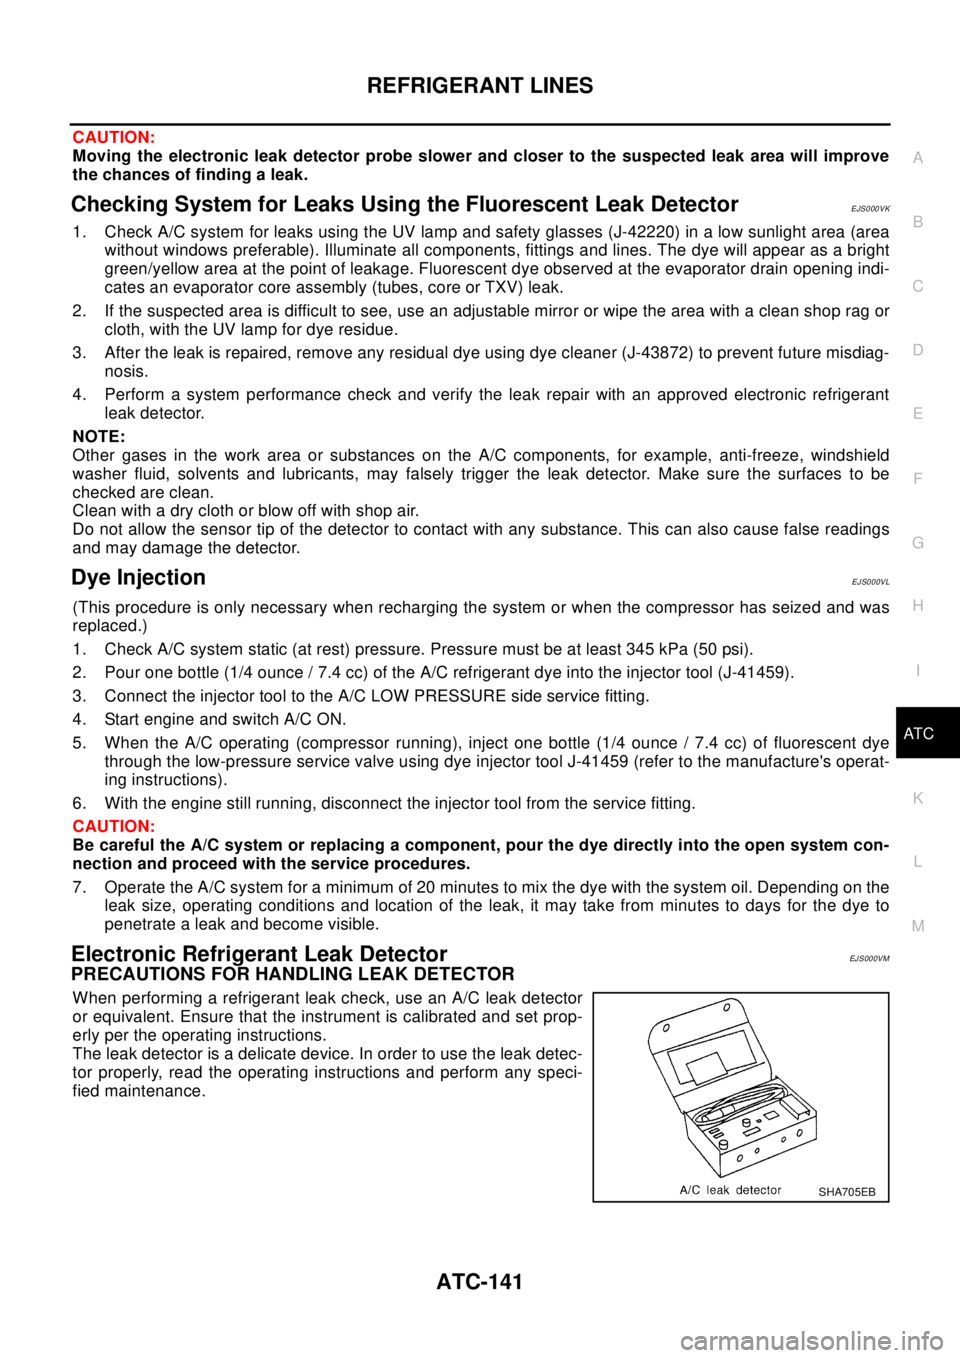
When performing a refrigerant leak check, use an A/C leak detector
or equivalent. Ensure that the instrument is calibrated and set prop-
erly per the operating instructions.
The leak detector is a delicate device. In order to use the leak detec-
tor properly, read the operating instructions and perform any speci-
fied maintenance.
SHA705EB