2003 NISSAN X-TRAIL engine oil capacity
[x] Cancel search: engine oil capacityPage 2516 of 3066
MA-24
ENGINE MAINTENANCE (QR20DE)
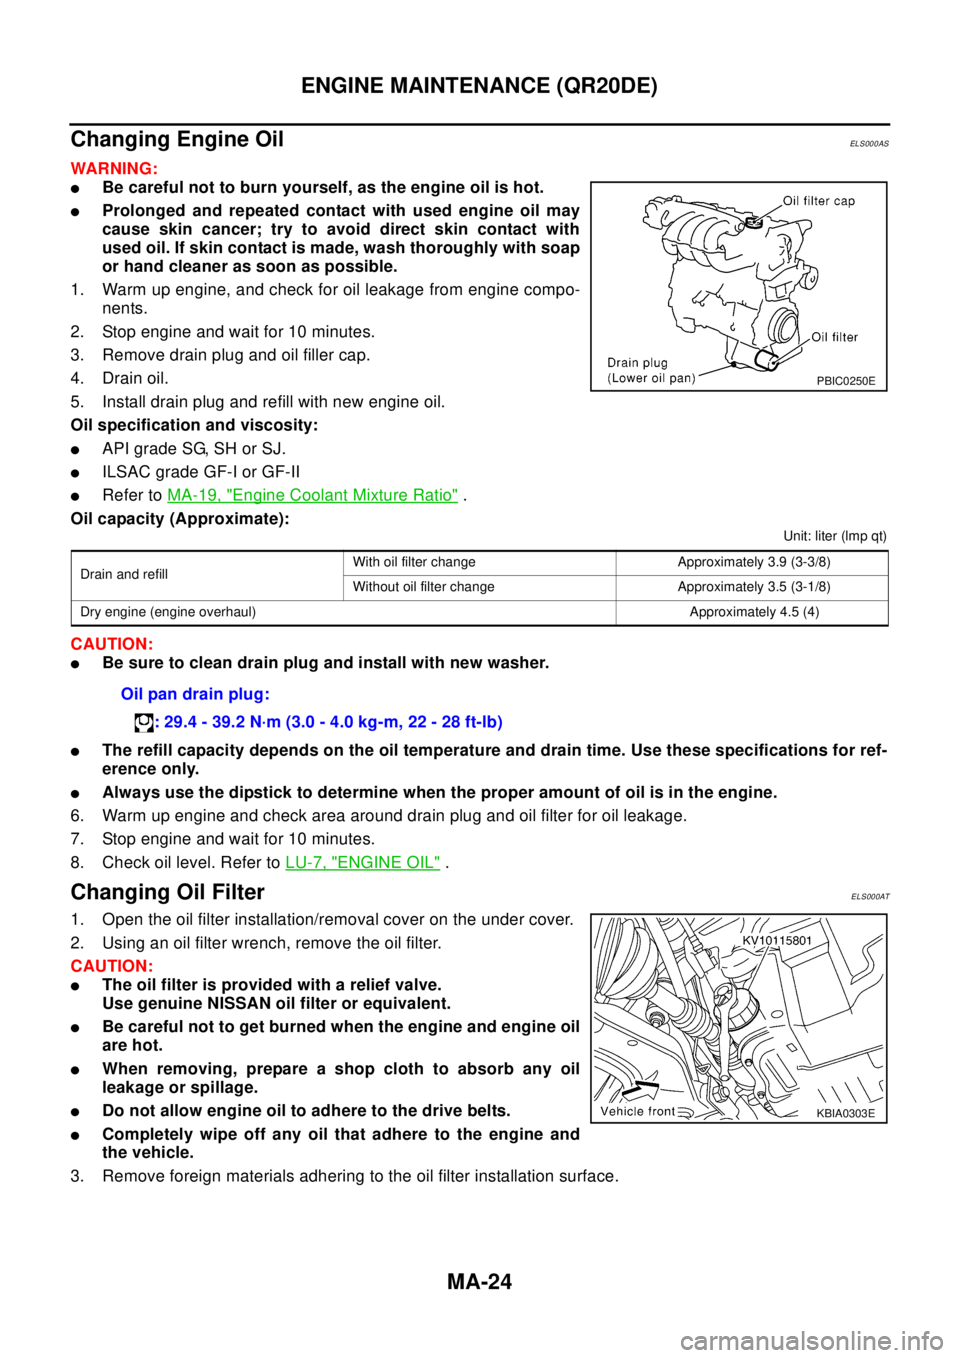
Changing Engine Oil
ELS000AS
WAR NIN G:
lBe careful not to burn yourself, as the engine oil is hot.
lProlonged and repeated contact with used engine oil may
cause skin cancer; try to avoid direct skin contact with
used oil. If skin contact is made, wash thoroughly with soap
or hand cleaner as soon as possible.
1. Warm up engine, and check for oil leakage from engine compo-
nents.
2. Stop engine and wait for 10 minutes.
3. Remove drain plug and oil filler cap.
4. Drain oil.
5. Install drain plug and refill with new engine oil.
Oil specification and viscosity:
lAPI grade SG, SH or SJ.
lILSAC grade GF-I or GF-II
lRefer toMA-19, "Engine Coolant Mixture Ratio".
Oil capacity (Approximate):
Unit: liter (lmp qt)
CAUTION:
lBe sure to clean drain plug and install with new washer.
lThe refill capacity depends on the oil temperature and drain time. Use these specifications for ref-
erence only.
lAlways use the dipstick to determine when the proper amount of oil is in the engine.
6. Warm up engine and check area around drain plug and oil filter for oil leakage.
7. Stop engine and wait for 10 minutes.
8. Check oil level. Refer toLU-7, "
ENGINE OIL".
Changing Oil FilterELS000AT
1. Open the oil filter installation/removal cover on the under cover.
2. Using an oil filter wrench, remove the oil filter.
CAUTION:
lThe oil filter is provided with a relief valve.
Use genuine NISSAN oil filter or equivalent.
lBe careful not to get burned when the engine and engine oil
are hot.
lWhen removing, prepare a shop cloth to absorb any oil
leakage or spillage.
lDo not allow engine oil to adhere to the drive belts.
lCompletely wipe off any oil that adhere to the engine and
the vehicle.
3. Remove foreign materials adhering to the oil filter installation surface.
PBIC0250E
Drain and refillWith oil filter change Approximately 3.9 (3-3/8)
Without oil filter change Approximately 3.5 (3-1/8)
Dry engine (engine overhaul) Approximately 4.5 (4)
Oil pan drain plug:
: 29.4 - 39.2 N·m (3.0 - 4.0 kg-m, 22 - 28 ft-lb)
KBIA0303E
Page 2524 of 3066
MA-32
ENGINE MAINTENANCE (YD22DDTI)
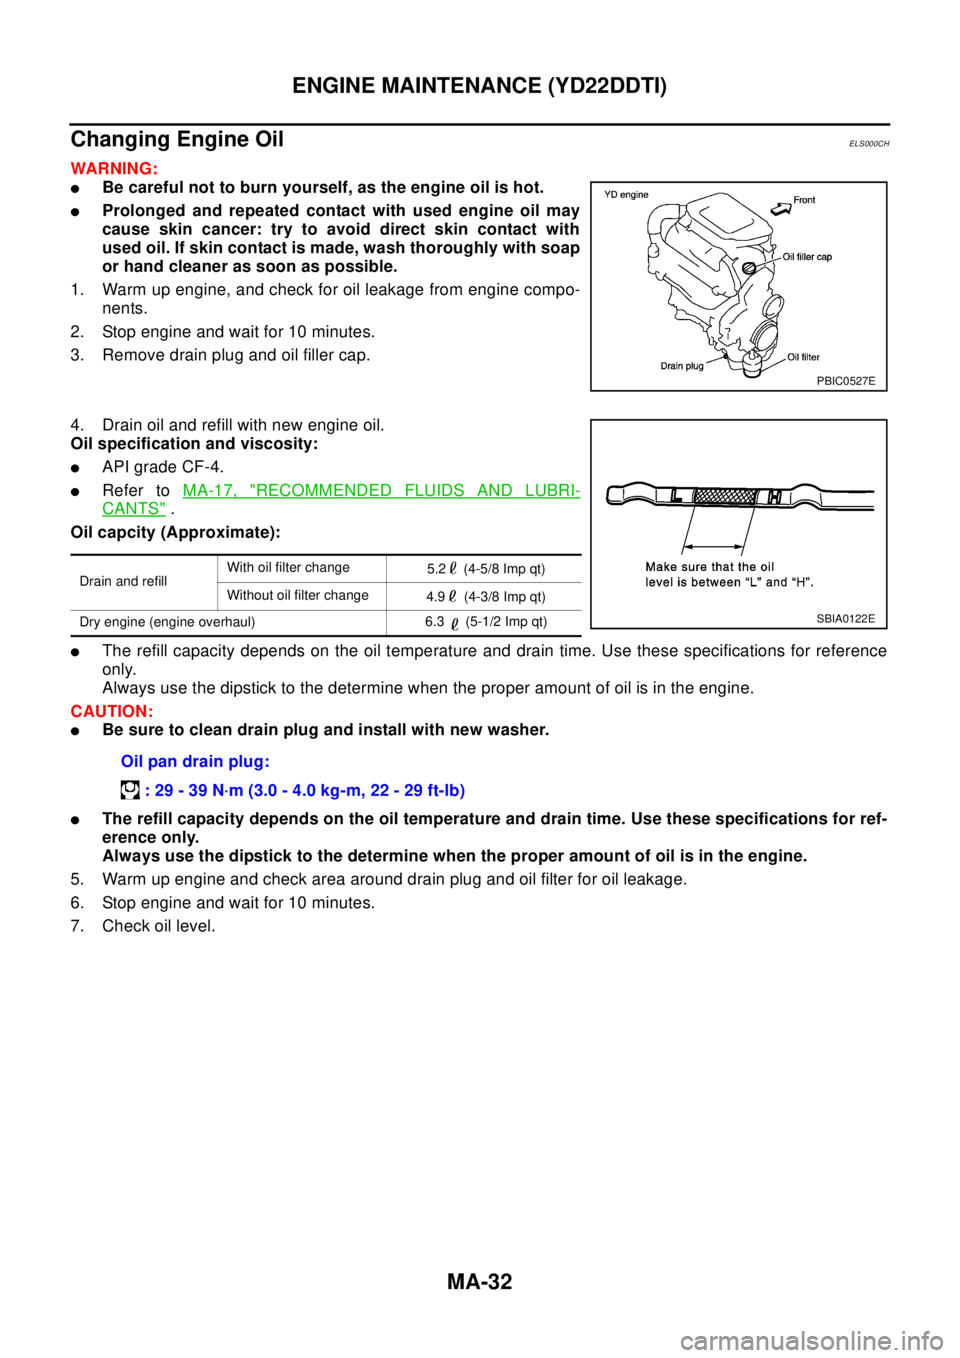
Changing Engine Oil
ELS000CH
WAR NIN G:
lBe careful not to burn yourself, as the engine oil is hot.
lProlonged and repeated contact with used engine oil may
cause skin cancer: try to avoid direct skin contact with
used oil. If skin contact is made, wash thoroughly with soap
or hand cleaner as soon as possible.
1. Warm up engine, and check for oil leakage from engine compo-
nents.
2. Stop engine and wait for 10 minutes.
3. Remove drain plug and oil filler cap.
4. Drain oil and refill with new engine oil.
Oil specification and viscosity:
lAPI grade CF-4.
lRefer toMA-17, "RECOMMENDED FLUIDS AND LUBRI-
CANTS".
Oil capcity (Approximate):
lThe refill capacity depends on the oil temperature and drain time. Use these specifications for reference
only.
Always use the dipstick to the determine when the proper amount of oil is in the engine.
CAUTION:
lBe sure to clean drain plug and install with new washer.
lThe refill capacity depends on the oil temperature and drain time. Use these specifications for ref-
erence only.
Always use the dipstick to the determine when the proper amount of oil is in the engine.
5. Warm up engine and check area around drain plug and oil filter for oil leakage.
6. Stop engine and wait for 10 minutes.
7. Check oil level.
PBIC0527E
Drain and refillWith oil filter change
5.2 (4-5/8 Imp qt)
Without oil filter change
4.9 (4-3/8 Imp qt)
Dry engine (engine overhaul)6.3 (5-1/2 Imp qt)
Oil pan drain plug:
:29-39N·m(3.0-4.0kg-m,22-29ft-lb)
SBIA0122E
Page 2526 of 3066
MA-34
ENGINE MAINTENANCE (YD22DDTI)
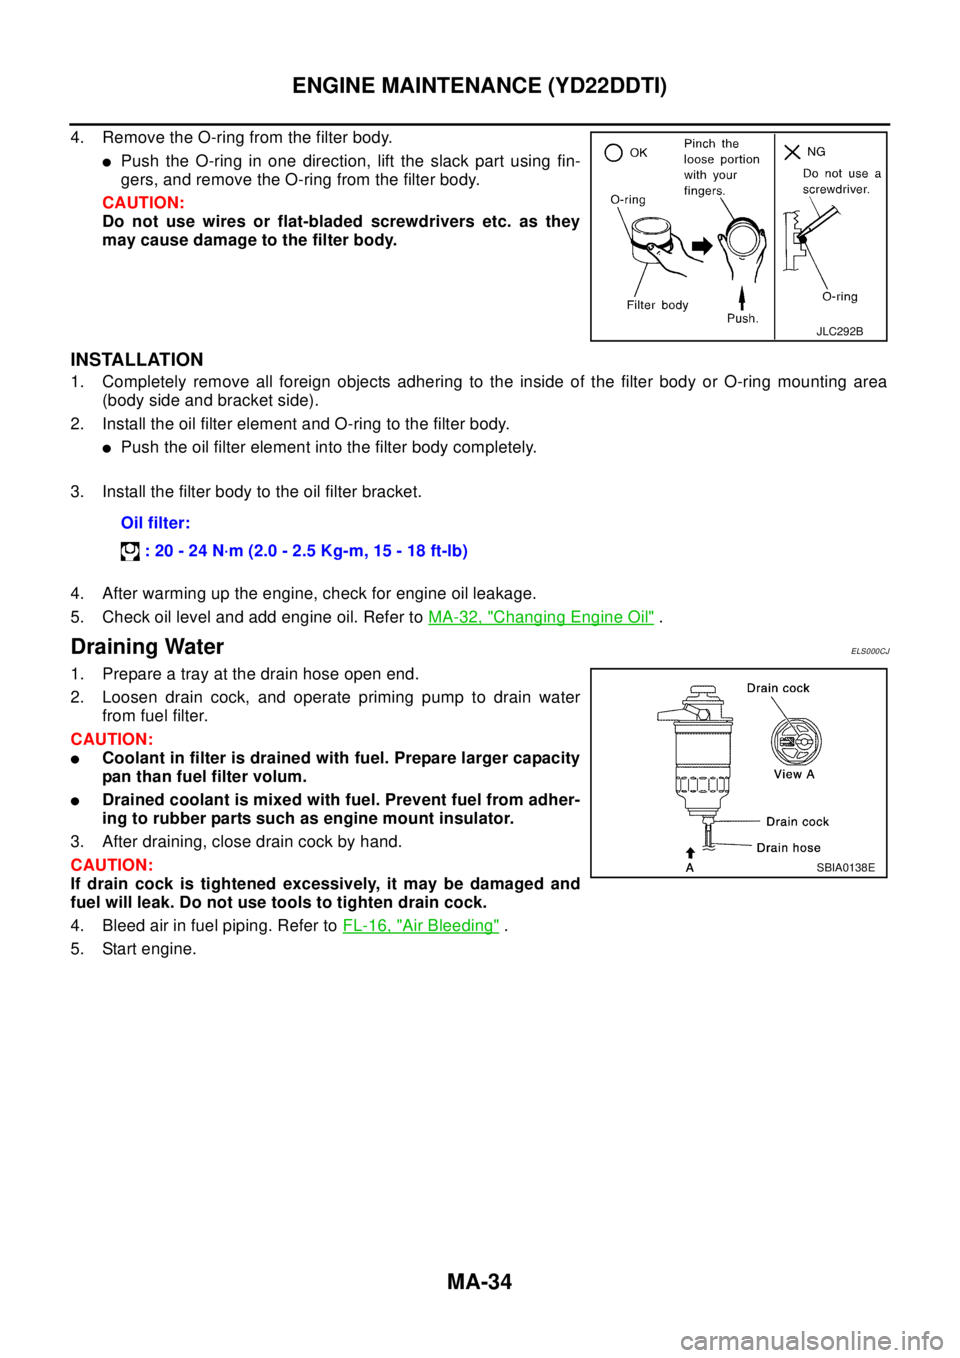
4. Remove the O-ring from the filter body.
lPush the O-ring in one direction, lift the slack part using fin-
gers, and remove the O-ring from the filter body.
CAUTION:
Do not use wires or flat-bladed screwdrivers etc. as they
may cause damage to the filter body.
INSTALLATION
1. Completely remove all foreign objects adhering to the inside of the filter body or O-ring mounting area
(body side and bracket side).
2. Install the oil filter element and O-ring to the filter body.
lPush the oil filter element into the filter body completely.
3. Install the filter body to the oil filter bracket.
4. After warming up the engine, check for engine oil leakage.
5. Check oil level and add engine oil. Refer toMA-32, "
Changing Engine Oil".
Draining WaterELS000CJ
1. Prepare a tray at the drain hose open end.
2. Loosen drain cock, and operate priming pump to drain water
from fuel filter.
CAUTION:
lCoolant in filter is drained with fuel. Prepare larger capacity
pan than fuel filter volum.
lDrained coolant is mixed with fuel. Prevent fuel from adher-
ing to rubber parts such as engine mount insulator.
3. After draining, close drain cock by hand.
CAUTION:
If drain cock is tightened excessively, it may be damaged and
fuel will leak. Do not use tools to tighten drain cock.
4. Bleed air in fuel piping. Refer toFL-16, "
Air Bleeding".
5. Start engine.
JLC292B
Oil filter:
:20-24N·m(2.0-2.5Kg-m,15-18ft-lb)
SBIA0138E
Page 2528 of 3066
MA-36
CHASSIS AND BODY MAINTENANCE
2. Check oil level.
CAUTION:
Do not reuse gasket.
Checking A/T FluidELS000BV
1. Warm up engine.
2. Check for fluid leakage.
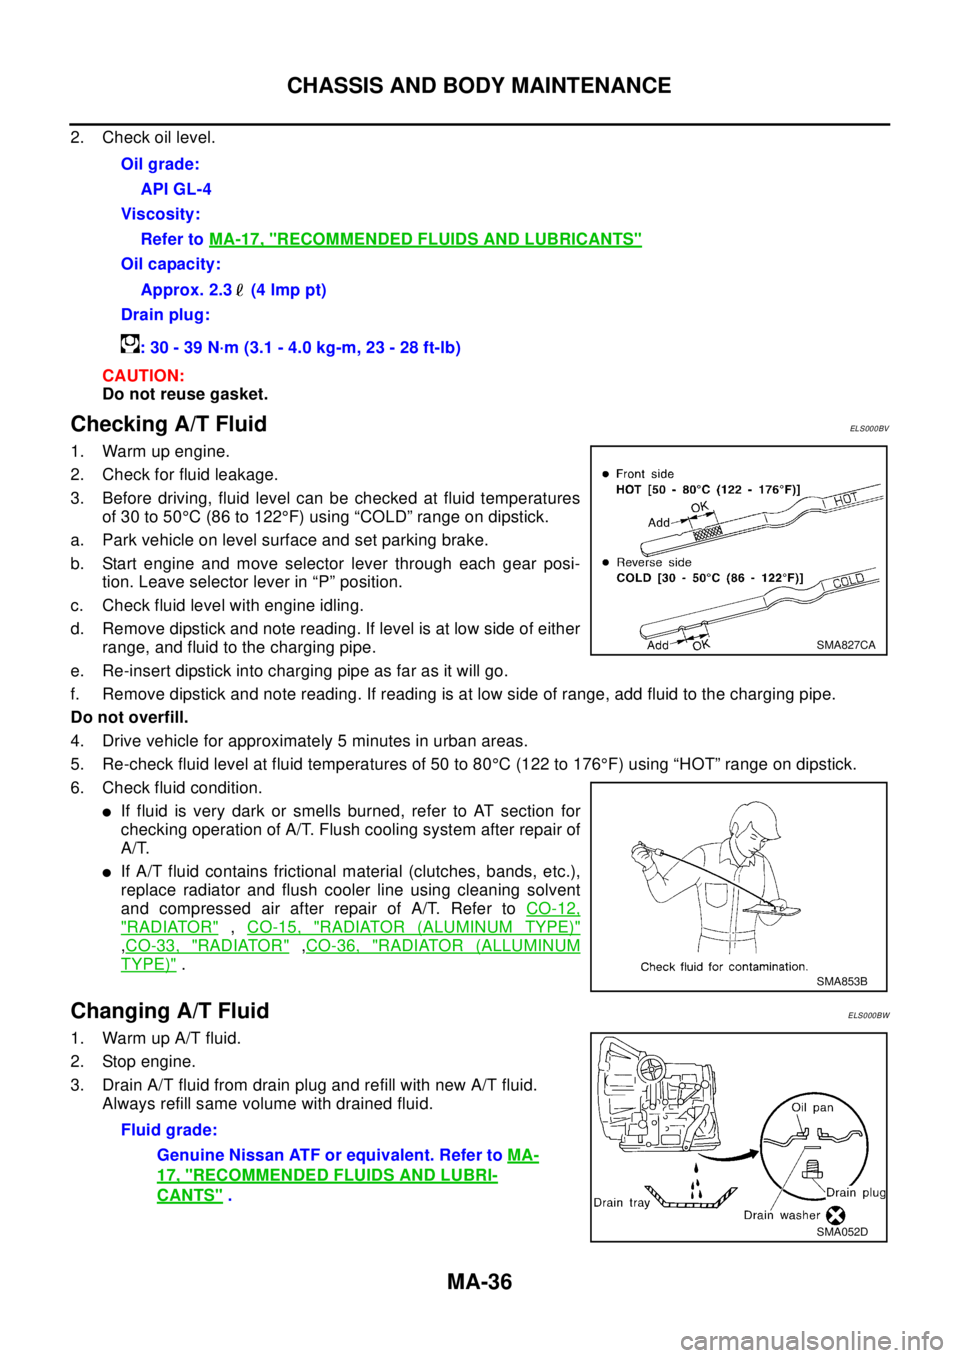
3. Before driving, fluid level can be checked at fluid temperatures
of 30 to 50°C (86 to 122°F) using “COLD” range on dipstick.
a. Park vehicle on level surface and set parking brake.
b. Start engine and move selector lever through each gear posi-
tion. Leave selector lever in “P” position.
c. Check fluid level with engine idling.
d. Remove dipstick and note reading. If level is at low side of either
range, and fluid to the charging pipe.
e. Re-insert dipstick into charging pipe as far as it will go.
f. Remove dipstick and note reading. If reading is at low side of range, add fluid to the charging pipe.
Do not overfill.
4. Drive vehicle for approximately 5 minutes in urban areas.
5. Re-check fluid level at fluid temperatures of 50 to 80°C (122 to 176°F) using “HOT” range on dipstick.
6. Check fluid condition.
lIf fluid is very dark or smells burned, refer to AT section for
checking operation of A/T. Flush cooling system after repair of
A/T.
lIf A/T fluid contains frictional material (clutches, bands, etc.),
replace radiator and flush cooler line using cleaning solvent
and compressed air after repair of A/T. Refer toCO-12,
"RADIATOR",CO-15, "RADIATOR (ALUMINUM TYPE)"
,CO-33, "RADIATOR",CO-36, "RADIATOR (ALLUMINUM
TYPE)".
Changing A/T FluidELS000BW
1. Warm up A/T fluid.
2. Stop engine.
3. Drain A/T fluid from drain plug and refill with new A/T fluid.
Always refill same volume with drained fluid.Oil grade:
API GL-4
Viscosity:
Refer toMA-17, "
RECOMMENDED FLUIDS AND LUBRICANTS"
Oil capacity:
Approx. 2.3 (4 lmp pt)
Drain plug:
: 30 - 39 N·m (3.1 - 4.0 kg-m, 23 - 28 ft-lb)
SMA827CA
SMA853B
Fluid grade:
Genuine Nissan ATF or equivalent. Refer toMA-
17, "RECOMMENDED FLUIDS AND LUBRI-
CANTS".
SMA052D
Page 2529 of 3066
CHASSIS AND BODY MAINTENANCE
MA-37
C
D
E
F
G
H
I
J
K
MA
B
MA
4. Run engine at idle speed for five minutes.
5. Check fluid level and condition. Refer to “Checking A/T Fluid”. If fluid is still dirty, repeat steps 2 through 5.
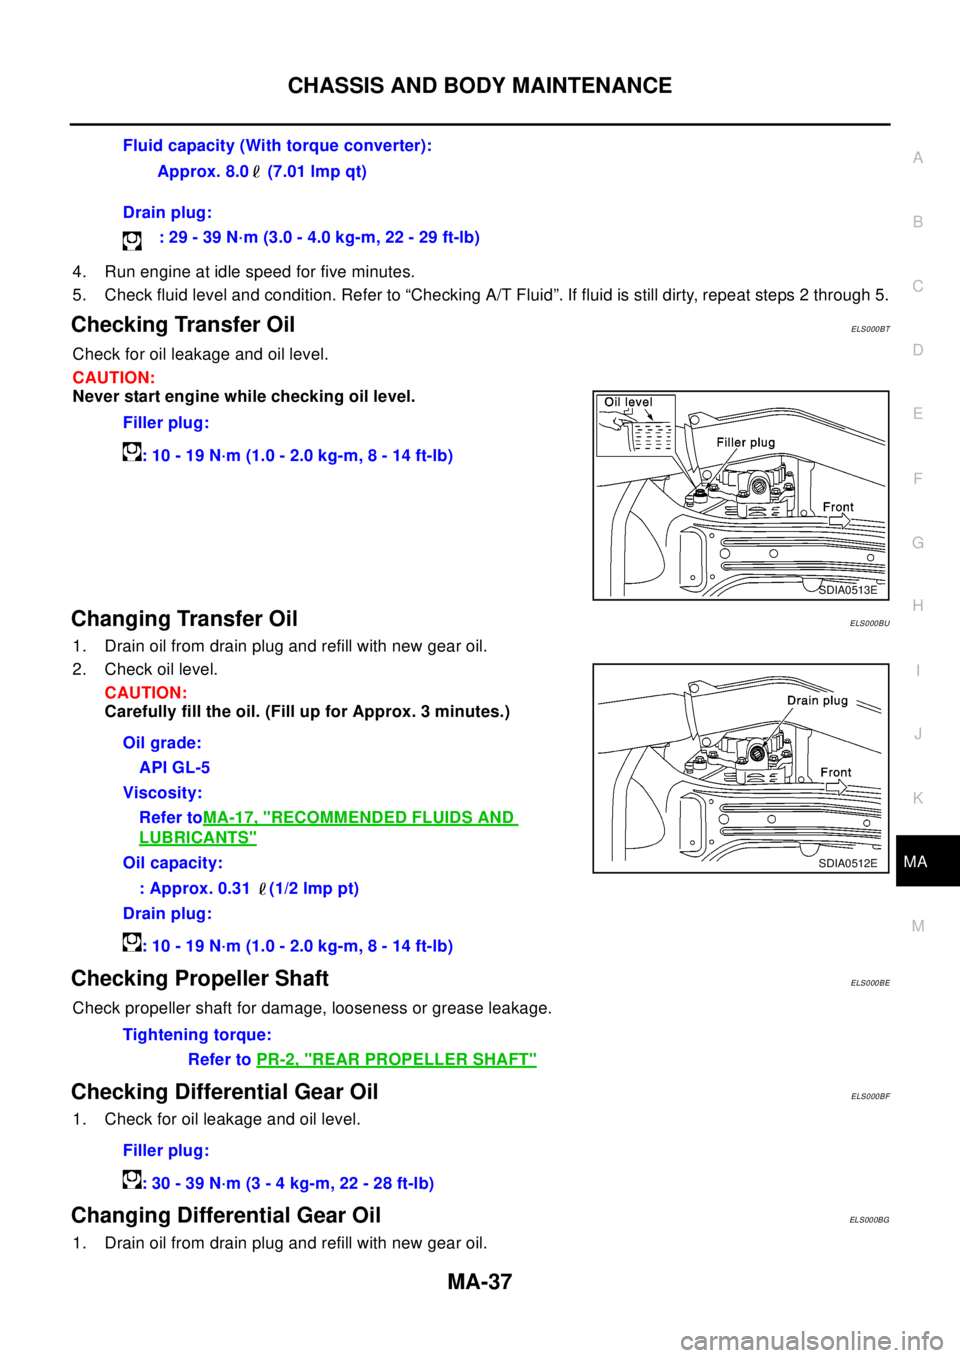
Checking Transfer OilELS000BT
Check for oil leakage and oil level.
CAUTION:
Never start engine while checking oil level.
Changing Transfer OilELS000BU
1. Drain oil from drain plug and refill with new gear oil.
2. Check oil level.
CAUTION:
Carefully fill the oil. (Fill up for Approx. 3 minutes.)
Checking Propeller ShaftELS000BE
Check propeller shaft for damage, looseness or grease leakage.
Checking Differential Gear OilELS000BF
1. Check for oil leakage and oil level.
Changing Differential Gear OilELS000BG
1. Drain oil from drain plug and refill with new gear oil.Fluid capacity (With torque converter):
Approx. 8.0 (7.01 lmp qt)
Drain plug:
:29-39N·m(3.0-4.0kg-m,22-29ft-lb)
Filler plug:
:10-19N·m(1.0-2.0kg-m,8-14ft-lb)
SDIA0513E
Oil grade:
API GL-5
Viscosity:
Refer toMA-17, "
RECOMMENDED FLUIDS AND
LUBRICANTS"
Oil capacity:
: Approx. 0.31 (1/2 lmp pt)
Drain plug:
:10-19N·m(1.0-2.0kg-m,8-14ft-lb)SDIA0512E
Tightening torque:
Refer toPR-2, "
REAR PROPELLER SHAFT"
Filler plug:
:30-39N·m(3-4kg-m,22-28ft-lb)
Page 2547 of 3066
M/T OIL
MT-11
D
E
F
G
H
I
J
K
L
MA
B
MT
M/T OILPFP:KLD20
Changing M/T OilECS001WQ
DRAINING
1. Start the engine and let it run to warm up the transaxle.
2. Stop the engine. Remove drain plug and drain oil.
3. Set a gasket on the drain plug and install it to the transaxle.
CAUTION:
Do not reuse gasket.
FILLING
1. Remove filler plug. Fill with new oil until oil level reaches the specified limit near filler plug mounting hole.
2. After refilling oil, check oil level. Assemble gasket to filler plug, then install it to transaxle body.
CAUTION:
Do not reuse gasket.
Checking M/T OilECS001WR
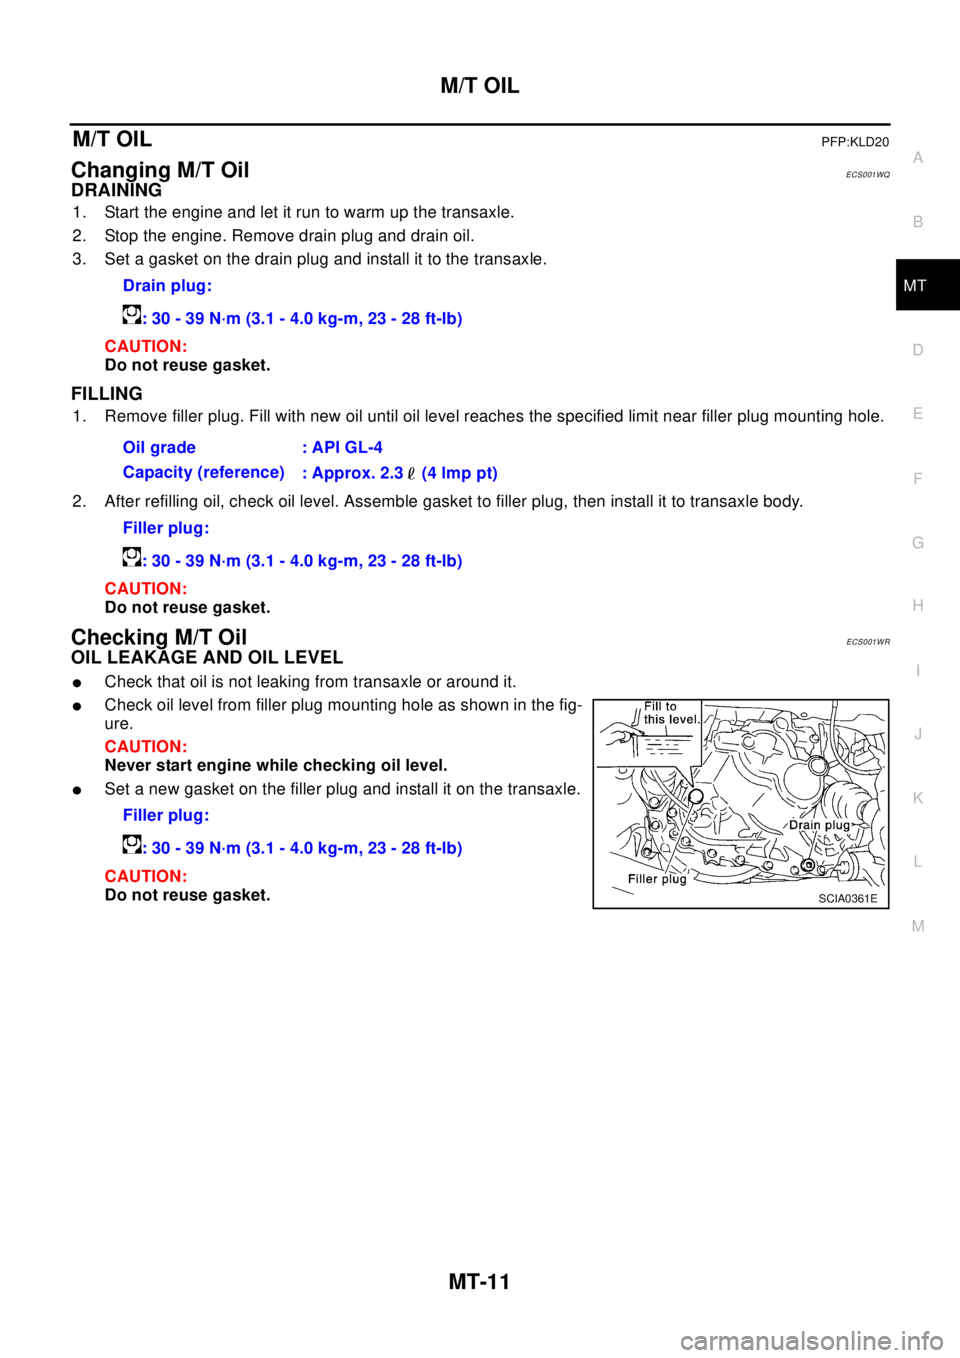
OIL LEAKAGE AND OIL LEVEL
lCheck that oil is not leaking from transaxle or around it.
lCheck oil level from filler plug mounting hole as shown in the fig-
ure.
CAUTION:
Never start engine while checking oil level.
lSet a new gasket on the filler plug and install it on the transaxle.
CAUTION:
Do not reuse gasket.Drain plug:
: 30 - 39 N·m (3.1 - 4.0 kg-m, 23 - 28 ft-lb)
Oil grade : API GL-4
Capacity (reference)
: Approx. 2.3 (4 lmp pt)
Filler plug:
: 30 - 39 N·m (3.1 - 4.0 kg-m, 23 - 28 ft-lb)
Filler plug:
: 30 - 39 N·m (3.1 - 4.0 kg-m, 23 - 28 ft-lb)
SCIA0361E
Page 2632 of 3066
MT-96
SERVICE DATA AND SPECIFICATIONS (SDS)
SERVICE DATA AND SPECIFICATIONS (SDS)
PFP:00030
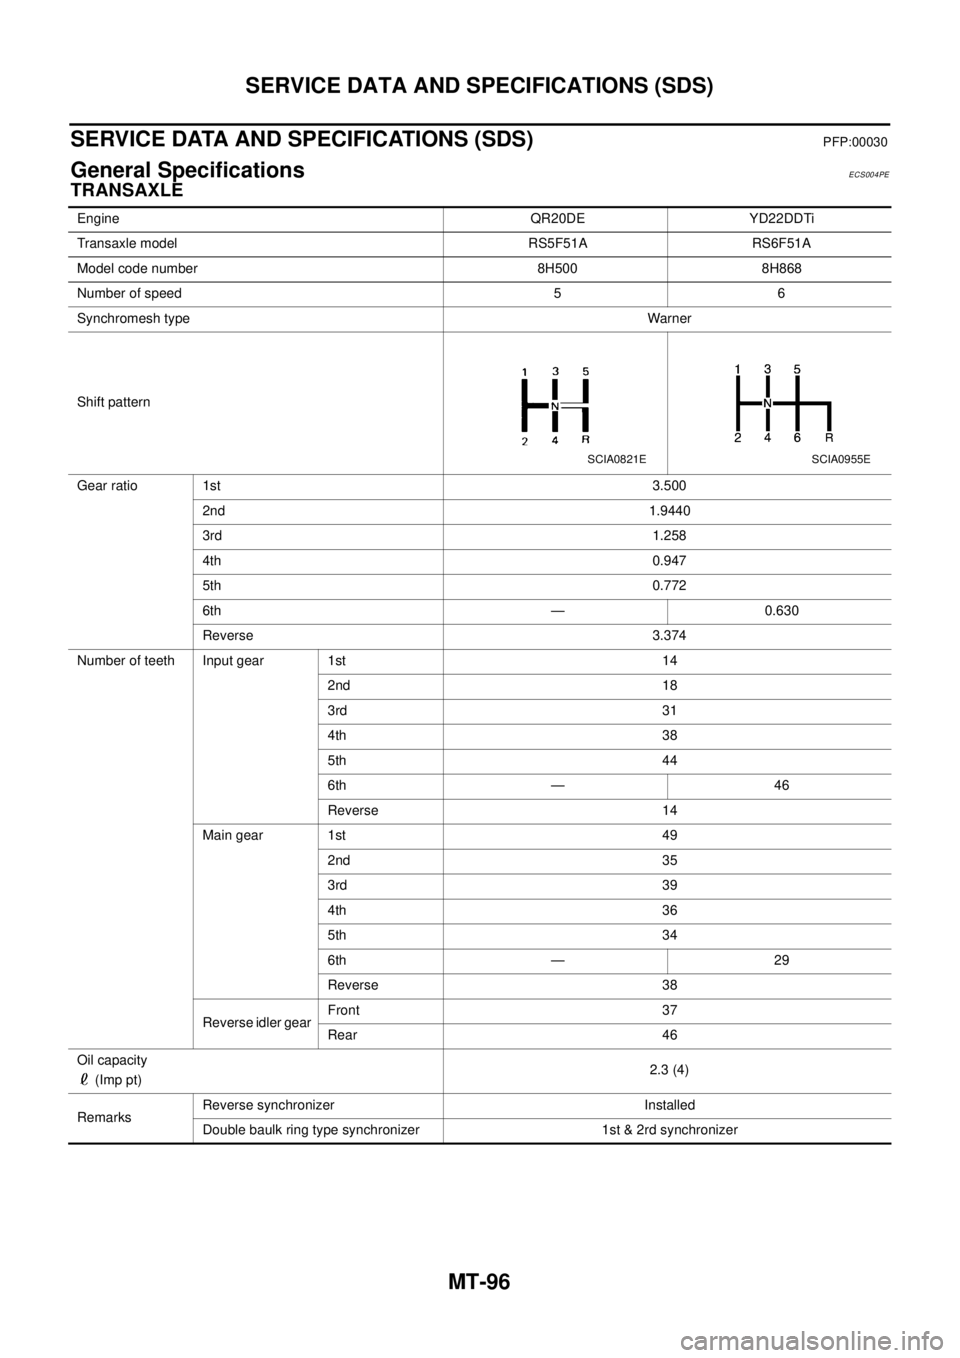
General SpecificationsECS004PE
TRANSAXLE
Engine QR20DE YD22DDTi
Transaxle model RS5F51A RS6F51A
Model code number 8H500 8H868
Number of speed 5 6
Synchromesh typeWarner
Shift pattern
Gear ratio 1st 3.500
2nd 1.9440
3rd 1.258
4th 0.947
5th 0.772
6th — 0.630
Reverse 3.374
Number of teeth Input gear 1st 14
2nd 18
3rd 31
4th 38
5th 44
6th — 46
Reverse 14
Main gear 1st 49
2nd 35
3rd 39
4th 36
5th 34
6th — 29
Reverse 38
Reverse idler gearFront 37
Rear 46
Oil capacity
(Imp pt)2.3 (4)
RemarksReverse synchronizer Installed
Double baulk ring type synchronizer 1st & 2rd synchronizer
SCIA0821ESCIA0955E
Page 2906 of 3066

SC-34
SERVICE DATA AND SPECIFICATIONS (SDS)
SERVICE DATA AND SPECIFICATIONS (SDS)
PFP:00030
BatteryEKS0031Q
StarterEKS0031R
AlternatorEKS0031S
Applied modelQR20 engine
YD22 engine
Standard Option
Type 55D23L 80D26L 110D26L
Capacity V-AH 12-48 12-55 12-70
Ty p eS114-844 M0T87081 M8T71471
HITACHI make MITSUBISHI make
Reduction
Applied model QR20 engine YD22 engine
System voltage V12
No-loadTerminal voltage V 11.0
Current A Less than 90 Less than 90 Less than 145
Revolution rpm More than 2,700 More than 2,500 More than 3,300
Minimum diameter of commutator mm (in) 28.0 (1.102) 28.8 (1.134) 31.4 (1.236)
Minimum length of brush mm (in) 10.5 (0.413) 7.0 (0.276) 11.0 (0.433)
Brush spring tension N (kg, lb) 16.2(1.65, 3.64)15.0 - 20.4(1.5 - 2.1, 3.4
-4.6)26.7 - 36.1(2.7 - 3.7, 6.0
-8.2)
Clearance between bearing metal and armature
shaft mm (in)Less than 0.2 (0.008) —
Clearance “l” between pinion front edge and pinion
stopper mm (in)0.3 - 2.5 (0.012 - 0.098) 0.5 - 2.0(0.020 - 0.079) —
Movement “l” in height of pinion assembly mm (in) — 0.5 - 2.0(0.020 - 0.079)
Ty p eLR1110-713 A3TB0771
HITACHI make MITSUBISHI make
Applied model QR20 engine YD22 engine
Nominal rating V-A 12-110 12-90
Ground polarityNegative
Minimum revolutions under no-load (When 13.5V is
applied) rpmLess than 1,100 Less than 1,300
Hot output current (When 13.5V is applied) A/rpmMore than35/1,300
More than91/2,500
More than110/5,000More than29/1,300
More than76/2,500
More than88/5,000
Regulated output voltage V 14.1 - 14.7
Minimum length of brush mm (in) More than 6.0 (0.236) More than 5.0 (0.197)
Brush spring pressure N (g, oz) 1.0 - 3.43 (102 - 350, 3.60 - 12.34) 4.8 - 6.0 (490 - 610, 17.28 - 21.51)
Slip ring minimum diameter mm (in) More than 26.0 (1.024) More than 22.1 (0.870)
Rotor coil resistance at 20°(68°F)W2.31 2.1 - 2.5