Page 2063 of 3502
FRONT BUMPER
EI-15
C
D
E
F
G
H
J
K
L
MA
B
EI
REMOVAL
1. Fully open hood assembly.
2. Remove front side of fender protector (LH/RH). Refer to EI-23, "
FENDER PROTECTOR" .
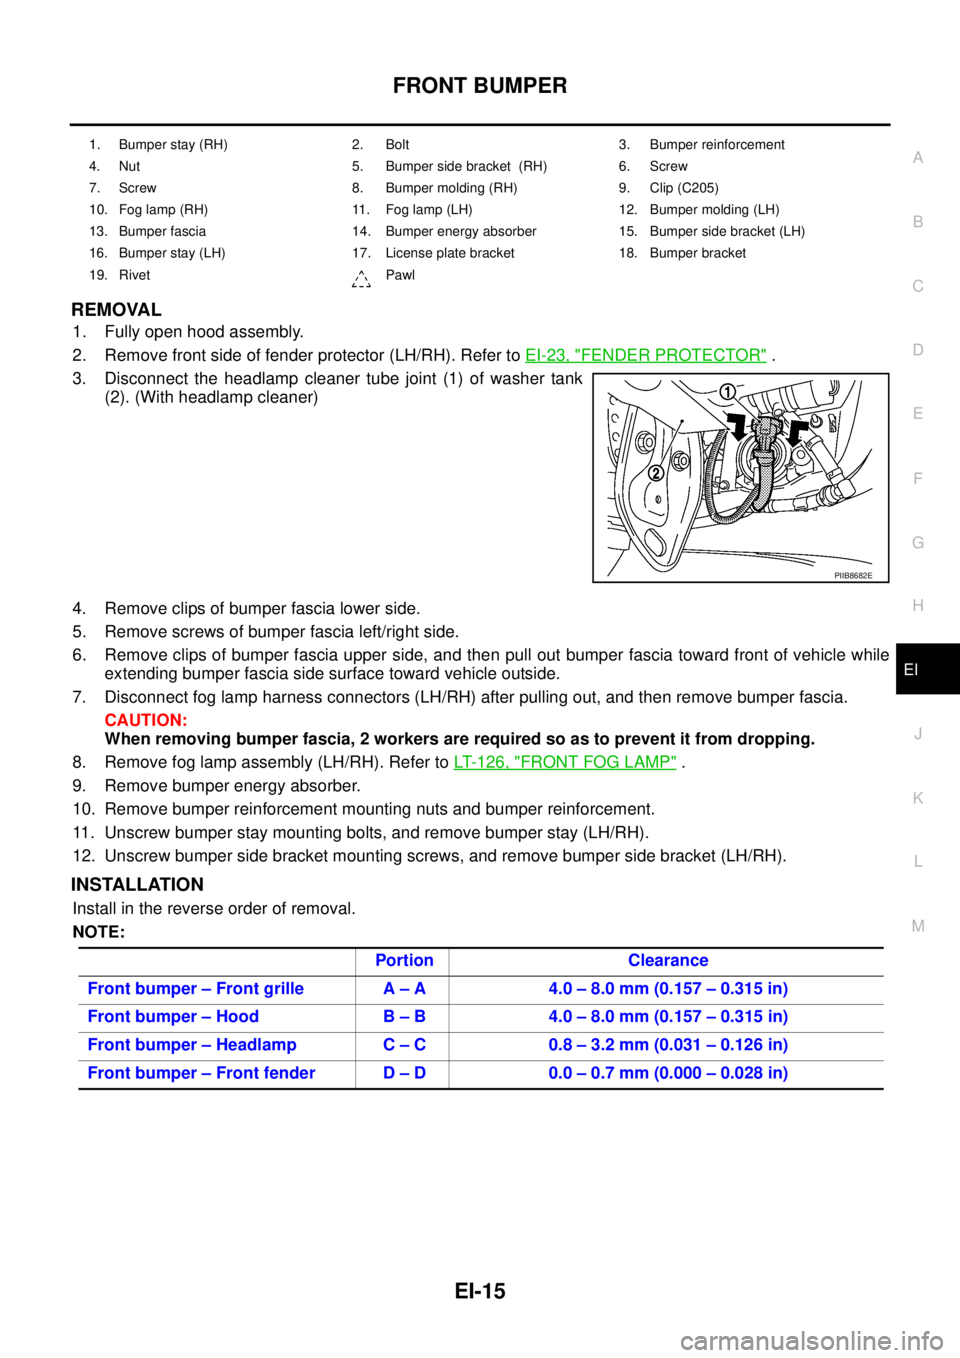
3. Disconnect the headlamp cleaner tube joint (1) of washer tank
(2). (With headlamp cleaner)
4. Remove clips of bumper fascia lower side.
5. Remove screws of bumper fascia left/right side.
6. Remove clips of bumper fascia upper side, and then pull out bumper fascia toward front of vehicle while
extending bumper fascia side surface toward vehicle outside.
7. Disconnect fog lamp harness connectors (LH/RH) after pulling out, and then remove bumper fascia.
CAUTION:
When removing bumper fascia, 2 workers are required so as to prevent it from dropping.
8. Remove fog lamp assembly (LH/RH). Refer to LT- 1 2 6 , "
FRONT FOG LAMP" .
9. Remove bumper energy absorber.
10. Remove bumper reinforcement mounting nuts and bumper reinforcement.
11. Unscrew bumper stay mounting bolts, and remove bumper stay (LH/RH).
12. Unscrew bumper side bracket mounting screws, and remove bumper side bracket (LH/RH).
INSTALLATION
Install in the reverse order of removal.
NOTE:
1. Bumper stay (RH) 2. Bolt 3. Bumper reinforcement
4. Nut 5. Bumper side bracket (RH) 6. Screw
7. Screw 8. Bumper molding (RH) 9. Clip (C205)
10. Fog lamp (RH) 11. Fog lamp (LH) 12. Bumper molding (LH)
13. Bumper fascia 14. Bumper energy absorber 15. Bumper side bracket (LH)
16. Bumper stay (LH) 17. License plate bracket 18. Bumper bracket
19. Rivet Pawl
PIIB8682E
Portion Clearance
Front bumper – Front grille A – A 4.0 – 8.0 mm (0.157 – 0.315 in)
Front bumper – Hood B – B 4.0 – 8.0 mm (0.157 – 0.315 in)
Front bumper – Headlamp C – C 0.8 – 3.2 mm (0.031 – 0.126 in)
Front bumper – Front fender D – D 0.0 – 0.7 mm (0.000 – 0.028 in)
Page 2066 of 3502
EI-18
REAR BUMPER
REMOVAL
1. Fully open trunk lid assembly.
2. Remove trunk floor carpet, trunk box assembly, trunk floor spacer (LH/RH), trunk rear garnish, trunk rear
finisher, and trunk wheelhouse finisher. Refer to EI-58, "
TRUNK ROOM TRIM & TRUNK LID FINISHER" .
3. Remove rear combination lamp (LH/RH). Refer to LT- 2 1 6 , "
REAR COMBINATION LAMP" .
4. Remove clips of bumper fascia lower side.
5. Remove screws of bumper fascia left/right side.
6. Remove bumper fascia left/right bolt from trunk room inside.
7. Remove clip and bumper clamp from bumper fascia upper side, and then pull out bumper fascia toward
rear of vehicle.
8. Disconnect rear fog lamp harness connector after pulling out, and then remove bumper fascia.
CAUTION:
When removing bumper fascia, 2 workers are required so as to prevent it from dropping.
9. Remove the following parts after removing bumper fascia.
�Bumper side bracket (LH/RH).
�Rear bumper molding (LH/RH).
10. Remove bumper energy absorber.
11. Remove bumper reinforcement mounting nuts and bumper reinforcement.
12. Unscrew bumper stay mounting bolts, and remove bumper stay (LH/RH).
INSTALLATION
Install in the reverse order of removal.
NOTE:
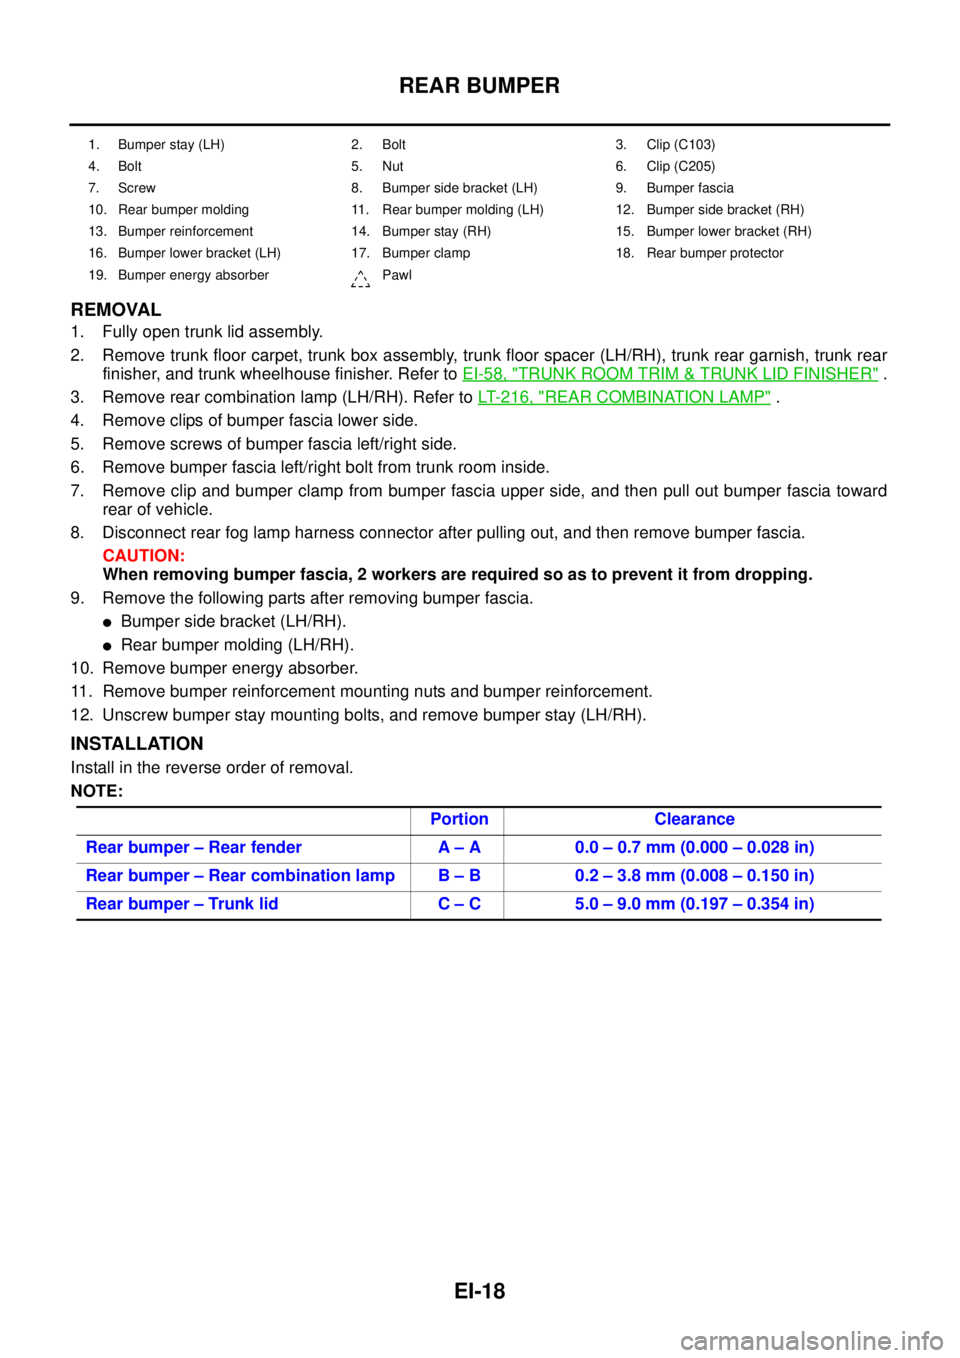
1. Bumper stay (LH) 2. Bolt 3. Clip (C103)
4. Bolt 5. Nut 6. Clip (C205)
7. Screw 8. Bumper side bracket (LH) 9. Bumper fascia
10. Rear bumper molding 11. Rear bumper molding (LH) 12. Bumper side bracket (RH)
13. Bumper reinforcement 14. Bumper stay (RH) 15. Bumper lower bracket (RH)
16. Bumper lower bracket (LH) 17. Bumper clamp 18. Rear bumper protector
19. Bumper energy absorber Pawl
Portion Clearance
Rear bumper – Rear fender A – A 0.0 – 0.7 mm (0.000 – 0.028 in)
Rear bumper – Rear combination lamp B – B 0.2 – 3.8 mm (0.008 – 0.150 in)
Rear bumper – Trunk lid C – C 5.0 – 9.0 mm (0.197 – 0.354 in)
Page 2068 of 3502
EI-20
FRONT GRILLE
FRONT GRILLEPFP:62310
Removal and InstallationBIS0011G
REMOVAL
1. Fully open hood assembly.
2. Remove mounting nut from back of grille.
3. Pull out front grille toward front of vehicle.
INSTALLATION
Install in the reverse order of removal.
PIIB1761E
1. Nut 2. Stud bolt 3. Front grille
Page 2073 of 3502
ROOF SIDE MOLDING
EI-25
C
D
E
F
G
H
J
K
L
MA
B
EI
ROOF SIDE MOLDINGPFP:73854
Removal and InstallationBIS0011K
REMOVAL
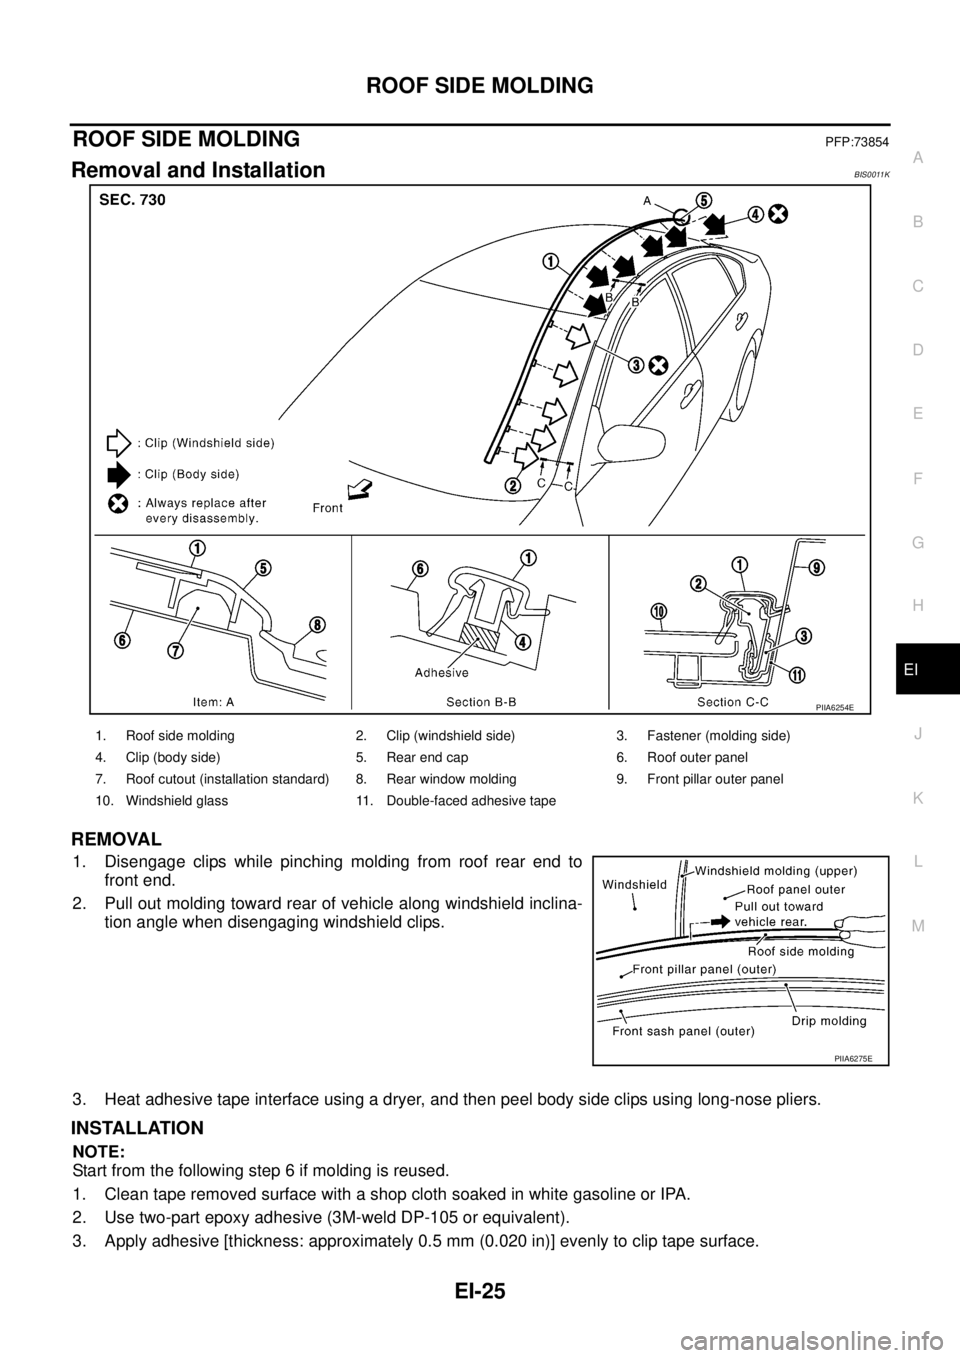
1. Disengage clips while pinching molding from roof rear end to
front end.
2. Pull out molding toward rear of vehicle along windshield inclina-
tion angle when disengaging windshield clips.
3. Heat adhesive tape interface using a dryer, and then peel body side clips using long-nose pliers.
INSTALLATION
NOTE:
Start from the following step 6 if molding is reused.
1. Clean tape removed surface with a shop cloth soaked in white gasoline or IPA.
2. Use two-part epoxy adhesive (3M-weld DP-105 or equivalent).
3. Apply adhesive [thickness: approximately 0.5 mm (0.020 in)] evenly to clip tape surface.
PIIA6254E
1. Roof side molding 2. Clip (windshield side) 3. Fastener (molding side)
4. Clip (body side) 5. Rear end cap 6. Roof outer panel
7. Roof cutout (installation standard) 8. Rear window molding 9. Front pillar outer panel
10. Windshield glass 11. Double-faced adhesive tape
PIIA6275E
Page 2080 of 3502
EI-32
DOOR OUTSIDE LOWER MOLDING
DOOR OUTSIDE LOWER MOLDINGPFP:82877
Removal and InstallationBIS0011P
FRONT AND REAR DOOR OUTSIDE LOWER MOLDING
Removal
1. Half-open front door and rear door.
2. Remove nuts from back of door panel.
3. Disengage mounting clips from molding rear end to front end using a clip clamp remover.
4. Remove door outside lower molding from body side after disengaging.
5. Slide molding toward rear of vehicle, and then remove front end clip.
CAUTION:
After removal, visually inspect molding, and if it is deformed, replace it with new molding.
Installation
Install in the reverse order of removal.
CAUTION:
When installing, confirm clips are accurately aligned with the holes on body side panel, then press in.
PIIA6257E
1. Clip (C101) 2. Door lower molding (front) 3. Stud bolt
4. Door lower molding (rear) 5. Nut
Page 2082 of 3502
EI-34
TRUNK LID FINISHER
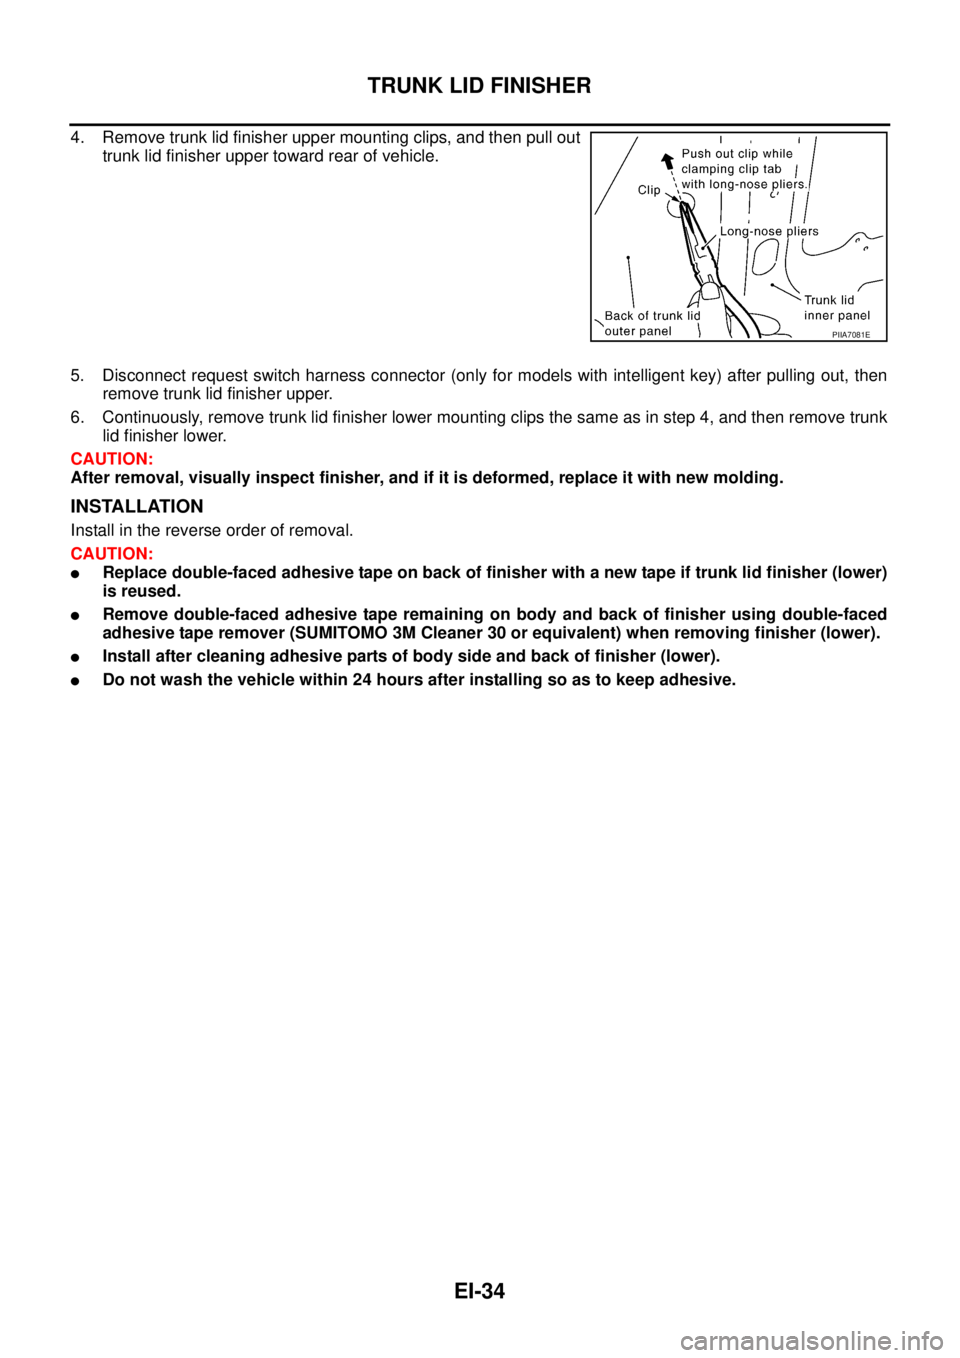
4. Remove trunk lid finisher upper mounting clips, and then pull out
trunk lid finisher upper toward rear of vehicle.
5. Disconnect request switch harness connector (only for models with intelligent key) after pulling out, then
remove trunk lid finisher upper.
6. Continuously, remove trunk lid finisher lower mounting clips the same as in step 4, and then remove trunk
lid finisher lower.
CAUTION:
After removal, visually inspect finisher, and if it is deformed, replace it with new molding.
INSTALLATION
Install in the reverse order of removal.
CAUTION:
�Replace double-faced adhesive tape on back of finisher with a new tape if trunk lid finisher (lower)
is reused.
�Remove double-faced adhesive tape remaining on body and back of finisher using double-faced
adhesive tape remover (SUMITOMO 3M Cleaner 30 or equivalent) when removing finisher (lower).
�Install after cleaning adhesive parts of body side and back of finisher (lower).
�Do not wash the vehicle within 24 hours after installing so as to keep adhesive.
PIIA7081E
Page 2084 of 3502
EI-36
DOOR FINISHER
FRONT AND REAR DOOR FINISHER
Removal
1. Fully open door window.
2. Remove inside handle escutcheon cap.
3. Remove inside handle escutcheon screw.
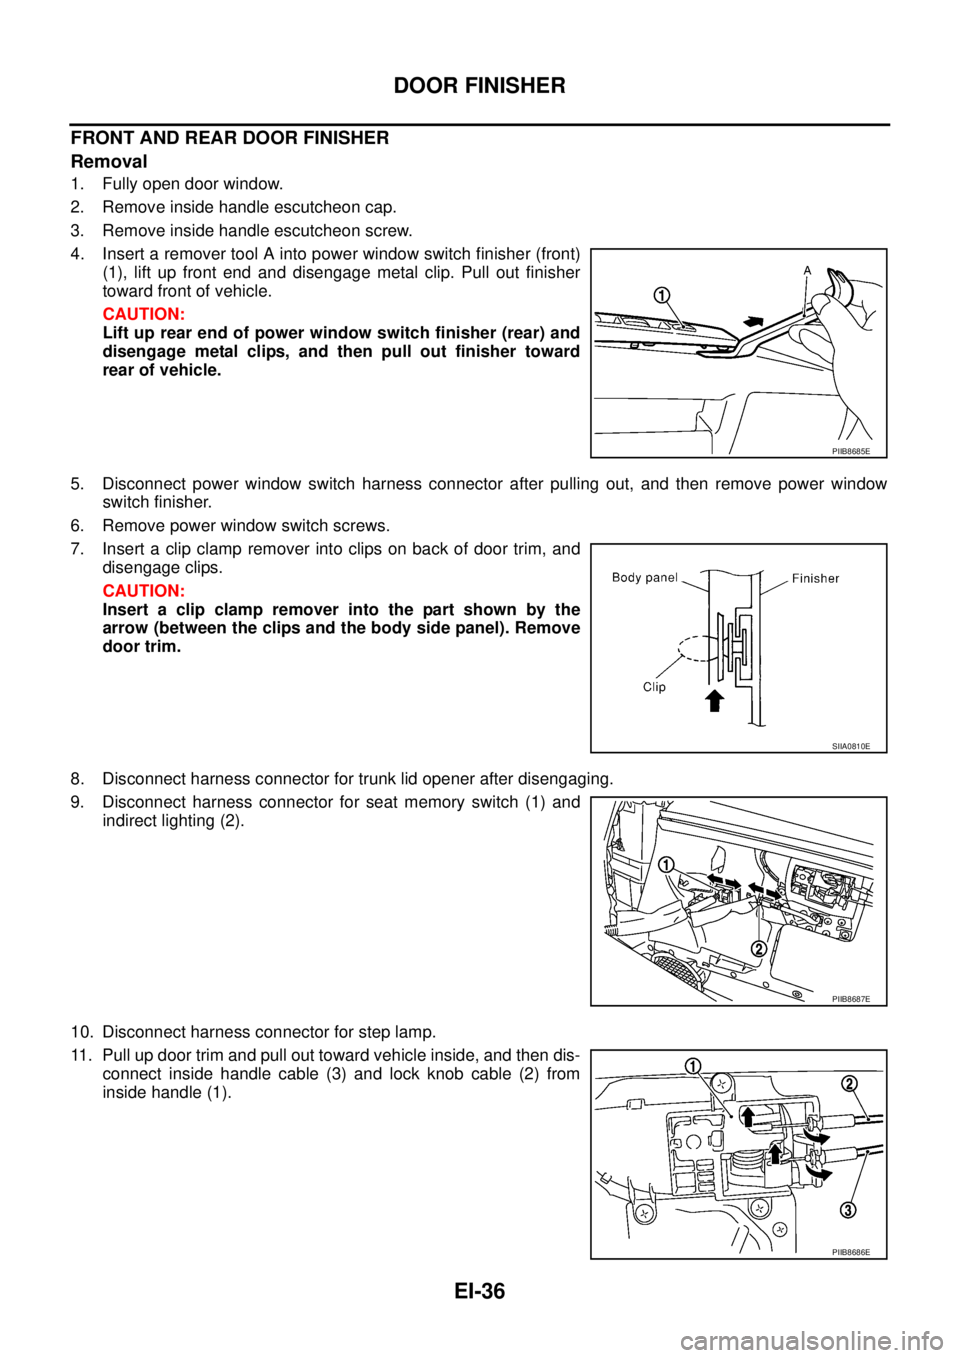
4. Insert a remover tool A into power window switch finisher (front)
(1), lift up front end and disengage metal clip. Pull out finisher
toward front of vehicle.
CAUTION:
Lift up rear end of power window switch finisher (rear) and
disengage metal clips, and then pull out finisher toward
rear of vehicle.
5. Disconnect power window switch harness connector after pulling out, and then remove power window
switch finisher.
6. Remove power window switch screws.
7. Insert a clip clamp remover into clips on back of door trim, and
disengage clips.
CAUTION:
Insert a clip clamp remover into the part shown by the
arrow (between the clips and the body side panel). Remove
door trim.
8. Disconnect harness connector for trunk lid opener after disengaging.
9. Disconnect harness connector for seat memory switch (1) and
indirect lighting (2).
10. Disconnect harness connector for step lamp.
11. Pull up door trim and pull out toward vehicle inside, and then dis-
connect inside handle cable (3) and lock knob cable (2) from
inside handle (1).
PIIB8685E
SIIA0810E
PIIB8687E
PIIB8686E
Page 2092 of 3502
EI-44
REAR PARCEL SHELF FINISHER
REMOVAL
1. Remove rear seatback and rear seat cushion. Refer to SE-112, "REAR SEAT" .
2. Remove rear seat belt floor anchor bolt and rear seat belt shoulder anchor bolt. Refer to SB-5, "
Removal
and Installation of Rear Seat Belt" .
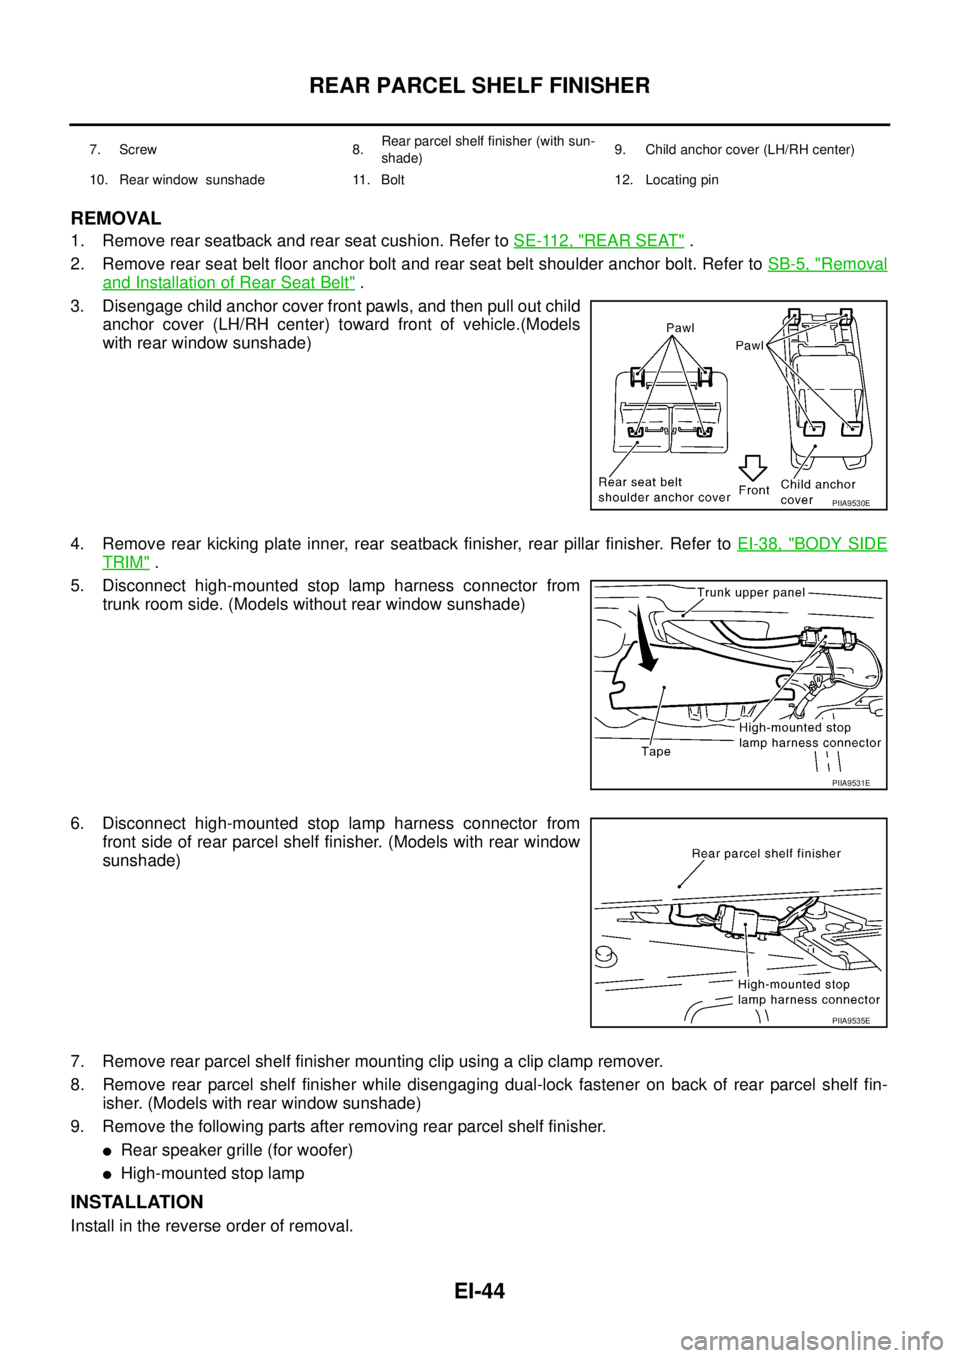
3. Disengage child anchor cover front pawls, and then pull out child
anchor cover (LH/RH center) toward front of vehicle.(Models
with rear window sunshade)
4. Remove rear kicking plate inner, rear seatback finisher, rear pillar finisher. Refer to EI-38, "
BODY SIDE
TRIM" .
5. Disconnect high-mounted stop lamp harness connector from
trunk room side. (Models without rear window sunshade)
6. Disconnect high-mounted stop lamp harness connector from
front side of rear parcel shelf finisher. (Models with rear window
sunshade)
7. Remove rear parcel shelf finisher mounting clip using a clip clamp remover.
8. Remove rear parcel shelf finisher while disengaging dual-lock fastener on back of rear parcel shelf fin-
isher. (Models with rear window sunshade)
9. Remove the following parts after removing rear parcel shelf finisher.
�Rear speaker grille (for woofer)
�High-mounted stop lamp
INSTALLATION
Install in the reverse order of removal.
7. Screw 8.Rear parcel shelf finisher (with sun-
shade)9. Child anchor cover (LH/RH center)
10. Rear window sunshade 11. Bolt 12. Locating pin
PIIA9530E
PIIA9531E
PIIA9535E