Page 108 of 265

OPEN THE FILLER LIDTo open the fuel filler lid, unlock it using one of
the following operations, then push the right-
hand side of the lid
�A.
�Press the unlock button on the keyfob once.
�Insert the key into the door lock cylinder and
turn the door key clockwise twice.
�Press the power door lock switch to the
unlock side.
To lock, close the fuel filler lid and lock the doors.
FUEL FILLER CAPThe fuel filler cap is a ratcheting type. Tighten the
cap clockwise until ratcheting clicks are heard.
Put the fuel filler cap on the cap holder while
refueling.
WARNING
�Gasoline is extremely flammable and
highly explosive under certain condi-
tions. You could be burned or seri-ously injured if it is misused or mis-
handled. Always stop the engine and
do not smoke or allow open flames
or sparks near the vehicle when refu-
eling.
�Fuel may be under pressure. Turn the
cap a quarter turn, and wait for any
hissing sound to stop to prevent fuel
from spraying out and possible per-
sonal injury. Then remove the cap.
�Do not attempt to top off the fuel
SPA1580
SPA1581
FUEL FILLER LID
Pre-driving checks and adjustments
3-11
�
03.1.28/Z50-D/V5.0
�
Page 110 of 265
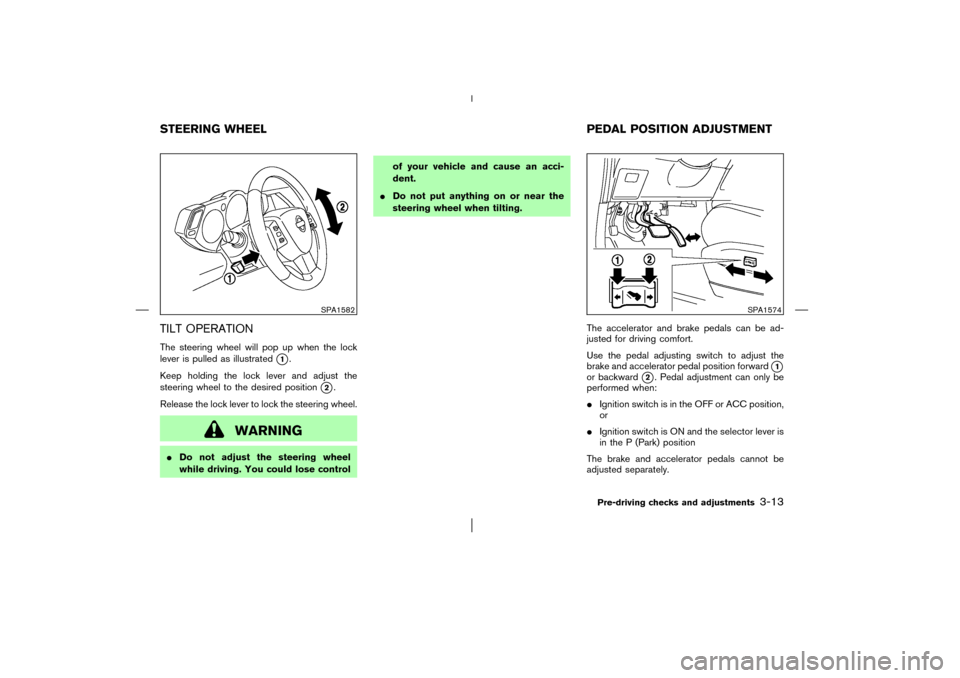
TILT OPERATIONThe steering wheel will pop up when the lock
lever is pulled as illustrated
�1.
Keep holding the lock lever and adjust the
steering wheel to the desired position
�2.
Release the lock lever to lock the steering wheel.
WARNING
�Do not adjust the steering wheel
while driving. You could lose controlof your vehicle and cause an acci-
dent.
�Do not put anything on or near the
steering wheel when tilting.
The accelerator and brake pedals can be ad-
justed for driving comfort.
Use the pedal adjusting switch to adjust the
brake and accelerator pedal position forward
�1
or backward
�2. Pedal adjustment can only be
performed when:
�Ignition switch is in the OFF or ACC position,
or
�Ignition switch is ON and the selector lever is
in the P (Park) position
The brake and accelerator pedals cannot be
adjusted separately.
SPA1582
SPA1574
STEERING WHEEL PEDAL POSITION ADJUSTMENT
Pre-driving checks and adjustments
3-13
�
03.1.28/Z50-D/V5.0
�
Page 111 of 265
CAUTION
Do not adjust the pedal position with
your foot on the pedal.
CAUTION
Store the main sun visor after storing
the extension sun visor.
INSIDE MIRRORThe night position will reduce glare from the
headlights of vehicles behind you at night.
WARNING
Use the night position only when neces-
sary, because it reduces rear view clar-
ity.
SPA1583
PD1006M
SUNVISORS MIRRORS
3-14
Pre-driving checks and adjustments
�
03.1.28/Z50-D/V5.0
�
Page 112 of 265

WARNING
Use Automatic Anti-glare only when
necessary, because it reduces rear view
clarity.
The inside mirror is designed so that it automati-
cally")
AUTOMATIC ANTI-GLARE INSIDE
MIRROR (if so equipped)
WARNING
Use Automatic Anti-glare only when
necessary, because it reduces rear view
clarity.
The inside mirror is designed so that it automati-
cally changes reflection according to the inten-
sity of the headlights of the vehicle following you.
When the inside MIRROR switch is in the ONposition (The Auto indicator light will illuminate),
excessive glare from the headlights of the ve-
hicle behind you will be reduced. When the
switch of the inside mirror is in the OFF position,
the inside mirror will operate normally.
For the HomeLink
Universal Transceiver and
the compass display, see the description in the
“2. Instruments and controls” section.
OUTSIDE MIRRORS
WARNING
Objects viewed in the outside mirror on
the passenger side are closer than they
appear. Be careful when moving to the
right. Using only this mirror could cause
an accident. Use inside mirror or glance
over your shoulder to properly judge
distances to other objects.
The outside mirror will operate only when the
SPA1448
SPA1449A
Pre-driving checks and adjustments
3-15
�
03.1.28/Z50-D/V5.0
�
Page 119 of 265
WARNING
�Positioning of the heating or air con-
ditioning controls and display con-
trols should not be done while driv-
ing, in order that full attention may
be given to the driving operation.
�Do not disassemble or modify this
system. If you do, it may result in
accidents, fire, or electrical shock.
�Do not use this system if you notice
any abnormality, such as a frozen
screen or lack of sound. Continued
use of the system may result in acci-
dent, fire or electric shock.
�In case you notice any foreign object
in the system hardware, spill liquid
on it, or notice smoke or smell com-
ing from it, stop using the system
immediately and contact your near-
est NISSAN dealer. Ignoring such
conditions may lead to accidents,
fire, or electric shock.
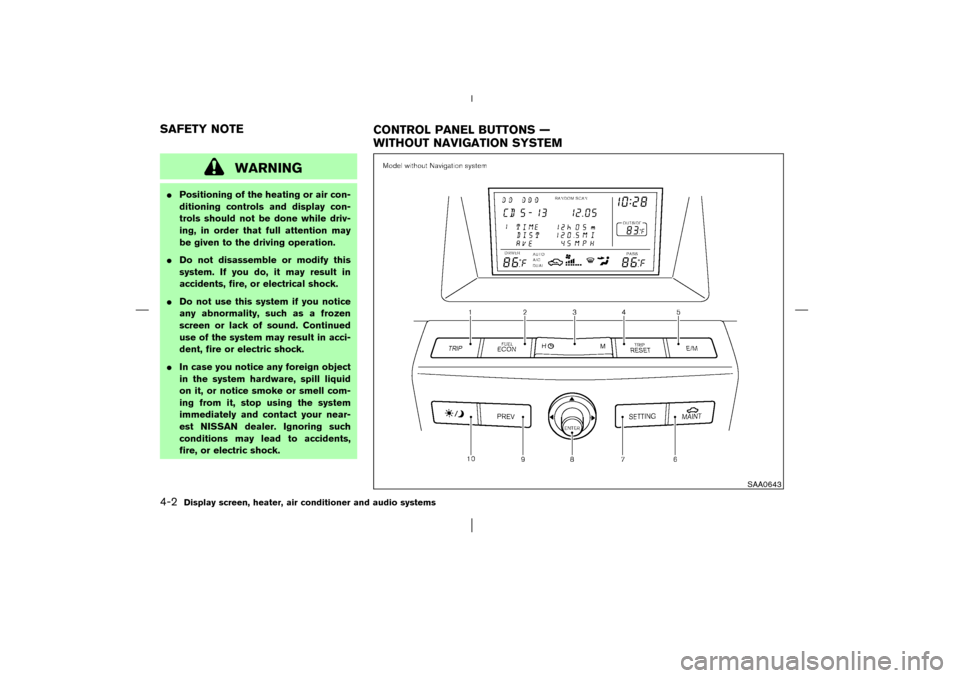
SAA0643
SAFETY NOTE
CONTROL PANEL BUTTONS —
WITHOUT NAVIGATION SYSTEM4-2
Display screen, heater, air conditioner and audio systems
�
03.1.28/Z50-D/V5.0
�
Page 122 of 265
 BUTTONPushing the “MAINT” button will change the
maintenance menu as follows:
ENGINE OIL→TIRE ROTATION→TIRE
PRESSURE (if so equipped)
To reset the driving")
HOW TO USE “MAINT”
(Maintenance) BUTTONPushing the “MAINT” button will change the
maintenance menu as follows:
ENGINE OIL→TIRE ROTATION→TIRE
PRESSURE (if so equipped)
To reset the driving distance, push the “MAINT”
button or “TRIP RESET” button for more than
approximately 1.5 seconds.
To set the distance, push the joystick to left or
right.
Tire pressure information (if so
equipped)Pressure indication in ** psi on the screen
indicates that the pressure is being measured.
After a few driving trips, the pressure for each
tire will be displayed randomly.
The order of tire pressure figures displayed on
the screen does not correspond with the actual
order of the tire position.
Tire pressure rises and falls depending on the
heat caused by the vehicle’s traveling condition
and the temperature.
In case of flat tire, a message (FLAT TIRE orCHECK ALL TIRE) is displayed on the screen:
FLAT TIRE — very low tire air pressure.
WARNING
When a spare tire is mounted or a wheel
is replaced, the pressure of that tire will
not be indicated and not be monitored
by the low tire pressure warning system.
Contact your NISSAN dealer as soon as
possible for tire replacement and/or
system resetting.HOW TO USE “SETTING” BUTTONPushing the “SETTING” button will change the
settings menu as follows:�1DISPLAY ON/OFF
�2LANGUAGE
�3BEEP SET
�4SERVICE ALERT
�5PERSONALIZED SETTINGS MENU — if so
equipped
SAA0646
SAA0647
Display screen, heater, air conditioner and audio systems
4-5
�
03.1.28/Z50-D/V5.0
�
Page 125 of 265

NAMES OF THE COMPONENTS1. “TRIP” drive computer button; refer to page
4-8.
2. “SETTING” button; refer to page 4-10.
3. Joystick and “ENTER” push button; refer to
page 4-8.
4. “PREV” previous button; refer to page 4-8.
5. “DAY/NIGHT” brightness control button; re-
fer to page 4-14.
6 - 10. For Navigation system control buttons;
refer to the separate Navigation Own-
er’s Manual.HOW TO USE JOYSTICK AND
“ENTER” BUTTONChoose an item on the display using the joystick
and push the “ENTER” button for operation.HOW TO USE “PREV” BUTTONThis has two functions.
�Go back to the previous display (cancel).
If you touch “PREV” button during setup, the
setup will be canceled and/or the display will
return to the previous screen.
�Finish setup.If you touch this button after the setup is com-
pleted, the setup will start over, and the display
will return to the climate control or Audio mode,
and Navigation screen.
SETTING UP THE START-UP
SCREENWhen you turn the ignition key to ACC, the
SYSTEM START-UP warning is displayed on
the screen. Read the warning and select the
“I AGREE” (English) or “ENTER” (Franc¸ ais) key
then push the “ENTER” button.
If you do not push the “ENTER” button, this
system will not proceed to the next step display.
If you do not touch the button or screen key for
more than 1 minute on the TRIP, SETTING or
START-UP screen, the screen will change to
TRIP screen automatically.
To proceed to the next step, refer to the separate
Navigation system Owner’s Manual.HOW TO USE THE “TRIP” BUTTONWhen the “TRIP” button is pushed, the following
models will display on the screen.
Warning message (if there are any)→TRIP 1
(Elapsed Time, Driving Distance, Average
Speed)→TRIP 2→FUEL ECONOMY (Aver-
age Fuel Economy, Distance to Empty)→MAINTENANCE (Engine Oil, Tire Rotation and
Tire Pressure — if so equipped)→OFF.
Trip 1, trip 2 and fuel economy itemsTo reset the TRIP 1, TRIP 2 and FUEL
ECONOMY, select the “RESET” key using the
joystick and push the “ENTER” button or push
the “TRIP” button for more than approximately
1.5 seconds.
SAA0654
4-8
Display screen, heater, air conditioner and audio systems
�
03.1.28/Z50-D/V5.0
�
Page 127 of 265
Pressure indication in ** psi on the screen
indicates that the pressure is being measured.
After a few driving trips, the pressure for each
tire will be displ")
Tire pressure information (if so
equipped)Pressure indication in ** psi on the screen
indicates that the pressure is being measured.
After a few driving trips, the pressure for each
tire will be displayed randomly.
The order of tire pressure figures displayed on
the screen does not correspond with the actual
order of the tire position.
Tire pressure rises and falls depending on the
heat caused by the vehicle’s traveling condition
and the temperature.In case of flat tire, a message is displayed on the
screen:
FLAT TIRE — very low tire air pressure.
WARNING
When a spare tire is mounted or a wheel
is replaced, the pressure of that tire will
not be indicated and not be monitored
by the low tire pressure warning system.
Contact your NISSAN dealer as soon as
possible for tire replacement and/or
system resetting.
For models with navigation system:
*1 — if so equipped. (Automatic drive positioner)
*2 — Please refer to the separate Navigation
system Owner’s Manual.
HOW TO USE THE “SETTING”
BUTTONThe SETTING screen will appear when the
“SETTING” button is pushed.
SAA0657
SAA0649
4-10
Display screen, heater, air conditioner and audio systems
�
03.1.28/Z50-D/V5.0
�