Page 104 of 265

2. Push the UNLOCK button on the keyfob
again within 5 seconds.
�All doors unlock
�The hazard indicator flashes once if all doors
are completely closed.
If the following operation is not carried out
within 1 minute after pressing the
UNLOCK button, all doors will be locked
automatically.
�any door is opened.
�the ignition key is turned to the ON
position
The interior light can be turned off without
waiting for 30 seconds by turning the ignition
switch to the ON position or by locking the
doors with the keyfob.Opening the front windowPush the UNLOCK button on the keyfob.
The driver’s door will unlock.
Continue to press the UNLOCK button for 3
seconds. The driver’s and front passenger’s
windows will be lowered.
Continue to press the UNLOCK button until
windows are fully open.To stop lowering the windows, release the UN-
LOCK button.
To start lowering the windows, press the UN-
LOCK button again for 3 more seconds.
This function will operate after the ignition switch
is off and 45 seconds passed or either the front
door is opened.
Using the panic alarmIf you are near your vehicle and feel threatened,
you may activate the alarm to call attention as
follows:
1. Push the PANIC button on the keyfob for
longer than 0.5 seconds.
2. The theft warning alarm and headlights will
stay on for 30 seconds.
3. The panic alarm stops when:
�It has run for 30 seconds, or
�The LOCK or the UNLOCK button is
pressed, or
�The panic button is pushed on the keyfob for
more than 0.5 seconds.
BATTERY REPLACEMENTReplace the battery as follows:
1. Open the lid using a suitable tool.
2. Replace the battery with a new one.
SPA1374
Pre-driving checks and adjustments
3-7
�
03.1.28/Z50-D/V5.0
�
Page 106 of 265

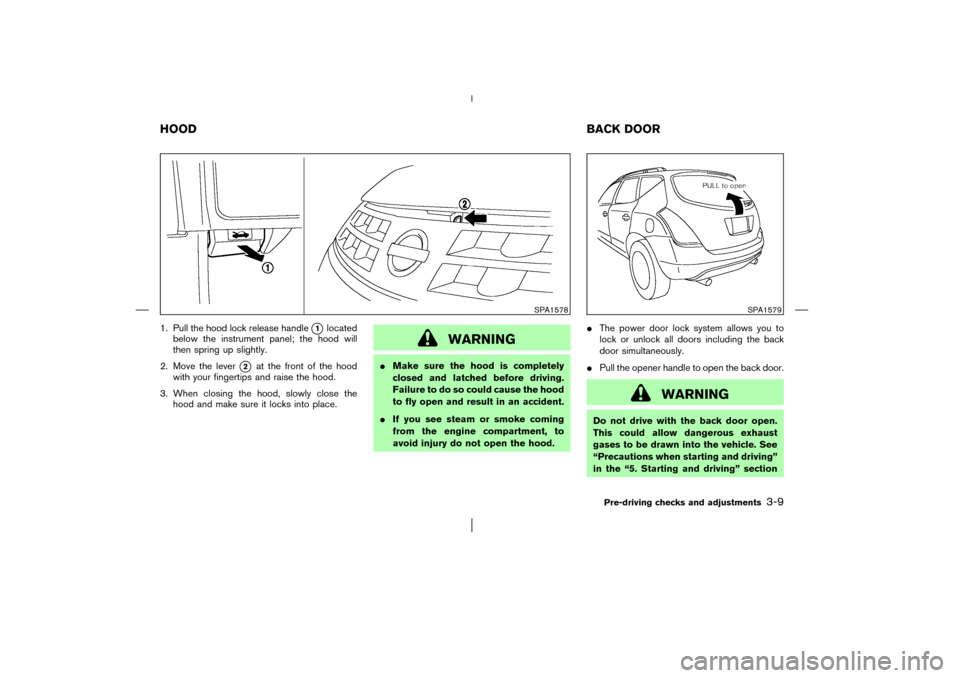
1. Pull the hood lock release handle
�1
located
below the instrument panel; the hood will
then spring up slightly.
2. Move the lever
�2
at the front of the hood
with your fingertips and raise the hood.
3. When closing the hood, slowly close the
hood and make sure it locks into place.
WARNING
�Make sure the hood is completely
closed and latched before driving.
Failure to do so could cause the hood
to fly open and result in an accident.
�If you see steam or smoke coming
from the engine compartment, to
avoid injury do not open the hood.�The power door lock system allows you to
lock or unlock all doors including the back
door simultaneously.
�Pull the opener handle to open the back door.
WARNING
Do not drive with the back door open.
This could allow dangerous exhaust
gases to be drawn into the vehicle. See
“Precautions when starting and driving”
in the “5. Starting and driving” section
SPA1578
SPA1579
HOODBACK DOOR
Pre-driving checks and adjustments
3-9
�
03.1.28/Z50-D/V5.0
�
Page 111 of 265
CAUTION
Do not adjust the pedal position with
your foot on the pedal.
CAUTION
Store the main sun visor after storing
the extension sun visor.
INSIDE MIRRORThe night position will reduce glare from the
headlights of vehicles behind you at night.
WARNING
Use the night position only when neces-
sary, because it reduces rear view clar-
ity.
SPA1583
PD1006M
SUNVISORS MIRRORS
3-14
Pre-driving checks and adjustments
�
03.1.28/Z50-D/V5.0
�
Page 112 of 265

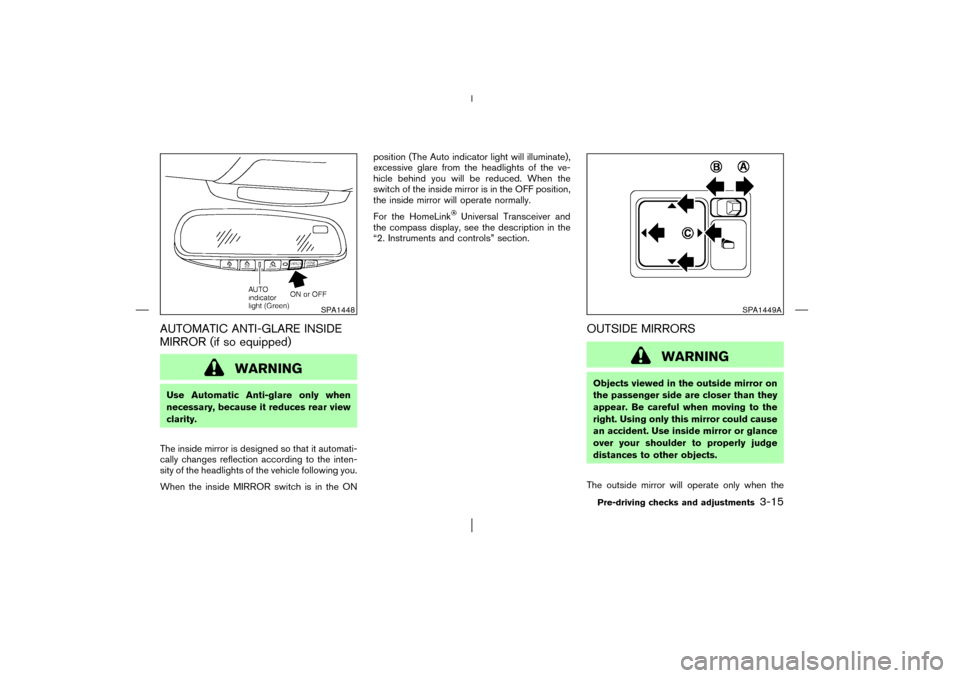
AUTOMATIC ANTI-GLARE INSIDE
MIRROR (if so equipped)
WARNING
Use Automatic Anti-glare only when
necessary, because it reduces rear view
clarity.
The inside mirror is designed so that it automati-
cally changes reflection according to the inten-
sity of the headlights of the vehicle following you.
When the inside MIRROR switch is in the ONposition (The Auto indicator light will illuminate),
excessive glare from the headlights of the ve-
hicle behind you will be reduced. When the
switch of the inside mirror is in the OFF position,
the inside mirror will operate normally.
For the HomeLink
Universal Transceiver and
the compass display, see the description in the
“2. Instruments and controls” section.
OUTSIDE MIRRORS
WARNING
Objects viewed in the outside mirror on
the passenger side are closer than they
appear. Be careful when moving to the
right. Using only this mirror could cause
an accident. Use inside mirror or glance
over your shoulder to properly judge
distances to other objects.
The outside mirror will operate only when the
SPA1448
SPA1449A
Pre-driving checks and adjustments
3-15
�
03.1.28/Z50-D/V5.0
�
Page 114 of 265

PROCEDURE FOR STORING
MEMORYTwo positions can be stored in the automatic
drive positioner memory.Follow these proce-
dures to use the memory system.
1. Set the selector lever to the P (Park)
position.
2. Turn the ignition ON.
3. Adjust the driver’s seat, outside mirrors and
pedals to the desired positions by manually
operating each adjusting switch. For addi-
tional information, see “Seats” in the “1.
Seats, restraints and supplemental air bag
systems” section and “Pedal position adjust-
ment” earlier in this section.
During this step, do not turn the ignition to
any positions other than ON.
4. Push the SET switch and, within 5 seconds,push the memory switch 1 or 2 fully for at
least 1 second.
The indicator light for the pushed memory
switch will come on and stay on for approxi-
mately 5 seconds after pushing the switch.
After the indicator light goes off, the selected
positions are stored in the selected memory
(1 or 2). Pushing the unlock button on the
keyfobwithin this 5 seconds, will link the
selected memory to the keyfob.
When the link is completed, the indicator light
of the selected memory switch will blink for
approximately 5 seconds.
When you unlock the door with the link
completed keyfob, the driver’s seat will move
back and move to the memorized position.
If memory is stored in the same memory
switch, the previous memory and the memory
which is linked to the keyfob, will be deleted.
Confirming memory storage�Turn the ignition ON and push the SET
switch. If the main memory has not been
stored, the indicator light will come on for
approximately 0.5 seconds. When the
memory has stored the position, the indicator
light will stay on for approximately 5 seconds.
�If the battery cable is disconnected, or if the
SPA1584
Pre-driving checks and adjustments
3-17
�
03.1.28/Z50-D/V5.0
�
Page 115 of 265

fuse blows, the memory will be canceled. In
such a case, reset the desired positions
using the following procedures.
1. Open and close the driver’s door more than
two times with the ignition key in the LOCK
position.
2. Reset the desired position using the previous
procedure.
Selecting the memorized position1. Set the selector lever to the P (Park) position.
2. Turn the ignition ON.
3. Push the memory switch 1 or 2 fully for at
least 1 second.
The driver’s seat, pedals and outside mirror
will move to the memorized position with the
indicator light flashing. Then the light will stay
on for approximately 5 seconds.Cancellation of the systemThe automatic drive positioner system can be
canceled.
See “4. Display screen, heater, air conditioner
and audio systems” section.System operationThe automatic drive positioner system will notwork or will stop operating under the following
conditions:
�when the vehicle speed is above 4 MPH (7
km/h).
�when either of the memory switches is
pressed while the automatic drive positioner
is operating.
�when the adjusting switch for the driver’s
seat, pedal or outside mirror is turned on
while the automatic drive positioner is oper-
ating.
�when the memory switch 1 or 2 is not pushed
for at least 1 second.
�when the seat, pedal and outside mirror has
already been moved to the memorized posi-
tion.
�when no seat position is stored in the
memory switch.3-18
Pre-driving checks and adjustments
�
03.1.28/Z50-D/V5.0
�
Page 128 of 265

“Display” settingsThe DISPLAY SETTINGS screen will appear
when pushing the “SETTING” button, selecting
“Display” key and pushing the “ENTER” button.
Brightness/Contrast/Map Background:
To adjust the brightness and contrast of the
screen, select the “Brightness/contrast” key and
push the “ENTER” button. Then you can adjust
the brightness to Darker or Brighter, the contrast
to Lower or Higher using the joystick.
The Map Background is for models with naviga-
tion system. Please refer to the separate naviga-
tion system Owner’s Manual.Display Off:
To turn off the screen, push the “SETTING”
button and select the “Display” key and “Display
Off” key. The indicator of the
“Display Off” will turn on to amber. When any
mode button is pushed with the screen off, the
screen turns on for further operation. The screen
will turn off automatically 5 seconds after the
operation is finished on the map display in the
Audio, HVAC (Heater and air conditioner), SET-
TING or VEHICLE INFO. modes.
To turn on the screen, push the “SETTING”
button and select the “Display” key and “Display
Off” key, then set the screen to on by pushing
the “ENTER” button.
Setting Audio or HVAC display:
Choose the“Audio” or “HVAC” (Heater and
air conditioner)key to be displayed at the
bottom, by using the joystick. The audio or
HVAC (heater, air conditioner) setting condition
will normally appear on the screen.
To return to the setting screen, push the
“SETTING” button or “PREV” button.
Vehicle electronic systems (if so
equipped)The VEHICLE ELECTRONIC SYSTEMS screen
will appear when selecting the “Vehicle Elec-
tronic Systems” key with the joystick and
pushing the “ENTER” button.
You can set the various electronic systems
operating conditions.
To set an operating condition, select the appli-
cable item using the joystick, and push the
“ENTER” button.
The indicator light alternately turns on and off
each time the “ENTER” button is pressed.
SAA0652
SAA0653
Display screen, heater, air conditioner and audio systems
4-11
�
03.1.28/Z50-D/V5.0
�
Page 129 of 265

Indicator light is illuminated. — ON
Indicator light is not illuminated. — OFF
Adjust driver seat when exiting vehicle
(if so equipped):
The driver’s seat automatically moves back and
returns to the original position for exceptional
ease of exit and entry.
Return all settings to default:
When this key is selected and turned on using
the “ENTER” button, all settings made by VE-
HICLE ELECTRONICS will return to the initial
conditions.
System settingsLanguage/Unit:
The LANGUAGE/UNIT screen will appear when
selecting the “Language/Unit” key and pushing
the “ENTER” button.
Language: English or French
Unit: US — Mile, °F, MPG
Metric — km, °C, L/100 km
You can select the language and unit using the
joystick and “ENTER” button.Clock:
Adjusting the time
Select the “Hours” or “Minutes” key and tilt the
joystick to the right or left to adjust the time.
The time will change step by step.
After completion of the setting, press the “PRE-
VIOUS” button.
SAA0658
SAA0659
4-12
Display screen, heater, air conditioner and audio systems
�
03.1.28/Z50-D/V5.0
�