2003 NISSAN MAXIMA stop start
[x] Cancel search: stop startPage 54 of 247

or
Anti-lock brake warning light
Low washer fluid warning light
High beam indicator light (Blue)
A/T check warning light (A/T models)
Seat belt warning light
Malfunction indicator lamp (MIL)
or
Brake warning light
Stop/tail warning light
Slip indicator light
Charge warning light
Supplemental air bag warning light
Traction control system indicator light
Door open warning light
Trunk lid open warning light
Turn signal/hazard indicator lights
Engine oil pressure warning light
Cruise main switch indicator light
Low fuel warning light
Cruise set indicator light
CHECKING BULBSApply the parking brake and turn the ignition
key to ON without starting the engine. The
following lights will come on:
,
or
,
,
The following lights come on briefly and then
go off:
,
or
,
,
,
If any light fails to come on, it may indicate a
burned-out bulb or an open circuit in the elec-trical system. Have the system repaired
promptly.
WARNING LIGHTS
or
Anti-lock brake
warning light
After turning the ignition key to the ON posi-
tion, the light will illuminate. The light will turn
off after about 2 seconds if the system is
operational.
If the light comes on while the engine isrunning, it may indicate that the anti-lock brake
system is not functioning properly. Have the
system checked by your NISSAN dealer.
If an abnormality occurs in the system, the
anti-lock function will cease but the ordinary
brakes will continue to operate normally.
If the light comes on while you are driving,
contact your NISSAN dealer for repair.
WARNING/INDICATOR LIGHTS
AND AUDIBLE REMINDERS
Instruments and controls
2-9
Z
02.7.12/A33-D/V5.0
X
Page 60 of 247

comes on. The SECURITY indicator light
glows for about 30 seconds and then blinks.
The system is now activated. If, during this
30 second time period, the door is unlocked
by the key or the keyfob, or the ignition key
is turned to ACC or ON, the system will not
activate.
IIf the key is turned slowly toward the
front of the vehicle when locking the
door, the system may not activate. If the
key is returned beyond the vertical po-
sition toward the rear of the vehicle to
remove the key, the system may be
deactivated. If the indicator light fails to
glow for 30 seconds, unlock the door
once and lock it again.
IEven when the driver and/or passengers
are in the vehicle, the system will acti-
vate with all doors, hood and trunk lid
locked and ignition key off. Turn the
ignition key to ACC to turn the system
off.
Vehicle security system operationThe security system will give the following
alarm:
IThe headlights blink and the horn sounds
intermittently.
IThe alarm automatically turns off after ap-proximately 1 minute. However, the alarm
reactivates if the vehicle is tampered with
again. The alarm can be shut off by unlock-
ing a door or trunk lid with the key, or by
pressing the UNLOCK button on the key-
fob.
The alarm is activated by:
IOpening the door without using the key or
keyfob.
IOpening the trunk lid without using the key
or keyfob.
IOpening the hood.
How to stop alarmThe alarm will stop only by unlocking a door or
trunk lid with the key, or by pressing the
UNLOCK button on keyfob. The alarm will not
stop if the ignition switch is turned to ACC or
ON.
If the system does not operate as de-
scribed above, have it checked by your
NISSAN dealer.NISSAN VEHICLE IMMOBILIZER
SYSTEMThe Nissan Vehicle Immobilizer System will
not allow the engine to start without the use ofthe registered Nissan Vehicle Immobilizer Sys-
tem key.
If the engine fails to start using the registered
Nissan Vehicle Immobilizer System key, it may
be due to interference caused by another
Nissan Vehicle Immobilizer System key, an
automated toll road device or automated pay-
ment device on the key ring. Restart the en-
gine using the following procedures:
1. Leave the ignition switch in the ON position
for approximately 5 seconds.
2. Turn the ignition switch to the OFF or LOCK
position and wait approximately 10 sec-
onds.
3. Repeat step 1 and 2 again.
4. Restart the engine while holding the device
(which may have caused the interference)
separate from the registered Nissan Ve-
hicle Immobilizer System key.
If this procedure allows the engine to start,
NISSAN recommends placing the regis-
tered Nissan Vehicle Immobilizer System
key on a separate key ring to avoid inter-
ference from other devices.
Statement related to section 15 of FCC
rules for Nissan Vehicle Immobilizer Sys-
Instruments and controls
2-15
Z
02.7.12/A33-D/V5.0
X
Page 64 of 247

XENON HEADLIGHTS
WARNINGHIGH VOLTAGE
IWhen xenon headlights are on, they
produce a high voltage. To prevent an
electric shock, never attempt to
modify or disassemble. Always have
your xenon headlights replaced at an
authorized NISSAN dealer.
IXenon headlights provide consider-
ably more light than conventional
headlights. If they are not correctly
aimed, they might temporarily blind
an oncoming driver or the driver
ahead of you and cause a serious
accident. If headlights are not aimed
correctly, immediately take your ve-
hicle to an authorized NISSAN dealer
and have the headlights adjusted cor-
rectly.
When the xenon headlight is initially turned on,
its brightness or color varies slightly. However,
the color and brightness will soon stabilize.IThe life of xenon headlights will be
shortened by frequent on-off operation.
It is generally desirable not to turn off
the headlights for short intervals, (for
example, when the vehicle stops at a
traffic signal). Even when the daytime
running lights are active (Canada only),
the xenon headlights do not turn on.
This way the life of the xenon headlights
is not reduced.
IIf the xenon headlight bulb is close to
burning out, the brightness will drasti-
cally decrease, the light will start blink-
ing, or the color of the light will become
reddish. If one or more of the above
signs appear, contact a NISSAN dealer.
HEADLIGHT SWITCH
LightingTurn the switch to the AUTO position:
When the ignition key is in the ON position, the
tail light, headlight, instrument light and other
lights turn on automatically, depending on the
brightness of the surroundings. The headlight
will automatically turn off 5 minutes after the
ignition switch is turned to the OFF position
and the driver's or front passenger's door is
opened.The headlight will also automatically turn off 45
seconds after a front door is opened and
closed.
When the light switch is turned to the
po-
sition, the headlight low or high beam will turn
off.
Turn the switch to the
position:
The front clearance, side marker, tail, license
plate and instrument lights will come on.
Turn the switch to theposition:
Headlights will come on and all the other lights
remain on.
Instruments and controls
2-19
Z
02.7.12/A33-D/V5.0
X
Page 72 of 247

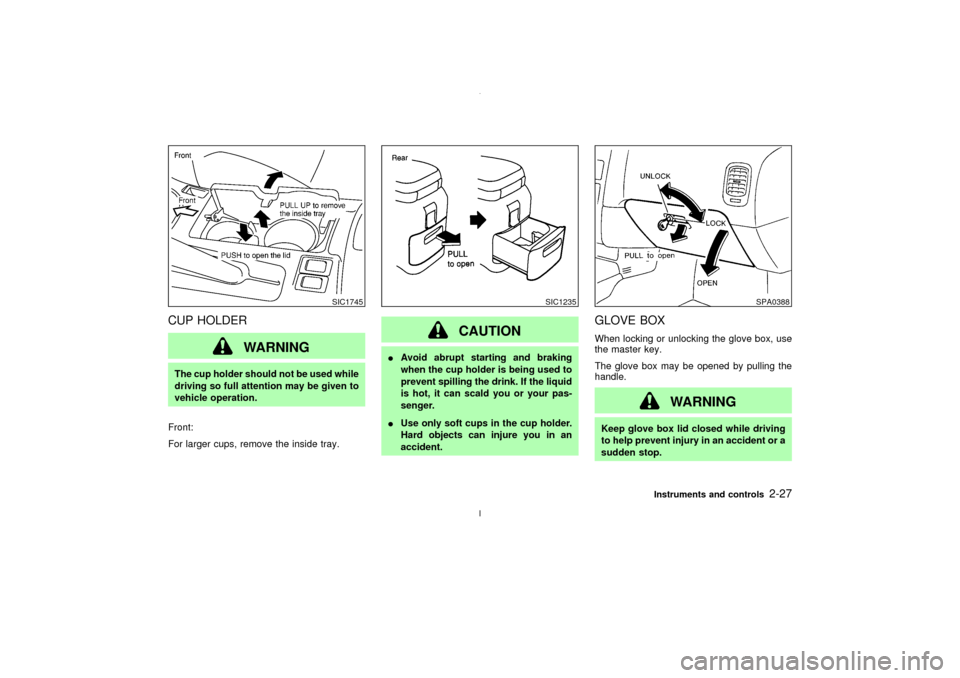
CUP HOLDER
WARNING
The cup holder should not be used while
driving so full attention may be given to
vehicle operation.
Front:
For larger cups, remove the inside tray.
CAUTION
IAvoid abrupt starting and braking
when the cup holder is being used to
prevent spilling the drink. If the liquid
is hot, it can scald you or your pas-
senger.
IUse only soft cups in the cup holder.
Hard objects can injure you in an
accident.
GLOVE BOXWhen locking or unlocking the glove box, use
the master key.
The glove box may be opened by pulling the
handle.
WARNING
Keep glove box lid closed while driving
to help prevent injury in an accident or a
sudden stop.
SIC1745
SIC1235
SPA0388
Instruments and controls
2-27
Z
02.7.12/A33-D/V5.0
X
Page 93 of 247

To stop lowering the windows, release the
UNLOCK button.
To start lowering the windows, press the UN-
LOCK button again for 3 more seconds.
This function will operate after the ignition
switch is off and 45 seconds passed or either
the front door is opened.Releasing the trunk lid1. Push the TRUNK button on the keyfob for
longer than 0.5 seconds with the key re-
moved from the ignition key cylinder.
2. The trunk lid opens.
The trunk lid will not open when the trunk lid
cancel lever is in the CANCEL position.
It can be opened only with the key.
See ªTrunk lidº later in this section for cancel
lever.Using the panic alarmIf you are near your vehicle and feel threat-
ened, you may activate the alarm to call atten-
tion as follows:
1. Push the PANIC button on the keyfob for
longer than 0.5 secondswith the key
removed from the ignition key cylinder.
2. The theft warning alarm and headlights willstay on for 30 seconds.
3. The panic alarm stops when:
IIt has run for 30 seconds, or
IThe LOCK or the UNLOCK button is
pressed, or
IThe panic button or the trunk lid release
button is pushed on the keyfob for longer
than 0.5 seconds.
BATTERY REPLACEMENTReplace the battery as follows:
1. Open the lid using a suitable tool.
2. Replace the battery with a new one.
SPA1374
3-8
Pre-driving checks and adjustments
Z
02.7.12/A33-D/V5.0
X
Page 103 of 247

During this step, do not turn the ignition to
any positions other than ON.
4. Push the SET switch and, within 5 seconds,
push the memory switch 1 or 2 fully for at
least 1 second.
The indicator light for the pushed memory
switch will come on and stay on for approxi-
mately 5 seconds after pushing the switch.
After the indicator light goes off, the se-
lected positions are stored in the selected
memory (1 or 2).
If memory is stored in the same memory
switch, the previous memory will be de-
leted.
Confirming memory storageITurn the ignition ON and push the SET
switch. If the main memory has not been
stored, the indicator light will come on for
approximately 0.5 seconds. When the
memory has stored the position, the indica-
tor light will stay on for approximately 5
seconds.
IIf the battery cable is disconnected, or if the
fuse blows, the memory will be canceled. In
such a case, reset the desired positions
using the following procedures.
1. Open and close the driver's door more thantwo times with the ignition key in the LOCK
position.
2. Reset the desired position using the previ-
ous procedure.
Selecting the memorized position1. A/T models:
Set the automatic transmission selector le-
ver to the P (Park) position.
M/T models:
Apply the parking brake securely when the
vehicle is stopped.
2. Turn the ignition ON.
3. Push the memory switch 1 or 2 fully for at
least 1 second.
The driver's seat will move to the memo-
rized position with the indicator light flash-
ing. Then the light will stay on for approxi-
mately 5 seconds.
When memory switch 1 or 2 is pushed with the
driver's door open and then the key inserted
into the ignition switch within approximately 1
minute, the driver's seat will move to the
memorized position. Ð A/T models only
System operationThe automatic drive positioner system will not
work or will stop operating under the following
conditions:
Iwhen the vehicle speed is above 4 MPH (7
km/h).
Iwhen any two or more of the memory
switches are simultaneously pressed while
the automatic drive positioner is operating.
Iwhen the adjusting switch for the driver's
seat is turned on while the automatic drive
positioner is operating.
Iwhen the cancel switch located on the
instrument panel is pushed to cancel.
Iwhen the memory switch 1 or 2 is not
pushed for at least 1 second.
Iwhen the seat has already been moved to
the memorized position.
Iwhen no seat position is stored in the
memory switch.
Iwhen the parking brake is not applied. Ð
M/T models
Iwhen the vehicle speed is above 4 MPH (7
km/h) while the parking brake is applied. Ð
M/T models
To restart the drive positioner system,
3-18
Pre-driving checks and adjustments
Z
02.7.12/A33-D/V5.0
X
Page 109 of 247

indicator and air recirculation lights will turn on.Air recirculation buttonOFF position:
Outside air is drawn into the passenger com-
partment.
Use the off position for normal heater, or air
conditioner operation.
ON position (Indicator light ON):
Interior air is recirculated inside the vehicle.
Push the air recirculation button to the ON
position when driving on a dusty road or to
avoid traffic fumes and for maximum cooling
when using the air conditioner.Air conditioning buttonStart the engine, move the fan control dial to
the desired (1 to 4) position and push the air
conditioning button to turn on the air condi-
tioner. The indicator light will come on when
the air conditioner is on. To stop the air con-
ditioner, push the switch again to return it to
the original position.
The air conditioner cooling function oper-
ates only when the engine is running.
HEATER OPERATION
HeatingThis mode is used to direct hot air from the
floor outlets. Some air will also come from the
defrost vents.
1. Push the air recirculation button to the OFF
position for normal heating.
2. Push the
button in.
3. Turn on the fan control dial.
4. Move the temperature control lever to the
desired position between the middle and
the HOT position.
When thebutton is pushed, the recircu-
lation mode will automatically be turned off.
VentilationThis mode directs outside air from the side and
center vents.
1. Push the air recirculation button to the OFF
position.
2. Push the
button in.
3. Turn on the fan control dial.
4. Move the temperature control lever to the
desired position.
Defrosting or defoggingThis mode is used to defrost/defog the win-
dows.
1. Push the
button in.
2. Turn on the fan control dial.
3. Move the temperature control lever to the
desired position between the middle and
the HOT position.
ITo quickly remove ice or fog from the
windows, turn on the fan control dial to 4
and the temperature control lever to the full
HOT position.
IWhen thebutton is pushed, the air
conditioner will automatically be turned on
to defog the windshield, and the air recircu-
late mode will automatically be turned off.
Outside air is drawn into the passenger
compartment to improve the defogging per-
formance.
Bi-level heatingThis mode directs outside air from the side and
center vents and hot air from the floor outlets.
1. Push the air recirculation button to the OFF
position.
2. Push the
button in.
4-4
Heater, air conditioner and audio systems
Z
02.7.12/A33-D/V5.0
X
Page 123 of 247

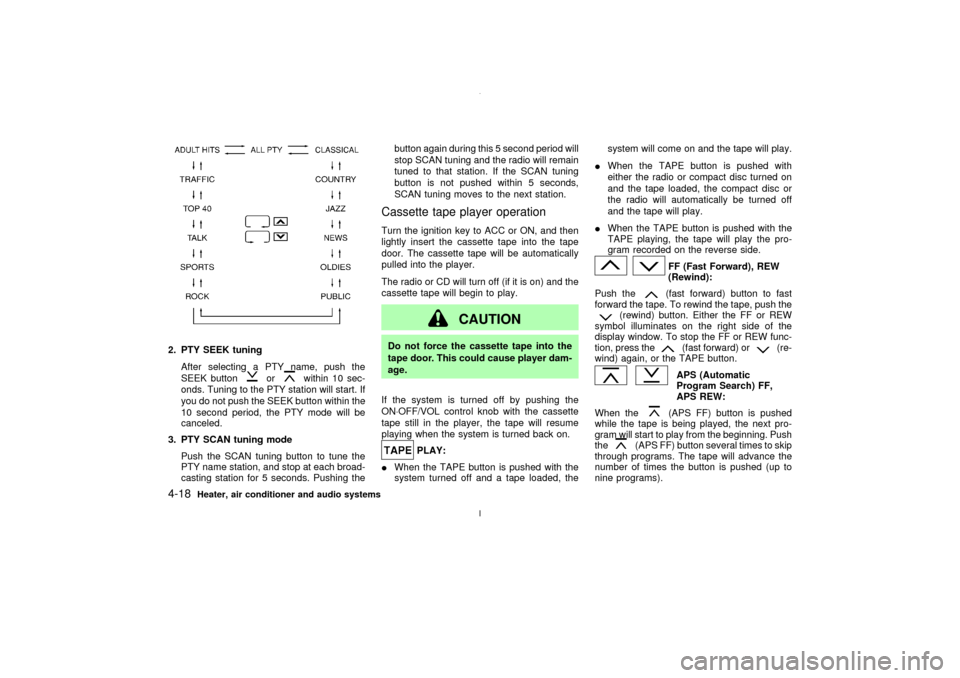
2. PTY SEEK tuning
After selecting a PTY name, push the
SEEK button
or
within 10 sec-
onds. Tuning to the PTY station will start. If
you do not push the SEEK button within the
10 second period, the PTY mode will be
canceled.
3. PTY SCAN tuning mode
Push the SCAN tuning button to tune the
PTY name station, and stop at each broad-
casting station for 5 seconds. Pushing thebutton again during this 5 second period will
stop SCAN tuning and the radio will remain
tuned to that station. If the SCAN tuning
button is not pushed within 5 seconds,
SCAN tuning moves to the next station.
Cassette tape player operationTurn the ignition key to ACC or ON, and then
lightly insert the cassette tape into the tape
door. The cassette tape will be automatically
pulled into the player.
The radio or CD will turn off (if it is on) and the
cassette tape will begin to play.
CAUTION
Do not force the cassette tape into the
tape door. This could cause player dam-
age.
If the system is turned off by pushing the
ON×OFF/VOL control knob with the cassette
tape still in the player, the tape will resume
playing when the system is turned back on.
PLAY:
IWhen the TAPE button is pushed with the
system turned off and a tape loaded, thesystem will come on and the tape will play.
IWhen the TAPE button is pushed with
either the radio or compact disc turned on
and the tape loaded, the compact disc or
the radio will automatically be turned off
and the tape will play.
IWhen the TAPE button is pushed with the
TAPE playing, the tape will play the pro-
gram recorded on the reverse side.
FF (Fast Forward), REW
(Rewind):
Push the(fast forward) button to fast
forward the tape. To rewind the tape, push the
(rewind) button. Either the FF or REW
symbol illuminates on the right side of the
display window. To stop the FF or REW func-
tion, press the
(fast forward) or
(re-
wind) again, or the TAPE button.
APS (Automatic
Program Search) FF,
APS REW:
When the(APS FF) button is pushed
while the tape is being played, the next pro-
gram will start to play from the beginning. Push
the
(APS FF) button several times to skip
through programs. The tape will advance the
number of times the button is pushed (up to
nine programs).
4-18
Heater, air conditioner and audio systems
Z
02.7.12/A33-D/V5.0
X