2003 NISSAN MAXIMA driver seat adjustment
[x] Cancel search: driver seat adjustmentPage 8 of 247

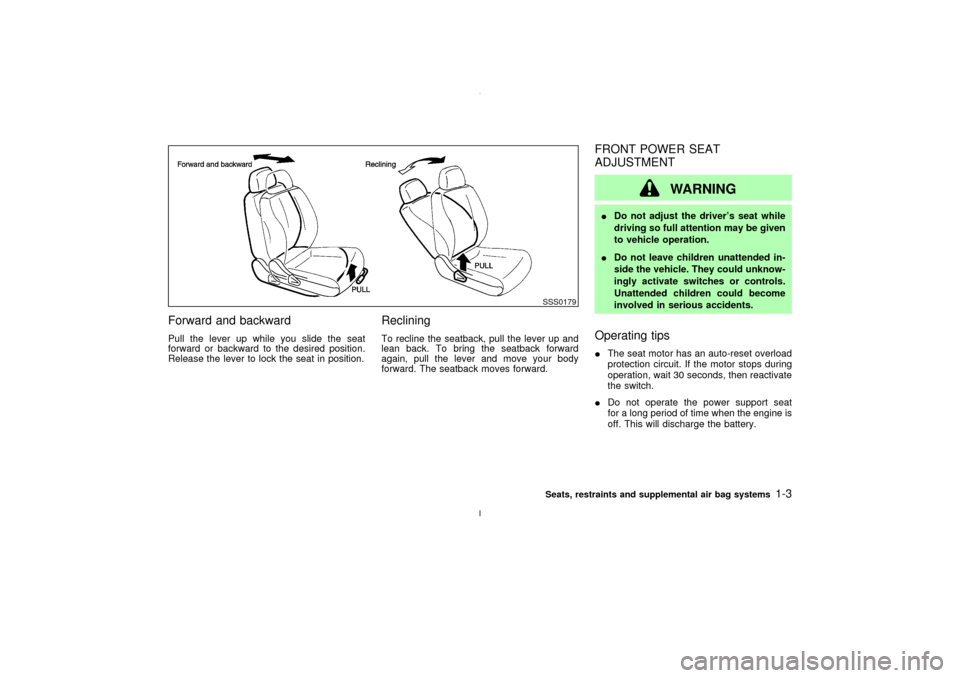
Forward and backwardPull the lever up while you slide the seat
forward or backward to the desired position.
Release the lever to lock the seat in position.
RecliningTo recline the seatback, pull the lever up and
lean back. To bring the seatback forward
again, pull the lever and move your body
forward. The seatback moves forward.
FRONT POWER SEAT
ADJUSTMENT
WARNING
IDo not adjust the driver's seat while
driving so full attention may be given
to vehicle operation.
IDo not leave children unattended in-
side the vehicle. They could unknow-
ingly activate switches or controls.
Unattended children could become
involved in serious accidents.Operating tipsIThe seat motor has an auto-reset overload
protection circuit. If the motor stops during
operation, wait 30 seconds, then reactivate
the switch.
IDo not operate the power support seat
for a long period of time when the engine is
off. This will discharge the battery.
SSS0179Seats, restraints and supplemental air bag systems
1-3
Z
02.7.12/A33-D/V5.0
X
Page 31 of 247

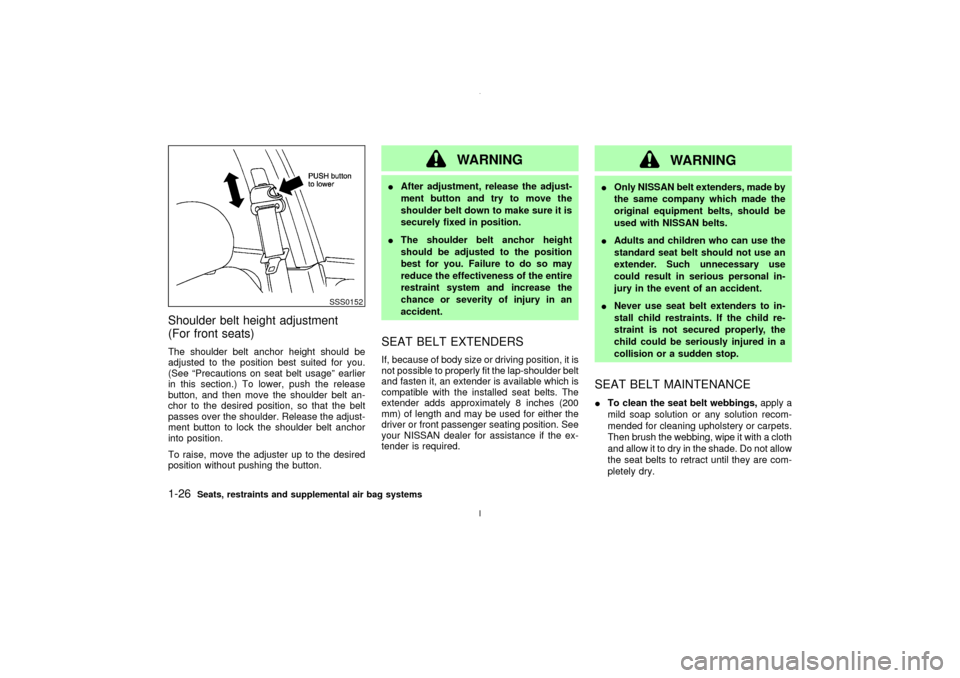
Shoulder belt height adjustment
(For front seats)The shoulder belt anchor height should be
adjusted to the position best suited for you.
(See ªPrecautions on seat belt usageº earlier
in this section.) To lower, push the release
button, and then move the shoulder belt an-
chor to the desired position, so that the belt
passes over the shoulder. Release the adjust-
ment button to lock the shoulder belt anchor
into position.
To raise, move the adjuster up to the desired
position without pushing the button.
WARNING
IAfter adjustment, release the adjust-
ment button and try to move the
shoulder belt down to make sure it is
securely fixed in position.
IThe shoulder belt anchor height
should be adjusted to the position
best for you. Failure to do so may
reduce the effectiveness of the entire
restraint system and increase the
chance or severity of injury in an
accident.SEAT BELT EXTENDERSIf, because of body size or driving position, it is
not possible to properly fit the lap-shoulder belt
and fasten it, an extender is available which is
compatible with the installed seat belts. The
extender adds approximately 8 inches (200
mm) of length and may be used for either the
driver or front passenger seating position. See
your NISSAN dealer for assistance if the ex-
tender is required.
WARNING
IOnly NISSAN belt extenders, made by
the same company which made the
original equipment belts, should be
used with NISSAN belts.
IAdults and children who can use the
standard seat belt should not use an
extender. Such unnecessary use
could result in serious personal in-
jury in the event of an accident.
INever use seat belt extenders to in-
stall child restraints. If the child re-
straint is not secured properly, the
child could be seriously injured in a
collision or a sudden stop.SEAT BELT MAINTENANCEITo clean the seat belt webbings,apply a
mild soap solution or any solution recom-
mended for cleaning upholstery or carpets.
Then brush the webbing, wipe it with a cloth
and allow it to dry in the shade. Do not allow
the seat belts to retract until they are com-
pletely dry.
SSS0152
1-26
Seats, restraints and supplemental air bag systems
Z
02.7.12/A33-D/V5.0
X
Page 102 of 247

AUTOMATIC SEAT POSITIONER
OPERATION (A/T models only)This system is designed so that the driver's
seat will automatically move when the auto-
matic transmission selector lever is in the P
(Park) position. This allows the driver to get in
and out of the driver's seat more easily.
When one of the following conditions is met,
the driver's seat will slide backward:
IWhen the key is removed from the ignition
switch.
IWhen the driver's door is opened with the
key turned to ACC or LOCK.
IWhen the key is turned from ON to ACC
with the driver's door open.
When one of the following conditions is met,
the driver's seat will return to the positions
before being set.
IWhen the key is inserted into the ignition
switch.
IWhen the driver's door is closed with the
key turned to LOCK.
PROCEDURE FOR STORING
MEMORYTwo positions can be stored in the automatic
driver's seat positioner memory.Follow these
procedures to use the memory system.
1. A/T models:
Set the automatic transmission selector
lever to the P (Park) position.
M/T models:
Apply the parking brake securely when the
vehicle is stopped.
2. Turn the ignition ON.
3. Adjust the driver's seat and steering column
to the desired positions by manually oper-
ating each adjusting switch. For additional
information, see ªSeatsº in the ª1. Seats,
restraints and supplemental air bag sys-
temsº section and ªSteering wheelº earlier
in this section.
SPA1385
AUTOMATIC SEAT POSITIONER
(if so equipped)
Pre-driving checks and adjustments
3-17
Z
02.7.12/A33-D/V5.0
X
Page 103 of 247

During this step, do not turn the ignition to
any positions other than ON.
4. Push the SET switch and, within 5 seconds,
push the memory switch 1 or 2 fully for at
least 1 second.
The indicator light for the pushed memory
switch will come on and stay on for approxi-
mately 5 seconds after pushing the switch.
After the indicator light goes off, the se-
lected positions are stored in the selected
memory (1 or 2).
If memory is stored in the same memory
switch, the previous memory will be de-
leted.
Confirming memory storageITurn the ignition ON and push the SET
switch. If the main memory has not been
stored, the indicator light will come on for
approximately 0.5 seconds. When the
memory has stored the position, the indica-
tor light will stay on for approximately 5
seconds.
IIf the battery cable is disconnected, or if the
fuse blows, the memory will be canceled. In
such a case, reset the desired positions
using the following procedures.
1. Open and close the driver's door more thantwo times with the ignition key in the LOCK
position.
2. Reset the desired position using the previ-
ous procedure.
Selecting the memorized position1. A/T models:
Set the automatic transmission selector le-
ver to the P (Park) position.
M/T models:
Apply the parking brake securely when the
vehicle is stopped.
2. Turn the ignition ON.
3. Push the memory switch 1 or 2 fully for at
least 1 second.
The driver's seat will move to the memo-
rized position with the indicator light flash-
ing. Then the light will stay on for approxi-
mately 5 seconds.
When memory switch 1 or 2 is pushed with the
driver's door open and then the key inserted
into the ignition switch within approximately 1
minute, the driver's seat will move to the
memorized position. Ð A/T models only
System operationThe automatic drive positioner system will not
work or will stop operating under the following
conditions:
Iwhen the vehicle speed is above 4 MPH (7
km/h).
Iwhen any two or more of the memory
switches are simultaneously pressed while
the automatic drive positioner is operating.
Iwhen the adjusting switch for the driver's
seat is turned on while the automatic drive
positioner is operating.
Iwhen the cancel switch located on the
instrument panel is pushed to cancel.
Iwhen the memory switch 1 or 2 is not
pushed for at least 1 second.
Iwhen the seat has already been moved to
the memorized position.
Iwhen no seat position is stored in the
memory switch.
Iwhen the parking brake is not applied. Ð
M/T models
Iwhen the vehicle speed is above 4 MPH (7
km/h) while the parking brake is applied. Ð
M/T models
To restart the drive positioner system,
3-18
Pre-driving checks and adjustments
Z
02.7.12/A33-D/V5.0
X