2003 NISSAN MAXIMA reset
[x] Cancel search: resetPage 8 of 247

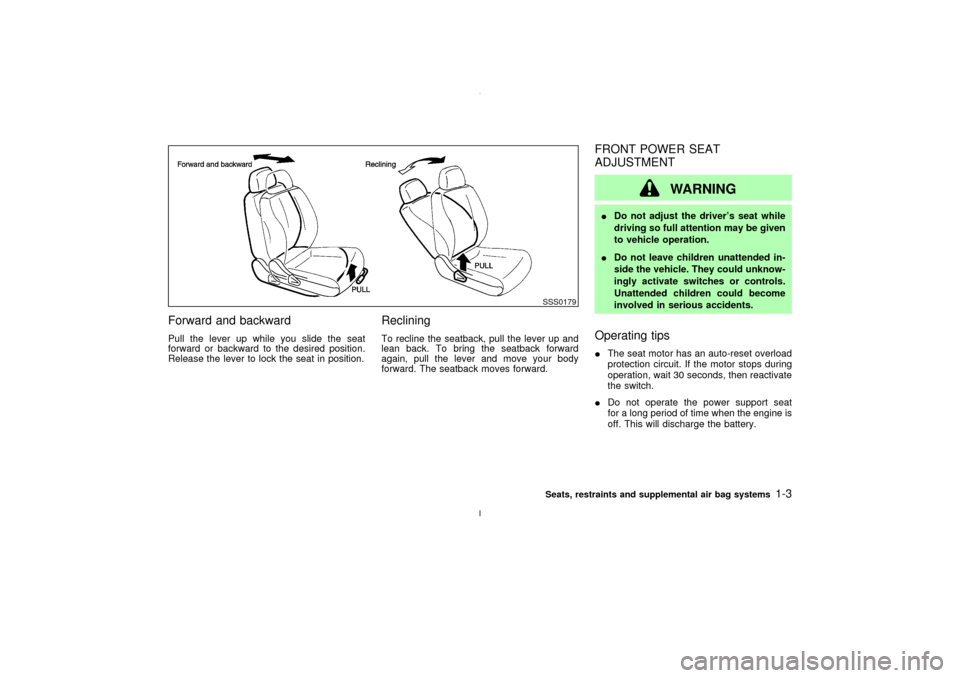
Forward and backwardPull the lever up while you slide the seat
forward or backward to the desired position.
Release the lever to lock the seat in position.
RecliningTo recline the seatback, pull the lever up and
lean back. To bring the seatback forward
again, pull the lever and move your body
forward. The seatback moves forward.
FRONT POWER SEAT
ADJUSTMENT
WARNING
IDo not adjust the driver's seat while
driving so full attention may be given
to vehicle operation.
IDo not leave children unattended in-
side the vehicle. They could unknow-
ingly activate switches or controls.
Unattended children could become
involved in serious accidents.Operating tipsIThe seat motor has an auto-reset overload
protection circuit. If the motor stops during
operation, wait 30 seconds, then reactivate
the switch.
IDo not operate the power support seat
for a long period of time when the engine is
off. This will discharge the battery.
SSS0179Seats, restraints and supplemental air bag systems
1-3
Z
02.7.12/A33-D/V5.0
X
Page 48 of 247

23. Power outlet (P.2-24) or cigarette lighter
(accessory) (P.2-25)
24. Hazard warning flasher switch (P.2-22)
25. Tray (P.2-26) or ashtray (accessory)
(P.2-25)
26. Glove box (P.2-27)
See the page indicated in parentheses for
operating details.
*: Refer to the separate Navigation System
Owner's Manual.
1. Fuel gauge
2. Speedometer
3. Warning/Indicator lights
4. Tachometer
5. Engine coolant temperature gauge6. Warning/Indicator lights
7. Odometer (Total/Twin trip)
8. Reset knob for trip odometer
9. Trip computer
10.Warning/Indicator lights
SIC1737
METERS AND GAUGES
Instruments and controls
2-3
Z
02.7.12/A33-D/V5.0
X
Page 49 of 247

SPEEDOMETER AND ODOMETER
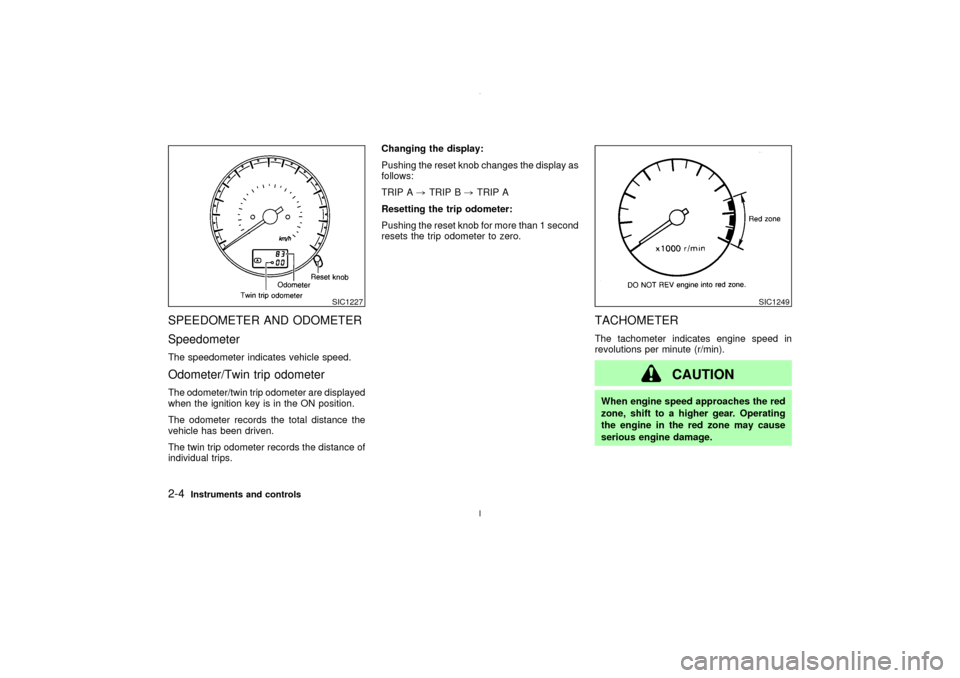
SpeedometerThe speedometer indicates vehicle speed.Odometer/Twin trip odometerThe odometer/twin trip odometer are displayed
when the ignition key is in the ON position.
The odometer records the total distance the
vehicle has been driven.
The twin trip odometer records the distance of
individual trips.Changing the display:
Pushing the reset knob changes the display as
follows:
TRIP A,TRIP B,TRIP A
Resetting the trip odometer:
Pushing the reset knob for more than 1 second
resets the trip odometer to zero.
TACHOMETERThe tachometer indicates engine speed in
revolutions per minute (r/min).
CAUTION
When engine speed approaches the red
zone, shift to a higher gear. Operating
the engine in the red zone may cause
serious engine damage.
SIC1227
SIC1249
2-4
Instruments and controls
Z
02.7.12/A33-D/V5.0
X
Page 78 of 247

When the ignition switch is turned to ON,
modes of the trip computer can be selected by
pushing once on the trip mode switch. The
following modes can be selected:Outside air temperature (ICY Ð ÉF
or ÉC)The outside air temperature is displayed in ÉF
or ÉC.
The outside air temperature mode includes a
low temperature warning feature: below 37ÉF
(3ÉC), the outside air temperature mode is
automatically selected and ICY indicator will
illuminate in order to draw the driver's atten-tion. Press the mode switch if you wish to
return to the mode that was selected before
the warning occurred. The ICY indicator will
continue blinking as long as the temperature
remains below 39ÉF (4ÉC).
Distance to empty (dte Ð mile or
km)The distance to empty (dte) mode provides
you with an estimation of the distance that can
be driven before refueling. The dte is con-
stantly being calculated, based on the amount
of fuel in the fuel tank and the actual fuel
consumption.
The display is updated every 30 seconds.
The dte mode includes a low range warning
feature: when the fuel level is low, the dte
mode is automatically selected and the digits
blink in order to draw the driver's attention.
Press the mode switch if you wish to return to
the mode that was selected before the warning
occurred. The dte mark (dte) will remain blink-
ing until the vehicle is refuelled.
When the fuel level drops even lower, the dte
display will change to (
).
NOTE:
IIf the amount of fuel added while the
ignition switch is OFF is small, the dis-play just before the ignition switch is
turned OFF may continue to be dis-
played.
IWhen driving uphill or rounding curves,
the fuel in the tank shifts, which may
momentarily change the display.
Average fuel consumption
(
or
)
The Average fuel consumption mode shows
the average fuel consumption since the last
reset. Resetting is done by pressing the mode
switch for more than approximately 1 second.
The display is updated every 30 seconds. At
about the first 1/3 miles (500 m) after a reset,
the display shows (
).
Average speed (
or
)
The average speed mode shows the average
vehicle speed since last reset. Resetting is
done by pressing the mode switch for more
than approximately 1 second. The display is
updated every 30 seconds. The first 30 sec-
onds after a reset, the display shows (
).
Journey timeThe journey time mode shows the time since
the last reset. The displayed time can be reset
by pressing the mode switch for more than
approximately 1 second.
SIC1750
Instruments and controls
2-33
Z
02.7.12/A33-D/V5.0
X
Page 103 of 247

During this step, do not turn the ignition to
any positions other than ON.
4. Push the SET switch and, within 5 seconds,
push the memory switch 1 or 2 fully for at
least 1 second.
The indicator light for the pushed memory
switch will come on and stay on for approxi-
mately 5 seconds after pushing the switch.
After the indicator light goes off, the se-
lected positions are stored in the selected
memory (1 or 2).
If memory is stored in the same memory
switch, the previous memory will be de-
leted.
Confirming memory storageITurn the ignition ON and push the SET
switch. If the main memory has not been
stored, the indicator light will come on for
approximately 0.5 seconds. When the
memory has stored the position, the indica-
tor light will stay on for approximately 5
seconds.
IIf the battery cable is disconnected, or if the
fuse blows, the memory will be canceled. In
such a case, reset the desired positions
using the following procedures.
1. Open and close the driver's door more thantwo times with the ignition key in the LOCK
position.
2. Reset the desired position using the previ-
ous procedure.
Selecting the memorized position1. A/T models:
Set the automatic transmission selector le-
ver to the P (Park) position.
M/T models:
Apply the parking brake securely when the
vehicle is stopped.
2. Turn the ignition ON.
3. Push the memory switch 1 or 2 fully for at
least 1 second.
The driver's seat will move to the memo-
rized position with the indicator light flash-
ing. Then the light will stay on for approxi-
mately 5 seconds.
When memory switch 1 or 2 is pushed with the
driver's door open and then the key inserted
into the ignition switch within approximately 1
minute, the driver's seat will move to the
memorized position. Ð A/T models only
System operationThe automatic drive positioner system will not
work or will stop operating under the following
conditions:
Iwhen the vehicle speed is above 4 MPH (7
km/h).
Iwhen any two or more of the memory
switches are simultaneously pressed while
the automatic drive positioner is operating.
Iwhen the adjusting switch for the driver's
seat is turned on while the automatic drive
positioner is operating.
Iwhen the cancel switch located on the
instrument panel is pushed to cancel.
Iwhen the memory switch 1 or 2 is not
pushed for at least 1 second.
Iwhen the seat has already been moved to
the memorized position.
Iwhen no seat position is stored in the
memory switch.
Iwhen the parking brake is not applied. Ð
M/T models
Iwhen the vehicle speed is above 4 MPH (7
km/h) while the parking brake is applied. Ð
M/T models
To restart the drive positioner system,
3-18
Pre-driving checks and adjustments
Z
02.7.12/A33-D/V5.0
X
Page 120 of 247

1. CD LOAD button (Type B only)
2. SEEK/APS REW, APS FF/TRACK
CHANGE button
3. CD play button
4. TAPE play button
5. FM/AM band select button
6. TAPE EJECT button
7. CD EJECT button
8. SCAN tuning button
9. ON×OFF/VOLUME control knob
10. AUTO.P (Automatic preset) button
11. Station and preset (FM/AM)/CD insert or
CD play (Type B only) select button
12. RADIO TUNE/FF×REW/AUDIO (Bass,
treble, fader, and balance, (SCV and NR
(Dolby) Ð Type B only)) ADJUSTING
button
13. AUDIO (BASS, TREBLE, FADER, and
BALANCE, (SCV and NR (Dolby) Ð Type
B only)) button
14. RPT (repeat) play button
15. DOLBY button (Type A only)
PTY button (Type B only)
SAA0550SAA0551
Heater, air conditioner and audio systems
4-15
Z
02.7.12/A33-D/V5.0
X
Page 122 of 247

turned off and the last radio station played will
come on.
The FM stereo indicator ST will glow during
FM stereo reception. When the stereo broad-
cast signal is weak, the radio will automatically
change from stereo to monaural reception.
TUNE (Tuning):WARNING
The radio should not be tuned while
driving so full attention may be given to
vehicle operation.
Use these buttons for manual tuning. To move
quickly through the channels, hold either of the
TUNE buttons down for more than 0.5 sec-
onds.
SEEK tuning:
Push the SEEK button
or
, to tune
from high to low or low to high frequencies and
stops at the next broadcasting station.
SCAN tuning:
Push the SCAN tuning button to tune from low
to high frequencies and stops at each broad-
casting station for 5 seconds. Pushing thebutton again during this 5 seconds period will
stop SCAN tuning and the radio will remain
tuned to that station.
If the SCAN tuning button is not pushed within
5 seconds, SCAN tuning moves to the next
station.
Station memory operations:
Twelve stations can be set for the FM band
(six for FM1, six for FM2) and six stations can
be set for the AM band.
1. Tune to the desired station using the SEEK,
SCAN or TUNE button.
2. Select the desired station and keep pushing
any of the desired station memory buttons
(1 to 6) until a beep sound is heard. (The
radio mutes when the select button is
pushed.)
3. The channel indicator will then come on
and the sound will resume. Memorizing is
now complete.
4. Other buttons can be set in the same
manner.
If the battery cable is disconnected, or if the
fuse blows, the radio memory will be can-
celled. In that case, reset the desired stations.
(Automatic preset) button:
To select the preset FM, AM or PTY station
(type B only), push the AUTO.P button for less
than 1.5 seconds.
To preset the FM, AM or PTY station, push the
AUTO.P button for more than 1.5 seconds.Program type Ð type B only:
When PTY button is pressed during FM mode,
the PTY name of the current tuned station is
displayed. During this time if the PTY data
code is zero, or the data is unreadable; the
display will show NONE.
1. PTY selection mode
PTY name selection can be done by the
up/down TUNE button
or
in the
PTY selection mode.
It is possible to shift the PTY name by one
step, with one push of the up/down tuning
button
or
.
PTY name selection can also be achieved by
pressing the preset buttons.
Initial PTY names are stored in the preset
buttons; but these can be changed by pressing
the preset buttons for more than 1.5 seconds
when the desired PTY name is in the display.
Heater, air conditioner and audio systems
4-17
Z
02.7.12/A33-D/V5.0
X
Page 129 of 247

display during radio operation. During cassette
tape operation, TAPE illuminates in the dis-
play.FM-AM radio operation
FM-AM band select and AUTO P:
Pushing the FM-AM band select button will
change the band as follows:
AM,AM (preset station),FM1,FM2,
FM (preset station),AM
When FM/AM band select button is pushed
while the ignition switch is in the ACC or ON,
the radio will come on at the station last
played.
The last station played will also come on when
the power knob is turned to ON.
If a compact disc or tape is playing when the
FM/AM band select button is turned to ON, the
compact disc or tape will automatically be
turned off and the last radio station played will
come on.
To preset (AUTO.P) the AM or FM station,
push the FM/AM button for more than 1.5
seconds.
The FM stereo indicator, ST illuminates during
FM stereo reception. When the stereo broad-
cast signal is weak, the radio automaticallychanges from stereo to monaural reception.
TUNE (Tuning):WARNING
The radio should not be tuned while
driving so full attention may be given to
vehicle operation.
Use these buttons for manual tuning. To move
quickly through the channels, hold either of the
TUNE buttons down for more than 0.5 sec-
onds.
SCAN tuning:
Push the SCAN tuning button and SCAN will
illuminate in the display window. SCAN tuning
begins from high to low or low to high frequen-
cies and stops at each broadcasting station for
5 seconds. Pushing the button again during
this 5 second period stops SCAN tuning and
the radio remains tuned to that station.
If any of the SCAN tuning buttons are not
pushed within 5 seconds, SCAN tuning moves
to the next station.
Station memory (and preset) operations:
Twelve stations can be set for the FM band(six for FM1, six for FM2) and six stations can
be set for the AM band.
1. Tune to the desired station using the SCAN
or TUNE buttons.
2. Select the desired station and keep pushing
any of the desired station memory buttons
(1 to 6) until a beep sound is heard. The
radio mutes when the select button is
pushed.)
3. The channel indicator will come on and the
sound will resume. Memorizing is now com-
plete.
4. Other station select buttons can be set in
the same manner.
If the battery cable is disconnected, or if the
radio fuse opens, the radio memory is can-
celled. In that case, reset the desired stations.
Program type:
When PTY button is pressed during FM mode,
the PTY name of the current tuned station is
displayed. During this time if the PTY data
code is zero, or the data is unreadable; the
display will show NONE.
1. PTY selection mode
PTY name selection can be done by the
4-24
Heater, air conditioner and audio systems
Z
02.7.12/A33-D/V5.0
X