2003 NISSAN MAXIMA light
[x] Cancel search: lightPage 115 of 247

1. Push the AUTO button on. (AUTO will be
displayed.)
2. Turn the temperature set dial to the left or
right to set the desired temperature.
IAdjust the temperature set dial to about
75ÉF (24ÉC) for normal operation.
IThe temperature of the passenger compart-
ment will be maintained automatically. Air
flow distribution and fan speed are also
controlled automatically.Heating (ECON)The air conditioner does not activate. When
you need to heat only, use this mode.
1. Push the ECON (Economy) button on.
(ECON will be displayed.)
2. Turn the temperature set dial to the left or
right to set the desired temperature.
IThe temperature of the passenger compart-
ment will be maintained automatically. Air
flow distribution and fan speed are also
controlled automatically.
IDo not set the temperature lower than the
outside air temperature. Otherwise the sys-
tem may not work properly.
INot recommended if windows fog up.
Dehumidified defrosting or defogging1. Push the DEF button
on. (The indica-
tor light on the button will come on.)
2. Turn the temperature set dial to the left or
right to set the desired temperature.
ITo quickly remove ice from the outside of
the windows, push the manual fan control
button
and set to the maximum posi-
tion.
IAs soon as possible after the windshield is
clean, push the AUTO button to return to
the auto mode.
IWhen the DEF button
is pushed, the
air conditioner will automatically be turned
on at outside temperatures above 23ÉF
(þ5ÉC) to defog the windshield, and the air
recirculate mode will automatically be
turned off.
Outside air is drawn into the passenger
compartment to improve the defogging per-
formance.
MANUAL OPERATION
Fan speed controlPush the fan control button
to manually
control the fan speed.Push the AUTO button to return to automatic
control of the fan speed.
Air recirculationPush the air recirculation button
to recir-
culate interior air inside the vehicle. The indi-
cator light on the switch will come on.
Push it again to make the air inlet controlled
automatically (FRESH, REC/FRE and
RECIRCULATION). The indicator will go out.
The air recirculation button will not be acti-
vated when the air conditioner is in DEF mode.
Air flow controlPushing the manual air flow control button
selects the air outlet to:
: Air flows from center and side ventila-
tors.: Air flows from center and side ventila-
tors and foot outlets.: Air flows mainly from foot outlets.: Air flows from defroster and foot out-
lets.
To turn the system offPush the OFF button.
4-10
Heater, air conditioner and audio systems
Z
02.7.12/A33-D/V5.0
X
Page 118 of 247
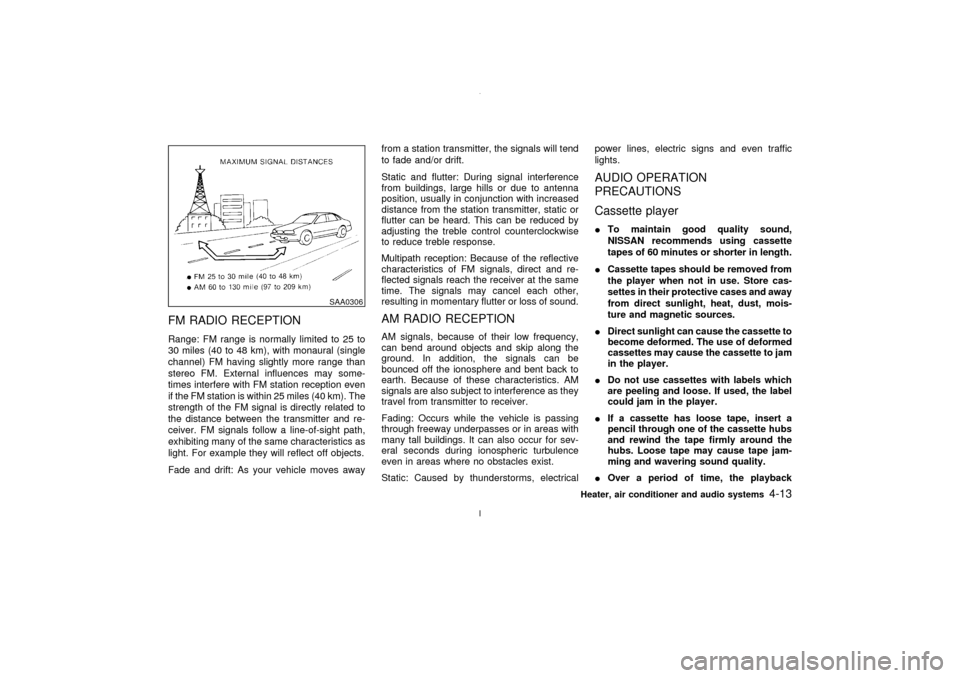
FM RADIO RECEPTIONRange: FM range is normally limited to 25 to
30 miles (40 to 48 km), with monaural (single
channel) FM having slightly more range than
stereo FM. External influences may some-
times interfere with FM station reception even
if the FM station is within 25 miles (40 km). The
strength of the FM signal is directly related to
the distance between the transmitter and re-
ceiver. FM signals follow a line-of-sight path,
exhibiting many of the same characteristics as
light. For example they will reflect off objects.
Fade and drift: As your vehicle moves awayfrom a station transmitter, the signals will tend
to fade and/or drift.
Static and flutter: During signal interference
from buildings, large hills or due to antenna
position, usually in conjunction with increased
distance from the station transmitter, static or
flutter can be heard. This can be reduced by
adjusting the treble control counterclockwise
to reduce treble response.
Multipath reception: Because of the reflective
characteristics of FM signals, direct and re-
flected signals reach the receiver at the same
time. The signals may cancel each other,
resulting in momentary flutter or loss of sound.
AM RADIO RECEPTIONAM signals, because of their low frequency,
can bend around objects and skip along the
ground. In addition, the signals can be
bounced off the ionosphere and bent back to
earth. Because of these characteristics. AM
signals are also subject to interference as they
travel from transmitter to receiver.
Fading: Occurs while the vehicle is passing
through freeway underpasses or in areas with
many tall buildings. It can also occur for sev-
eral seconds during ionospheric turbulence
even in areas where no obstacles exist.
Static: Caused by thunderstorms, electricalpower lines, electric signs and even traffic
lights.
AUDIO OPERATION
PRECAUTIONS
Cassette playerITo maintain good quality sound,
NISSAN recommends using cassette
tapes of 60 minutes or shorter in length.
ICassette tapes should be removed from
the player when not in use. Store cas-
settes in their protective cases and away
from direct sunlight, heat, dust, mois-
ture and magnetic sources.
IDirect sunlight can cause the cassette to
become deformed. The use of deformed
cassettes may cause the cassette to jam
in the player.
IDo not use cassettes with labels which
are peeling and loose. If used, the label
could jam in the player.
IIf a cassette has loose tape, insert a
pencil through one of the cassette hubs
and rewind the tape firmly around the
hubs. Loose tape may cause tape jam-
ming and wavering sound quality.
IOver a period of time, the playback
SAA0306
Heater, air conditioner and audio systems
4-13
Z
02.7.12/A33-D/V5.0
X
Page 119 of 247
head, capstan and pinch roller may col-
lect a tape coating residue as the tape is
played. This residue accumulation can
cause weak or wavering sound, and
should be removed periodically with a
head cleaning tape. If the residue is not
removed periodically, the player may
need to be disassembled for cleaning.
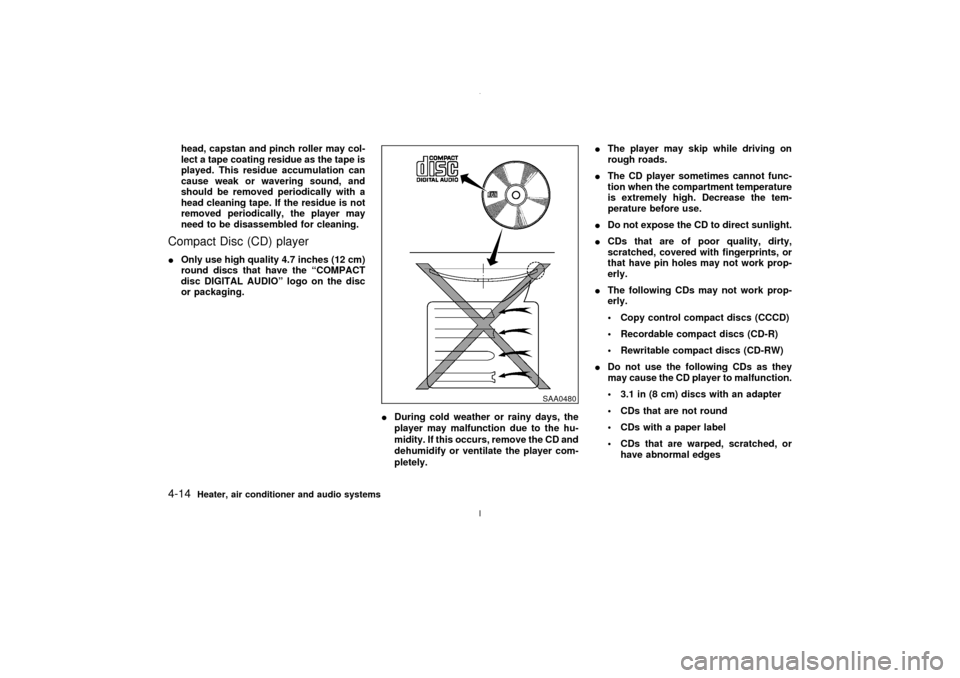
Compact Disc (CD) playerIOnly use high quality 4.7 inches (12 cm)
round discs that have the ªCOMPACT
disc DIGITAL AUDIOº logo on the disc
or packaging.
IDuring cold weather or rainy days, the
player may malfunction due to the hu-
midity. If this occurs, remove the CD and
dehumidify or ventilate the player com-
pletely.IThe player may skip while driving on
rough roads.
IThe CD player sometimes cannot func-
tion when the compartment temperature
is extremely high. Decrease the tem-
perature before use.
IDo not expose the CD to direct sunlight.
ICDs that are of poor quality, dirty,
scratched, covered with fingerprints, or
that have pin holes may not work prop-
erly.
IThe following CDs may not work prop-
erly.
· Copy control compact discs (CCCD)
· Recordable compact discs (CD-R)
· Rewritable compact discs (CD-RW)
IDo not use the following CDs as they
may cause the CD player to malfunction.
· 3.1 in (8 cm) discs with an adapter
· CDs that are not round
· CDs with a paper label
· CDs that are warped, scratched, or
have abnormal edges
SAA0480
4-14
Heater, air conditioner and audio systems
Z
02.7.12/A33-D/V5.0
X
Page 123 of 247
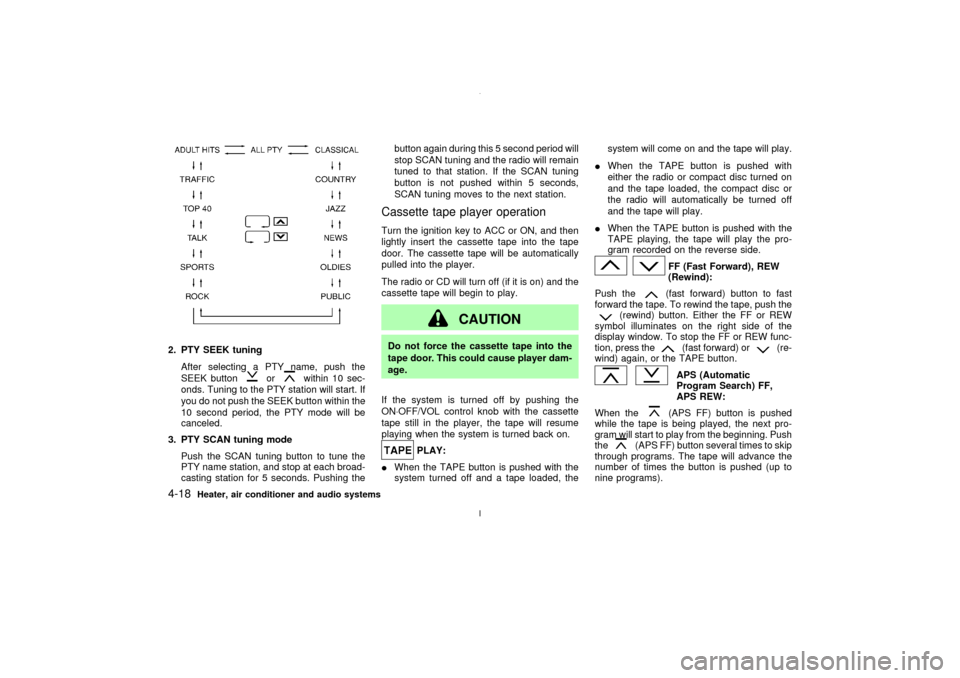
2. PTY SEEK tuning
After selecting a PTY name, push the
SEEK button
or
within 10 sec-
onds. Tuning to the PTY station will start. If
you do not push the SEEK button within the
10 second period, the PTY mode will be
canceled.
3. PTY SCAN tuning mode
Push the SCAN tuning button to tune the
PTY name station, and stop at each broad-
casting station for 5 seconds. Pushing thebutton again during this 5 second period will
stop SCAN tuning and the radio will remain
tuned to that station. If the SCAN tuning
button is not pushed within 5 seconds,
SCAN tuning moves to the next station.
Cassette tape player operationTurn the ignition key to ACC or ON, and then
lightly insert the cassette tape into the tape
door. The cassette tape will be automatically
pulled into the player.
The radio or CD will turn off (if it is on) and the
cassette tape will begin to play.
CAUTION
Do not force the cassette tape into the
tape door. This could cause player dam-
age.
If the system is turned off by pushing the
ON×OFF/VOL control knob with the cassette
tape still in the player, the tape will resume
playing when the system is turned back on.
PLAY:
IWhen the TAPE button is pushed with the
system turned off and a tape loaded, thesystem will come on and the tape will play.
IWhen the TAPE button is pushed with
either the radio or compact disc turned on
and the tape loaded, the compact disc or
the radio will automatically be turned off
and the tape will play.
IWhen the TAPE button is pushed with the
TAPE playing, the tape will play the pro-
gram recorded on the reverse side.
FF (Fast Forward), REW
(Rewind):
Push the(fast forward) button to fast
forward the tape. To rewind the tape, push the
(rewind) button. Either the FF or REW
symbol illuminates on the right side of the
display window. To stop the FF or REW func-
tion, press the
(fast forward) or
(re-
wind) again, or the TAPE button.
APS (Automatic
Program Search) FF,
APS REW:
When the(APS FF) button is pushed
while the tape is being played, the next pro-
gram will start to play from the beginning. Push
the
(APS FF) button several times to skip
through programs. The tape will advance the
number of times the button is pushed (up to
nine programs).
4-18
Heater, air conditioner and audio systems
Z
02.7.12/A33-D/V5.0
X
Page 131 of 247
FF (fast forward), REW
(rewind):
Push either the FF or REW button for the
desired direction.
The FF or REW symbol illuminates in the
display.
To stop the FF or REW function, press the FF
or REW button again, or the TAPE/CD button.APS (automatic program
search) FF, APS REW:
Push either the APS FF or APS REW button
while the cassette tape is playing. The tape
runs quickly, stops, then plays the next selec-
tion. Either the FF or REW symbol flashes in
the display while searching for the selection.
This system searches at the blank intervals
between selections. If there is a blank interval
within one selection or there is no interval
between selections, the system may not stop
in the desired or expected location.
PROG (program):
Push the PROG button. The moving digital
squares illuminate on either the right or left
side of the display window to indicate the side
of program play.
If the PROG button is pushed during either theFF or REW function the tape enters the normal
play mode.
Dolby NR (Noise Reduction):
Push the Dolby NR
button for Dolby NR
encoded tapes to reduce high frequency tape
noise. The
indicator light comes on.
Dolby NR is manufactured under license from
Dolby Laboratories Licensing Corporation.
DOLBY NR and the double-D symbol
are trademarks of Dolby Laboratories
Licensing Corporation.
Metal or chrome tape usage:
The cassette player is automatically set to high
performance play when playing a metal or
chrome cassette tape.TAPE EJECT:
Push the EJECT button. The cassette tape
automatically comes out.
Compact disc (CD) player/changer
operationTurn the ignition key to the ACC or ON posi-
tion.
To play the CD, push the TAPE/CD button
after loading the disc.
If the disc loaded, the number of discs andtracks will appear on the display.
If the radio or tape is already operating, it will
automatically turn off and the CD will play.
CAUTION
Do not force the CD into the slot. This
could damage the player.
If the system has been turned off while the CD
was playing, pushing the ON×OFF/VOL control
knob will start the CD.
8 cm diameter CD can also be used without an
adapter.
PLAY:
IWhen the TAPE/CD button is pushed with
the CD loaded in the player or CD au-
tochanger (if so equipped):
a) If the TAPE player (if cassette tape is
inserted) is turn on, the mode (CD
player or CD autochanger) will turn on.
b) If the CD player turns on, the CD player
will automatically be turned off and the
CD autochanger will turn on.
c) If the CD autochanger turns on, the CD
autochanger will automatically be turned
4-26
Heater, air conditioner and audio systems
Z
02.7.12/A33-D/V5.0
X
Page 134 of 247
or
button for more than 1.5 sec-
onds again.
ANTENNA
Window antennaThe antenna pattern is printed inside the rear
window.
CAUTION
IDo not place metalized film near the
rear window glass or attach any metal
parts to it. This may cause poor re-
ception or noise.
IWhen cleaning the inside of the rear
window, be careful not to scratch or
damage the rear window antenna.
Lightly wipe along the antenna with a
dampened soft cloth.
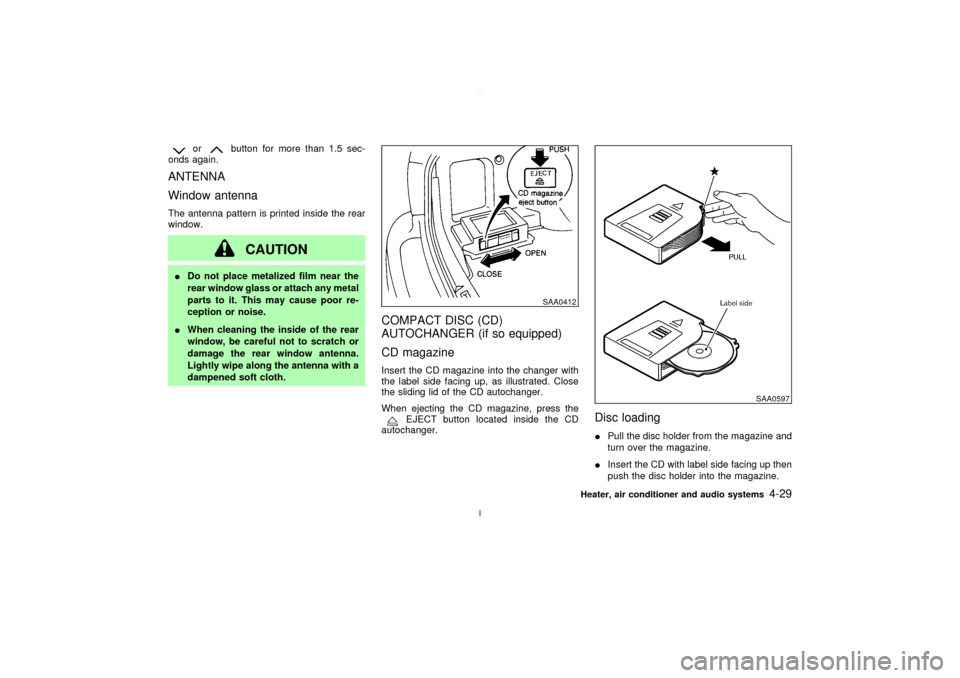
COMPACT DISC (CD)
AUTOCHANGER (if so equipped)
CD magazineInsert the CD magazine into the changer with
the label side facing up, as illustrated. Close
the sliding lid of the CD autochanger.
When ejecting the CD magazine, press the
EJECT button located inside the CD
autochanger.
Disc loadingIPull the disc holder from the magazine and
turn over the magazine.
IInsert the CD with label side facing up then
push the disc holder into the magazine.
SAA0412
SAA0597
Heater, air conditioner and audio systems
4-29
Z
02.7.12/A33-D/V5.0
X
Page 140 of 247
LOCK position, proceed as follows to remove
the key:
1. Move the selector lever into the P (Park)
position.
2. Turn the ignition key slightly in the ON
direction.
3. Turn the key toward the LOCK position.
4. Remove the key.
If the key is removed from the ignition switch,
the selector lever cannot be moved from P
(Park) position.The selector lever can be
moved if the ignition switch is in the ON
position and the foot brake pedal is de-
pressed.
There is an OFF position in between LOCK
and ACC, although it does not show on the
lock cylinder. When the ignition is in OFF the
steering wheel is not locked.
In order for the steering wheel to be locked, it
must be turned about 1/6 of a turn counter-
clockwise from the straight up position.
To lock the steering wheel, turn the key to
the LOCK position. Remove the key. To
unlock the steering wheel, insert the key
and turn it gently while rotating the steer-
ing wheel slightly right and left.
WARNING
Never remove or turn the key to the
LOCK position while driving. The steer-
ing wheel will lock. This may cause the
driver to lose control of the vehicle and
could result in serious vehicle damage
and/or personal injury.
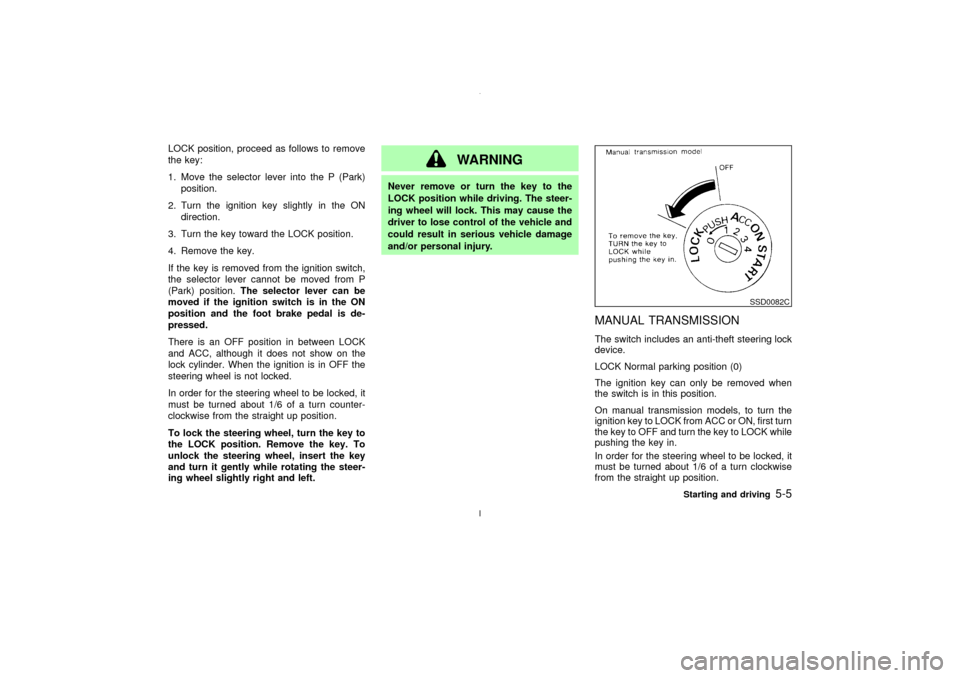
MANUAL TRANSMISSIONThe switch includes an anti-theft steering lock
device.
LOCK Normal parking position (0)
The ignition key can only be removed when
the switch is in this position.
On manual transmission models, to turn the
ignition key to LOCK from ACC or ON, first turn
the key to OFF and turn the key to LOCK while
pushing the key in.
In order for the steering wheel to be locked, it
must be turned about 1/6 of a turn clockwise
from the straight up position.
SSD0082C
Starting and driving
5-5
Z
02.7.12/A33-D/V5.0
X
Page 141 of 247
To lock the steering wheel, turn the key to
the LOCK position. Remove the key. To
unlock the steering wheel, insert the key
and turn it gently while rotating the steer-
ing wheel slightly right and left.
WARNING
Never remove or turn the key to the
LOCK position while driving. The steer-
ing wheel will lock. This may cause the
driver to lose control of the vehicle and
could result in serious vehicle damage
and/or personal injury.
KEY POSITIONSThe switch includes an anti-theft steering lock
device.
LOCK (Normal parking position) (0)
The ignition key can only be removed when
the switch is in this position.
OFF (1)
The engine can be turned off without locking
the steering wheel.
ACC (Accessories) (2)
This position activates electrical accessories
such as the radio when the engine is not
running.
ON (Normal operating position) (3)
This position turns on the ignition system and
the electrical accessories.
START (4)
This position activates the starter motor, start-
ing the engine.NISSAN VEHICLE IMMOBILIZER
SYSTEMThe Nissan Vehicle Immobilizer System will
not allow the engine to start without the use ofthe registered Nissan Vehicle Immobilizer Sys-
tem key.
If the engine fails to start using the registered
Nissan Vehicle Immobilizer System key, it may
be due to interference caused by another
Nissan Vehicle Immobilizer System key, an
automated toll road device or automated pay-
ment device on the key ring. Restart the en-
gine using the following procedures:
1. Leave the ignition switch in the ON position
for approximately 5 seconds.
2. Turn the ignition switch to the OFF or LOCK
position and wait approximately 10 sec-
onds.
3. Repeat step 1 and 2 again.
4. Restart the engine while holding the device
(which may have caused the interference)
separate from the registered Nissan Ve-
hicle Immobilizer System key.
If this procedure allows the engine to start,
NISSAN recommends placing the registered
Nissan Vehicle Immobilizer System key on a
separate key ring to avoid interference from
other devices.
5-6
Starting and driving
Z
02.7.12/A33-D/V5.0
X