2003 NISSAN MAXIMA air condition
[x] Cancel search: air conditionPage 139 of 247
DRINKING ALCOHOL/DRUGS AND
DRIVING
WARNING
Never drive under the influence of alco-
hol or drugs. Alcohol in the bloodstream
reduces coordination, delays reaction
time and impairs judgment. Driving after
drinking alcohol increases the likeli-
hood of being involved in an accident
injuring yourself and others. Addition-
ally, if you are injured in the accident,
alcohol can increase the severity of the
injury.
NISSAN is committed to safe driving. You
must not drive under the influence of alcohol.
Every year thousands of people are injured or
killed in alcohol related accidents. Although
the local laws vary on what is considered to be
legally intoxicated, the fact is that alcohol
affects all people differently and most people
underestimate the effects of alcohol.
Remember, drinking and driving don't mix!
And that's true for drugs too (over the counter,
prescription, and illegal drugs). Don't drive ifyour ability to operate your vehicle is impaired
by alcohol, drugs, or some other physical
condition.
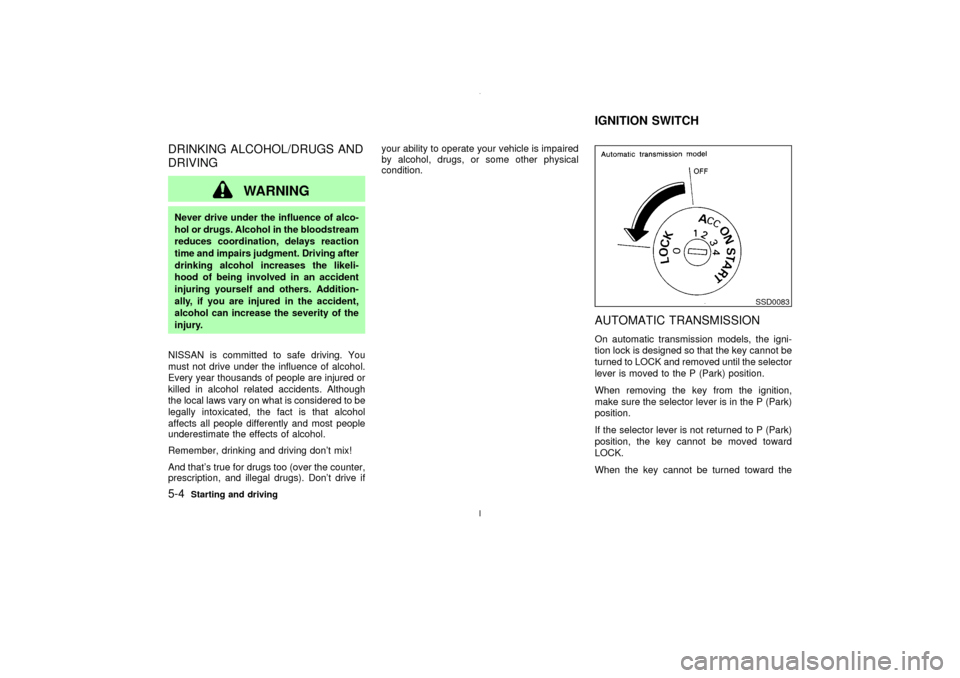
AUTOMATIC TRANSMISSIONOn automatic transmission models, the igni-
tion lock is designed so that the key cannot be
turned to LOCK and removed until the selector
lever is moved to the P (Park) position.
When removing the key from the ignition,
make sure the selector lever is in the P (Park)
position.
If the selector lever is not returned to P (Park)
position, the key cannot be moved toward
LOCK.
When the key cannot be turned toward the
SSD0083
IGNITION SWITCH
5-4
Starting and driving
Z
02.7.12/A33-D/V5.0
X
Page 146 of 247
system may be activated. This will occur
even if all electrical circuits are functioning
properly. In this case, turn the ignition key
OFF and wait for 3 seconds. Then turn the
key back to the ON position. The vehicle
should return to its normal operating con-
dition. If it does not return to its normal
operating condition, have your NISSAN
dealer check the transmission and repair if
necessary.
MANUAL TRANSMISSION
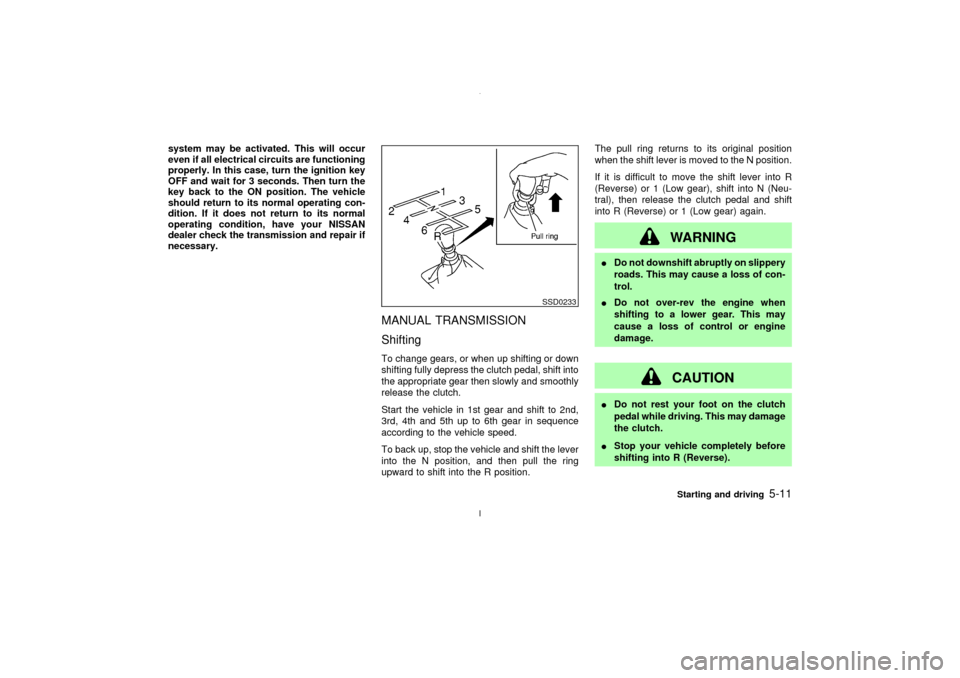
ShiftingTo change gears, or when up shifting or down
shifting fully depress the clutch pedal, shift into
the appropriate gear then slowly and smoothly
release the clutch.
Start the vehicle in 1st gear and shift to 2nd,
3rd, 4th and 5th up to 6th gear in sequence
according to the vehicle speed.
To back up, stop the vehicle and shift the lever
into the N position, and then pull the ring
upward to shift into the R position.The pull ring returns to its original position
when the shift lever is moved to the N position.
If it is difficult to move the shift lever into R
(Reverse) or 1 (Low gear), shift into N (Neu-
tral), then release the clutch pedal and shift
into R (Reverse) or 1 (Low gear) again.
WARNING
IDo not downshift abruptly on slippery
roads. This may cause a loss of con-
trol.
IDo not over-rev the engine when
shifting to a lower gear. This may
cause a loss of control or engine
damage.
CAUTION
IDo not rest your foot on the clutch
pedal while driving. This may damage
the clutch.
IStop your vehicle completely before
shifting into R (Reverse).
SSD0233
Starting and driving
5-11
Z
02.7.12/A33-D/V5.0
X
Page 151 of 247
IKeep your engine tuned up.
IFollow the recommended periodic mainte-
nance schedule.
IKeep the tires inflated at the correct pres-
sure. Low pressure will increase tire wear
and waste fuel.
IKeep the front wheels in correct alignment.
Improper alignment will cause not only tire
wear but also lower fuel economy.
IAir conditioner operation lowers fuel
economy. Use the air conditioner only when
necessary.
IWhen cruising at highway speeds, it is
more economical to use the air conditioner
and leave the windows closed to reduce
drag.
WARNING
IDo not stop or park the vehicle over
flammable materials such as dry
grass, waste paper or rags. They may
ignite and cause a fire.
INever leave the engine running while
the vehicle is unattended.
INever leave children unattended in
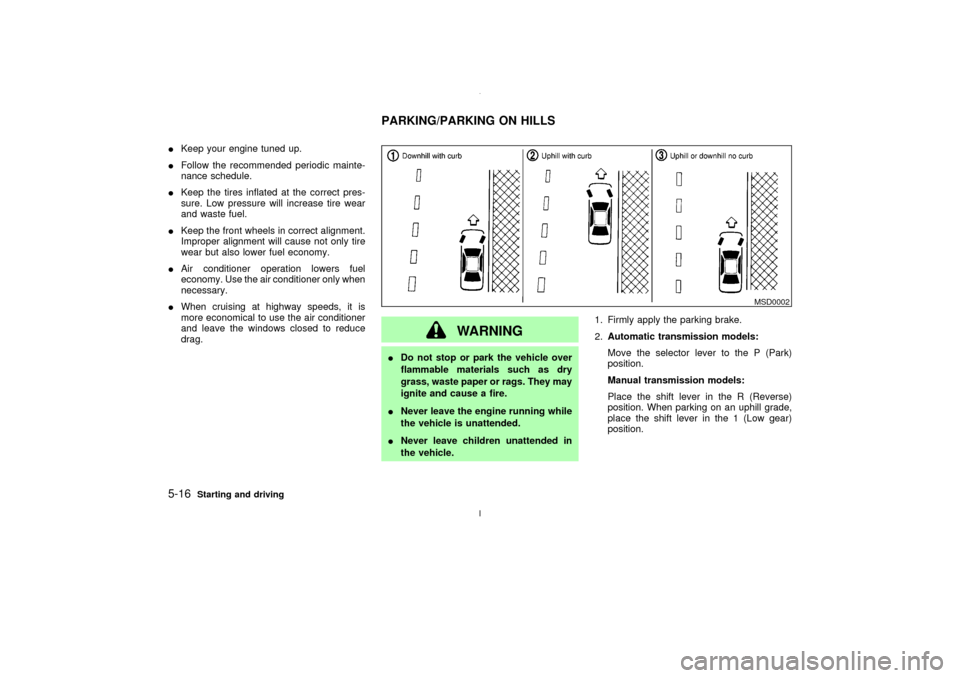
the vehicle.1. Firmly apply the parking brake.
2.Automatic transmission models:
Move the selector lever to the P (Park)
position.
Manual transmission models:
Place the shift lever in the R (Reverse)
position. When parking on an uphill grade,
place the shift lever in the 1 (Low gear)
position.
MSD0002
PARKING/PARKING ON HILLS
5-16
Starting and driving
Z
02.7.12/A33-D/V5.0
X
Page 154 of 247
conditions are hazardous and extra care is
required while driving.Self-test featureThe anti-lock brake system consists of elec-
tronic sensors, electric pumps, and hydraulic
solenoids controlled by a computer. The com-
puter has a built-in diagnostic feature that tests
the system each time you start the engine and
move the vehicle at a low speed in forward or
reverse. When the self-test occurs, you may
hear a clunk noise and/or feel a pulsation in
the brake pedal. This is normal and is not an
indication of any malfunction. If the computer
senses any malfunction, it switches the anti-
lock brake system OFF and turns on the ABS
warning light in the dashboard. The brake
system will then behave normally, but without
anti-lock assistance.
If the light comes on during the self check, or
while you are driving, you should take your
vehicle to your NISSAN dealer for repair at
your earliest convenience.
WARNING
The anti-lock brake system is a sophis-
ticated device, but it cannot prevent ac-cidents resulting from careless or dan-
gerous driving techniques. It can help
maintain vehicle control during braking
on slippery surfaces, but remember that
the stopping distance on slippery sur-
faces will be longer than on normal
surfaces, even with the anti-lock sys-
tem. Stopping distances may also be
longer on rough, gravel or snow covered
roads, or if you are using tire chains.
Always maintain a safe distance from
the vehicle in front of you. Ultimately,
the responsibility for safety of self and
others rests in the hands of the driver.
Tire type and condition of tires may also
affect braking effectiveness.
IWhen replacing tires, install the
specified size of tires on all four
wheels.
IWhen installing a spare tire, make
sure it is the proper size and type as
specified on the tire placard. See ªVe-
hicle identificationº in the ª9. Techni-
cal and consumer informationº sec-
tion for tire placard location.On slippery surfaces such as wet asphalt
roads, vehicle wheels may spin when the
vehicle is accelerated. This wheel spin re-
duces acceleration, or causes the vehicle to
swerve, thus decreasing vehicle stability.
The traction control system helps limit wheel
spin on slippery roads. The system operates
only if it senses one or both of the front wheels
spinning or beginning to lose traction. When
this happens, the system reduces engine
power and may also upshift the transmission
to help limit wheel spin.
IIndicator light
If a malfunction occurs in the traction con-
trol system, the SLIP and
indicator
lights come on in the meter panel.
As long as these warning lights are on, the
traction control function is canceled. The
vehicle will behaves like a model without
the traction control system.
CAUTION
IThe traction control system is most
effective when the transmission gear
selector is in the D position.
IIf you drive in gear 1 or 2 with the TCSTRACTION CONTROL SYSTEM (if
so equipped)
Starting and driving
5-19
Z
02.7.12/A33-D/V5.0
X
Page 164 of 247
IThe booster battery must be rated at
12 volts. Use of an improperly rated
battery can damage your vehicle.
IWhenever working on or near a bat-
tery, always wear suitable eye protec-
tors (for example, goggles or indus-
trial safety spectacles) and remove
rings, metal bands, or any other jew-
elry. Do not lean over the battery
when jump starting.
IDo not attempt to jump start a frozen
battery. It could explode and cause
serious injury.
IYour vehicle has an automatic engine
cooling fan. It could come on at any
time. Keep hands and other objects
away from it.
WARNING
Always follow the instructions below.
Failure to do so could result in damage
to the charging system and cause per-
sonal injury.
1. If the booster battery is in another vehicle,
position the two vehicles to bring their bat-
teries into close proximity to each other.
Do not allow the two vehicles to touch.
2. Apply parking brake. Move the shift lever tothe N (Neutral) position (On automatic
transmission models, move the selector
lever to the P (Park) position). Switch off all
unnecessary electrical systems (light,
heater, air conditioner, etc.).
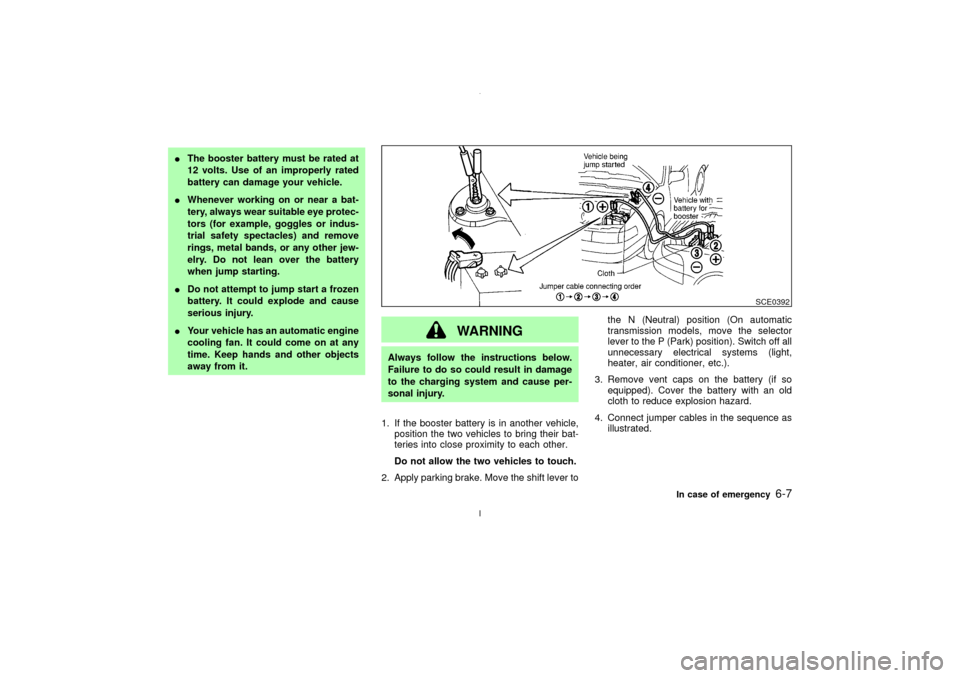
3. Remove vent caps on the battery (if so
equipped). Cover the battery with an old
cloth to reduce explosion hazard.
4. Connect jumper cables in the sequence as
illustrated.
SCE0392
In case of emergency
6-7
Z
02.7.12/A33-D/V5.0
X
Page 166 of 247
WARNING
IDo not continue to drive if your ve-
hicle overheats. Doing so could
cause a vehicle fire.
ITo avoid the danger of being scalded,
never remove the radiator cap while
the engine is still hot. When the radia-
tor cap is removed, pressurized hot
water will spurt out, possibly causing
serious injury.
IDo not open the hood if steam is
coming out.
If your vehicle is overheating (indicated by an
extremely high temperature gauge reading), or
if you feel a lack of engine power, detect
abnormal noise, etc., take the following steps:
1. Move the vehicle safely off the road, apply
the parking brake and move the shift lever
to the N (Neutral) position (automatic trans-
mission to the P (Park) position).
Do not stop the engine.
2. Turn off the air conditioner switch. Open all
the windows, move the heater or air condi-tioner temperature control to maximum hot
and fan control to high speed.
3. Get out of the vehicle. Look and listen for
steam or coolant escaping from the radiator
before opening the hood. Wait until no
steam or coolant can be seen before pro-
ceeding.
4. Open the engine hood.
WARNING
If steam or water is coming from the
engine, stand clear to prevent getting
burned.
5. Visually check if the cooling fan is running.
The radiator hoses and radiator should not
leak water.
If coolant is leaking or the cooling fan does
not run, stop the engine.
WARNING
IBe careful not to allow your hands,
hair, jewelry or clothing to come intocontact with, or to get caught in the
cooling fan, or drive belt.
IThe engine cooling fan can start at
any time when the coolant tempera-
ture is high.
6. After the engine cools down, check the
coolant level in the reservoir tank with the
engine running. Add coolant to the reservoir
tank if necessary. Have your vehicle re-
paired at the nearest NISSAN dealer.
IF YOUR VEHICLE OVERHEATS
In case of emergency
6-9
Z
02.7.12/A33-D/V5.0
X
Page 176 of 247

8 Maintenance and do-it-yourselfMaintenance requirements ........................................ 8-2
General maintenance ................................................ 8-2
Explanation of general maintenance items .......... 8-2
Maintenance precautions .......................................... 8-5
Engine compartment check locations ....................... 8-7
Engine cooling system .............................................. 8-8
Checking engine coolant level ............................. 8-8
Changing engine coolant ..................................... 8-9
Engine oil ................................................................ 8-10
Checking engine oil level ................................... 8-10
Changing engine oil ........................................... 8-11
Changing engine oil filter ................................... 8-12
Automatic transmission fluid ................................... 8-12
Temperature conditions for checking ................. 8-13
Power steering fluid ................................................ 8-14
Brake and clutch fluid ............................................. 8-14
Window washer fluid ............................................... 8-15
Battery ..................................................................... 8-15
Drive belts ............................................................... 8-17
Spark plugs ............................................................. 8-17
Replacing spark plugs ........................................ 8-18Air cleaner ............................................................... 8-18
Windshield wiper blades ......................................... 8-19
Cleaning ............................................................. 8-19
Replacing............................................................ 8-20
Parking brake and brake pedal ............................... 8-21
Checking parking brake ..................................... 8-21
Checking brake pedal ........................................ 8-21
Brake booster ..................................................... 8-22
Fuses....................................................................... 8-22
Engine compartment .......................................... 8-22
Passenger compartment .................................... 8-24
Keyfob battery replacement .................................... 8-24
Lights ....................................................................... 8-26
Headlights........................................................... 8-27
Exterior and interior lights .................................. 8-28
Wheels and tires ..................................................... 8-33
Tire pressure ...................................................... 8-33
Types of tires...................................................... 8-33
Tire chains .......................................................... 8-34
Changing wheels and tires ................................. 8-35
Z
02.7.12/A33-D/V5.0
X
Page 177 of 247

Your new NISSAN has been designed to have
minimum maintenance requirements with
longer service intervals to save you both time
and money. However, some day-to-day and
regular maintenance is essential to maintain
your NISSAN's good mechanical condition, as
well as its emission and engine performance.
It is the owner's responsibility to make sure
that scheduled maintenance, as well as gen-
eral maintenance, is performed.
As the vehicle owner, you are the only one
who can ensure that your vehicle receives the
proper maintenance care. You are a vital link
in the maintenance chain.
Scheduled maintenance:
For your convenience, both required and op-
tional scheduled maintenance items are de-
scribed and listed in your ªService and Main-
tenance Guideº. You must refer to that guide to
ensure that necessary maintenance is per-
formed on your NISSAN at regular intervals.
General maintenance:
General maintenance includes those items
which should be checked during normal day-
to-day operation of the vehicle. They are es-
sential if your vehicle is to continue to operate
properly. It is your responsibility to perform
these procedures regularly as prescribed.Performing general maintenance checks re-
quire minimal mechanical skill and only a few
general automotive tools.
These checks or inspections can be done by
yourself, a qualified technician or, if you prefer,
your NISSAN dealer.
Where to go for service:
If maintenance service is required or your
vehicle appears to malfunction, have the sys-
tems checked and tuned by an authorized
NISSAN dealer.
NISSAN technicians are well-trained special-
ists and are kept up to date with the latest
service information through technical bulletins,
service tips, and in-dealership training pro-
grams. They are completely qualified to work
on NISSAN vehiclesbeforethey work on your
vehicle, rather than after they have worked on
it.
You can be confident that your NISSAN deal-
er's service department performs the best job
to meet the maintenance requirements of your
vehicle Ð in a reliable and economic way.During the normal day-to-day operation of the
vehicle, general maintenance should be per-
formed regularly as prescribed in this section.
If you detect any unusual sounds, vibrations or
smell, be sure to check for the cause or have
your NISSAN dealer check it promptly. In
addition, you should notify your NISSAN
dealer if you think that repairs are required.
When performing any checks or maintenance
work, closely observe the ªMaintenance pre-
cautionsº later in this section.
EXPLANATION OF GENERAL
MAINTENANCE ITEMSAdditional information on the following
items with ª*º is found later in this section.Outside the vehicleThe maintenance items listed here should be
performed from time to time, unless otherwise
specified.
Tires*:Check the pressure with a gauge at
least once a month and always prior to long
distance trips. If necessary, adjust the pres-
sure in all tires, including the spare, to the
pressure specified. Check carefully for dam-
age, cuts or excessive wear.
Wheel nuts*:When checking the tires, make
sure no nuts are missing, and check for any
MAINTENANCE REQUIREMENTS GENERAL MAINTENANCE8-2
Maintenance and do-it-yourself
Z
02.7.12/A33-D/V5.0
X