2003 NISSAN MAXIMA ECO mode
[x] Cancel search: ECO modePage 123 of 247
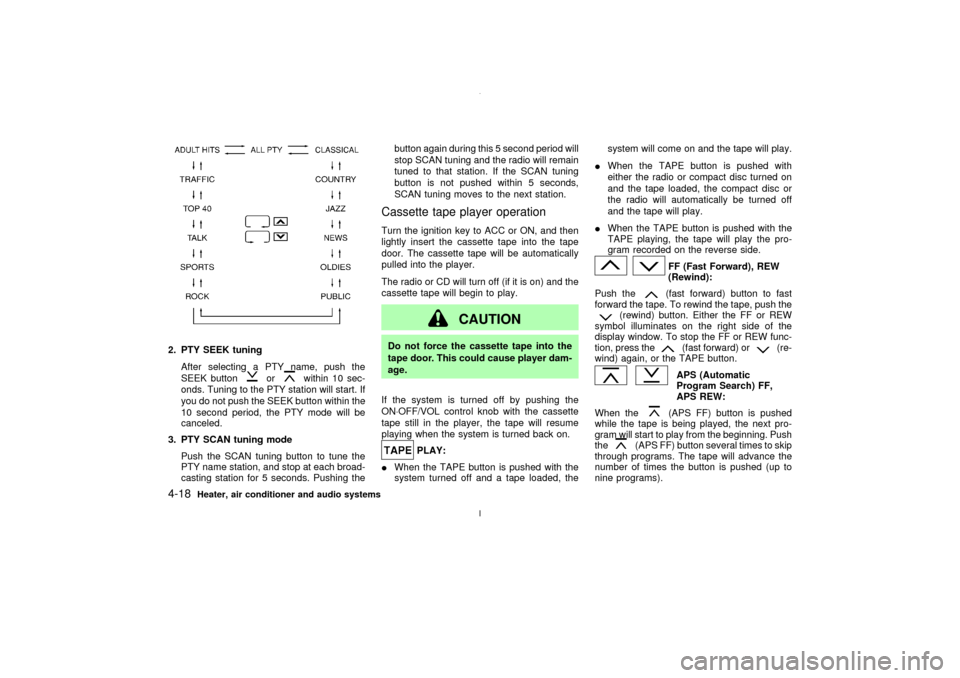
2. PTY SEEK tuning
After selecting a PTY name, push the
SEEK button
or
within 10 sec-
onds. Tuning to the PTY station will start. If
you do not push the SEEK button within the
10 second period, the PTY mode will be
canceled.
3. PTY SCAN tuning mode
Push the SCAN tuning button to tune the
PTY name station, and stop at each broad-
casting station for 5 seconds. Pushing thebutton again during this 5 second period will
stop SCAN tuning and the radio will remain
tuned to that station. If the SCAN tuning
button is not pushed within 5 seconds,
SCAN tuning moves to the next station.
Cassette tape player operationTurn the ignition key to ACC or ON, and then
lightly insert the cassette tape into the tape
door. The cassette tape will be automatically
pulled into the player.
The radio or CD will turn off (if it is on) and the
cassette tape will begin to play.
CAUTION
Do not force the cassette tape into the
tape door. This could cause player dam-
age.
If the system is turned off by pushing the
ON×OFF/VOL control knob with the cassette
tape still in the player, the tape will resume
playing when the system is turned back on.
PLAY:
IWhen the TAPE button is pushed with the
system turned off and a tape loaded, thesystem will come on and the tape will play.
IWhen the TAPE button is pushed with
either the radio or compact disc turned on
and the tape loaded, the compact disc or
the radio will automatically be turned off
and the tape will play.
IWhen the TAPE button is pushed with the
TAPE playing, the tape will play the pro-
gram recorded on the reverse side.
FF (Fast Forward), REW
(Rewind):
Push the(fast forward) button to fast
forward the tape. To rewind the tape, push the
(rewind) button. Either the FF or REW
symbol illuminates on the right side of the
display window. To stop the FF or REW func-
tion, press the
(fast forward) or
(re-
wind) again, or the TAPE button.
APS (Automatic
Program Search) FF,
APS REW:
When the(APS FF) button is pushed
while the tape is being played, the next pro-
gram will start to play from the beginning. Push
the
(APS FF) button several times to skip
through programs. The tape will advance the
number of times the button is pushed (up to
nine programs).
4-18
Heater, air conditioner and audio systems
Z
02.7.12/A33-D/V5.0
X
Page 127 of 247

DISPLAY CD TEXT:
To indicate the CD mode text, push the PTY
button during CD playing.
To change the indicated text, push the PTY
button.
The text will change as follows:If the text is more than 10 letters, push the
AUTOP button to display the remaining text.
(Type B only)
CD EJECT:
When the CD EJECT button is pushed with the
compact disc loaded, the compact disc will be
ejected.
To eject the discs selected by the EJECT
button, push it for less than 1.5 seconds.
To eject all the discs, push the EJECT button
for more than 1.5 seconds.
When this button is pushed while the compact
disc is being played, the compact disc will
come out and the system will turn off.
If the compact disc comes out and is notremoved, it will be pulled back into the slot
to protect it. (except 8 cm diameter com-
pact discs)
CD IN indicator:
CD IN indicator appears on the display when
the CD is loaded with the system on.
4-22
Heater, air conditioner and audio systems
Z
02.7.12/A33-D/V5.0
X
Page 128 of 247

FM-AM RADIO WITH CASSETTE
PLAYER Ð for navigation system
equipped modelsRefer to the separate Owner's Manual for
information about the navigation system.Audio main operationON×OFF/Volume control:
Turn the ignition key to ACC or ON, then push
the ON×OFF/Volume control dial. The mode
(radio or cassette) which was playing immedi-
ately before the system was turned off re-
sumes playing. When no cassette is loaded,the radio comes on. Pushing the
ON×OFF/Volume control dial again turns the
system off.
Turn the ON×OFF/Volume control dial to adjust
the volume.
This vehicle has Speed sensitive Control Vol-
ume (SCV) for audio. The audio volume
changes as the driving speed changes.AUDIO button (BASS, TREBLE, FADER,
BALANCE, SCV):
Press the AUDIO button to change the select-
ing mode as follows:
BASS,TREBLE,FADER,BALANCE,
SCV,BASS
To adjust Bass, Treble, Fader, Balance, press
the AUDIO button until the desired mode
BASS, TREBLE, FADER or BALANCE ap-
pears in the display.
Press the
or
button to adjust Bass
and Treble to the desired level. Use the
or
button to adjust Fader or Bal-
ance modes. Fader adjusts the sound level
between the front and rear speakers and Bal-
ance adjusts the sound level between the right
and left speakers.
To change the SCV mode to OFF, LOW, MID
or HIGH, press the
or
(TUNE) but-
ton.
After 10 seconds, the radio or cassette tape
display reappears. Once the sound quality is
set to the desired level, press the AUDIO
button repeatedly until the radio or cassette
tape display appears.
Radio/Cassette tape priority modeIn this mode, the radio station illuminates in the
SAA0568
Heater, air conditioner and audio systems
4-23
Z
02.7.12/A33-D/V5.0
X
Page 129 of 247
display during radio operation. During cassette
tape operation, TAPE illuminates in the dis-
play.FM-AM radio operation
FM-AM band select and AUTO P:
Pushing the FM-AM band select button will
change the band as follows:
AM,AM (preset station),FM1,FM2,
FM (preset station),AM
When FM/AM band select button is pushed
while the ignition switch is in the ACC or ON,
the radio will come on at the station last
played.
The last station played will also come on when
the power knob is turned to ON.
If a compact disc or tape is playing when the
FM/AM band select button is turned to ON, the
compact disc or tape will automatically be
turned off and the last radio station played will
come on.
To preset (AUTO.P) the AM or FM station,
push the FM/AM button for more than 1.5
seconds.
The FM stereo indicator, ST illuminates during
FM stereo reception. When the stereo broad-
cast signal is weak, the radio automaticallychanges from stereo to monaural reception.
TUNE (Tuning):WARNING
The radio should not be tuned while
driving so full attention may be given to
vehicle operation.
Use these buttons for manual tuning. To move
quickly through the channels, hold either of the
TUNE buttons down for more than 0.5 sec-
onds.
SCAN tuning:
Push the SCAN tuning button and SCAN will
illuminate in the display window. SCAN tuning
begins from high to low or low to high frequen-
cies and stops at each broadcasting station for
5 seconds. Pushing the button again during
this 5 second period stops SCAN tuning and
the radio remains tuned to that station.
If any of the SCAN tuning buttons are not
pushed within 5 seconds, SCAN tuning moves
to the next station.
Station memory (and preset) operations:
Twelve stations can be set for the FM band(six for FM1, six for FM2) and six stations can
be set for the AM band.
1. Tune to the desired station using the SCAN
or TUNE buttons.
2. Select the desired station and keep pushing
any of the desired station memory buttons
(1 to 6) until a beep sound is heard. The
radio mutes when the select button is
pushed.)
3. The channel indicator will come on and the
sound will resume. Memorizing is now com-
plete.
4. Other station select buttons can be set in
the same manner.
If the battery cable is disconnected, or if the
radio fuse opens, the radio memory is can-
celled. In that case, reset the desired stations.
Program type:
When PTY button is pressed during FM mode,
the PTY name of the current tuned station is
displayed. During this time if the PTY data
code is zero, or the data is unreadable; the
display will show NONE.
1. PTY selection mode
PTY name selection can be done by the
4-24
Heater, air conditioner and audio systems
Z
02.7.12/A33-D/V5.0
X
Page 130 of 247
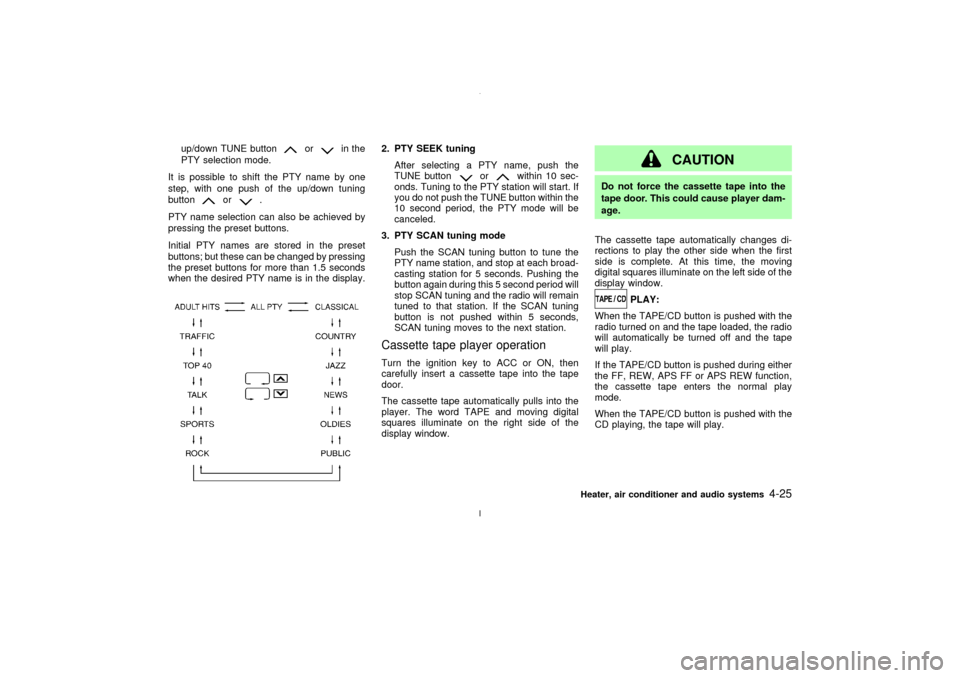
up/down TUNE button
or
in the
PTY selection mode.
It is possible to shift the PTY name by one
step, with one push of the up/down tuning
button
or
.
PTY name selection can also be achieved by
pressing the preset buttons.
Initial PTY names are stored in the preset
buttons; but these can be changed by pressing
the preset buttons for more than 1.5 seconds
when the desired PTY name is in the display.
2. PTY SEEK tuning
After selecting a PTY name, push the
TUNE button
or
within 10 sec-
onds. Tuning to the PTY station will start. If
you do not push the TUNE button within the
10 second period, the PTY mode will be
canceled.
3. PTY SCAN tuning mode
Push the SCAN tuning button to tune the
PTY name station, and stop at each broad-
casting station for 5 seconds. Pushing the
button again during this 5 second period will
stop SCAN tuning and the radio will remain
tuned to that station. If the SCAN tuning
button is not pushed within 5 seconds,
SCAN tuning moves to the next station.
Cassette tape player operationTurn the ignition key to ACC or ON, then
carefully insert a cassette tape into the tape
door.
The cassette tape automatically pulls into the
player. The word TAPE and moving digital
squares illuminate on the right side of the
display window.
CAUTION
Do not force the cassette tape into the
tape door. This could cause player dam-
age.
The cassette tape automatically changes di-
rections to play the other side when the first
side is complete. At this time, the moving
digital squares illuminate on the left side of the
display window.
PLAY:
When the TAPE/CD button is pushed with the
radio turned on and the tape loaded, the radio
will automatically be turned off and the tape
will play.
If the TAPE/CD button is pushed during either
the FF, REW, APS FF or APS REW function,
the cassette tape enters the normal play
mode.
When the TAPE/CD button is pushed with the
CD playing, the tape will play.
Heater, air conditioner and audio systems
4-25
Z
02.7.12/A33-D/V5.0
X
Page 133 of 247
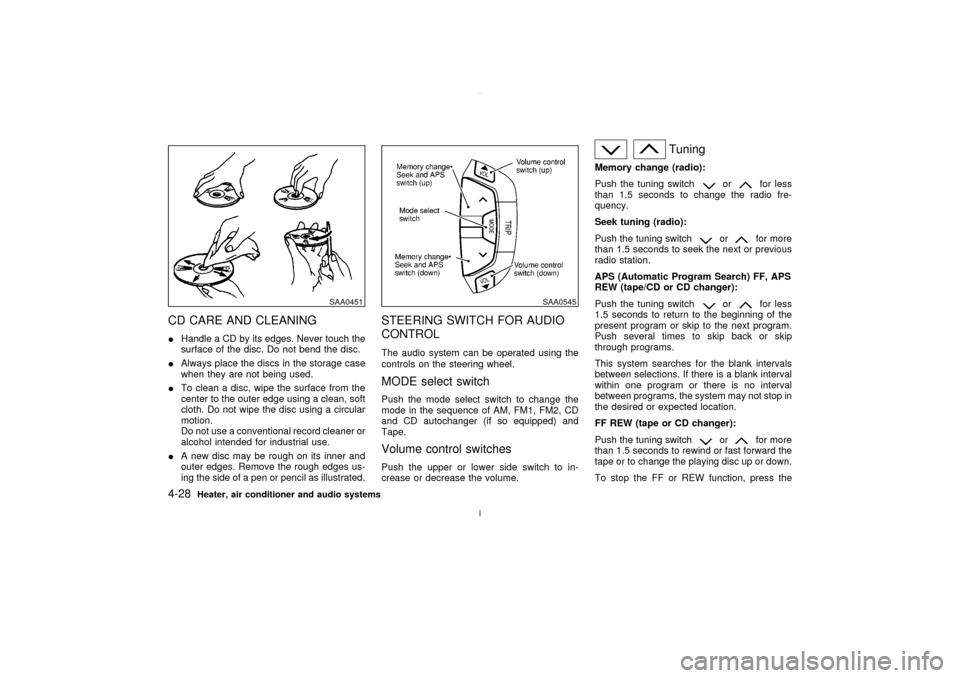
CD CARE AND CLEANINGIHandle a CD by its edges. Never touch the
surface of the disc. Do not bend the disc.
IAlways place the discs in the storage case
when they are not being used.
ITo clean a disc, wipe the surface from the
center to the outer edge using a clean, soft
cloth. Do not wipe the disc using a circular
motion.
Do not use a conventional record cleaner or
alcohol intended for industrial use.
IA new disc may be rough on its inner and
outer edges. Remove the rough edges us-
ing the side of a pen or pencil as illustrated.
STEERING SWITCH FOR AUDIO
CONTROLThe audio system can be operated using the
controls on the steering wheel.MODE select switchPush the mode select switch to change the
mode in the sequence of AM, FM1, FM2, CD
and CD autochanger (if so equipped) and
Tape.Volume control switchesPush the upper or lower side switch to in-
crease or decrease the volume.
Tuning
Memory change (radio):
Push the tuning switch
or
for less
than 1.5 seconds to change the radio fre-
quency.
Seek tuning (radio):
Push the tuning switch
or
for more
than 1.5 seconds to seek the next or previous
radio station.
APS (Automatic Program Search) FF, APS
REW (tape/CD or CD changer):
Push the tuning switch
or
for less
1.5 seconds to return to the beginning of the
present program or skip to the next program.
Push several times to skip back or skip
through programs.
This system searches for the blank intervals
between selections. If there is a blank interval
within one program or there is no interval
between programs, the system may not stop in
the desired or expected location.
FF REW (tape or CD changer):
Push the tuning switch
or
for more
than 1.5 seconds to rewind or fast forward the
tape or to change the playing disc up or down.
To stop the FF or REW function, press the
SAA0451
SAA0545
4-28
Heater, air conditioner and audio systems
Z
02.7.12/A33-D/V5.0
X
Page 135 of 247
Disc removalIPull the * marked area with your fingers.
IUse your fingertips to grasp the center part
of the disc and remove the disc.
CAUTION
IDo not touch the playing surface of
the disc.
IDo not use 8 cm discs. They may
cause player damage even if using
with the optional adapter.When installing a CB, ham radio or car phone
in your NISSAN, be sure to observe the follow-
ing cautions, otherwise the new equipment
may adversely affect the Engine control sys-
tem and other electronic parts.
WARNING
IA cellular telephone should not be
used while driving so full attention
may be given to vehicle operation.
Some jurisdictions prohibit the use of
cellular telephones while driving.
IIf you must make a call while your
vehicle is in motion, the hands free
cellular phone operational mode (if
so equipped) is highly recommended.
Exercise extreme caution at all times
so full attention may be given to ve-
hicle operation.
IIf a conversation in a moving vehicle
requires you to take notes, pull off the
road to a safe location and stop your
vehicle before doing so.
CAUTION
IKeep the antenna as far as possible
away from the Engine Control Module
(ECM).
IKeep the antenna wire more than 8 in
(20 cm) away from the Multiport Fuel
Injection harness. Do not route the
antenna wire next to any harness.
IAdjust the antenna standing-wave ra-
tio as recommended by the manufac-
turer.
IConnect the ground wire from the CB
radio chassis to the body.
IFor details, consult an authorized
NISSAN dealer.
CAR PHONE OR CB RADIO
4-30
Heater, air conditioner and audio systems
Z
02.7.12/A33-D/V5.0
X
Page 142 of 247
IMake sure the area around the vehicle is
clear.
IMaintenance items should be checked pe-
riodically, e.g., each time you check engine
oil.
ICheck that all windows and lights are clean.
IVisually inspect tires for their appearance
and condition. Also, check tires for proper
inflation.
ILock all doors.
IPosition seat and adjust head restraints.
IAdjust inside and outside mirrors.
IFasten seat belts and ask all passengers to
do likewise.
ICheck the operation of warning lights when
key is turned to the ON (3) position.1. Apply the parking brake.
2.Automatic transmission:
Move the selector lever to P (Park) or N
(Neutral). (P preferred.)
The starter is designed not to operate if the
selector lever is in one of the driving posi-
tions.
Manual transmission:
Move the shift lever to N (Neutral) position,
and depress the clutch pedal to the floor
while cranking the engine.
The starter is designed not to operate un-
less the clutch pedal is fully depressed.
3. Crank the enginewith your foot off the
accelerator pedalby turning the ignition
key to START. Release the key when the
engine starts. If the engine starts, but fails
to run, repeat the above procedure.
IWhen the engine is very hard to start in
extremely cold weather or when restarting,
depress the accelerator pedal a little (ap-
proximately 1/5 to the floor) and hold it then
crank the engine. Release the key and the
accelerator pedal when the engine starts.
IWhen the engine is very hard to start
because it is flooded, depress the accelera-tor pedal all the way to the floor and hold it.
Crank the engine for 5 to 6 seconds. After
cranking the engine, release the accelera-
tor pedal. Crank the enginewith your foot
off the accelerator pedalby turning the
ignition key to START. Release the key
when the engine starts. If the engine starts,
but fails to run, repeat the above procedure.
CAUTION
Do not operate the starter for more than
15 seconds at a time. If the engine does
not start, turn the key off and wait 10
seconds before cranking again, other-
wise the starter could be damaged.
4.Warm-up
Allow the engine to idle for at least 30
seconds after starting. Drive at moderate
speed for a short distance first, especially in
cold weather.
BEFORE STARTING THE ENGINE STARTING THE ENGINE
Starting and driving
5-7
Z
02.7.12/A33-D/V5.0
X