Page 81 of 247
CAUTION
ITurn off the interior, personal and
vanity mirror lights when you leave
the vehicle.
IDo not use for extended periods of
time with the engine stopped. This
could result in a discharged battery.
The light on the vanity mirror will turn on when
the cover on the vanity mirror is opened.
When the interior light or the personal light
switch is in the ON position, the interior,
personal, and vanity mirror lights will auto-
matically turn off 30 minutes after the igni-
tion switch has been turned to the OFF
position. To turn on the light again, insert
the key into the ignition switch and move it
to the ON position.The light illuminates when the trunk lid is
opened. When the trunk lid is closed, the light
will go off.
SIC0186
VANITY MIRROR LIGHT (if so
equipped)TRUNK LIGHT
2-36
Instruments and controls
Z
02.7.12/A33-D/V5.0
X
Page 86 of 247

3 Pre-driving checks and adjustmentsKeys .......................................................................... 3-2
Doors ......................................................................... 3-2
Locking with key ................................................... 3-3
Locking with inside lock knob............................... 3-3
Locking with power door lock switch.................... 3-4
Child safety rear door lock ................................... 3-4
Remote keyless entry system ................................... 3-4
How to use remote keyless entry system ............ 3-5
Battery replacement ............................................. 3-8
Hood ........................................................................ 3-10
Trunk lid .................................................................. 3-10
Opener operation ............................................... 3-11
Key operation ..................................................... 3-11
Interior trunk lid release ..................................... 3-12Fuel filler lid ............................................................. 3-12
Opener operation ............................................... 3-12
Fuel filler cap ...................................................... 3-13
Steering wheel ........................................................ 3-14
Tilt operation....................................................... 3-14
Sun visors ............................................................... 3-15
Mirrors ..................................................................... 3-15
Automatic anti-glare inside mirror ...................... 3-15
Outside mirrors ................................................... 3-16
Automatic seat positioner (if so equipped) ............. 3-17
Automatic seat positioner operation (A/T models
only) .................................................................... 3-17
Procedure for storing memory............................ 3-17
Cancel switch ..................................................... 3-19
Z
02.7.12/A33-D/V5.0
X
Page 87 of 247

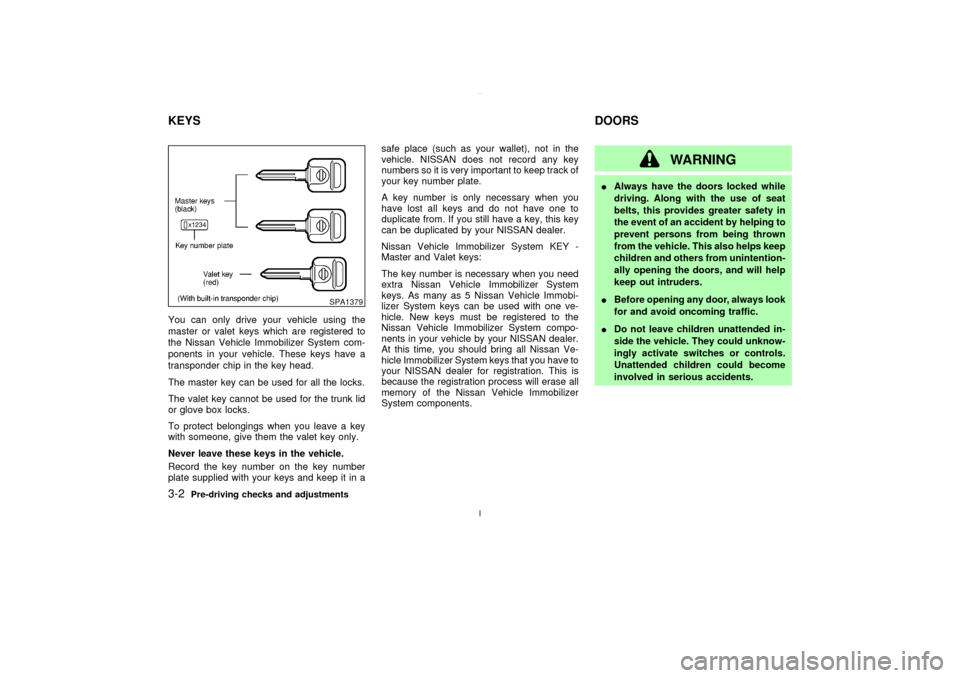
You can only drive your vehicle using the
master or valet keys which are registered to
the Nissan Vehicle Immobilizer System com-
ponents in your vehicle. These keys have a
transponder chip in the key head.
The master key can be used for all the locks.
The valet key cannot be used for the trunk lid
or glove box locks.
To protect belongings when you leave a key
with someone, give them the valet key only.
Never leave these keys in the vehicle.
Record the key number on the key number
plate supplied with your keys and keep it in asafe place (such as your wallet), not in the
vehicle. NISSAN does not record any key
numbers so it is very important to keep track of
your key number plate.
A key number is only necessary when you
have lost all keys and do not have one to
duplicate from. If you still have a key, this key
can be duplicated by your NISSAN dealer.
Nissan Vehicle Immobilizer System KEY -
Master and Valet keys:
The key number is necessary when you need
extra Nissan Vehicle Immobilizer System
keys. As many as 5 Nissan Vehicle Immobi-
lizer System keys can be used with one ve-
hicle. New keys must be registered to the
Nissan Vehicle Immobilizer System compo-
nents in your vehicle by your NISSAN dealer.
At this time, you should bring all Nissan Ve-
hicle Immobilizer System keys that you have to
your NISSAN dealer for registration. This is
because the registration process will erase all
memory of the Nissan Vehicle Immobilizer
System components.
WARNING
IAlways have the doors locked while
driving. Along with the use of seat
belts, this provides greater safety in
the event of an accident by helping to
prevent persons from being thrown
from the vehicle. This also helps keep
children and others from unintention-
ally opening the doors, and will help
keep out intruders.
IBefore opening any door, always look
for and avoid oncoming traffic.
IDo not leave children unattended in-
side the vehicle. They could unknow-
ingly activate switches or controls.
Unattended children could become
involved in serious accidents.
SPA1379
KEYSDOORS3-2
Pre-driving checks and adjustments
Z
02.7.12/A33-D/V5.0
X
Page 89 of 247

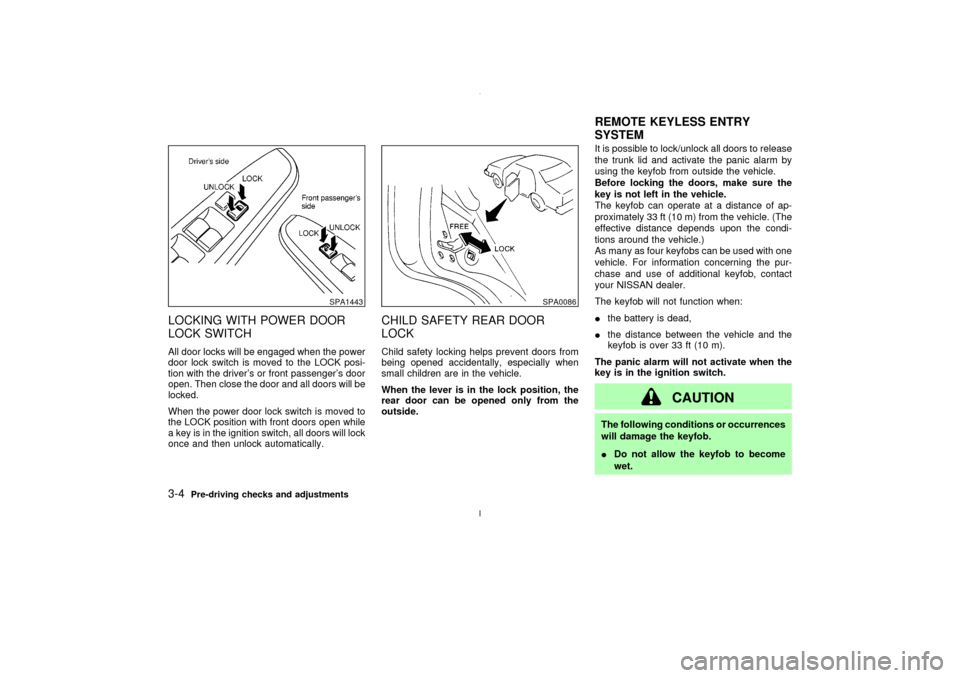
LOCKING WITH POWER DOOR
LOCK SWITCHAll door locks will be engaged when the power
door lock switch is moved to the LOCK posi-
tion with the driver's or front passenger's door
open. Then close the door and all doors will be
locked.
When the power door lock switch is moved to
the LOCK position with front doors open while
a key is in the ignition switch, all doors will lock
once and then unlock automatically.
CHILD SAFETY REAR DOOR
LOCKChild safety locking helps prevent doors from
being opened accidentally, especially when
small children are in the vehicle.
When the lever is in the lock position, the
rear door can be opened only from the
outside.It is possible to lock/unlock all doors to release
the trunk lid and activate the panic alarm by
using the keyfob from outside the vehicle.
Before locking the doors, make sure the
key is not left in the vehicle.
The keyfob can operate at a distance of ap-
proximately 33 ft (10 m) from the vehicle. (The
effective distance depends upon the condi-
tions around the vehicle.)
As many as four keyfobs can be used with one
vehicle. For information concerning the pur-
chase and use of additional keyfob, contact
your NISSAN dealer.
The keyfob will not function when:
Ithe battery is dead,
Ithe distance between the vehicle and the
keyfob is over 33 ft (10 m).
The panic alarm will not activate when the
key is in the ignition switch.
CAUTION
The following conditions or occurrences
will damage the keyfob.
IDo not allow the keyfob to become
wet.
SPA1443
SPA0086
REMOTE KEYLESS ENTRY
SYSTEM
3-4
Pre-driving checks and adjustments
Z
02.7.12/A33-D/V5.0
X
Page 93 of 247

To stop lowering the windows, release the
UNLOCK button.
To start lowering the windows, press the UN-
LOCK button again for 3 more seconds.
This function will operate after the ignition
switch is off and 45 seconds passed or either
the front door is opened.Releasing the trunk lid1. Push the TRUNK button on the keyfob for
longer than 0.5 seconds with the key re-
moved from the ignition key cylinder.
2. The trunk lid opens.
The trunk lid will not open when the trunk lid
cancel lever is in the CANCEL position.
It can be opened only with the key.
See ªTrunk lidº later in this section for cancel
lever.Using the panic alarmIf you are near your vehicle and feel threat-
ened, you may activate the alarm to call atten-
tion as follows:
1. Push the PANIC button on the keyfob for
longer than 0.5 secondswith the key
removed from the ignition key cylinder.
2. The theft warning alarm and headlights willstay on for 30 seconds.
3. The panic alarm stops when:
IIt has run for 30 seconds, or
IThe LOCK or the UNLOCK button is
pressed, or
IThe panic button or the trunk lid release
button is pushed on the keyfob for longer
than 0.5 seconds.
BATTERY REPLACEMENTReplace the battery as follows:
1. Open the lid using a suitable tool.
2. Replace the battery with a new one.
SPA1374
3-8
Pre-driving checks and adjustments
Z
02.7.12/A33-D/V5.0
X
Page 95 of 247

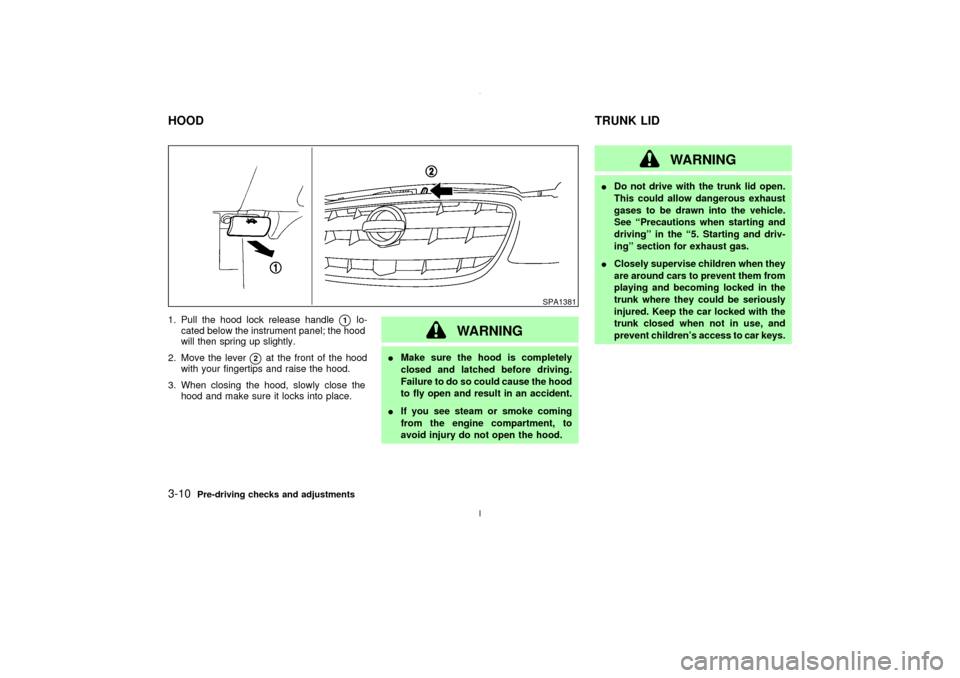
1. Pull the hood lock release handle
q1
lo-
cated below the instrument panel; the hood
will then spring up slightly.
2. Move the lever
q2
at the front of the hood
with your fingertips and raise the hood.
3. When closing the hood, slowly close the
hood and make sure it locks into place.
WARNING
IMake sure the hood is completely
closed and latched before driving.
Failure to do so could cause the hood
to fly open and result in an accident.
IIf you see steam or smoke coming
from the engine compartment, to
avoid injury do not open the hood.
WARNING
IDo not drive with the trunk lid open.
This could allow dangerous exhaust
gases to be drawn into the vehicle.
See ªPrecautions when starting and
drivingº in the ª5. Starting and driv-
ingº section for exhaust gas.
IClosely supervise children when they
are around cars to prevent them from
playing and becoming locked in the
trunk where they could be seriously
injured. Keep the car locked with the
trunk closed when not in use, and
prevent children's access to car keys.
SPA1381
HOODTRUNK LID3-10
Pre-driving checks and adjustments
Z
02.7.12/A33-D/V5.0
X
Page 96 of 247
OPENER OPERATIONThe trunk lid release button is located under
the driver's arm rest.
To open the trunk lid, pull the release button.
To close, push the trunk lid down securely.
Cancel leverWhen the lever is in the cancel position, the
trunk lid cannot be opened with the trunk lid
release button. It can be opened only with the
master key.
KEY OPERATIONTo open the trunk lid, turn the key clockwise.
To close, lower and push the trunk lid down
securely.
SPA0985
SPA0095
SPA0992
Pre-driving checks and adjustments
3-11
Z
02.7.12/A33-D/V5.0
X
Page 97 of 247
INTERIOR TRUNK LID RELEASE
WARNING
Closely supervise children when they
are around cars to prevent them from
playing and becoming locked in the
trunk where they could be seriously in-
jured. Keep the car locked, with the
trunk closed, when not in use, and pre-
vent children's access to car keys.
The interior trunk lid release mechanism pro-vides a means of escape for children and
adults in the event they become locked inside
the trunk.
The handle is located on the back side of the
trunk lid inside the trunk compartment.
To open the trunk lid from the inside, pull
the release handle towards you until the
lock releases and push up on the trunk lid.
The release lever is made of a material that
glows in the dark after a brief exposure to
ambient light.
OPENER OPERATIONTo open the fuel filler lid, push the opener
switch. To lock, close the fuel filler lid securely.
SPA1382
SPA0986
FUEL FILLER LID
3-12
Pre-driving checks and adjustments
Z
02.7.12/A33-D/V5.0
X