2003 NISSAN MAXIMA manual transmission
[x] Cancel search: manual transmissionPage 149 of 247

CRUISE CONTROL OPERATIONSThe cruise control allows driving at a speed
between 25 to 89 MPH (40 to 144 km/h)
without keeping your foot on the accelerator
pedal.
To turn on the cruise control,push the main
switch on. The CRUISE indicator light on the
meter panel will come on.
To set at cruising speed,accelerate your
vehicle to the desired speed, push the
COAST/SET switch and release it. (The SET
indicator light will come on.) Take your foot off
the accelerator pedal. Your vehicle will main-
tain the set speed.ITo pass another vehicle,depress the
accelerator pedal. When you release the
pedal, the vehicle will return to the previ-
ously set speed.
IThe vehicle may not maintain the set speed
when going up or down steep hills. If this
happens, drive without the cruise control.
To cancel the preset speed,follow either of
these three methods:
a) Push the cancel switch; The SET indicator
light will go out.
b) Tap the brake pedal; The SET indicator
light will go out.
c) Turn the main switch off. Both the CRUISE
indicator and SET indicator lights will go
out.
IIf you depress the brake pedal while push-
ing the RES/ACCEL set switch and reset at
the cruising speed, turn the main switch off
once and then turn it on again.
IThe cruise control will automatically be can-
celled if the vehicle slows down below
approximately 8 MPH (13 km/h).
IDepress the clutch pedal (manual transmis-
sion), or move the selector lever to N (Neu-
tral) position (automatic transmission). The
SET indicator light will go out.To reset at a faster cruising speed,use one
of the following three methods:
a) Depress the accelerator pedal. When the
vehicle attains the desired speed, push and
release the COAST/SET switch.
b) Push and hold the RES/ACCEL set switch.
When the vehicle attains the speed you
desire, release the switch.
c) Push, then quickly release the RES/ACCEL
set switch. Each time you do this, the set
speed will increase by about 1 MPH (1.6
km/h).
To reset at a slower cruising speed,use one
of the following three methods:
a) Lightly tap the brake pedal. When the ve-
hicle attains the desired speed, push the
COAST/SET switch and release it.
b) Push and hold the COAST/SET switch.
Release the switch when the vehicle slows
down to the desired speed.
c) Push, then quickly release the COAST/
SET switch. Each time you do this, the set
speed will decrease by about 1 MPH (1.6
km/h).
To resume the preset speed,push and re-
lease the RES/ACCEL set switch. The vehicle
will resume the last set cruising speed when
SSD0193
5-14
Starting and driving
Z
02.7.12/A33-D/V5.0
X
Page 151 of 247
IKeep your engine tuned up.
IFollow the recommended periodic mainte-
nance schedule.
IKeep the tires inflated at the correct pres-
sure. Low pressure will increase tire wear
and waste fuel.
IKeep the front wheels in correct alignment.
Improper alignment will cause not only tire
wear but also lower fuel economy.
IAir conditioner operation lowers fuel
economy. Use the air conditioner only when
necessary.
IWhen cruising at highway speeds, it is
more economical to use the air conditioner
and leave the windows closed to reduce
drag.
WARNING
IDo not stop or park the vehicle over
flammable materials such as dry
grass, waste paper or rags. They may
ignite and cause a fire.
INever leave the engine running while
the vehicle is unattended.
INever leave children unattended in
the vehicle.1. Firmly apply the parking brake.
2.Automatic transmission models:
Move the selector lever to the P (Park)
position.
Manual transmission models:
Place the shift lever in the R (Reverse)
position. When parking on an uphill grade,
place the shift lever in the 1 (Low gear)
position.
MSD0002
PARKING/PARKING ON HILLS
5-16
Starting and driving
Z
02.7.12/A33-D/V5.0
X
Page 152 of 247
WARNING
ISafe parking procedures require that
both the parking brake be set and the
transmission placed into P (Park) for
automatic transmission models or in
an appropriate gear for manual trans-
mission models. Failure to do so
could cause the vehicle to move un-
expectedly or roll away and result in
an accident.
IMake sure the automatic transmis-
sion selector lever has been pushed
as far forward as it can go and cannot
be moved without depressing the
button at the end of the lever.
3. To help prevent the vehicle from rolling into
the street when parked on a sloping drive
way, it is a good practice to turn the wheels
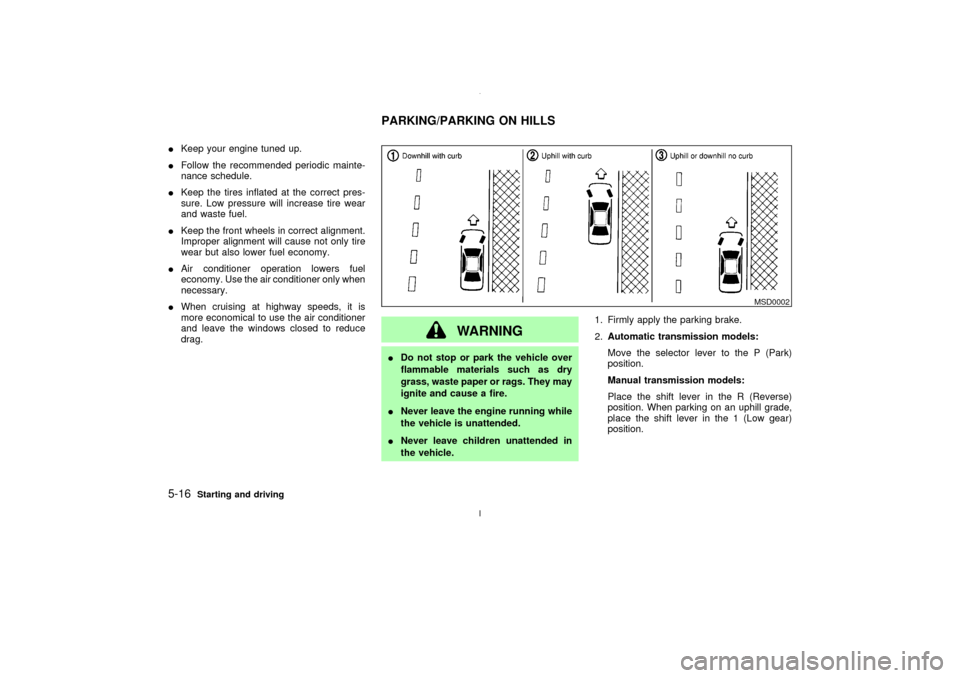
as illustrated.
IHEADED DOWNHILL WITH CURB:
q1
Turn the wheels into the curb and move the
vehicle forward until the curb side wheel
gently touches the curb.IHEADED UPHILL WITH CURB:
q2
Turn the wheels away from the curb and
move the vehicle back until the curb side
wheel gently touches the curb.
IHEADED UPHILL OR DOWNHILL, NO
CURB:
q3
Turn the wheels toward the side of the road
so the vehicle will move away from the
center of the road if it moves.
4. Turn the ignition key to the LOCK position
and remove the key.The power assisted steering is designed to
use a hydraulic pump, driven by the engine, to
assist steering.
If the engine stops or drive belt breaks, you will
still have control of the vehicle. However,
much greater steering effort is needed, espe-
cially in sharp turns or at low speeds.
WARNING
If the engine is not running or is turned
off while driving, the power assist for the
steering will not work. Steering will be
much harder to operate.POWER STEERING
Starting and driving
5-17
Z
02.7.12/A33-D/V5.0
X
Page 159 of 247
CHANGING A FLAT TIREIf you have a flat tire, follow the instructions
below.Stopping the vehicle1. Safely move the vehicle off the road away
from traffic.
2. Turn on the hazard warning flashers.
3. Park on a level surface and apply the
parking brake. Shift the manual transmis-
sion into R (Reverse) position (automatic
transmission in P (Park) position).
4. Turn off the engine.
5. Raise the hood to warn other traffic, and to
signal professional road assistance person-
nel that you need assistance.
6. Have all passengers get out of the vehicle
and stand in a safe place, away from traffic
and clear of the vehicle.
WARNING
IMake sure that the parking brake is
securely applied and the manual
transmission is shifted into R (Re-verse), or the automatic transmission
into P (Park).
INever change tires when the vehicle
is on a slope, ice or slippery areas.
This is hazardous.
INever change tires if oncoming traffic
is close to your vehicle. Wait for pro-
fessional road assistance.
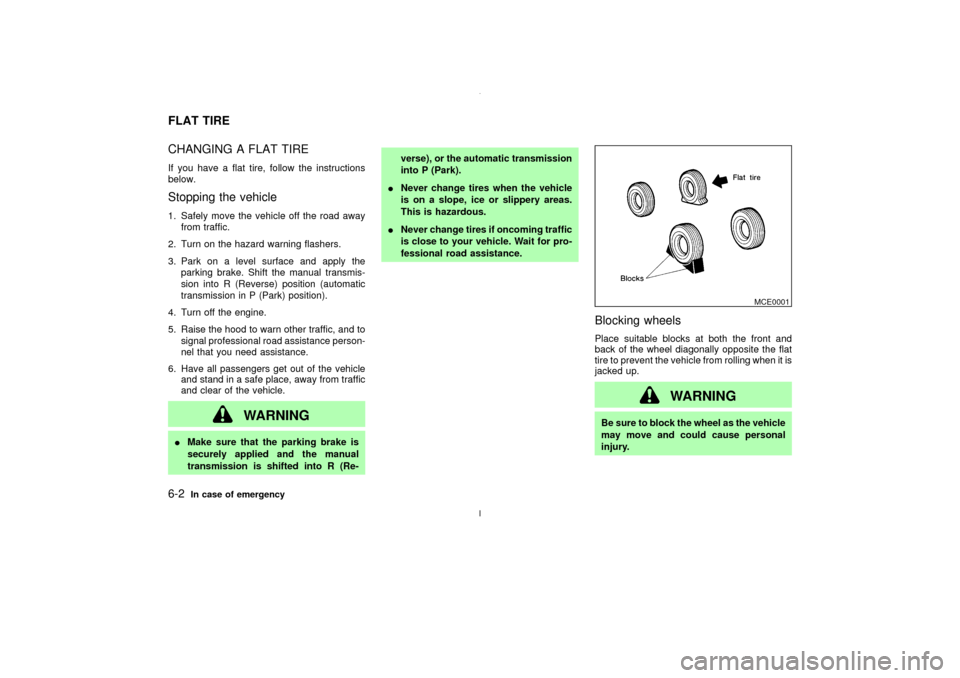
Blocking wheelsPlace suitable blocks at both the front and
back of the wheel diagonally opposite the flat
tire to prevent the vehicle from rolling when it is
jacked up.
WARNING
Be sure to block the wheel as the vehicle
may move and could cause personal
injury.
MCE0001
FLAT TIRE6-2
In case of emergency
Z
02.7.12/A33-D/V5.0
X
Page 168 of 247
CAUTION
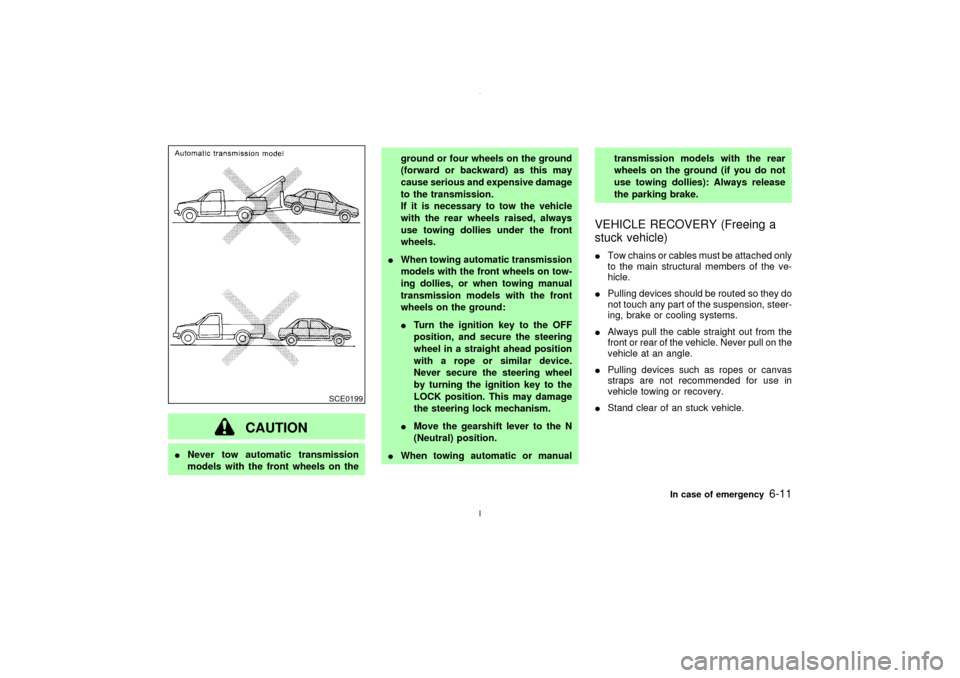
INever tow automatic transmission
models with the front wheels on theground or four wheels on the ground
(forward or backward) as this may
cause serious and expensive damage
to the transmission.
If it is necessary to tow the vehicle
with the rear wheels raised, always
use towing dollies under the front
wheels.
IWhen towing automatic transmission
models with the front wheels on tow-
ing dollies, or when towing manual
transmission models with the front
wheels on the ground:
ITurn the ignition key to the OFF
position, and secure the steering
wheel in a straight ahead position
with a rope or similar device.
Never secure the steering wheel
by turning the ignition key to the
LOCK position. This may damage
the steering lock mechanism.
IMove the gearshift lever to the N
(Neutral) position.
IWhen towing automatic or manualtransmission models with the rear
wheels on the ground (if you do not
use towing dollies): Always release
the parking brake.
VEHICLE RECOVERY (Freeing a
stuck vehicle)ITow chains or cables must be attached only
to the main structural members of the ve-
hicle.
IPulling devices should be routed so they do
not touch any part of the suspension, steer-
ing, brake or cooling systems.
IAlways pull the cable straight out from the
front or rear of the vehicle. Never pull on the
vehicle at an angle.
IPulling devices such as ropes or canvas
straps are not recommended for use in
vehicle towing or recovery.
IStand clear of an stuck vehicle.
SCE0199
In case of emergency
6-11
Z
02.7.12/A33-D/V5.0
X
Page 180 of 247
When performing any inspection or mainte-
nance work on your vehicle, always take care
to prevent serious accidental injury to yourself
or damage to the vehicle. The following are
general precautions which should be closely
observed.
WARNING
IPark the vehicle on a level surface,
apply the parking brake securely and
block the wheels to prevent the ve-
hicle from moving. For a manual
transmission, move the shift lever to
N (Neutral) position. For an automatic
transmission, move the selector lever
to P (Park) position.
IBe sure the ignition key is OFF or
LOCK when performing any parts re-
placement or repairs.
IYour vehicle is equipped with an au-
tomatic engine cooling fan. It may
come on at any time without warning,
even if the ignition key is in the OFF
position and the engine is not run-
ning. To avoid injury, always discon-nect the negative battery cable before
working near the fan.
IIf you must work with the engine
running, keep your hands, clothing,
hair and tools away from moving
fans, belts and any other moving
parts.
IIt is advisable to secure or remove
any loose clothing and any jewelry,
such as rings, watches, etc. before
working on your vehicle.
IAlways wear eye protection when-
ever you work on your vehicle.
IIf you must run the engine in an
enclosed space such as a garage, be
sure there is proper ventilation for
exhaust gases to escape.
INever get under the vehicle while it is
supported only by a jack. If it is nec-
essary to work under the vehicle,
support it with safety stands.
IKeep smoking materials, flame and
sparks away from fuel and the bat-tery.
IOn gasoline engine models with the
Multiport Fuel Injection (MFI) System,
the fuel filter or fuel lines should be
serviced by a NISSAN dealer because
the fuel lines are under high pressure
even when the engine is off.
CAUTION
IDo not work under the hood while the
engine is hot. Turn off the engine and
wait until it cools down.
INever connect or disconnect either
the battery or any transistorized com-
ponent connector while the ignition
key is on.
INever leave the engine or the auto-
matic transmission related compo-
nent harness connector discon-
nected while the ignition key is on.
IAvoid direct contact with used engine
oil and coolant. Improperly disposed
MAINTENANCE PRECAUTIONS
Maintenance and do-it-yourself
8-5
Z
02.7.12/A33-D/V5.0
X
Page 217 of 247

The following are approximate capacities. The actual refill capacities may be a little different. When refilling, follow the procedure
instructed in the ª8. Maintenance and do-it-yourselfº section to determine the proper refill capacity.
Capacity (Approximate)
Recommended
specifications US
measureImp
measureLiter
Fuel 18-1/2 gal 15-3/8 gal 70 Unleaded gasoline with an octane rating of at least 91 AKI (RON 96)*1
Engine oil*6
Drain and refill
With oil filter change 4-1/4 qt 3-1/2 qt 4.0IAPI Certification Mark*2, *3
IAPI grade SG/SH, Energy ConservingI&IIorAPIgrade SJ or SL, En-
ergy Conserving*2, *3
IILSAC grade GF-I, GF-II & GF-III*2, *3 Without oil filter change 3-7/8 qt 3-1/4 qt 3.7
Cooling system
With reservoir 8-1/8 qt 6-3/4 qt 7.7
Genuine NISSAN anti-freeze coolant or equivalent
Reservoir 7/8 qt 3/5 qt 0.8
Manual transmission gear oil Ð Ð Ð API GL-4, Viscosity SAE 75W-90 or 75W-85
Automatic transmission fluid
Refill to the proper oil level according to the instructions
in the ª8. Maintenance and do-it-yourselfº section.Nissan Matic ªDº (Continental U.S. and Alaska) or Canada NISSAN Auto-
matic Transmission Fluid*4
Power steering fluidGenuine Nissan PSFII or equivalent*8
Brake and clutch fluidGenuine Nissan Brake Fluid*5 or equivalent DOT 3 (US FMVSS No. 116)
Multi-purpose grease Ð Ð Ð NLGI No. 2 (Lithium soap base)
Air conditioning system refrigerant Ð Ð Ð HFC-134a (R-134a)*7
Air conditioning system lubricants Ð Ð ÐNissan A/C System Oil
Type S or exact equivalent
*1: For additional information, see later in this paragraph for fuel recommendation.
*2: For additional information, see later in this paragraph for engine oil and oil filter recommendation.
*3: For additional information, see later in this paragraph for recommended SAE viscosity number.
*4: Dexron
TMIII/Mercon
TM
or equivalent may also be used. Outside the continental United States and Alaska contact a NISSAN dealer for more information regarding
suitable fluids, including recommended brand(s) of Dexron
TMIII/Mercon
TM
automatic transmission fluid.
*5: Available in mainland US through your NISSAN dealer.
*6: For additional information, see ªEngine oilº in the ª8. Maintenance and do-it-yourselfº section for changing engine oil.
*7: For additional information, see ªVehicle identificationº in this section for air conditioner specification label.
*8: Genuine Nissan PSFII, Canada Nissan Automatic Transmission fluid, Dexron
TMIII/Mercon
TM
or equivalent ATF may also be used.
CAPACITIES AND
RECOMMENDED
FUEL/LUBRICANTS9-2
Technical and consumer information
Z
02.7.12/A33-D/V5.0
X
Page 233 of 247

trailer is hitched. Do not drive the vehicle if
it has an abnormal nose-up or nose-down
condition; check for improper tongue load,
overload, worn suspension or other pos-
sible causes of either condition.
IAlways secure items in the trailer to prevent
load shifts while driving.
IBe certain your rear view mirrors conform to
all federal, state or local regulations. If not,
install any mirrors required for towing be-
fore driving the vehicle.
Trailer towing tipsIn order to gain skill and an understanding of
the vehicle's behavior, you should practice
turning, stopping and backing up in an area
which is free from traffic. Steering stability, and
braking performance will be somewhat differ-
ent than under normal driving conditions.
IAlways secure items in the trailer to prevent
load shift while driving.
IAvoid abrupt starts, acceleration or stops.
IAvoid sharp turns or lane changes.
IAlways drive your vehicle at a moderate
speed.
IAlways block the wheels on both vehicle
and trailer when parking. Parking on aslope is not recommended; however, if you
must do so, and if your vehicle is equipped
with automatic transmission, first block the
wheels and apply the parking brake, and
then move the transmission selector lever
into the P (Park) position. If you move the
selector lever to the P (Park) position be-
fore blocking the wheels and applying the
parking brake, transmission damage could
occur.
IWhen going down a hill, shift into a lower
gear and use the engine braking effect.
When ascending a long grade, downshift
the transmission to a lower gear and reduce
speed to reduce chances of engine over-
loading and/or overheating.
IIf the engine coolant rises to an extremely
high temperature when the air conditioning
system is on, turn off the air conditioner.
Coolant heat can be additionally vented by
opening the windows, switching the fan
control to high and setting the temperature
control to the HOT position.
ITrailer towing requires more fuel than nor-
mal circumstances.
IAvoid towing a trailer for the first 500 miles
(800 km).
IHave your vehicle serviced more often thanat intervals specified in the recommended
maintenance schedule.
IWhen making a turn, your trailer wheels will
be closer to the inside of the turn than your
vehicle wheels. To compensate for this,
make a larger than normal turning radius
during the turn.
ICrosswinds and rough roads will adversely
affect vehicle/trailer handling, possibly
causing vehicle sway. When being passed
by larger vehicles, be prepared for possible
changes in crosswinds that could affect
vehicle handling. If swaying does occur,
firmly grip the steering wheel, steer straight
ahead, and immediately (but gradually) re-
duce vehicle speed. This combination will
help stabilize the vehicle. Never increase
speed.
IBe careful when passing other vehicles.
Passing while towing a trailer requires con-
siderably more distance than normal pass-
ing. Remember the length of the trailer
must also pass the other vehicle before you
can safely change lanes.
ITo maintain engine braking efficiency and
electrical charging performance, do not use
fifth gear (manual transmission) or over-
drive (automatic transmission).9-18
Technical and consumer information
Z
02.7.12/A33-D/V5.0
X