2003 NISSAN 350Z belt
[x] Cancel search: beltPage 34 of 227
child in a sudden stop or collision.
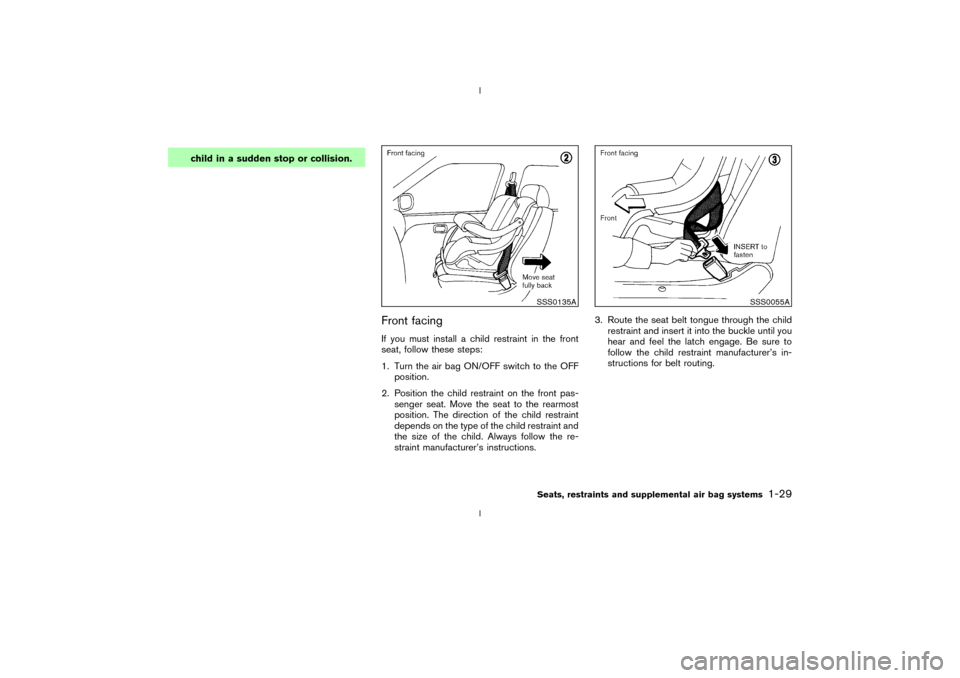
Front facingIf you must install a child restraint in the front
seat, follow these steps:
1. Turn the air bag ON/OFF switch to the OFF
position.
2. Position the child restraint on the front pas-
senger seat. Move the seat to the rearmost
position. The direction of the child restraint
depends on the type of the child restraint and
the size of the child. Always follow the re-
straint manufacturer's instructions.3. Route the seat belt tongue through the child
restraint and insert it into the buckle until you
hear and feel the latch engage. Be sure to
follow the child restraint manufacturer's in-
structions for belt routing.
SSS0135A
SSS0055A
Seats, restraints and supplemental air bag systems
1-29
Z
02.9.13/Z33-D/V5.0
X
Page 35 of 227
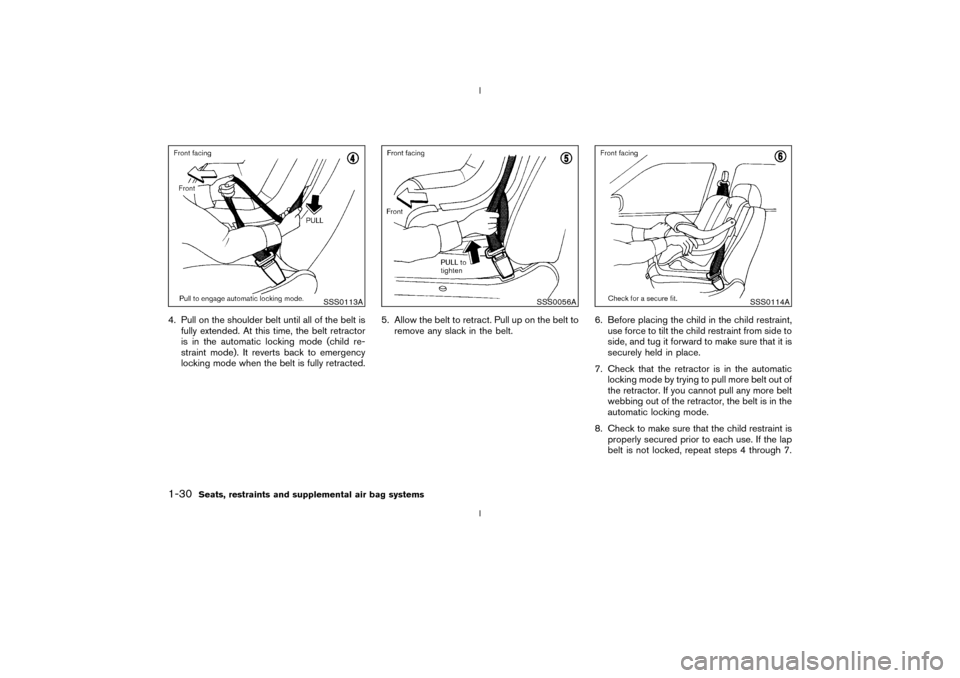
4. Pull on the shoulder belt until all of the belt is
fully extended. At this time, the belt retractor
is in the automatic locking mode (child re-
straint mode). It reverts back to emergency
locking mode when the belt is fully retracted.5. Allow the belt to retract. Pull up on the belt to
remove any slack in the belt.6. Before placing the child in the child restraint,
use force to tilt the child restraint from side to
side, and tug it forward to make sure that it is
securely held in place.
7. Check that the retractor is in the automatic
locking mode by trying to pull more belt out of
the retractor. If you cannot pull any more belt
webbing out of the retractor, the belt is in the
automatic locking mode.
8. Check to make sure that the child restraint is
properly secured prior to each use. If the lap
belt is not locked, repeat steps 4 through 7.
SSS0113A
SSS0056A
SSS0114A
1-30
Seats, restraints and supplemental air bag systems
Z
02.9.13/Z33-D/V5.0
X
Page 36 of 227

After the child restraint is removed and the seat
belt is allowed to wind back into the retractor,
the automatic locking mode (child restraint
mode) is canceled; the seat belt only locks
during a sudden stop or impact.
Rear facingWhen you install a child restraint in the front
seat, follow these steps:
1. Turn the air bag ON/OFF switch to the OFF
position.
2. Position the child restraint on the front pas-
senger seat. Move the seat to the rearmost
position. The direction of the child restraint
depends on the type of the child restraint and
the size of the child. Always follow the re-
straint manufacturer's instructions.3. Route the seat belt tongue through the child
restraint and insert it into the buckle until you
hear and feel the latch engage.
Be sure to follow the child restraint manufac-
turer's instructions for belt routing.
SSS0211
SSS0212
Seats, restraints and supplemental air bag systems
1-31
Z
02.9.13/Z33-D/V5.0
X
Page 37 of 227
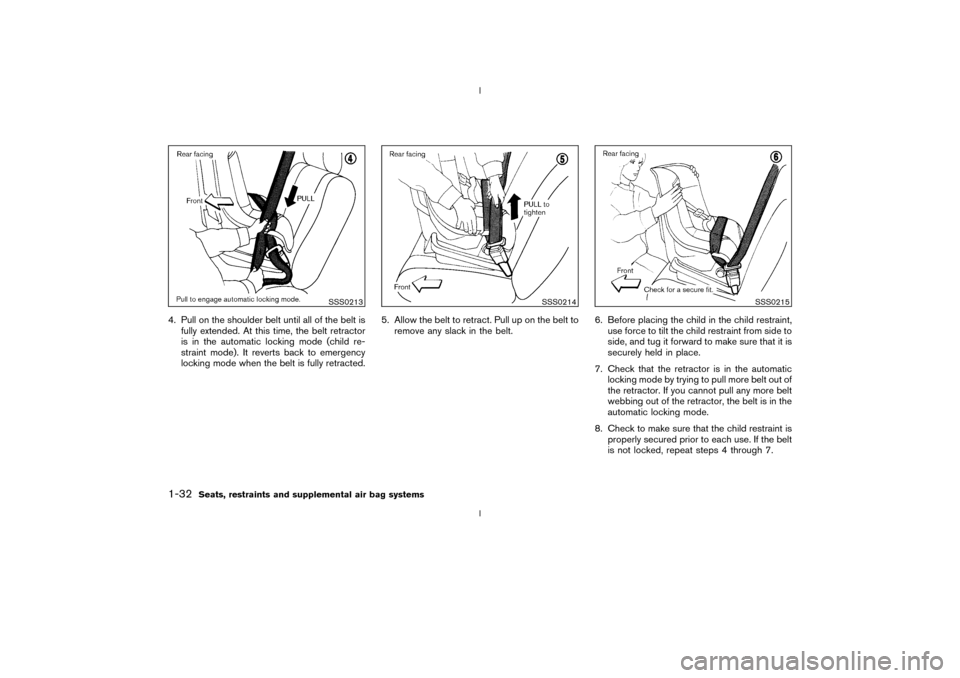
4. Pull on the shoulder belt until all of the belt is
fully extended. At this time, the belt retractor
is in the automatic locking mode (child re-
straint mode). It reverts back to emergency
locking mode when the belt is fully retracted.5. Allow the belt to retract. Pull up on the belt to
remove any slack in the belt.6. Before placing the child in the child restraint,
use force to tilt the child restraint from side to
side, and tug it forward to make sure that it is
securely held in place.
7. Check that the retractor is in the automatic
locking mode by trying to pull more belt out of
the retractor. If you cannot pull any more belt
webbing out of the retractor, the belt is in the
automatic locking mode.
8. Check to make sure that the child restraint is
properly secured prior to each use. If the belt
is not locked, repeat steps 4 through 7.
SSS0213
SSS0214
SSS0215
1-32
Seats, restraints and supplemental air bag systems
Z
02.9.13/Z33-D/V5.0
X
Page 38 of 227

After the child restraint is removed and the seat
belt is allowed to wind back into the retractor,
the automatic locking mode (child restraint
mode) is canceled; the seat belt only locks
during a sudden stop or impact.
Seats, restraints and supplemental air bag systems
1-33
Z
02.9.13/Z33-D/V5.0
X
Page 50 of 227

or
Anti-lock brake warning light
Low washer fluid warning light
Malfunction indicator lamp (MIL)
Automatic transmission check warning
light
Seat belt warning light
Slip indicator light
or
Brake warning light
Supplemental air bag warning light
Traction control system off indicator light
(if so equipped)
Charge warning light
Automatic transmission position indicator
light
Vehicle dynamic control off indicator light
(if so equipped)
Door open warning light
Cruise main switch indicator light (if so
equipped)
Turn signal/hazard indicator lights
Engine oil pressure warning light
Cruise set switch indicator light (if so
equipped)
Low tire pressure warning light (if so
equipped)
High beam indicator light (Blue)
CHECKING BULBSApply the parking brake and turn the ignition key
to ON without starting the engine. The following
lights will come on:
,
or
,
,
The following lights come on briefly and then go
off:
,
or
,
,
,
,
,
If any light fails to come on, it may indicate a
burned-out bulb or an open circuit in the elec-trical system. Have the system repaired
promptly.
WARNING LIGHTS
or
Anti-lock brake
warning light
After turning the ignition key to the ON position,
the light will illuminate. The light will turn off after
about 1 second if the system is operational.
If the light comes on while the engine is running,
it may indicate the anti-lock brake system is notfunctioning properly. Have the system checked
by your NISSAN dealer.
If an abnormality occurs in the system, the
anti-lock function will cease but the ordinary
brakes will continue to operate normally. See
ªAnti-lock brake system (ABS)º in the ª5. Start-
ing and drivingº section for further details.
If the light comes on while you are driving,
contact your NISSAN dealer for repair.
WARNING/INDICATOR LIGHTS
AND AUDIBLE REMINDERS
Instruments and controls
2-11
Z
02.9.13/Z33-D/V5.0
X
Page 51 of 227
Automatic transmission check
warning light (A/T models)
When the ignition switch is turned ON, the light
comes on for 2 seconds. If the light blinks for
approximately 8 seconds, it may indicate the
automatic transmission system is not functioning
properly. Have your NISSAN dealer check and
repair the transmission.
or
Brake warning light
This light functions for both the parking brake
and the foot brake systems.
Parking brake indicator:
When the ignition key is in the ON position, the
light comes on when the parking brake is ap-
plied.
Low brake fluid warning light:
The light warns of a low brake fluid level. If the
light comes on while the engine is running with
the parking brake not applied, stop the vehicle
and perform the following:
1. Check the brake fluid level. Add brake fluid as
necessary. See ªBrake and clutch fluidº in the
ª8. Maintenance and do-it-yourselfº section.
WARNING
IYour brake system may not be work-
ing properly if the warning light is on.
Driving could be dangerous. If you
judge it to be safe, drive carefully to
the nearest service station for re-
pairs. Otherwise, have your vehicle
towed because driving it could be
dangerous.
IPressing the brake pedal with the
engine stopped and/or low brake
fluid level may increase your stop-
ping distance and braking will re-
quire greater pedal effort as well as
greater pedal travel.
IIf the brake fluid level is below the
MIN mark on the brake fluid reser-
voir, do not drive until the brake sys-
tem has been checked at a NISSAN
dealer.
2. If the brake fluid level is correct, have the
warning system checked by a NISSAN
dealer. Avoid high speed driving and abrupt
braking.
If both the brake warning light and the anti-lock brake warning light come on simulta-
neously, it may indicate the anti-lock brake
system is not functioning properly. See ªAnti-
lock brake warning lightº earlier in this sec-
tion.
Charge warning light
If the light comes on while the engine is running,
it may indicate that the charging system is not
functioning properly. Turn the engine off and
check the alternator belt. If the belt is loose,
broken, missing or if the light remains on, see
your NISSAN dealer immediately.
CAUTION
Do not continue driving if the belt is
loose, broken or missing.
Door open warning light
This light comes on when any of the doors
and/or rear hatch are not closed securely while
the ignition key is ON.
Engine oil pressure warning
light
This light warns of low engine oil pressure. If the
light flickers or comes on during normal driving,
pull off the road in a safe area, stop the engine
2-12
Instruments and controls
Z
02.9.13/Z33-D/V5.0
X
Page 53 of 227
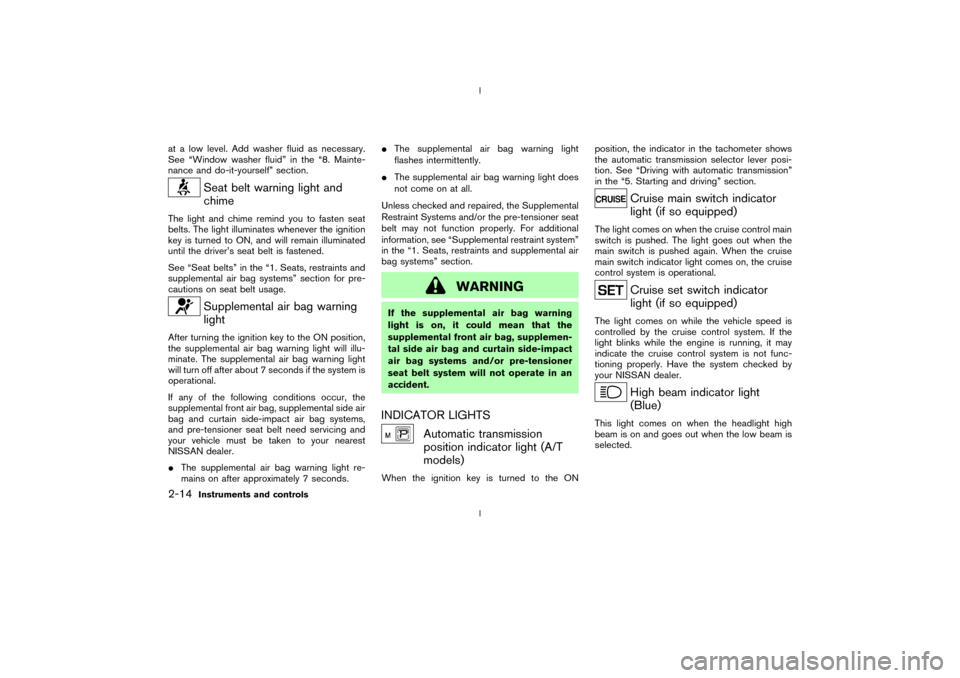
at a low level. Add washer fluid as necessary.
See ªWindow washer fluidº in the ª8. Mainte-
nance and do-it-yourselfº section.
Seat belt warning light and
chime
The light and chime remind you to fasten seat
belts. The light illuminates whenever the ignition
key is turned to ON, and will remain illuminated
until the driver's seat belt is fastened.
See ªSeat beltsº in the ª1. Seats, restraints and
supplemental air bag systemsº section for pre-
cautions on seat belt usage.
Supplemental air bag warning
light
After turning the ignition key to the ON position,
the supplemental air bag warning light will illu-
minate. The supplemental air bag warning light
will turn off after about 7 seconds if the system is
operational.
If any of the following conditions occur, the
supplemental front air bag, supplemental side air
bag and curtain side-impact air bag systems,
and pre-tensioner seat belt need servicing and
your vehicle must be taken to your nearest
NISSAN dealer.
IThe supplemental air bag warning light re-
mains on after approximately 7 seconds.IThe supplemental air bag warning light
flashes intermittently.
IThe supplemental air bag warning light does
not come on at all.
Unless checked and repaired, the Supplemental
Restraint Systems and/or the pre-tensioner seat
belt may not function properly. For additional
information, see ªSupplemental restraint systemº
in the ª1. Seats, restraints and supplemental air
bag systemsº section.
WARNING
If the supplemental air bag warning
light is on, it could mean that the
supplemental front air bag, supplemen-
tal side air bag and curtain side-impact
air bag systems and/or pre-tensioner
seat belt system will not operate in an
accident.INDICATOR LIGHTS
Automatic transmission
position indicator light (A/T
models)
When the ignition key is turned to the ONposition, the indicator in the tachometer shows
the automatic transmission selector lever posi-
tion. See ªDriving with automatic transmissionº
in the ª5. Starting and drivingº section.
Cruise main switch indicator
light (if so equipped)
The light comes on when the cruise control main
switch is pushed. The light goes out when the
main switch is pushed again. When the cruise
main switch indicator light comes on, the cruise
control system is operational.
Cruise set switch indicator
light (if so equipped)
The light comes on while the vehicle speed is
controlled by the cruise control system. If the
light blinks while the engine is running, it may
indicate the cruise control system is not func-
tioning properly. Have the system checked by
your NISSAN dealer.
High beam indicator light
(Blue)
This light comes on when the headlight high
beam is on and goes out when the low beam is
selected.
2-14
Instruments and controls
Z
02.9.13/Z33-D/V5.0
X