2003 NISSAN 350Z belt
[x] Cancel search: beltPage 83 of 227
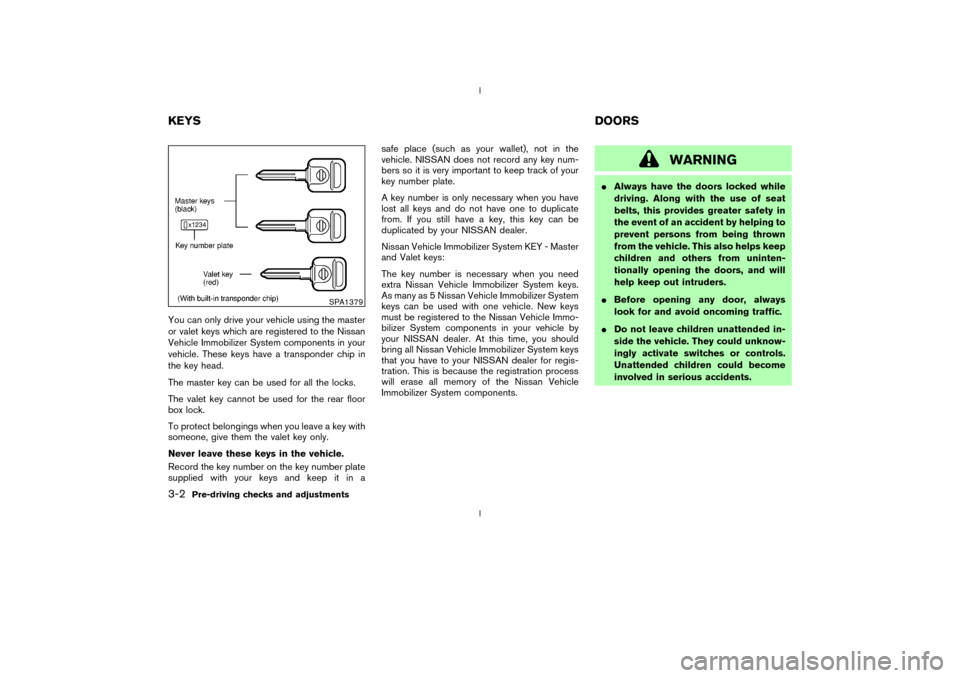
You can only drive your vehicle using the master
or valet keys which are registered to the Nissan
Vehicle Immobilizer System components in your
vehicle. These keys have a transponder chip in
the key head.
The master key can be used for all the locks.
The valet key cannot be used for the rear floor
box lock.
To protect belongings when you leave a key with
someone, give them the valet key only.
Never leave these keys in the vehicle.
Record the key number on the key number plate
supplied with your keys and keep it in asafe place (such as your wallet), not in the
vehicle. NISSAN does not record any key num-
bers so it is very important to keep track of your
key number plate.
A key number is only necessary when you have
lost all keys and do not have one to duplicate
from. If you still have a key, this key can be
duplicated by your NISSAN dealer.
Nissan Vehicle Immobilizer System KEY - Master
and Valet keys:
The key number is necessary when you need
extra Nissan Vehicle Immobilizer System keys.
As many as 5 Nissan Vehicle Immobilizer System
keys can be used with one vehicle. New keys
must be registered to the Nissan Vehicle Immo-
bilizer System components in your vehicle by
your NISSAN dealer. At this time, you should
bring all Nissan Vehicle Immobilizer System keys
that you have to your NISSAN dealer for regis-
tration. This is because the registration process
will erase all memory of the Nissan Vehicle
Immobilizer System components.
WARNING
IAlways have the doors locked while
driving. Along with the use of seat
belts, this provides greater safety in
the event of an accident by helping to
prevent persons from being thrown
from the vehicle. This also helps keep
children and others from uninten-
tionally opening the doors, and will
help keep out intruders.
IBefore opening any door, always
look for and avoid oncoming traffic.
IDo not leave children unattended in-
side the vehicle. They could unknow-
ingly activate switches or controls.
Unattended children could become
involved in serious accidents.
SPA1379
KEYSDOORS3-2
Pre-driving checks and adjustments
Z
02.9.13/Z33-D/V5.0
X
Page 122 of 227
times, and avoid driving when tired. Never drive
when under the influence of alcohol or drugs
(including prescription or over-the-counter
drugs which may cause drowsiness). Always
wear your seat belt. See ªSeat Beltsº in the ª1.
Seats, restraints and supplemental air bag sys-
temsº section. Also instruct your passengers to
do so.DRINKING ALCOHOL/DRUGS AND
DRIVING
WARNING
Never drive under the influence of alco-
hol or drugs. Alcohol in the bloodstream
reduces coordination, delays reaction
time and impairs judgment. Driving after
drinking alcohol increases the likeli-
hood of being involved in an accident
injuring yourself and others. Addition-
ally, if you are injured in the accident,
alcohol can increase the severity of the
injury.
NISSAN is committed to safe driving. You must
not drive under the influence of alcohol. Every
year thousands of people are injured or killed in
alcohol related accidents. Although the locallaws vary on what is considered to be legally
intoxicated, the fact is that alcohol affects all
people differently and most people underesti-
mate the effects of alcohol.
Remember, drinking and driving don't mix!
And that's true for drugs too (over the counter,
prescription, and illegal drugs). Don't drive if
your ability to operate your vehicle is impaired by
alcohol, drugs, or some other physical condition.
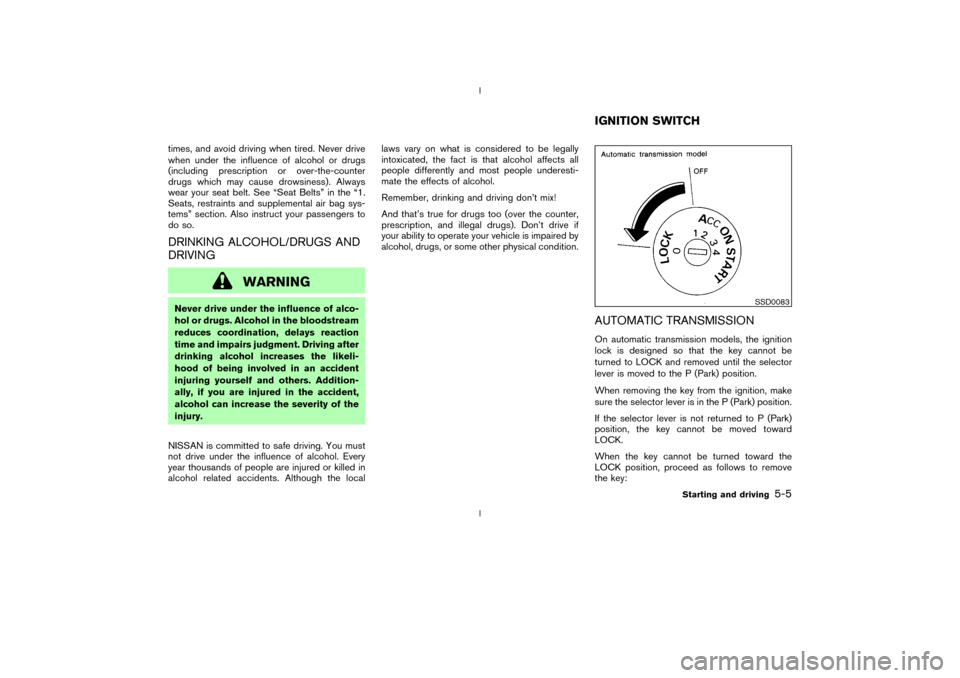
AUTOMATIC TRANSMISSIONOn automatic transmission models, the ignition
lock is designed so that the key cannot be
turned to LOCK and removed until the selector
lever is moved to the P (Park) position.
When removing the key from the ignition, make
sure the selector lever is in the P (Park) position.
If the selector lever is not returned to P (Park)
position, the key cannot be moved toward
LOCK.
When the key cannot be turned toward the
LOCK position, proceed as follows to remove
the key:
SSD0083
IGNITION SWITCH
Starting and driving
5-5
Z
02.9.13/Z33-D/V5.0
X
Page 125 of 227
IMake sure the area around the vehicle is
clear.
IMaintenance items should be checked peri-
odically, for example, each time you check
engine oil.
ICheck that all windows and lights are clean.
IVisually inspect tires for their appearance and
condition. Also, check tires for proper infla-
tion.
ILock all doors.
IPosition seat and adjust head restraints.
IAdjust inside and outside mirrors.
IFasten seat belts and ask all passengers to
do likewise.
ICheck the operation of warning lights when
key is turned to the ON (3) position.1. Apply the parking brake.
2.Automatic transmission:
Move the selector lever to P (Park) or N
(Neutral). (P preferred.)
The starter is designed not to operate if the
selector lever is in one of the driving posi-
tions.
Manual transmission:
Move the shift lever to N (Neutral) position,
and depress the clutch pedal to the floor
while cranking the engine.
The starter is designed not to operate unless
the clutch pedal is fully depressed.
3. Crank the enginewith your foot off the
accelerator pedalby turning the ignition
key to START. Release the key when the
engine starts. If the engine starts, but fails to
run, repeat the above procedure.
IWhen the engine is very hard to start in
extremely cold weather or when restarting,
depress the accelerator pedal a little (ap-
proximately 1/5 to the floor) and hold it then
crank the engine. Release the key and the
accelerator pedal when the engine starts.
IWhen the engine is very hard to start be-
cause it is flooded, depress the acceleratorpedal all the way to the floor and hold it.
Crank the engine for 5 to 6 seconds. After
cranking the engine, release the accelerator
pedal. Crank the enginewith your foot off
the accelerator pedalby turning the igni-
tion key to START. Release the key when the
engine starts. If the engine starts, but fails to
run, repeat the above procedure.
CAUTION
Do not operate the starter for more than
15 seconds at a time. If the engine does
not start, turn the key off and wait 10
seconds before cranking again, other-
wise the starter could be damaged.
4.Warm-up
Allow the engine to idle for at least 30
seconds after starting. Drive at moderate
speed for a short distance first, especially in
cold weather.
BEFORE STARTING THE ENGINE STARTING THE ENGINE5-8
Starting and driving
Z
02.9.13/Z33-D/V5.0
X
Page 136 of 227
WARNING
ISafe parking procedures require that
both the parking brake be set and the
transmission placed into P (Park) for
automatic transmission models or in
an appropriate gear for manual
transmission models. Failure to do
so could cause the vehicle to move
unexpectedly or roll away and result
in an accident.
IMake sure the automatic transmis-
sion selector lever has been pushed
as far forward as it can go and cannot
be moved without depressing the
button at the end of the lever.
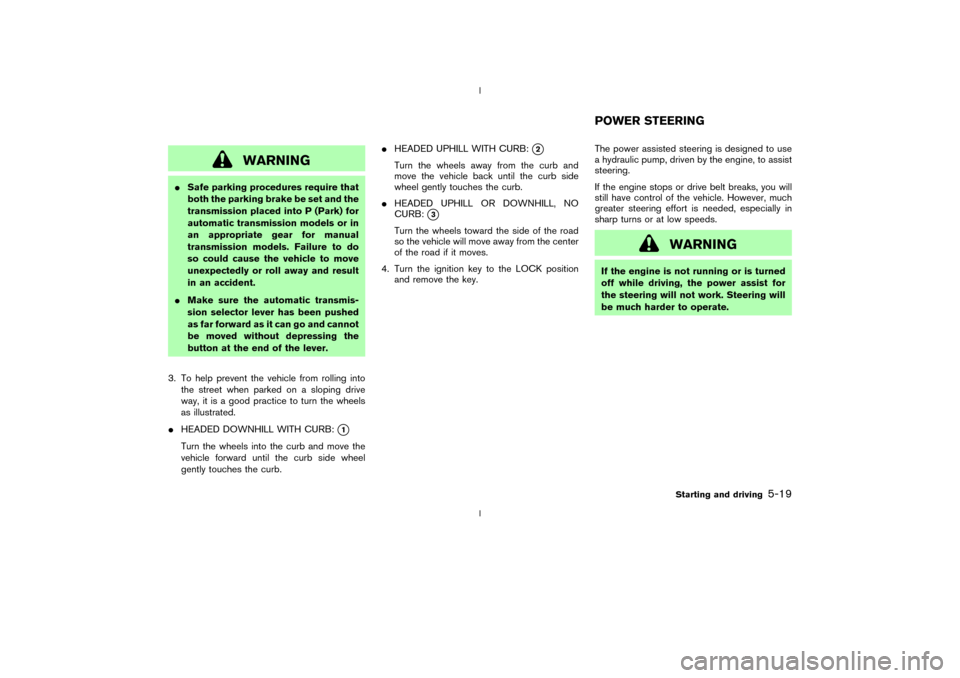
3. To help prevent the vehicle from rolling into
the street when parked on a sloping drive
way, it is a good practice to turn the wheels
as illustrated.
IHEADED DOWNHILL WITH CURB:
q1
Turn the wheels into the curb and move the
vehicle forward until the curb side wheel
gently touches the curb.IHEADED UPHILL WITH CURB:
q2
Turn the wheels away from the curb and
move the vehicle back until the curb side
wheel gently touches the curb.
IHEADED UPHILL OR DOWNHILL, NO
CURB:
q3
Turn the wheels toward the side of the road
so the vehicle will move away from the center
of the road if it moves.
4. Turn the ignition key to the LOCK position
and remove the key.The power assisted steering is designed to use
a hydraulic pump, driven by the engine, to assist
steering.
If the engine stops or drive belt breaks, you will
still have control of the vehicle. However, much
greater steering effort is needed, especially in
sharp turns or at low speeds.
WARNING
If the engine is not running or is turned
off while driving, the power assist for
the steering will not work. Steering will
be much harder to operate.POWER STEERING
Starting and driving
5-19
Z
02.9.13/Z33-D/V5.0
X
Page 152 of 227
WARNING
IDo not continue to drive if your ve-
hicle overheats. Doing so could
cause a vehicle fire.
ITo avoid the danger of being scalded,
never remove the radiator cap while
the engine is still hot. When the ra-
diator cap is removed, pressurized
hot water will spurt out, possibly
causing serious injury.
IDo not open the hood if steam is
coming out.
If your vehicle is overheating (indicated by an
extremely high temperature gauge reading), or if
you feel a lack of engine power, detect abnormal
noise, etc., take the following steps:
1. Move the vehicle safely off the road, apply the
parking brake and move the shift lever to the
N (Neutral) position (automatic transmission
to the P (Park) position).
Do not stop the engine.
2. Turn off the air conditioner switch. Open all
the windows, move the heater or air condi-tioner temperature control to maximum hot
and fan control to high speed.
3. If engine overheating is caused by climbing a
long hill on a hot day, run the engine at a fast
idle (approximately 1,500 rpm) until the tem-
perature gauge indication returns to normal.
4. Get out of the vehicle. Look and listen for
steam or coolant escaping from the radiator
before opening the hood. Wait until no steam
or coolant can be seen before proceeding.
5. Open the engine hood.
WARNING
If steam or water is coming from the
engine, stand clear to prevent getting
burned.
6. Visually check if the cooling fan is running.
The radiator hoses and radiator should not
leak water.
If coolant is leaking or the cooling fan does
not run, stop the engine.
WARNING
IBe careful not to allow your hands,
hair, jewelry or clothing to come into
contact with, or to get caught in the
cooling fan, or drive belt.
IThe engine cooling fan can start at
any time when the coolant tempera-
ture is high.
7. After the engine cools down, check the cool-
ant level in the reservoir tank with the engine
running. Add coolant to the reservoir tank if
necessary. Have your vehicle repaired at the
nearest NISSAN dealer.
IF YOUR VEHICLE OVERHEATS
In case of emergency
6-9
Z
02.9.13/Z33-D/V5.0
X
Page 156 of 227

7 Appearance and careCleaning exterior .................................................................... 7-2
Washing ............................................................................. 7-2
Waxing ................................................................................ 7-2
Removing spots ................................................................ 7-3
Underbody ......................................................................... 7-3
Glass ................................................................................... 7-3
Aluminum alloy wheels.................................................... 7-3
Chrome parts .................................................................... 7-3
Cleaning interior ..................................................................... 7-4Floor mats .......................................................................... 7-4
Seat belts ........................................................................... 7-5
Corrosion protection ............................................................. 7-5
Most common factors contributing to vehicle
corrosion............................................................................. 7-5
Environmental factors influence the rate of
corrosion............................................................................. 7-5
To protect your vehicle from corrosion ...................... 7-5
Z
02.9.13/Z33-D/V5.0
X
Page 160 of 227
SEAT BELTSThe seat belts can be cleaned by wiping them
with a sponge dampened in a mild soap solution.
Allow the belts to dry completely before using
them.
WARNING
Do not allow wet belts to roll up in the
retractor. NEVER use bleach, dye, or
chemical solvents since these may se-
verely weaken the seat belt webbing.
MOST COMMON FACTORS
CONTRIBUTING TO VEHICLE
CORROSION:IThe accumulation of moisture-retaining dirt
and debris in body panel sections, cavities,
and other areas.
IDamage to paint and other protective coat-
ings caused by gravel and stone chips or
minor traffic accidents.ENVIRONMENTAL FACTORS
INFLUENCE THE RATE OF
CORROSION:
MoistureAccumulation of sand, dirt and water on the
vehicle body underside can accelerate corro-
sion. Wet floor coverings will not dry completely
inside the vehicle, and should be removed for
drying to avoid floor panel corrosion.Relative humidityCorrosion will be accelerated in areas of high
relative humidity, especially those areas where
the temperatures stay above freezing and where
atmospheric pollution exists and road salt is
used.
TemperatureA temperature increase will accelerate the rate
of corrosion to those parts which are not well
ventilated.Air pollutionIndustrial pollution, the presence of salt in the air
in coastal areas, or heavy road salt use will
accelerate the corrosion process. Road salt will
also accelerate the disintegration of paint sur-
faces.TO PROTECT YOUR VEHICLE
FROM CORROSION:IWash and wax your vehicle often to keep the
vehicle clean.
IAlways check for minor damage to the paint
and repair it as soon as possible.
IKeep drain holes at the bottom of the doors
open to avoid water accumulation.
ICheck the underbody for accumulation of
sand, dirt or salt. If present, wash with water
as soon as possible.
CORROSION PROTECTION
Appearance and care
7-5
Z
02.9.13/Z33-D/V5.0
X
Page 162 of 227

8 Maintenance and do-it-yourselfMaintenance requirements .................................................. 8-2
General maintenance ............................................................ 8-2
Explanation of general maintenance items ................ 8-2
Maintenance precautions ..................................................... 8-5
Engine compartment check locations .............................. 8-7
Engine cooling system.......................................................... 8-8
Checking engine coolant level...................................... 8-8
Changing engine coolant ............................................... 8-9
Engine oil ............................................................................... 8-10
Checking engine oil level ............................................ 8-10
Changing engine oil and filter .................................... 8-10
Automatic transmission fluid ............................................. 8-12
Power steering fluid ............................................................ 8-13
Brake and clutch fluid ........................................................ 8-13
Brake fluid ....................................................................... 8-13
Clutch fluid ...................................................................... 8-14
Window washer fluid.......................................................... 8-14
Battery .................................................................................... 8-15
Jump starting .................................................................. 8-16
Drive belts ............................................................................. 8-17
Spark plugs ........................................................................... 8-17Replacing spark plugs.................................................. 8-17
Air cleaner ............................................................................. 8-18
Windshield wiper blades ................................................... 8-19
Cleaning ........................................................................... 8-19
Replacing ......................................................................... 8-20
Parking brake and brake pedal ........................................ 8-21
Checking parking brake ............................................... 8-21
Checking brake pedal .................................................. 8-21
Brake booster ................................................................. 8-22
Fuses ...................................................................................... 8-22
Engine compartment ..................................................... 8-22
Passenger compartment .............................................. 8-23
Keyfob battery replacement .............................................. 8-24
Lights ...................................................................................... 8-25
Headlights ....................................................................... 8-26
Exterior and interior lights............................................ 8-27
Wheels and tires ................................................................. 8-29
Tire pressure ................................................................... 8-29
Types of tires .................................................................. 8-30
Tire chains ....................................................................... 8-31
Changing wheels and tires ......................................... 8-31
Z
02.9.13/Z33-D/V5.0
X