2003 NISSAN 350Z tire pressure
[x] Cancel search: tire pressurePage 135 of 227
IFollow the recommended periodic mainte-
nance schedule.
IKeep the tires inflated at the correct pres-
sure. Low pressure will increase tire wear and
waste fuel.
IKeep the front wheels in correct alignment.
Improper alignment will cause not only tire
wear but also lower fuel economy.
IAir conditioner operation lowers fuel
economy. Use the air conditioner only when
necessary.
IWhen cruising at highway speeds, it is more
economical to use the air conditioner and
leave the windows closed to reduce drag.
WARNING
IDo not stop or park the vehicle over
flammable materials such as dry
grass, waste paper or rags. They may
ignite and cause a fire.
INever leave the engine running while
the vehicle is unattended.
INever leave children unattended in
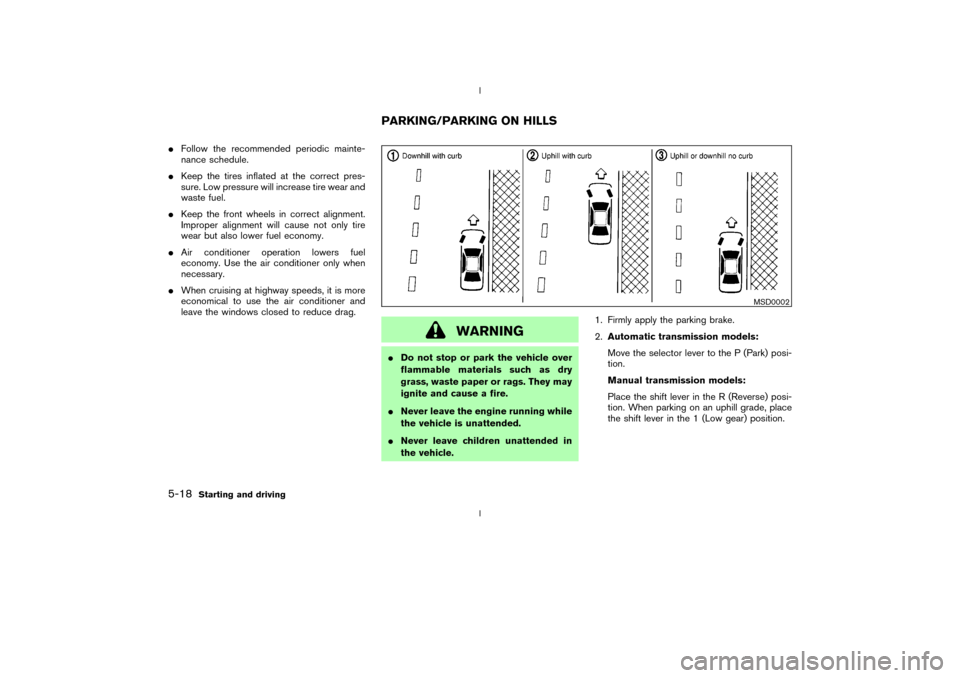
the vehicle.1. Firmly apply the parking brake.
2.Automatic transmission models:
Move the selector lever to the P (Park) posi-
tion.
Manual transmission models:
Place the shift lever in the R (Reverse) posi-
tion. When parking on an uphill grade, place
the shift lever in the 1 (Low gear) position.
MSD0002
PARKING/PARKING ON HILLS
5-18
Starting and driving
Z
02.9.13/Z33-D/V5.0
X
Page 144 of 227

6 In case of emergencyFlat tire ...................................................................................... 6-2
Low tire pressure warning system
(if so equipped) ................................................................ 6-2
Changing a flat tire .......................................................... 6-2
Jump starting ........................................................................... 6-6Push starting ........................................................................... 6-8
If your vehicle overheats....................................................... 6-9
Towing your vehicle ............................................................ 6-10
Towing recommended by NISSAN........................... 6-10
Vehicle recovery (Freeing a stuck vehicle) ............. 6-11
Z
02.9.13/Z33-D/V5.0
X
Page 145 of 227
LOW TIRE PRESSURE WARNING
SYSTEM (if so equipped)The low tire pressure warning system which
displays pressure of all tires (except the spare
tire) on the trip computer by sending a signal
from a sensor that is installed in each wheel. If
the vehicle is being driven with a flat tire or very
low tire pressure (lower than 28 psi), the low tire
pressure warning system will activate and warn
you of it by the low tire pressure warning light (in
the meter panel) or the PSI indicator (on the trip
computer). This system will activate only when
the vehicle is driven at speeds above 20 MPH
(32 km/h). For more details, refer to ªTrip com-
puterº and ªWarning/indicator lights and audible
remindersº in the ª2. Instruments and controlsº
section and ªLow tire pressure warning systemº
in the ª5. Starting and drivingº section.
WARNING
IIf the low tire pressure warning light
comes on and/or the PSI indicator
flashes while driving, avoid sudden
steering maneuvers or abrupt brak-
ing, reduce vehicle speed, pull off the
road to a safe location and stop thevehicle as soon as possible. Serious
vehicle damage could occur and may
lead to an accident and could result
in serious personal injury. Check the
pressure for all four tires and adjust
the pressure to the COLD tire pres-
sure shown on the tire placard. If you
have a flat tire, replace it with a spare
tire as soon as possible.
IWhen a spare tire is mounted or a
wheel is replaced, tire pressure will
not be indicated and the low tire
pressure warning system will not
function. Contact your NISSAN
dealer as soon as possible for tire
replacement and/or system reset-
ting.
IDo not inject any tire liquid or aerosol
tire sealant into the tires, as this may
cause a malfunction of the tire pres-
sure sensors.
CHANGING A FLAT TIREIf you have a flat tire, follow the instructions
below.Stopping the vehicle1. Safely move the vehicle off the road away
from traffic.
2. Turn on the hazard warning flashers.
3. Park on a level surface and apply the parking
brake. Shift the manual transmission into R
(Reverse) position (automatic transmission in
P (Park) position).
4. Turn off the engine.
5. Raise the hood to warn other traffic, and to
signal professional road assistance person-
nel that you need assistance.
6. Have all passengers get out of the vehicle
and stand in a safe place, away from traffic
and clear of the vehicle.
WARNING
IMake sure that the parking brake is
securely applied and the manual
transmission is shifted into R (Re-
FLAT TIRE6-2
In case of emergency
Z
02.9.13/Z33-D/V5.0
X
Page 146 of 227
verse), or the automatic transmission
into P (Park).
INever change tires when the vehicle
is on a slope, ice or slippery areas.
This is hazardous.
INever change tires if oncoming traffic
is close to your vehicle. Wait for pro-
fessional road assistance.
IWhen a spare tire is mounted or a
wheel is replaced, tire pressure will
not be indicated and the low tire
pressure warning system will not
function. Contact your NISSAN
dealer as soon as possible for tire
replacement and/or system reset-
ting. (For models with the low tire
pressure warning system)
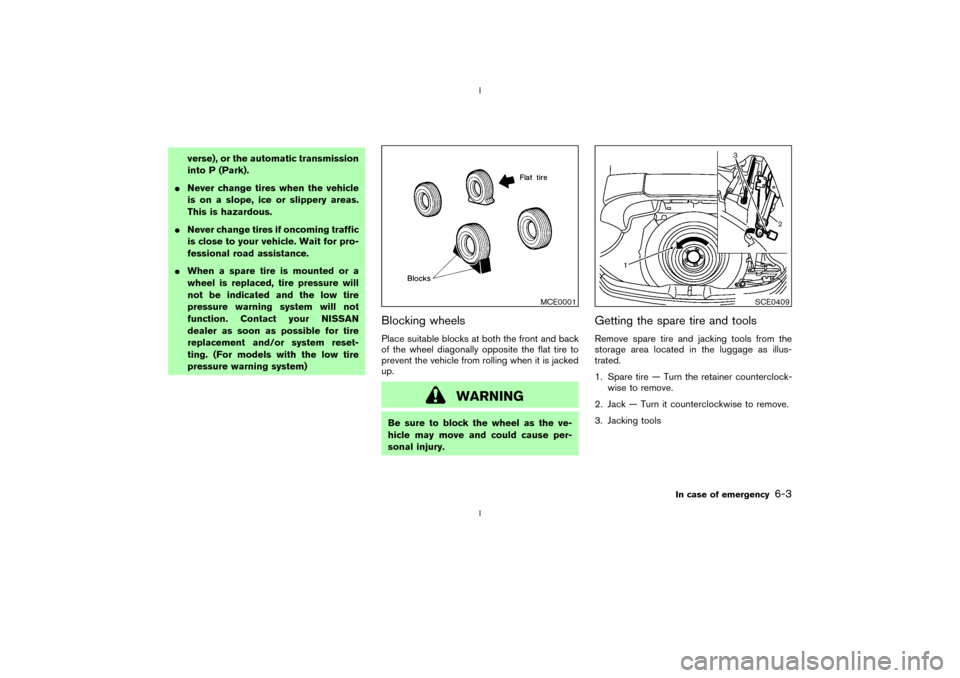
Blocking wheelsPlace suitable blocks at both the front and back
of the wheel diagonally opposite the flat tire to
prevent the vehicle from rolling when it is jacked
up.
WARNING
Be sure to block the wheel as the ve-
hicle may move and could cause per-
sonal injury.
Getting the spare tire and toolsRemove spare tire and jacking tools from the
storage area located in the luggage as illus-
trated.
1. Spare tire Ð Turn the retainer counterclock-
wise to remove.
2. Jack Ð Turn it counterclockwise to remove.
3. Jacking tools
MCE0001
SCE0409
In case of emergency
6-3
Z
02.9.13/Z33-D/V5.0
X
Page 148 of 227
IUse the correct jack up points; never
use any other part of the vehicle for
jack support.
INever jack up the vehicle more than
necessary.
INever use blocks on or under the
jack.
IDo not start or run engine while ve-
hicle is on the jack, as it may cause
the vehicle to move. This is especially
true for vehicles with limited slip dif-
ferential carriers.
IDo not allow passengers to stay in
the vehicle while it is on the jack.
Installing the spare tire1. Clean any mud or dirt from the surface
between the wheel and hub.
2. Carefully put the wheel on and tighten the
wheel nuts finger tight. When replacing a
front tire, make sure the hole in the spare tire
wheel is aligned with the pin on the brake
rotor.
3. With the wheel nut wrench, tighten wheel
nuts alternately and evenly until they are tight.
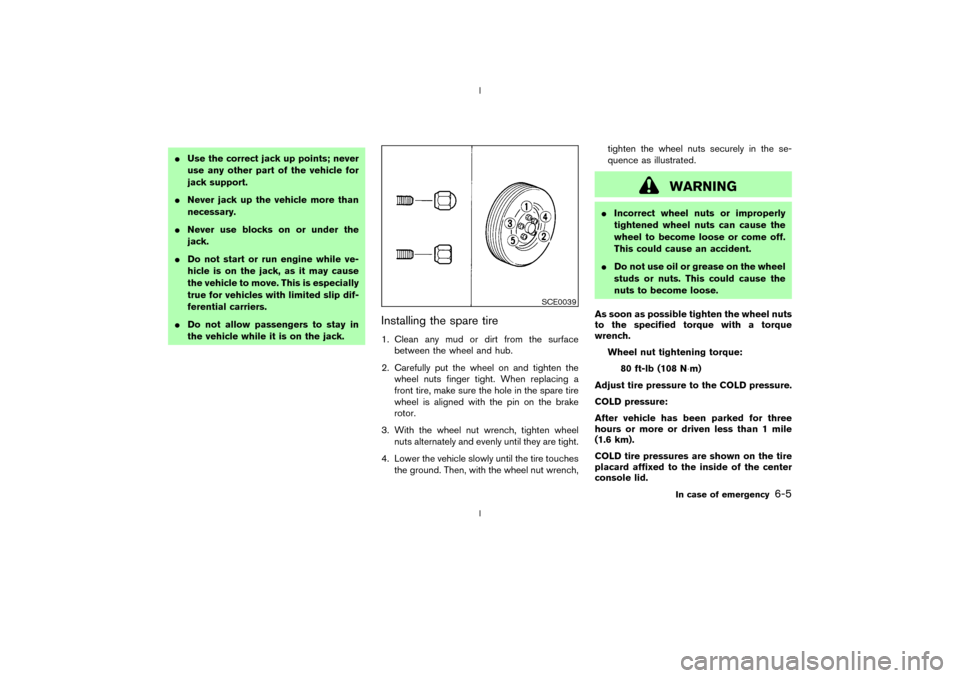
4. Lower the vehicle slowly until the tire touches
the ground. Then, with the wheel nut wrench,tighten the wheel nuts securely in the se-
quence as illustrated.
WARNING
IIncorrect wheel nuts or improperly
tightened wheel nuts can cause the
wheel to become loose or come off.
This could cause an accident.
IDo not use oil or grease on the wheel
studs or nuts. This could cause the
nuts to become loose.
As soon as possible tighten the wheel nuts
to the specified torque with a torque
wrench.
Wheel nut tightening torque:
80 ft-lb (108 N×m)
Adjust tire pressure to the COLD pressure.
COLD pressure:
After vehicle has been parked for three
hours or more or driven less than 1 mile
(1.6 km).
COLD tire pressures are shown on the tire
placard affixed to the inside of the center
console lid.
SCE0039
In case of emergency
6-5
Z
02.9.13/Z33-D/V5.0
X
Page 149 of 227
For models equipped with the low tire
pressure warning system:
After adjusting tire pressure to the COLD tire
pressure, the display of the tire pressure infor-
mation may show higher pressure than the
COLD tire pressure after the vehicle has been
driven more than 1 mile (1.6 km). This is because
the tire pressurizes as the tire temperature rises.
This does not indicate a system malfunction.
WARNING
Retighten the wheel nuts when the ve-
hicle has been driven for 600 miles
(1,000 km) (also in cases of a flat tire,
etc.).Stowing the tire and toolsSecurely store the spare tire and jacking equip-
ment in the vehicle.
WARNING
IAlways make sure that the spare tire
and jacking equipment are properly
secured after use. Such items canbecome dangerous projectiles in an
accident or sudden stop.
IThe T-type spare tire and small size
spare tire are designed for emer-
gency use. See ªWheels and tiresº in
the ª8. Maintenance and do-it-
yourselfº section.To start your engine with a booster battery, the
instructions and precautions below must be
followed.
WARNING
IIf done incorrectly, jump starting can
lead to a battery explosion, resulting
in severe injury or death. It could also
damage your vehicle.
IExplosive hydrogen gas is always
present in the vicinity of the battery.
Keep all sparks and flames away
from the battery.
IDo not allow battery fluid to come
into contact with eyes, skin, cloth or
painted surfaces. Battery fluid is a
corrosive sulphuric acid solution
which can cause severe burns. If the
fluid should come into contact with
anything, immediately flush the con-
tacted area with water.
IKeep battery out of the reach of chil-
dren.
IThe booster battery must be rated atJUMP STARTING
6-6
In case of emergency
Z
02.9.13/Z33-D/V5.0
X
Page 162 of 227

8 Maintenance and do-it-yourselfMaintenance requirements .................................................. 8-2
General maintenance ............................................................ 8-2
Explanation of general maintenance items ................ 8-2
Maintenance precautions ..................................................... 8-5
Engine compartment check locations .............................. 8-7
Engine cooling system.......................................................... 8-8
Checking engine coolant level...................................... 8-8
Changing engine coolant ............................................... 8-9
Engine oil ............................................................................... 8-10
Checking engine oil level ............................................ 8-10
Changing engine oil and filter .................................... 8-10
Automatic transmission fluid ............................................. 8-12
Power steering fluid ............................................................ 8-13
Brake and clutch fluid ........................................................ 8-13
Brake fluid ....................................................................... 8-13
Clutch fluid ...................................................................... 8-14
Window washer fluid.......................................................... 8-14
Battery .................................................................................... 8-15
Jump starting .................................................................. 8-16
Drive belts ............................................................................. 8-17
Spark plugs ........................................................................... 8-17Replacing spark plugs.................................................. 8-17
Air cleaner ............................................................................. 8-18
Windshield wiper blades ................................................... 8-19
Cleaning ........................................................................... 8-19
Replacing ......................................................................... 8-20
Parking brake and brake pedal ........................................ 8-21
Checking parking brake ............................................... 8-21
Checking brake pedal .................................................. 8-21
Brake booster ................................................................. 8-22
Fuses ...................................................................................... 8-22
Engine compartment ..................................................... 8-22
Passenger compartment .............................................. 8-23
Keyfob battery replacement .............................................. 8-24
Lights ...................................................................................... 8-25
Headlights ....................................................................... 8-26
Exterior and interior lights............................................ 8-27
Wheels and tires ................................................................. 8-29
Tire pressure ................................................................... 8-29
Types of tires .................................................................. 8-30
Tire chains ....................................................................... 8-31
Changing wheels and tires ......................................... 8-31
Z
02.9.13/Z33-D/V5.0
X
Page 163 of 227

Your new NISSAN has been designed to have
minimum maintenance requirements with longer
service intervals to save you both time and
money. However, some day-to-day and regular
maintenance is essential to maintain your
NISSAN's good mechanical condition, as well
as its emission and engine performance.
It is the owner's responsibility to make sure that
scheduled maintenance, as well as general
maintenance, is performed.
As the vehicle owner, you are the only one who
can ensure that your vehicle receives the proper
maintenance care. You are a vital link in the
maintenance chain.
Scheduled maintenance:
For your convenience, both required and op-
tional scheduled maintenance items are de-
scribed and listed in your ªService and Mainte-
nance Guideº. You must refer to that guide to
ensure that necessary maintenance is performed
on your NISSAN at regular intervals.
General maintenance:
General maintenance includes those items
which should be checked during normal day-to-
day operation of the vehicle. They are essential if
your vehicle is to continue to operate properly. It
is your responsibility to perform these proce-
dures regularly as prescribed.Performing general maintenance checks require
minimal mechanical skill and only a few general
automotive tools.
These checks or inspections can be done by
yourself, a qualified technician or, if you prefer,
your NISSAN dealer.
Where to go for service:
If maintenance service is required or your vehicle
appears to malfunction, have the systems
checked and tuned by an authorized NISSAN
dealer.
NISSAN technicians are well-trained specialists
and are kept up to date with the latest service
information through technical bulletins, service
tips, and in-dealership training programs. They
are completely qualified to work on NISSAN
vehiclesbeforethey work on your vehicle,
rather than after they have worked on it.
You can be confident that your NISSAN dealer's
service department performs the best job to
meet the maintenance requirements of your ve-
hicle Ð in a reliable and economic way.During the normal day-to-day operation of the
vehicle, general maintenance should be per-
formed regularly as prescribed in this section. If
you detect any unusual sounds, vibrations or
smell, be sure to check for the cause or have
your NISSAN dealer check it promptly. In addi-
tion, you should notify your NISSAN dealer if you
think that repairs are required.
When performing any checks or maintenance
work, closely observe the ªMaintenance precau-
tionsº later in this section.
EXPLANATION OF GENERAL
MAINTENANCE ITEMSAdditional information on the following
items with ª*º is found later in this section.Outside the vehicleThe maintenance items listed here should be
performed from time to time, unless otherwise
specified.
Tires*:Check the pressure with a gauge at least
once a month and always prior to long distance
trips. Adjust the pressure in all tires, including
the spare, to the pressure specified. Check
carefully for damage, cuts or excessive wear.
Wheel nuts*:When checking the tires, make
sure no nuts are missing, and check for any
loose nuts. Tighten if necessary.
MAINTENANCE REQUIREMENTS GENERAL MAINTENANCE8-2
Maintenance and do-it-yourself
Z
02.9.13/Z33-D/V5.0
X