2003 NISSAN 350Z battery
[x] Cancel search: batteryPage 78 of 227

light flashes rapidly (indicating successful pro-
gramming).
NOTE:
If programming a garage door opener, etc.,
it is advised to unplug the device during
the ªcyclingº process to prevent possible
damage to the garage door opener compo-
nents.OPERATING THE HomeLinkUNIVERSAL TRANSCEIVERThe HomeLink
Universal Transceiver (once
programmed) may now be used to activate the
garage door, etc. To operate, simply press the
appropriate programmed HomeLink
Universal
Transceiver button. The red indicator light will
illuminate while the signal is being transmitted.
PROGRAMMING TROUBLE
DIAGNOSISIf the HomeLink
does not quickly learn the
hand-held transmitter information:
Ireplace the hand-held transmitter batteries
with new batteries.
Iposition the hand-held transmitter with its
battery area facing away from the HomeLink
surface.Ipress and hold both the HomeLink
and
hand-held transmitter buttons without inter-
ruption.
Iposition the hand-held transmitter 2 to 5
inches (50 to 127 mm) away from the
HomeLink
surface. Hold the transmitter in
that position for up to 15 seconds. If
HomeLinkis not programmed within that
time, try holding the transmitter in another
position - keeping the indicator light in view at
all times.
If you continue to have programming difficulties,
please contact the NISSAN Consumer Affairs
Department. The phone numbers are located in
the Foreword of this Owner's Manual.
CLEARING THE PROGRAMMED
INFORMATIONIndividual buttons cannot be cleared, however to
clear all programming, press and hold the two
outside buttons and release when the indicator
light begins to flash (approximately 20 seconds).
REPROGRAMMING A SINGLE
HomeLink
BUTTON
To reprogram a HomeLink
Universal Trans-
ceiver button, complete the following.
1. Press and hold the desired HomeLink
but-
ton.Do notrelease the button until step 4
has been completed.
2. When the indicator light begins to flash
slowly (after 20 seconds), position the hand-
held transmitter 2 to 5 inches (50 to 127 mm)
away from the HomeLink
surface.
3. Press and hold the hand-held transmitter
button.
4. The HomeLink
indicator light will flash, first
slowly and then rapidly. When the indicator
light begins to flash rapidly, release both
buttons.
The HomeLinkUniversal Transceiver button
has now been reprogrammed. The new device
can be activated by pushing the HomeLink
button that was just programmed. This proce-
dure will not affect any other programmed
HomeLink
buttons.
IF YOUR VEHICLE IS STOLENIf your vehicle is stolen, you should change the
codes of any non-rolling code device that has
Instruments and controls
2-39
Z
02.9.13/Z33-D/V5.0
X
Page 82 of 227

3 Pre-driving checks and adjustmentsKeys ........................................................................................... 3-2
Doors......................................................................................... 3-2
Locking with key (Driver's side) ................................... 3-3
Locking with inside lock knob ...................................... 3-3
Locking with power door lock switch ......................... 3-4
Remote keyless entry system ............................................. 3-4
How to use remote keyless entry system.................. 3-5
Battery replacement ........................................................ 3-7
Hood ......................................................................................... 3-8
Rear hatch ............................................................................... 3-9
Opener operation ............................................................. 3-9Secondary rear hatch release .................................... 3-10
Fuel filler lid ........................................................................... 3-10
Opener operation .......................................................... 3-10
Fuel filler cap .................................................................. 3-11
Steering wheel ..................................................................... 3-12
Tilt operation ................................................................... 3-12
Mirrors .................................................................................... 3-13
Inside mirror .................................................................... 3-13
Automatic anti-glare inside mirror
(if so equipped).............................................................. 3-13
Outside mirrors .............................................................. 3-14
Z
02.9.13/Z33-D/V5.0
X
Page 85 of 227
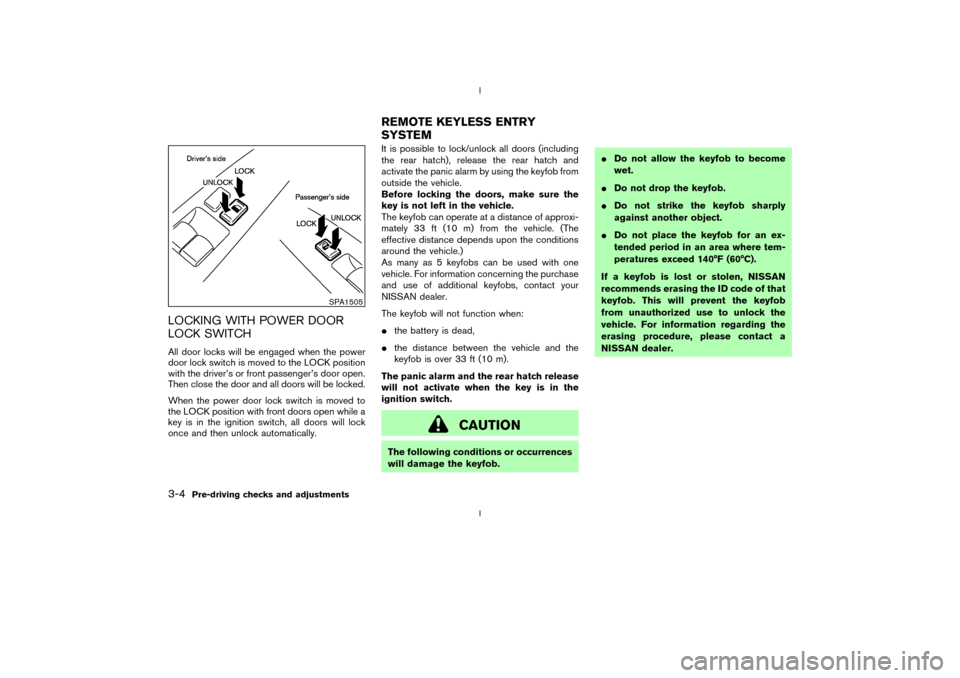
LOCKING WITH POWER DOOR
LOCK SWITCHAll door locks will be engaged when the power
door lock switch is moved to the LOCK position
with the driver's or front passenger's door open.
Then close the door and all doors will be locked.
When the power door lock switch is moved to
the LOCK position with front doors open while a
key is in the ignition switch, all doors will lock
once and then unlock automatically.It is possible to lock/unlock all doors (including
the rear hatch), release the rear hatch and
activate the panic alarm by using the keyfob from
outside the vehicle.
Before locking the doors, make sure the
key is not left in the vehicle.
The keyfob can operate at a distance of approxi-
mately 33 ft (10 m) from the vehicle. (The
effective distance depends upon the conditions
around the vehicle.)
As many as 5 keyfobs can be used with one
vehicle. For information concerning the purchase
and use of additional keyfobs, contact your
NISSAN dealer.
The keyfob will not function when:
Ithe battery is dead,
Ithe distance between the vehicle and the
keyfob is over 33 ft (10 m).
The panic alarm and the rear hatch release
will not activate when the key is in the
ignition switch.
CAUTION
The following conditions or occurrences
will damage the keyfob.IDo not allow the keyfob to become
wet.
IDo not drop the keyfob.
IDo not strike the keyfob sharply
against another object.
IDo not place the keyfob for an ex-
tended period in an area where tem-
peratures exceed 140ÉF (60ÉC).
If a keyfob is lost or stolen, NISSAN
recommends erasing the ID code of that
keyfob. This will prevent the keyfob
from unauthorized use to unlock the
vehicle. For information regarding the
erasing procedure, please contact a
NISSAN dealer.
SPA1505
REMOTE KEYLESS ENTRY
SYSTEM
3-4
Pre-driving checks and adjustments
Z
02.9.13/Z33-D/V5.0
X
Page 88 of 227

LOCK button again for 3 more seconds.Releasing the rear hatch1. Push the REAR HATCH button on the keyfob
for longer than 0.5 seconds with the key
removed from the ignition key cylinder.
2. The rear hatch opens.Using the panic alarmIf you are near your vehicle and feel threatened,
you may activate the alarm to call attention as
follows:
1. Push the PANIC button on the keyfob for
longer than 0.5 secondswith the key
removed from the ignition key cylinder.
2. The theft warning alarm and headlights will
stay on for 30 seconds.
3. The panic alarm stops when:
IIt has run for 30 seconds, or
IThe LOCK or the UNLOCK button is
pressed, or
IThe PANIC or the REAR HATCH button is
pushed on the keyfob for longer than 0.5
seconds.
BATTERY REPLACEMENTReplace the battery as follows:
1. Open the lid using a suitable tool.
2. Replace the battery with a new one.Recommended battery: CR2025 or equiva-
lent
Make sure that theÅside faces the
bottom case.
3. Close the lid securely.
4. Push the keyfob button two or three times to
check its operation.
See your NISSAN dealer if you need any assis-
tance for replacement.
If the battery is removed for any reason
other than replacement, perform step 4
above.
IBe careful not to touch the circuit board
and the battery terminal.
IAn improperly disposed battery can
harm the environment. Always confirm
local regulations for battery disposal.
IThe keyfob is water-resistant; however,
if it gets wet, immediately wipe it com-
pletely dry.
IWhen changing batteries, do not let
dust or oil get on the keyfob.
FCC Notice:
Changes or modifications not expressly
approved by the manufacturer compliance
SPA1374
Pre-driving checks and adjustments
3-7
Z
02.9.13/Z33-D/V5.0
X
Page 91 of 227

SECONDARY REAR HATCH
RELEASEThe secondary rear hatch release mechanism
allows opening the rear hatch in the event of
discharged battery or emergency.
The string handle is located under the strut
tower bar inside the luggage compartment.
To open the rear hatch from the inside,
firmly pull the release handle to the direc-
tion shown above until the lock releases.
OPENER OPERATIONTo open the fuel filler lid, push the opener switch.
To lock, close the fuel filler lid securely.
SPA1556
SPA1508
FUEL FILLER LID
3-10
Pre-driving checks and adjustments
Z
02.9.13/Z33-D/V5.0
X
Page 108 of 227
SCAN tuning:
Push the SCAN tuning button to tune from low
to high frequencies and stops at each broad-
casting station for 5 seconds. Pushing the but-
ton again during this 5 second period will stop
SCAN tuning and the radio will remain tuned to
that station.
If the SCAN tuning button is not pushed within 5
seconds, SCAN tuning moves to the next sta-
tion.
Station memory operations:
Twelve stations can be set for the FM band (six
for FM1, six for FM2) and six stations can be set
for the AM band.
1. Tune to the desired station using the SEEK,
SCAN or TUNE button.
2. Select the desired station and keep pushing
any of the desired station select buttons (1 to
6) until a beep sound is heard. (The radio
mutes when the select button is pushed.)
3. The channel indicator will then come on and
the sound will resume. Memorizing is now
complete.
4. Other buttons can be set in the same manner.
If the battery cable is disconnected, or if the fuse
blows, the radio memory will be cancelled. Inthat case, reset the desired stations.
Compact disc (CD) player operationTurn the ignition key to the ACC or ON position
and insert the compact disc into the slot with the
label side facing up. The compact disc will be
guided automatically into the slot and start play-
ing.
After loading the disc, the number of tracks on
the disc will appear on the display.
If the radio is already operating, it will automati-
cally turn off and the compact disc will play.
CAUTION
Do not force the compact disc into the
slot. This could damage the player.
If the system has been turned off while the
compact disc was playing, pushing the
ON×OFF/VOL control knob will start the com-
pact disc.
8 cm diameter compact discs can also be used
without an adapter.
CD PLAY:
When the CD (CD play) button is pushed with
the system off and the compact disc loaded, thesystem will turn on and the compact disc will
start to play.
When the CD button is pushed with the com-
pact disc loaded but the radio playing, the radio
will automatically be turned off and the compact
disc will start to play.
DISP CD PLAY TIME:
Push the DISP button for less than 1.5 seconds
while the compact disc is being played to show
the play time on the display.
FF (Fast Forward), REW
(Rewind):
When the(fast forward) or
(rewind)
button is pushed while the compact disc is
being played, the compact disc will play while
fast forwarding or rewinding. When the button is
released, the compact disc will return to normal
play speed.
APS (Automatic Program
Search) FF, APS REW:
When the(APS FF) button is pushed
while the compact disc is being played, the
program next to the present one will start to play
from its beginning. Push several times to skip
through programs. The compact disc will ad-
vance the number of times the button is pushed.
(When the last program on the compact disc is
Heater, air conditioner and audio systems
4-11
Z
02.9.13/Z33-D/V5.0
X
Page 112 of 227
change from stereo to monaural reception.
TUNE (Tuning):WARNING
The radio should not be tuned while
driving so full attention may be given to
vehicle operation.
Use the TUNE button
or
for manual
tuning. To move quickly through the channels,
hold either side of the TUNE button down for
more than 0.5 seconds.
SEEK tuning:
Push the SEEK button
or
to tune
from high to low or low to high frequencies and
stops at the next broadcasting station.
SCAN tuning:
Push the SCAN tuning button to tune from low
to high frequencies and stops at each broad-
casting station for 5 seconds. Pushing the but-
ton again during this 5 second period will stop
SCAN tuning and the radio will remain tuned to
that station.
If the SCAN tuning button is not pushed within 5seconds, SCAN tuning moves to the next sta-
tion.
Station memory operations:
Twelve stations can be set for the FM band (six
for FM1, six for FM2) and six stations can be set
for the AM band.
1. Tune to the desired station using the SEEK,
SCAN or TUNE button.
2. Select the desired station and keep pushing
any of the desired station and preset buttons
(1 to 6) until a beep sound is heard. (The
radio mutes when the station and preset
button is pushed.)
3. The channel indicator will then come on and
the sound will resume. Memorizing is now
complete.
4. Other buttons can be set in the same manner.
If the battery cable is disconnected, or if the fuse
blows, the radio memory will be cancelled. In
that case, reset the desired stations.
Program type:
When PTY button is pressed during FM mode,
the PTY name of the current tuned station is
displayed. During this time if the PTY data code
is zero, or the data is unreadable; the display will
show NONE.1. PTY selection mode
PTY name selection can be done by the
up/down TUNE button
or
in the
PTY selection mode.
It is possible to shift the PTY name by one
step, with one push of the up/down TUNE
button
or
.
PTY name selection can also be achieved by
pressing the preset buttons.
Initial PTY names are stored in the preset
buttons; but these can be changed by press-
ing the preset buttons for more than 1.5
seconds when the desired PTY name is in the
display.
Heater, air conditioner and audio systems
4-15
Z
02.9.13/Z33-D/V5.0
X
Page 118 of 227

5 Starting and drivingPrecautions when starting and driving ............................. 5-2
Exhaust gas (Carbon monoxide) .................................. 5-2
Three way catalyst ........................................................... 5-3
Low tire pressure warning system
(if so equipped) ................................................................ 5-3
Avoiding collision and rollover ...................................... 5-4
Drinking alcohol/drugs and driving .............................. 5-5
Ignition switch ......................................................................... 5-5
Automatic transmission................................................... 5-5
Manual transmission ........................................................ 5-6
Key positions ..................................................................... 5-7
Nissan vehicle immobilizer system (NVIS)................. 5-7
Before starting the engine ................................................... 5-8
Starting the engine ................................................................ 5-8
Driving the vehicle ................................................................. 5-9
Automatic transmission................................................... 5-9
Manual transmission ..................................................... 5-12
Parking brake........................................................................ 5-14
Cruise control (if so equipped)........................................ 5-15
Precautions on cruise control .................................... 5-15Cruise control operations ............................................ 5-16
Break-in schedule ............................................................... 5-17
Increasing fuel economy .................................................... 5-17
Parking/parking on hills...................................................... 5-18
Power steering ..................................................................... 5-19
Brake system ........................................................................ 5-20
Braking precautions ...................................................... 5-20
Anti-lock brake system (ABS) .................................... 5-20
Traction control system (TCS) (if so equipped).......... 5-22
Vehicle dynamic control (VDC) system
(if so equipped) .................................................................. 5-22
Cold weather driving .......................................................... 5-24
Freeing a frozen door lock .......................................... 5-24
Anti-freeze ....................................................................... 5-24
Battery .............................................................................. 5-24
Draining of coolant water ............................................ 5-24
Tire equipment................................................................ 5-24
Special winter equipment ............................................ 5-24
Driving on snow or ice ................................................. 5-25
Engine block heater (if so equipped) ....................... 5-25
Z
02.9.13/Z33-D/V5.0
X