2003 NISSAN 350Z stop start
[x] Cancel search: stop startPage 48 of 227

temperature displayed on various signs or bill-
boards.Distance to empty (dte Ð mile or km)The distance to empty (dte) mode provides you
with an estimation of the distance that can be
driven before refueling. The dte is constantly
being calculated, based on the amount of fuel in
the fuel tank and the actual fuel consumption.
The display is updated every 30 seconds.
The dte mode includes a low range warning
feature: when the fuel level is low, the dte mode
is automatically selected and the digits blink in
order to draw the driver's attention. Press the
mode switch
qAif you wish to return to the mode
that was selected before the warning occurred.
The dte indicator will remain blinking until the
vehicle is refuelled.
When the fuel level drops even lower, the dte
display will change to (----).
NOTE:
IIf the amount of fuel added while the
ignition switch is OFF is small, the dis-
play just before the ignition switch is
turned OFF may continue to be dis-
played.
IWhen driving uphill or rounding curves,
the fuel in the tank shifts, which maymomentarily change the display.
Average fuel consumption
(Mpg or l/100 km)The average fuel consumption mode shows the
average fuel consumption since the last reset.
Resetting is done by pressing the trip computer
setting switch
qB
for more than approximately 1
second. (The average speed is also reset at the
same time.)
The display is updated every 30 seconds. At
about the first 1/3 miles (500 m) after a reset,
the display shows (----).
Average speed (MPH or km/h)The average speed mode shows the average
vehicle speed since the last reset. Resetting is
done by pressing the setting switch
qB
for more
than approximately 1 second. (The average fuel
consumption is also reset at the same time.)
The display is updated every 30 seconds. The
first 30 seconds after a reset, the display shows
(----).
Elapsed time (h:m:s)The elapsed time mode shows the time since the
last reset. The displayed time can be reset by
pressing the trip computer setting switch
qB
for
more than approximately 1 second. (The tripodometer is also reset at the same time.)
Trip odometer (MLS or km)The trip odometer mode shows the total dis-
tance the vehicle has been driven since the last
reset. Resetting is done by pressing the setting
switch
qBfor more than approximately 1 second.
(The elapsed time is also reset at the same time.)
Stopwatch (h:m:s)You can use the trip computer as a stopwatch.
Each time the trip computer setting switch
qB
is
pressed, the stopwatch will be operated as
follows:
After 100 hours, the time will start from the reset
display again.
Even if the display is switched to the other mode
while the time is starting, the stopwatch contin-
ues to advance until you stop the time in the
stopwatch mode. When the ignition switch is
turned OFF, the time is reset.Tire pressure indicator (PSI) (if so
equipped)The tire pressure indicator shows tire pressure
(0 - 51 psi) of all wheels (except the spare tire)
Instruments and controls
2-9
Z
02.9.13/Z33-D/V5.0
X
Page 52 of 227
immediatelyand call a NISSAN dealer or other
authorized repair shop.
The engine oil pressure warning light is not
designed to indicate a low oil level. Use the
dipstick to check the oil level.See ªEngine
oilº in the ª8. Maintenance and do-it-yourselfº
section.
CAUTION
Running the engine with the engine oil
pressure warning light on could cause
serious damage to the engine almost
immediately. Turn off the engine as
soon as it is safe to do so.
Low tire pressure warning light
(if so equipped)
The light comes on for about 1 second when the
key switch is turned ON, and then it turns off.
If the vehicle is being driven with a flat tire or
extremely low tire pressure, the light will illumi-
nate. Also a chime will sound for about 10
seconds if a tire is flat.
For additional information, see ªLow tire pres-
sure warning systemº in the ª5. Starting and
drivingº section and ªFlat tireº in the ª6. In caseof emergencyº section. Also, you can check the
tire pressure of all 4 tires on the trip computer
display. See ªTrip computerº earlier in this sec-
tion.
WARNING
IIf the light does not come on with the
key switch turned ON, have the ve-
hicle checked by a NISSAN dealer as
soon as possible.
IIf the light comes on while driving,
avoid sudden steering maneuvers or
abrupt braking, reduce vehicle speed,
pull off the road to a safe location
and stop the vehicle as soon as pos-
sible. Serious vehicle damage could
occur and may lead to an accident
and could result in serious personal
injury. Check the pressure for all four
tires and adjust the pressure to the
COLD tire pressure shown on the tire
placard. If the light still comes on
while driving after adjusting the tire
pressure, a tire may be flat. If you
have a flat tire, replace it with a spare
tire as soon as possible.IWhen a spare tire is mounted or a
wheel is replaced, tire pressure will
not be indicated and the low tire
pressure warning system will not
function. Contact your NISSAN
dealer as soon as possible for tire
replacement and/or system reset-
ting.
CAUTION
IThe low tire pressure warning is not a
substitute for the regular tire pres-
sure check. Be sure to check the tire
pressure regularly.
IIf the vehicle is being driven at
speeds of less than 20 MPH (32
km/h), the low tire pressure warning
system may not operate correctly.
IBe sure to install the specified size
for the front and rear tires.
Low washer fluid warning light
This light comes on when the washer tank fluid is
Instruments and controls
2-13
Z
02.9.13/Z33-D/V5.0
X
Page 60 of 227

To defog/defrost the rear window glass and
outside mirrors (if so equipped), start the engine
and push the switch on. The indicator light will
come on. Push the switch again to turn the
defroster off.
It will automatically turn off in approximately 15
minutes.
CAUTION
When cleaning the inner side of the rear
window, be careful not to scratch or
damage the rear window defroster.
XENON HEADLIGHTS (if so
equipped)
WARNINGHIGH VOLTAGE
IWhen xenon headlights are on, they
produce a high voltage. To prevent an
electric shock, never attempt to
modify or disassemble. Always have
your xenon headlights replaced at a
NISSAN dealer.
IXenon headlights provide consider-
ably more light than conventional
headlights. If they are not correctly
aimed, they might temporarily blind
an oncoming driver or the driver
ahead of you and cause a serious
accident. If headlights are not aimed
correctly, immediately take your ve-
hicle to a NISSAN dealer and have
the headlights adjusted correctly.
When the xenon headlight is initially turned on,
its brightness or color varies slightly. However,
the color and brightness will soon stabilize.IThe life of xenon headlights will be
shortened by frequent on-off operation.
It is generally desirable not to turn off
the headlights for short intervals (for
example, when the vehicle stops at a
traffic signal). Even when the daytime
running lights are active (Canada only),
the xenon headlights do not turn on.
This way the life of the xenon headlights
is not reduced.
IIf the xenon headlight bulb is close to
burning out, the brightness will drasti-
cally decrease, the light will start blink-
ing, or the color of the light will become
reddish. If one or more of the above
signs appear, contact a NISSAN dealer.
SIC1960
REAR WINDOW AND OUTSIDE
MIRROR (if so equipped)
DEFROSTER SWITCHHEADLIGHT AND TURN SIGNAL
SWITCH
Instruments and controls
2-21
Z
02.9.13/Z33-D/V5.0
X
Page 87 of 227
*2: Doors lock with the keyfob while the ignition
switch is in the ON position. However, the
hazard indicator and horn will not function.
*3: Doors lock with the keyfob while any door is
open. However, the hazard indicator and
horn will not function.
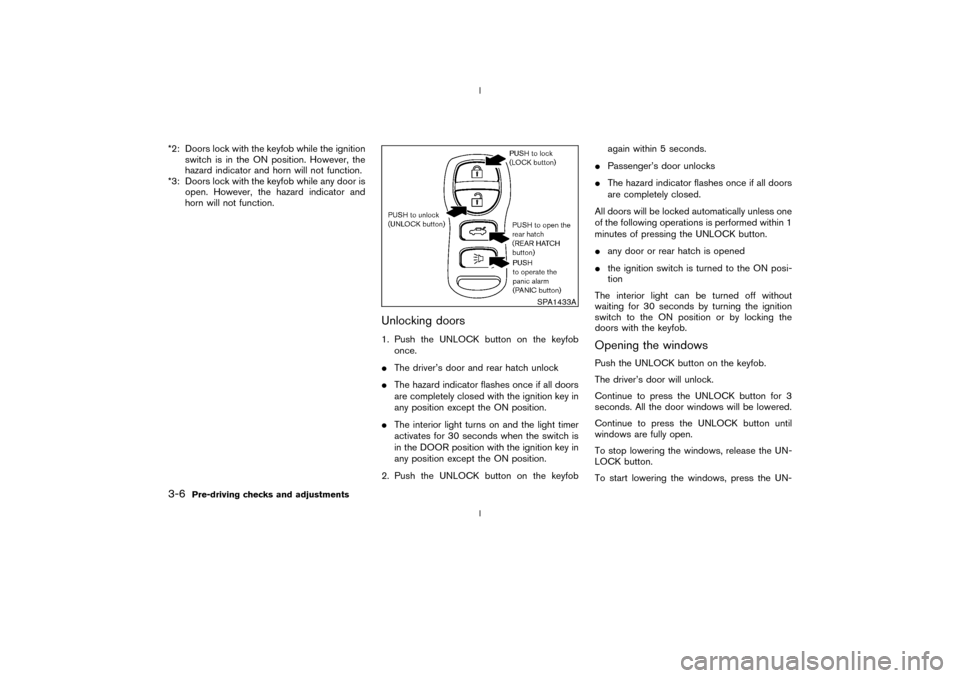
Unlocking doors1. Push the UNLOCK button on the keyfob
once.
IThe driver's door and rear hatch unlock
IThe hazard indicator flashes once if all doors
are completely closed with the ignition key in
any position except the ON position.
IThe interior light turns on and the light timer
activates for 30 seconds when the switch is
in the DOOR position with the ignition key in
any position except the ON position.
2. Push the UNLOCK button on the keyfobagain within 5 seconds.
IPassenger's door unlocks
IThe hazard indicator flashes once if all doors
are completely closed.
All doors will be locked automatically unless one
of the following operations is performed within 1
minutes of pressing the UNLOCK button.
Iany door or rear hatch is opened
Ithe ignition switch is turned to the ON posi-
tion
The interior light can be turned off without
waiting for 30 seconds by turning the ignition
switch to the ON position or by locking the
doors with the keyfob.
Opening the windowsPush the UNLOCK button on the keyfob.
The driver's door will unlock.
Continue to press the UNLOCK button for 3
seconds. All the door windows will be lowered.
Continue to press the UNLOCK button until
windows are fully open.
To stop lowering the windows, release the UN-
LOCK button.
To start lowering the windows, press the UN-
SPA1433A
3-6
Pre-driving checks and adjustments
Z
02.9.13/Z33-D/V5.0
X
Page 108 of 227
SCAN tuning:
Push the SCAN tuning button to tune from low
to high frequencies and stops at each broad-
casting station for 5 seconds. Pushing the but-
ton again during this 5 second period will stop
SCAN tuning and the radio will remain tuned to
that station.
If the SCAN tuning button is not pushed within 5
seconds, SCAN tuning moves to the next sta-
tion.
Station memory operations:
Twelve stations can be set for the FM band (six
for FM1, six for FM2) and six stations can be set
for the AM band.
1. Tune to the desired station using the SEEK,
SCAN or TUNE button.
2. Select the desired station and keep pushing
any of the desired station select buttons (1 to
6) until a beep sound is heard. (The radio
mutes when the select button is pushed.)
3. The channel indicator will then come on and
the sound will resume. Memorizing is now
complete.
4. Other buttons can be set in the same manner.
If the battery cable is disconnected, or if the fuse
blows, the radio memory will be cancelled. Inthat case, reset the desired stations.
Compact disc (CD) player operationTurn the ignition key to the ACC or ON position
and insert the compact disc into the slot with the
label side facing up. The compact disc will be
guided automatically into the slot and start play-
ing.
After loading the disc, the number of tracks on
the disc will appear on the display.
If the radio is already operating, it will automati-
cally turn off and the compact disc will play.
CAUTION
Do not force the compact disc into the
slot. This could damage the player.
If the system has been turned off while the
compact disc was playing, pushing the
ON×OFF/VOL control knob will start the com-
pact disc.
8 cm diameter compact discs can also be used
without an adapter.
CD PLAY:
When the CD (CD play) button is pushed with
the system off and the compact disc loaded, thesystem will turn on and the compact disc will
start to play.
When the CD button is pushed with the com-
pact disc loaded but the radio playing, the radio
will automatically be turned off and the compact
disc will start to play.
DISP CD PLAY TIME:
Push the DISP button for less than 1.5 seconds
while the compact disc is being played to show
the play time on the display.
FF (Fast Forward), REW
(Rewind):
When the(fast forward) or
(rewind)
button is pushed while the compact disc is
being played, the compact disc will play while
fast forwarding or rewinding. When the button is
released, the compact disc will return to normal
play speed.
APS (Automatic Program
Search) FF, APS REW:
When the(APS FF) button is pushed
while the compact disc is being played, the
program next to the present one will start to play
from its beginning. Push several times to skip
through programs. The compact disc will ad-
vance the number of times the button is pushed.
(When the last program on the compact disc is
Heater, air conditioner and audio systems
4-11
Z
02.9.13/Z33-D/V5.0
X
Page 113 of 227
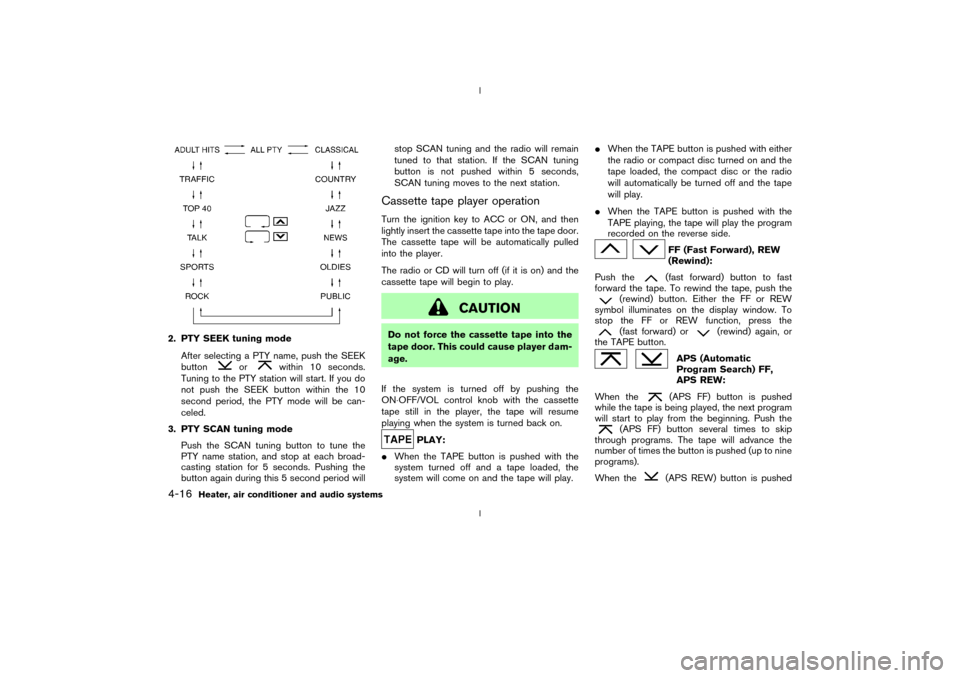
2. PTY SEEK tuning mode
After selecting a PTY name, push the SEEK
button
or
within 10 seconds.
Tuning to the PTY station will start. If you do
not push the SEEK button within the 10
second period, the PTY mode will be can-
celed.
3. PTY SCAN tuning mode
Push the SCAN tuning button to tune the
PTY name station, and stop at each broad-
casting station for 5 seconds. Pushing the
button again during this 5 second period willstop SCAN tuning and the radio will remain
tuned to that station. If the SCAN tuning
button is not pushed within 5 seconds,
SCAN tuning moves to the next station.
Cassette tape player operationTurn the ignition key to ACC or ON, and then
lightly insert the cassette tape into the tape door.
The cassette tape will be automatically pulled
into the player.
The radio or CD will turn off (if it is on) and the
cassette tape will begin to play.
CAUTION
Do not force the cassette tape into the
tape door. This could cause player dam-
age.
If the system is turned off by pushing the
ON×OFF/VOL control knob with the cassette
tape still in the player, the tape will resume
playing when the system is turned back on.
PLAY:
IWhen the TAPE button is pushed with the
system turned off and a tape loaded, the
system will come on and the tape will play.IWhen the TAPE button is pushed with either
the radio or compact disc turned on and the
tape loaded, the compact disc or the radio
will automatically be turned off and the tape
will play.
IWhen the TAPE button is pushed with the
TAPE playing, the tape will play the program
recorded on the reverse side.
FF (Fast Forward), REW
(Rewind):
Push the(fast forward) button to fast
forward the tape. To rewind the tape, push the
(rewind) button. Either the FF or REW
symbol illuminates on the display window. To
stop the FF or REW function, press the(fast forward) or
(rewind) again, or
the TAPE button.
APS (Automatic
Program Search) FF,
APS REW:
When the(APS FF) button is pushed
while the tape is being played, the next program
will start to play from the beginning. Push the
(APS FF) button several times to skip
through programs. The tape will advance the
number of times the button is pushed (up to nine
programs).
When the
(APS REW) button is pushed
4-16
Heater, air conditioner and audio systems
Z
02.9.13/Z33-D/V5.0
X
Page 114 of 227
once, the program being played starts over from
the beginning. Push the
(APS REW) but-
ton several times to skip back several selections.
The tape will go back the number of times the
button is pushed. Either the FF or REW symbol
flashes on the display window while searching
for the selection.
This system searches for the blank intervals
between selections. If there is a blank interval
within one program or there is no interval be-
tween programs, the system may not stop in the
desired or expected location.
SCAN tuning:
Push the SCAN tuning button while playing
tape, and it stops at the next tape program for 5
seconds. Pushing the button again during this 5
second period will stop SCAN tuning and the
tape program is continued. If the SCAN tuning
button is not pushed within 5 seconds, SCAN
tuning moves to the next tape program.TAPE EJECT:
When this button is pushed with the tape
loaded, the tape will be ejected.
When the tape is ejected while it is being played,
the system will be turned off.
Compact disc (CD) changer
operationTurn the ignition key to the ACC or ON position,
push the LOAD button and insert the compact
disc into the slot with the label side facing up.
The compact disc will be guided automatically
into the slot and start playing.
After loading the disc, the number of tracks on
the disc will appear on the display.
If the radio or tape is already operating, it will
automatically turn off and the compact disc will
play.
CAUTION
IDo not force the compact disc into
the slot. This could damage the
player.
IDo not use 3.1 in (8 cm) discs.
If the system has been turned off while the
compact disc was playing, pushing the
ON×OFF/VOL control knob will start the com-
pact disc.
CD LOAD:
To insert a CD in the CD changer, push the
LOAD button for less than 1.5 seconds. Selectthe loading slot by pushing the CD insert select
button (1 to 6), then insert the CD.
To insert 6 CDs to the CD changer in succes-
sion, push the LOAD button for more than 1.5
seconds.
The inserted slot numbers will illuminate on the
display.
CD PLAY:
When the
(CD play) button is pushed with
the system off and the compact disc loaded, the
system will turn on and the compact disc will
start to play.
When thebutton is pushed with the com-
pact disc loaded but the tape or the radio
playing, the tape or radio will automatically be
turned off and the compact disc will start to play.
DISP CD PLAY TIME:
Push the DISP button for less than 1.5 seconds
while the compact disc is being played to show
the play time on the display.
FF (Fast Forward), REW
(Rewind):
When the(fast forward) or
(rewind)
button is pushed while the compact disc is
being played, the compact disc will play while
fast forwarding or rewinding. When the button is
Heater, air conditioner and audio systems
4-17
Z
02.9.13/Z33-D/V5.0
X
Page 115 of 227

released, the compact disc will return to normal
play speed.
APS (Automatic Program
Search) FF, APS REW:
When the(APS FF) button is pushed
while the compact disc is being played, the
program next to the present one will start to play
from its beginning. Push several times to skip
through programs. The compact disc will ad-
vance the number of times the button is pushed.
(When the last program on the compact disc is
skipped through, the first program will be
played.) When the
(APS REW) button is
pushed, the program being played returns to its
beginning. Push several times to skip back
through programs. The compact disc will go
back the number of times the button is pushed.
CD PLAY select button:
To change CD, push the CD play select button
(1 to 6).
SCAN tuning:
When the SCAN tuning button is pushed for
less than 1.5 seconds while the CD is being
played, the beginning of all the tracks of CDs will
be played for 10 seconds in sequence.
When the SCAN tuning button is pushed for
more than 1.5 seconds while the CD is beingplayed, the first program in all the CDs will be
played for 10 seconds.
Pushing the button again during this 10 second
period will stop SCAN tuning.
If the SCAN tuning button is not pushed within
10 seconds, SCAN tuning moves to the next
disc program.
REPEAT (RPT):
When the RPT play button is pushed while the
compact disc is played, the play pattern can be
changed as follows:
The display shows the following symbols.
(no mark): ALL CD RPT (Repeat)
1DISC: 1 CD RPT
1: 1 TR (Track) RPT
MIX: ALL CD MIX
1DISC MIX: 1 CD MIX
CD EJECT:
When the CD EJECT button is pushed with the
compact disc loaded, the compact disc will be
ejected.To eject the discs selected by the CD select
button, push the EJECT button for less than 1.5
seconds.
To eject all the discs in succession, push the
EJECT button for more than 1.5 seconds.
When this button is pushed while the compact
disc is being played, the compact disc will come
out and the system will turn off.
If the compact disc comes out and is not
removed, it will be pulled back into the slot
to protect it.
CD IN indicator:
CD IN indicator (inserted slot number) appears
on the display when the CD is loaded with the
system on.
4-18
Heater, air conditioner and audio systems
Z
02.9.13/Z33-D/V5.0
X