2003 NISSAN 350Z key fob
[x] Cancel search: key fobPage 56 of 227

The security condition will be shown by the
security indicator light.VEHICLE SECURITY SYSTEMThe vehicle security system provides visual and
audio alarm signals if parts of the vehicle are
disturbed.How to activate the vehicle security
system1. Close all windows.
The system can be activated even if the
windows are open.2. Remove the key from the ignition switch.
3. Close and lock all doors, hood and rear
hatch.
Lock all doors by pressing the LOCK button
on the keyfob. When using the keyfob, the
hazard indicators flash twice to indicate all
doors are locked.
4. Confirm that the security indicator light
comes on. The security indicator light glows
for about 30 seconds and then blinks. The
system is now activated. If, during this 30
second time period, the door is unlocked by
the key or the keyfob, or the ignition key is
turned to ACC or ON, the system will not
activate.
IIf the key is turned slowly toward the
rear of the vehicle when locking the
door, the system may not activate. If the
key is returned beyond the vertical po-
sition toward the front of the vehicle to
remove the key, the system may be
deactivated. If the indicator light fails to
glow for 30 seconds, unlock the door
once and lock it again.
IEven when the driver and/or passengers
are in the vehicle, the system will acti-
vate with all doors, hood and rear hatch
locked and ignition key off. Turn theignition key to ACC to turn the system
off.
Vehicle security system operationThe security system will give the following alarm:
IThe headlights blink and the horn sounds
intermittently.
IThe alarm automatically turns off after ap-
proximately 1 minute. However, the alarm
reactivates if the vehicle is tampered with
again. The alarm can be shut off by unlocking
a door with the key, or by pressing the
UNLOCK button on the keyfob.
The alarm is activated by:
IOpening the door without using the key or
keyfob.
IOpening the rear hatch without using the rear
hatch release switch or keyfob.
IOpening the hood.How to stop alarmThe alarm will stop only by unlocking a door with
the key, or by pressing the UNLOCK button on
keyfob. The alarm will not stop if the ignition
switch is turned to ACC or ON.
If the system does not operate as de-
SIC1699
Instruments and controls
2-17
Z
02.9.13/Z33-D/V5.0
X
Page 74 of 227

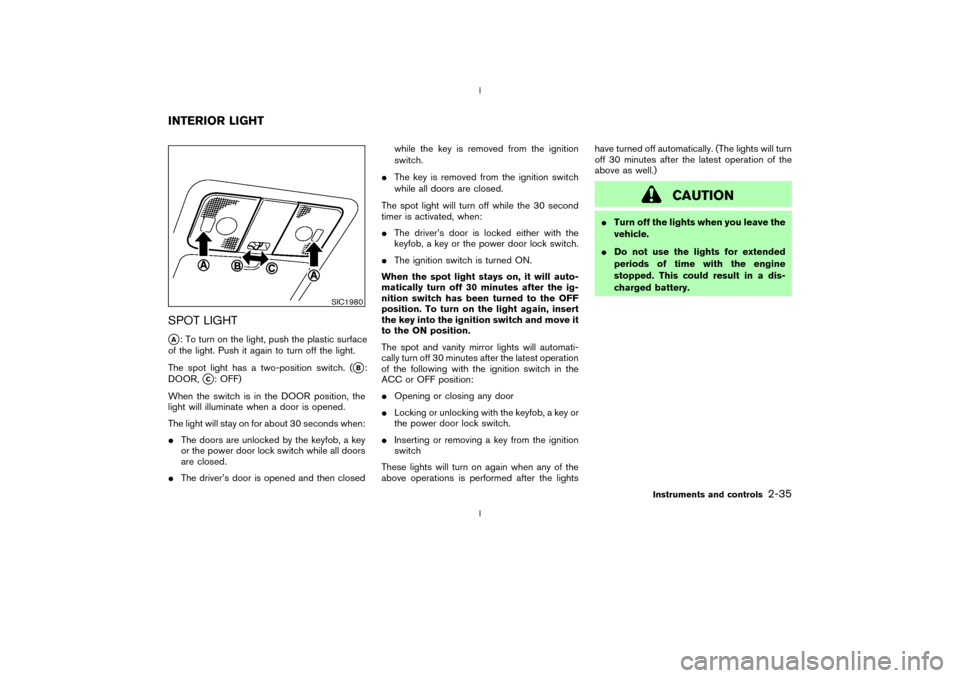
SPOT LIGHTqA: To turn on the light, push the plastic surface
of the light. Push it again to turn off the light.
The spot light has a two-position switch. (
qB:
DOOR,
qC: OFF)
When the switch is in the DOOR position, the
light will illuminate when a door is opened.
The light will stay on for about 30 seconds when:
IThe doors are unlocked by the keyfob, a key
or the power door lock switch while all doors
are closed.
IThe driver's door is opened and then closedwhile the key is removed from the ignition
switch.
IThe key is removed from the ignition switch
while all doors are closed.
The spot light will turn off while the 30 second
timer is activated, when:
IThe driver's door is locked either with the
keyfob, a key or the power door lock switch.
IThe ignition switch is turned ON.
When the spot light stays on, it will auto-
matically turn off 30 minutes after the ig-
nition switch has been turned to the OFF
position. To turn on the light again, insert
the key into the ignition switch and move it
to the ON position.
The spot and vanity mirror lights will automati-
cally turn off 30 minutes after the latest operation
of the following with the ignition switch in the
ACC or OFF position:
IOpening or closing any door
ILocking or unlocking with the keyfob, a key or
the power door lock switch.
IInserting or removing a key from the ignition
switch
These lights will turn on again when any of the
above operations is performed after the lightshave turned off automatically. (The lights will turn
off 30 minutes after the latest operation of the
above as well.)
CAUTION
ITurn off the lights when you leave the
vehicle.
IDo not use the lights for extended
periods of time with the engine
stopped. This could result in a dis-
charged battery.
SIC1980
INTERIOR LIGHT
Instruments and controls
2-35
Z
02.9.13/Z33-D/V5.0
X
Page 85 of 227

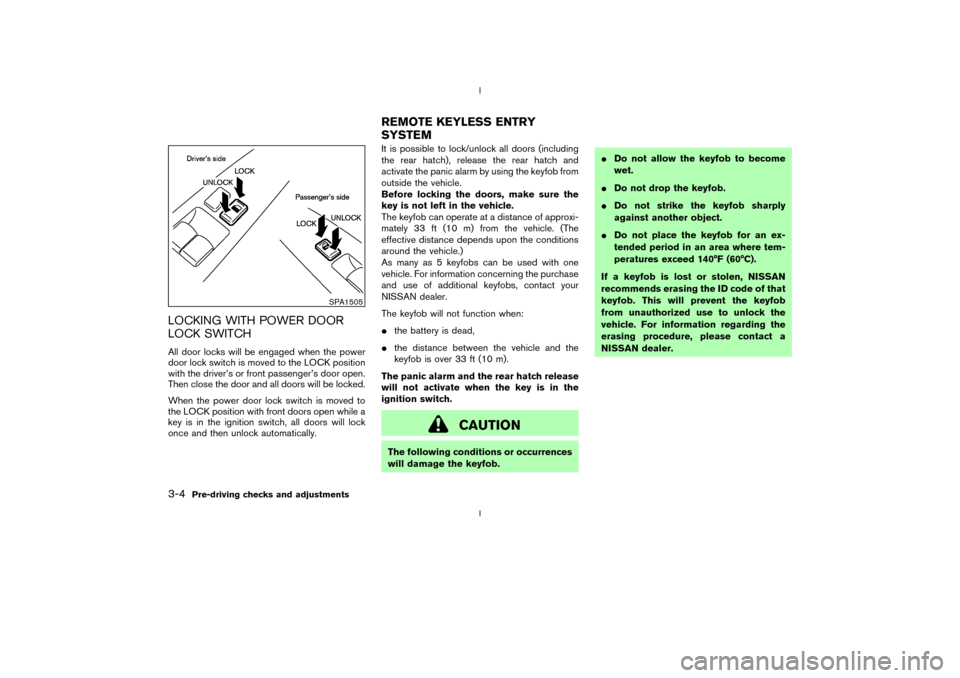
LOCKING WITH POWER DOOR
LOCK SWITCHAll door locks will be engaged when the power
door lock switch is moved to the LOCK position
with the driver's or front passenger's door open.
Then close the door and all doors will be locked.
When the power door lock switch is moved to
the LOCK position with front doors open while a
key is in the ignition switch, all doors will lock
once and then unlock automatically.It is possible to lock/unlock all doors (including
the rear hatch), release the rear hatch and
activate the panic alarm by using the keyfob from
outside the vehicle.
Before locking the doors, make sure the
key is not left in the vehicle.
The keyfob can operate at a distance of approxi-
mately 33 ft (10 m) from the vehicle. (The
effective distance depends upon the conditions
around the vehicle.)
As many as 5 keyfobs can be used with one
vehicle. For information concerning the purchase
and use of additional keyfobs, contact your
NISSAN dealer.
The keyfob will not function when:
Ithe battery is dead,
Ithe distance between the vehicle and the
keyfob is over 33 ft (10 m).
The panic alarm and the rear hatch release
will not activate when the key is in the
ignition switch.
CAUTION
The following conditions or occurrences
will damage the keyfob.IDo not allow the keyfob to become
wet.
IDo not drop the keyfob.
IDo not strike the keyfob sharply
against another object.
IDo not place the keyfob for an ex-
tended period in an area where tem-
peratures exceed 140ÉF (60ÉC).
If a keyfob is lost or stolen, NISSAN
recommends erasing the ID code of that
keyfob. This will prevent the keyfob
from unauthorized use to unlock the
vehicle. For information regarding the
erasing procedure, please contact a
NISSAN dealer.
SPA1505
REMOTE KEYLESS ENTRY
SYSTEM
3-4
Pre-driving checks and adjustments
Z
02.9.13/Z33-D/V5.0
X
Page 86 of 227

HOW TO USE REMOTE KEYLESS
ENTRY SYSTEM
Setting hazard indicator and horn
modeThis vehicle is set in hazard indicator and horn
mode when you first receive the vehicle.
In hazard indicator and horn mode, when the
LOCK button is pushed, the hazard indicator
flashes twice and the horn chirps once. When
the UNLOCK button is pushed, the hazard indi-
cator flashes once.
If hazard indicator and horn mode is not neces-sary, you can switch to hazard indicator only
mode by following the switching procedure.
In hazard indicator only mode, when the LOCK
button is pushed, the hazard indicator flashes
twice. When the UNLOCK button is pushed,
neither the hazard indicator nor the horn oper-
ates.
(Switching procedure)
Push the LOCK and UNLOCK buttons on the
keyfob simultaneously for more than 2 seconds
to switch from one mode to the other.
When pushing the buttons to set hazard indica-tor only mode, the hazard indicator flashes 3
times.
When pushing the buttons to set hazard indica-
tor and horn mode, the hazard indicator flashes
once and the horn chirps once.
Locking doors1. Remove the ignition key.*1 *2
2. Close all the doors.*3
3. Push the LOCK button on the keyfob.
4. All the doors will lock.
All of the doors will lock when the LOCK
button on the keyfob is pushed even
though a door remains open and/or the
ignition key is in the ON position.
5. The hazard indicator flashes twice and the
horn chirps once.
IWhen the LOCK button is pushed with all
doors locked, the hazard indicator flashes
twice and the horn chirps once as a reminder
that the doors are already locked.
*1: Doors lock with the keyfob while a key is in
the ignition switch. However, the panic
alarm and the rear hatch release will not
activate when the key is in the ignition
switch.
SPA1260
Pre-driving checks and adjustments
3-5
Z
02.9.13/Z33-D/V5.0
X
Page 87 of 227

*2: Doors lock with the keyfob while the ignition
switch is in the ON position. However, the
hazard indicator and horn will not function.
*3: Doors lock with the keyfob while any door is
open. However, the hazard indicator and
horn will not function.
Unlocking doors1. Push the UNLOCK button on the keyfob
once.
IThe driver's door and rear hatch unlock
IThe hazard indicator flashes once if all doors
are completely closed with the ignition key in
any position except the ON position.
IThe interior light turns on and the light timer
activates for 30 seconds when the switch is
in the DOOR position with the ignition key in
any position except the ON position.
2. Push the UNLOCK button on the keyfobagain within 5 seconds.
IPassenger's door unlocks
IThe hazard indicator flashes once if all doors
are completely closed.
All doors will be locked automatically unless one
of the following operations is performed within 1
minutes of pressing the UNLOCK button.
Iany door or rear hatch is opened
Ithe ignition switch is turned to the ON posi-
tion
The interior light can be turned off without
waiting for 30 seconds by turning the ignition
switch to the ON position or by locking the
doors with the keyfob.
Opening the windowsPush the UNLOCK button on the keyfob.
The driver's door will unlock.
Continue to press the UNLOCK button for 3
seconds. All the door windows will be lowered.
Continue to press the UNLOCK button until
windows are fully open.
To stop lowering the windows, release the UN-
LOCK button.
To start lowering the windows, press the UN-
SPA1433A
3-6
Pre-driving checks and adjustments
Z
02.9.13/Z33-D/V5.0
X
Page 88 of 227

LOCK button again for 3 more seconds.Releasing the rear hatch1. Push the REAR HATCH button on the keyfob
for longer than 0.5 seconds with the key
removed from the ignition key cylinder.
2. The rear hatch opens.Using the panic alarmIf you are near your vehicle and feel threatened,
you may activate the alarm to call attention as
follows:
1. Push the PANIC button on the keyfob for
longer than 0.5 secondswith the key
removed from the ignition key cylinder.
2. The theft warning alarm and headlights will
stay on for 30 seconds.
3. The panic alarm stops when:
IIt has run for 30 seconds, or
IThe LOCK or the UNLOCK button is
pressed, or
IThe PANIC or the REAR HATCH button is
pushed on the keyfob for longer than 0.5
seconds.
BATTERY REPLACEMENTReplace the battery as follows:
1. Open the lid using a suitable tool.
2. Replace the battery with a new one.Recommended battery: CR2025 or equiva-
lent
Make sure that theÅside faces the
bottom case.
3. Close the lid securely.
4. Push the keyfob button two or three times to
check its operation.
See your NISSAN dealer if you need any assis-
tance for replacement.
If the battery is removed for any reason
other than replacement, perform step 4
above.
IBe careful not to touch the circuit board
and the battery terminal.
IAn improperly disposed battery can
harm the environment. Always confirm
local regulations for battery disposal.
IThe keyfob is water-resistant; however,
if it gets wet, immediately wipe it com-
pletely dry.
IWhen changing batteries, do not let
dust or oil get on the keyfob.
FCC Notice:
Changes or modifications not expressly
approved by the manufacturer compliance
SPA1374
Pre-driving checks and adjustments
3-7
Z
02.9.13/Z33-D/V5.0
X
Page 90 of 227

WARNING
Do not drive with the rear hatch open.
This could allow dangerous exhaust
gases to be drawn into the vehicle. See
ªPrecautions when starting and drivingº
in the ª5. Starting and drivingº section
for exhaust gas.
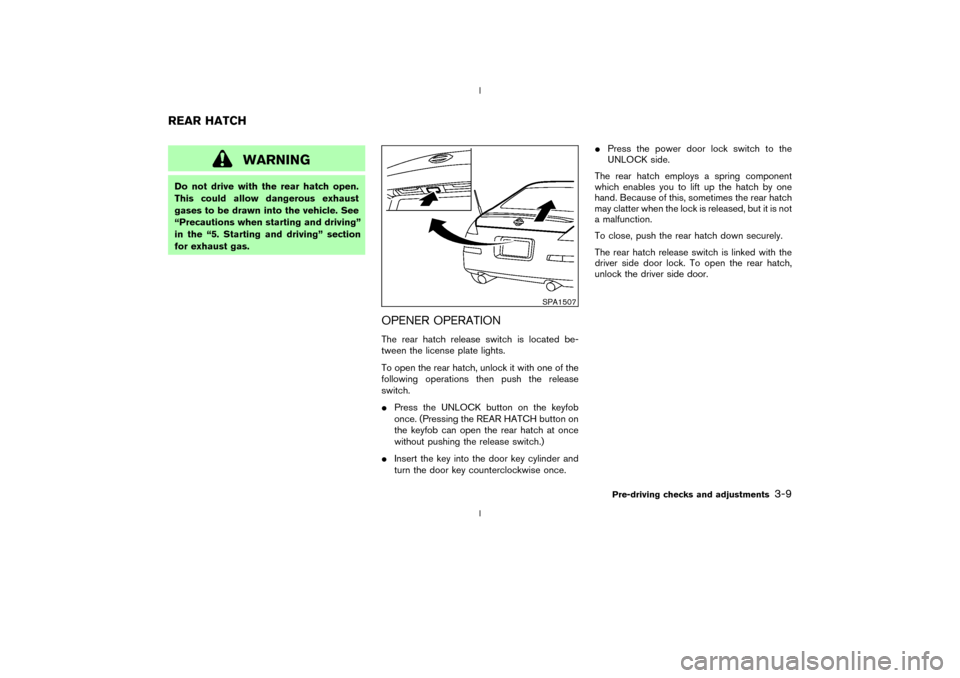
OPENER OPERATIONThe rear hatch release switch is located be-
tween the license plate lights.
To open the rear hatch, unlock it with one of the
following operations then push the release
switch.
IPress the UNLOCK button on the keyfob
once. (Pressing the REAR HATCH button on
the keyfob can open the rear hatch at once
without pushing the release switch.)
IInsert the key into the door key cylinder and
turn the door key counterclockwise once.IPress the power door lock switch to the
UNLOCK side.
The rear hatch employs a spring component
which enables you to lift up the hatch by one
hand. Because of this, sometimes the rear hatch
may clatter when the lock is released, but it is not
a malfunction.
To close, push the rear hatch down securely.
The rear hatch release switch is linked with the
driver side door lock. To open the rear hatch,
unlock the driver side door.
SPA1507
REAR HATCH
Pre-driving checks and adjustments
3-9
Z
02.9.13/Z33-D/V5.0
X
Page 162 of 227

8 Maintenance and do-it-yourselfMaintenance requirements .................................................. 8-2
General maintenance ............................................................ 8-2
Explanation of general maintenance items ................ 8-2
Maintenance precautions ..................................................... 8-5
Engine compartment check locations .............................. 8-7
Engine cooling system.......................................................... 8-8
Checking engine coolant level...................................... 8-8
Changing engine coolant ............................................... 8-9
Engine oil ............................................................................... 8-10
Checking engine oil level ............................................ 8-10
Changing engine oil and filter .................................... 8-10
Automatic transmission fluid ............................................. 8-12
Power steering fluid ............................................................ 8-13
Brake and clutch fluid ........................................................ 8-13
Brake fluid ....................................................................... 8-13
Clutch fluid ...................................................................... 8-14
Window washer fluid.......................................................... 8-14
Battery .................................................................................... 8-15
Jump starting .................................................................. 8-16
Drive belts ............................................................................. 8-17
Spark plugs ........................................................................... 8-17Replacing spark plugs.................................................. 8-17
Air cleaner ............................................................................. 8-18
Windshield wiper blades ................................................... 8-19
Cleaning ........................................................................... 8-19
Replacing ......................................................................... 8-20
Parking brake and brake pedal ........................................ 8-21
Checking parking brake ............................................... 8-21
Checking brake pedal .................................................. 8-21
Brake booster ................................................................. 8-22
Fuses ...................................................................................... 8-22
Engine compartment ..................................................... 8-22
Passenger compartment .............................................. 8-23
Keyfob battery replacement .............................................. 8-24
Lights ...................................................................................... 8-25
Headlights ....................................................................... 8-26
Exterior and interior lights............................................ 8-27
Wheels and tires ................................................................. 8-29
Tire pressure ................................................................... 8-29
Types of tires .................................................................. 8-30
Tire chains ....................................................................... 8-31
Changing wheels and tires ......................................... 8-31
Z
02.9.13/Z33-D/V5.0
X