Page 153 of 304

153 Controls in detail
Useful features
Programming or reprogramming the
integrated remote control�
Turn key in the steering lock to
position1 or2.
�
Hold the end of the hand-held transmit-
ter of the device you wish to train
approximately 2 to 5 inches (5 cm to
12 cm) away from the surface of the in-
tegrated remote control located on the
inside rear view mirror, keeping the in-
dicator lamp in view.
�
Using both hands, simultaneously push
the hand-held transmitter button and
the desired integrated remote control
button. Do not release the buttons until
completing next step.
�
The indicator lamp on the integrated
remote control will flash, first slowly
and then rapidly. The rapid flashing
lamp indicates successful program-
ming of the new frequency signal.
�
When the indicator lamp flashes rapid-
ly, release both buttons.
�
To program the remaining two buttons,
repeat the steps above.
iFor operation in the USA only: This de-
vice complies with Part 15 of the
FCC Rules. Operation is subject to the
following two conditions:
(1) This device may not cause harmful
interference, and
(2) this device must accept any inter-
ference received, including interfer-
ence that may cause undesired
operation.
Any unauthorized modification to this
device could void the user’s authority
to operate the equipment.
iIf, after several attempts, you do not
successfully program the integrated re-
mote control device to learn the signal
of the hand-held transmitter, the ga-
rage door opener could be equipped
with the “rolling code feature”.
Page 155 of 304
155 Controls in detail
Useful features
Operation of remote control�
Turn key in steering lock to position1
or2.
�
Select and press the appropriate but-
ton to activate the remote controlled
device.
The integrated remote control trans-
mitter continues to send the signal as
long as the button is pressed – up to
20 seconds.Erasing the remote control memory
�
Turn key in steering lock to position1
or2.
�
Simultaneously hold down the left and
right side buttons for approximately
20 seconds, or until the indicator lamp
blinks rapidly.
The codes of all three channels are
erased.iIf you sell your vehicle, erase the codes
of all three channels.
Page 161 of 304

161 Operation
Driving instructions
After hard braking, it is advisable to drive
on for some time, rather than immediately
parking, so that the air stream will cool
down the brakes faster.Driving off
Apply the brakes to test them briefly after
driving off. Perform this procedure only
when the road is clear of other traffic.
Warm up the engine smoothly. Do not
place full load on the engine until the oper-
ating temperature has been reached.
When starting off on a slippery surface, do
not allow one drive wheel to spin for an ex-
tended period with the ESP switched off.
Doing so may cause serious damage to the
drivetrain which is not covered by the
Mercedes-Benz Limited Warranty.
Parking
All checks and service work on the
brake system should be carried out by
an authorized Mercedes-Benz Center.
Install only brake pads and brake fluid
recommended by Mercedes-Benz.
Warning!
G
If other than recommended brake pads are
installed, or other than recommended brake
fluid is used, the braking properties of the
vehicle can be degraded to an extent that
safe braking is substantially impaired. This
could result in an accident.!When driving down long and steep
grades, relieve the load on the brakes
by shifting into a lower gear to use the
engine’s braking power. This helps pre-
vent overheating of the brakes and re-
duces brake pad wear.
!Simultaneously depressing the acceler-
ator pedal and applying the brake re-
duces engine performance and causes
premature brake and drivetrain wear.
Warning!
G
Do not park this vehicle in areas where com-
bustible materials such as grass, hay or
leaves can come into contact with the hot
exhaust system, as these materials could be
ignited and cause a vehicle fire.
To reduce the risk of personal injury as a re-
sult of vehicle movement, before turning off
the engine and leaving the vehicle always:�
Keep right foot on brake pedal.
�
Firmly depress parking brake pedal.
�
Move the selector lever to positionP
(manual transmission: first or reverse
gear).
�
Slowly release brake pedal.
�
When parked on an incline, turn front
wheels towards the road curb.
�
Turn the key to steering lock position0.
�
Take the key and lock vehicle when
leaving.
Page 169 of 304

169 Operation
At the gas station
At the gas station
The fuel filler flap is located on the
right-hand side of the vehicle towards the
rear. Locking/unlocking the vehicle with
the remote control automatically
locks/unlocks the fuel filler flap.
Fuel filler flap�
Remove the key from the steering lock.
�
Open the fuel filler flap by pushing at
the point indicated by the arrow.
The fuel filler flap springs open.
�
Turn the fuel cap to the left and hold on
to it until possible pressure is released.
�
Take off the cap and set it in the recess
on the fuel filler flap.
To prevent fuel vapors from escaping
into open air, fully insert filler nozzle
unit.
�
Only fill your tank until the filler nozzle
unit cuts out – do not top up or overfill.
�
Replace the fuel cap by turning it to the
right.
Warning!
G
Gasoline is highly flammable and poisonous.
It burns violently and can cause serious inju-
ry. Whenever you are around gasoline, avoid
inhaling fumes and skin contact, extinguish
all smoking materials. Never allow sparks,
flame or smoking materials near gasoline!
iUse only premium unleaded gasoline
with a minimum Posted Octane Rating
of 91 (average of 96 RON / 86 MON).
Information on gasoline quality can
normally be found on the fuel pump.
More information on gasoline can be
found in the Factory Approved Service
Products pamphlet.Warning!
G
Overfilling of the fuel tank may create pres-
sure in the system which could cause a gas
discharge. This could cause the gas to spray
back out when removing the fuel pump noz-
zle, which could cause personal injury.
��
Page 171 of 304

171 Operation
Engine compartment
Engine compartment
Hood
Opening
1Hood release
�
Pull hood release1 downwards.
The hood is unlocked.
2Lever for opening the hood
�
Push lever2 on the hood upwards.
�
Open the hood (do not pull up on the
lever) and then release it.
The hood will be automatically held
open at shoulder height by gas-filled
struts.
Warning!
G
Do not pull the release lever while the vehi-
cle is in motion. Otherwise the hood could
be forced open by passing air flow.
!To avoid damage to the windshield wip-
ers or hood, never open the hood if the
wiper arms are folded forward away
from the windshield.
Warning!
G
To help prevent personal injury, stay clear of
moving parts when the hood is open and the
engine is running. Make sure the hood is
properly closed before driving. When closing
the hood, use extreme caution not to catch
hands or fingers.
The radiator fan may continue to run for ap-
proximately 30 seconds or even restart af-
ter the engine has been turned off. Stay
clear of fan blades.
Page 172 of 304
.
The hood will lock audibly.
�
Check to make sure that the hood is
fully closed.
If you can rai")
172 OperationEngine compartment
Closing�
Let the hood drop from a height of ap-
proximately 1ft (30cm).
The hood will lock audibly.
�
Check to make sure that the hood is
fully closed.
If you can raise the hood at a point
above the headlamps, then it is not
properly closed. Open it again and let it
drop with somewhat greater force.
Engine oil
The amount of oil your engine needs will
depend on a number of factors, including
driving style. Higher oil consumption can
occur when�
the vehicle is new
�
the vehicle is driven frequently at high-
er engine speeds
Engine oil consumption checks should only
be made after the vehicle break-in period.
Checking engine oil level
When checking the oil level the vehicle
must
�
be parked on level ground
�
be at normal operating temperature
�
have been stationary for at least five
minutes with the engine turned off
Warning!
G
If you see flames or smoke coming from the
engine compartment, or if the coolant tem-
perature gauge indicates that the engine is
overheated, do not open the hood. Move
away from vehicle and do not open the hood
until the engine has cooled. If necessary,
call the fire department.Warning!
G
The engine is equipped with a transistorized
ignition system. Because of the high voltage
it is dangerous to touch any components (ig-
nition coils, spark plug sockets, diagnostic
socket) of the ignition system�
with the engine running
�
while starting the engine
�
if ignition is “on” and the engine is
turned manually
Warning!
G
Be careful that you do not close the hood on
anyone.
Page 173 of 304
173 Operation
Engine compartment
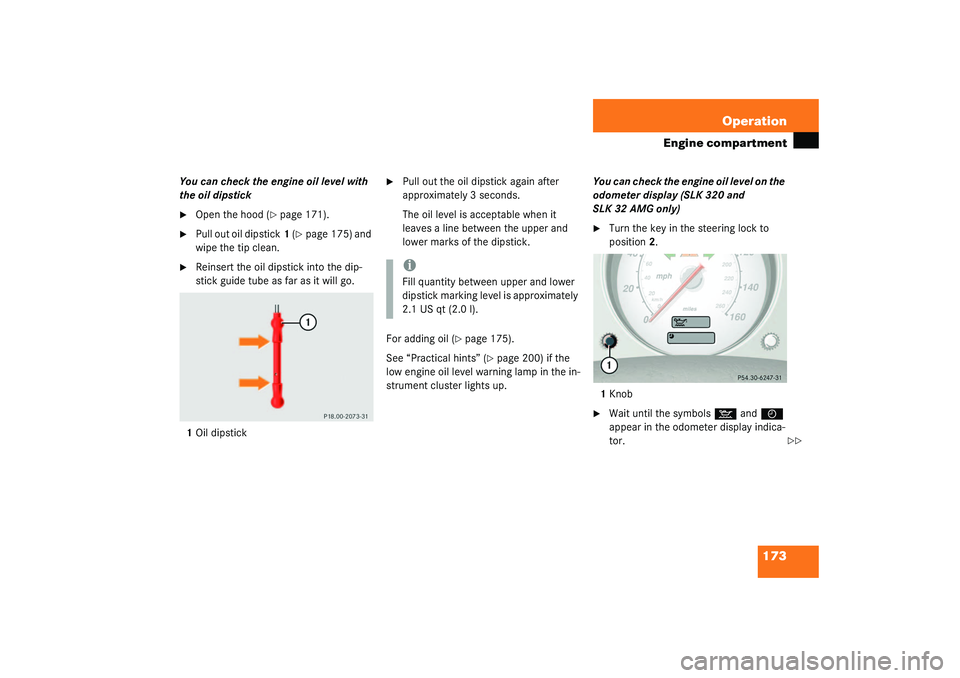
You can check the engine oil level with
the oil dipstick�
Open the hood (
�page 171).
�
Pull out oil dipstick1 (
�page 175) and
wipe the tip clean.
�
Reinsert the oil dipstick into the dip-
stick guide tube as far as it will go.
1Oil dipstick
�
Pull out the oil dipstick again after
approximately 3 seconds.
The oil level is acceptable when it
leaves a line between the upper and
lower marks of the dipstick.
For adding oil (
�page 175).
See “Practical hints” (
�page 200) if the
low engine oil level warning lamp in the in-
strument cluster lights up.You can check the engine oil level on the
odometer display (SLK 320 and
SLK 32 AMG only)
�
Turn the key in the steering lock to
position2.
1Knob
�
Wait until the symbols
:
and
I
appear in the odometer display indica-
tor.
iFill quantity between upper and lower
dipstick marking level is approximately
2.1 US qt (2.0 l).
��
Page 177 of 304

177 Operation
Engine compartment
�
Add coolant as required.
�
Turn the cap back, past the first detent
position, as far as it will go.
More information on coolant can be found
in the “Technical data” section
(
�page 273).
SLK 320, SLK 32 AMG1Coolant expansion tank
2Marker in the filler neck�
Using a rag, turn the cap slowly approx-
imately one half turn to the left to re-
lease any excess pressure.
�
Continue turning the cap to the left and
remove it.The coolant level is correct if the level
�
for cold coolant: the level must
reach marker2 in the filler neck of
the expansion tank.
�
for warm coolant: is approx. 0.6 in
(1.5 cm) higher
�
Add coolant as required.
�
Replace and tighten cap.
More information on coolant can be found
in the “Technical data” section
(
�page 273).
iThe drain plugs for the cooling system
are located on the right side of the en-
gine block and at the bottom of the ra-
diator.
iThe drain plugs for the cooling system
are located on the right side of the en-
gine block and at the bottom of the ra-
diator.