Page 197 of 304
197 Practical hints
What to do if …?
Problem
Possible cause
Suggested solution
1
The red SRS indicator lamp lights
up while driving.
There is a malfunction in the restraint sys-
tems. The airbags or emergency tensioning
device (ETDs) could deploy unexpectedly or
fail to activate in an accident.
�
Drive with added caution to the
nearest authorized Mercedes-Benz
Center.
Warning!
G
In the event a malfunction of the SRS is indi-
cated as outlined above, the SRS may not be
operational. For your safety, we strongly
recommend that you visit an authorized
Mercedes-Benz Center immediately to have
the system checked. Otherwise the SRS
may not be activated when needed in an ac-
cident, which could result in serious or fatal
injury, or it might deploy unexpectedly and
unnecessarily which could also result in an
accident and/or injury to you or to others.
Page 198 of 304

;
(except Canada)The red brake warning lamp
lights up while driving and you
hear a warning sound.
You a")
198 Practical hintsWhat to do if …?Problem
Possible cause
Suggested solution
3
(Canada only)
;
(except Canada)The red brake warning lamp
lights up while driving and you
hear a warning sound.
You are driving with the parking brake set.
�
Release the parking brake
(�page 42).
3
(Canada only)
;
(except Canada)The red brake warning lamp
lights up while driving.
There is insufficient brake fluid in the reser-
voir.
�
Risk of accident! Carefully stop the
vehicle and notify an authorized
Mercedes-Benz Center. Do not add
brake fluid! This will not solve the
problem.
Warning!
G
Driving with the brake warning lamp illumi-
nated can result in an accident. Have your
brake system checked immediately if the
brake warning lamp stays on. Don’t add
brake fluid before checking the brake sys-
tem.
Overfilling the brake fluid reservoir can re-
sult in spilling brake fluid on hot engine
parts and the brake fluid catching fire. You
can be seriously burned.
!If you find that the brake fluid in the
brake fluid reservoir has fallen to the
minimum mark or below, have the
brake system checked for brake pad
thickness and leaks.
Page 200 of 304

200 Practical hintsWhat to do if …?When the low engine oil level warning lamp
does not go out after starting the engine,
or comes on while the engine is running
and at operating temperature, the engine
oil level has dropped to approximately the
minimum mark on the dipstick.When this occurs, the warning lamp will
first come on intermittently and then stay
on if the oil level drops further.
If no oil leaks are noted, continue to drive
to the nearest service station where the
engine oil should be topped to the “full”
mark on the dipstick with an approved oil.Problem
Possible cause
Suggested solution
_
The red telescoping steering
column* warning lamp remains
lit after starting the engine.
The adjustable steering column is not locked
properly.
�
Lock the steering column
(�page 34).
W
The yellow low windshield and
headlamp* washer system fluid
level warning lamp remains lit af-
ter starting the engine or lights
up while driving.
The fluid level has dropped to about
1/3 of
total reservoir capacity.
�
Add washer fluid (
�page 179).
N
The yellow low engine oil level
warning lamp remains lit after
starting the engine or lights up
while driving.
The engine oil level is too low.
�
Check the engine oil level
(�page 172) and add oil as required
(�page 175).
�
If you must add engine oil frequently,
have the engine checked for possible
leaks.!The low engine oil level warning light
should not be ignored. Extended driv-
ing with the light illuminated could re-
sult in serious engine damage that is
not covered by the Mercedes-Benz
Limited Warranty.
Page 201 of 304

201 Practical hints
What to do if …?
Problem
Possible cause
Suggested solution
The fuel reserve and fuel cap placement
warning lamp:�
lights up while driving
The fuel level has gone below the reserve
mark.
�
Refuel at the next gas station
(�page 169).
�
blinks
The fuel cap is not closed tight.
�
Check the fuel cap.
A fuel system leak has been detected.
�
Have the fuel system checked as soon
as possible by an authorized
Mercedes-Benz Center
B
The yellow low engine coolant
level warning lamp remains lit af-
ter starting the engine or lights
up while driving.
The coolant level is too low.
�
Add coolant (
�page 176).
�
If you have to add coolant frequently,
have the cooling system checked by
an authorized Mercedes-Benz Center.
Warning!
G
Do not spill antifreeze on hot engine parts.
Antifreeze contains ethylene glycol which
may burn if it comes into contact with hot
engine parts. You can be seriously burned.
!Do not ignore the low engine coolant
level warning light. Extended driving
with the light illuminated may cause
serious engine damage not covered by
the Mercedes-Benz Limited Warranty.
Do not drive without sufficient amount
of coolant in the cooling system. The
engine will overheat, causing major
engine damage.
Page 222 of 304

222 Practical hintsReplacing bulbsRear lamps Notes on bulb replacement
�
Use only 12-volt bulbs of the same type
and with the specified watt rating.
�
Switch lights off before changing a bulb
to prevent short circuits.
�
Always use a clean lint-free cloth when
handling bulbs.
�
Your hands should be dry and free of oil
and grease.
�
If the newly installed bulb does not light
up, visit an authorized Mercedes-Benz
Center.
�
Have the LEDs and bulbs for the follow-
ing lamps replaced by an authorized
Mercedes-Benz Center.�
Additional turn signals in the
exterior rear view mirrors
�
High mounted brake lamp
�
Xenon* lamps
�
Front fog lamps
Lamp
Type
7
Brake lamp
1154 / 32 cp
8
High mounted brake
lamp
LED
9
Backup lamp
1154 / 32 cp
10
Turn signal lamp
1156 NA
11
Tail, parking, stand-
ing and side marker
lamp
67 / 4 cp
12
License plate lamps
C5W
13
Rear fog lamp,
driver’s side
1155 / 32 cp
Warning!
G
Keep bulbs out of reach of children.
Bulbs and bulb sockets can be very hot.
Allow the lamp to cool down before
changing a bulb.
Halogen lamps contain pressurized gas.
A bulb can explode if you:�
touch or move it when hot
�
drop the bulb
�
scratch the bulb
Wear eye and hand protection.
Because of high voltage in xenon lamps, it is
dangerous to replace the bulb or repair the
lamp and its components. We recommend
that you have such work done by a qualified
technician.
Page 223 of 304
223 Practical hints
Replacing bulbs
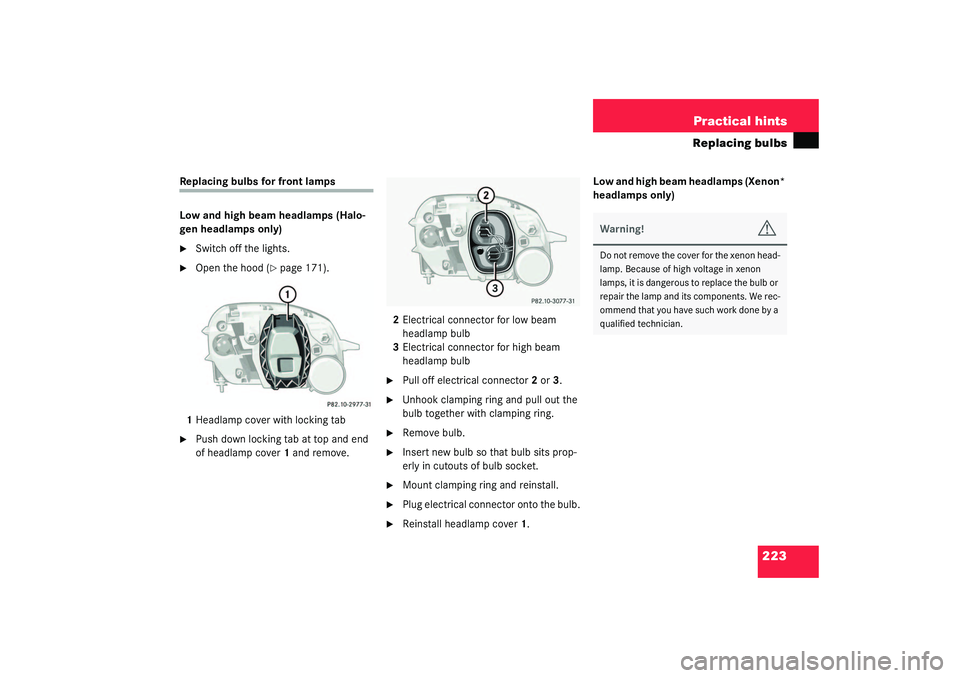
Replacing bulbs for front lamps
Low and high beam headlamps (Halo-
gen headlamps only)�
Switch off the lights.
�
Open the hood (
�page 171).
1Headlamp cover with locking tab
�
Push down locking tab at top and end
of headlamp cover1 and remove.2Electrical connector for low beam
headlamp bulb
3Electrical connector for high beam
headlamp bulb
�
Pull off electrical connector2 or3.
�
Unhook clamping ring and pull out the
bulb together with clamping ring.
�
Remove bulb.
�
Insert new bulb so that bulb sits prop-
erly in cutouts of bulb socket.
�
Mount clamping ring and reinstall.
�
Plug electrical connector onto the bulb.
�
Reinstall headlamp cover1.Low and high beam headlamps (Xenon*
headlamps only)
Warning!
G
Do not remove the cover for the xenon head-
lamp. Because of high voltage in xenon
lamps, it is dangerous to replace the bulb or
repair the lamp and its components. We rec-
ommend that you have such work done by a
qualified technician.
Page 232 of 304

232 Practical hintsFlat tireInflating the tire
1Flap
2Air hose with pressure gauge and vent
screw
3Union nut
4Electrical plug
�
Open flap1 on air pump.
�
Pull out electrical plug4 and air hose
with pressure gauge2.
�
Screw union nut3 with air hose2 on to
the tire valve.
�
Insert electrical plug4 into vehicle
cigarette lighter socket.
�
Turn key in steering lock to position1
(�page 29).
�
PressI on the electric air pump switch.
The electric air pump should now
switch on and inflate the tire.
After 5 minutes, the pressure gauge must
display at least 26 psi (1.8 bar). The air
hose and the union nut can become hot
during inflation. Please exercise appropri-
ate caution.
�
If this tire pressure is not attained, turn
off the electric air pump, detach the air
hose from the tire valve, and again
drive vehicle back and forth very slowly
approximately 30 ft (10 m).
This serves to better distribute the
TIREFIT sealant material inside the tire.
�
Inflate the tire again.
�
Press0 on the electric air pump
switch.
�
Turn key in steering lock to position0.
The electric air pump should now be
switched off.
Warning!
G
Observe safety instructions on air pump la-
bel.
!Do not exceed the maximum pressure
of 36 psi (2.5 bar).
!Do not operate the electric air pump
longer than eight minutes without in-
terruption. Otherwise it may overheat.
You may operate the air pump again af-
ter it has cooled off.
��
Page 236 of 304

236 Practical hintsFlat tire�
Unscrew the valve cap from tire
valve7.
�
Screw filler hose10 onto tire valve7.
�
Insert electrical plug4 into vehicle cig-
arette lighter socket.
�
Turn key in steering lock to position1
(�page 29).
�
PressI on electric air pump switch8.
The electric air pump should now
switch on and inflate the tire.After 5 minutes, the pressure gauge must
display at least 26 psi (1.8 bar). The air
hose can become hot during inflation.
Please exercise appropriate caution.
�
If this tire pressure is not attained, turn
off the electric air pump, detach the fill-
er hose from the tire valve, and drive
vehicle back and forth very slowly ap-
proximately 30 ft (10 m).
This serves to better distribute the
TIREFIT sealant material inside the tire.
�
Unscrew the air pump’s air hose5 from
flange6 of the TIREFIT container.
�
Inflate the tire again.
�
After attaining a tire pressure of 26 psi
(1.8 bar), press0 on electric air pump
switch8.
The electric air pump should now be
switched off.
�
Turn key in steering lock to position0
(�page 29).
!Do not operate the electric air pump
longer than eight minutes without in-
terruption. Otherwise it may overheat.
You may operate the air pump again af-
ter it has cooled off.
��
Warning!
G
If a tire pressure of 26 psi (1.8 bar) is not at-
tained, tire is too severely damaged for
TIREFIT to provide a reliable tire repair.
In this case, TIREFIT cannot properly seal
the tire.
Do not drive the vehicle.
Contact the nearest Mercedes-Benz Center
or call Roadside Assistance.