Page 191 of 376
191 Controls in detail
Useful features
Auxiliary cup holder
You can fasten the auxiliary cup holder
onto the left front side of the passenger
seat.
Inserting the auxiliary cup holder
1Cover�
Pull up the cover and place it in a
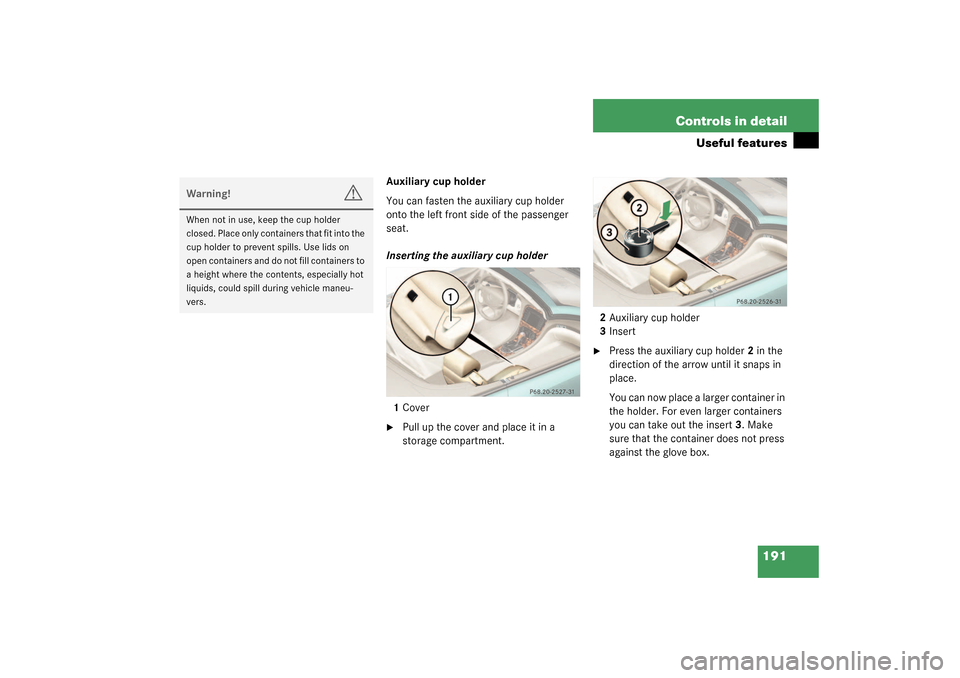
storage compartment.2Auxiliary cup holder
3Insert
�
Press the auxiliary cup holder2 in the
direction of the arrow until it snaps in
place.
You can now place a larger container in
the holder. For even larger containers
you can take out the insert3. Make
sure that the container does not press
against the glove box.
Warning!
G
When not in use, keep the cup holder
closed. Place only containers that fit into the
cup holder to prevent spills. Use lids on
open containers and do not fill containers to
a height where the contents, especially hot
liquids, could spill during vehicle maneu-
vers.
Page 192 of 376
 up and out of the recep-
tacle and place it in a storage compart-
ment.
�
Replace t")
192 Controls in detailUseful features
Removing the auxiliary cup holder�
Pull the auxiliary cup holder2
(�page 191) up and out of the recep-
tacle and place it in a storage compart-
ment.
�
Replace the cover1 (
�page 191) on
the opening and press it down until it
snaps in place.
Door storage compartments
1Release button
2Lid
Opening
�
Press the release button.
The lid opens upwards.
Warning!
G
When not in use, remove the auxiliary cup
holder. Place only containers that fit into the
auxiliary cup holder to prevent spills. Use
lids on open containers and do not fill con-
tainers to a height where the contents, es-
pecially hot liquids, could spill during vehicle
maneuvers.iWhen you move the seat forward, the
auxiliary cup holder turns to the side.
When you move the seat back, turn the
auxiliary cup holder back until it stops
in its original position.
Warning!
G
Keep the door storage compartments
closed while vehicle is in motion. Failure to
d o s o m a y c a u s e t h e s e a t b e l t t o c a t c h a t t h e
rear and prevent proper positioning of the
seat belt.
Page 193 of 376
193 Controls in detail
Useful features
Armrest storage spaces
The buttons are located under the cushion
of the armrest.
1Button to open storage tray
2Button to open storage compartmentOpening storage tray
�
Press button1 and lift up the armrest.
Opening storage compartment
�
Press button2 and lift the armrest.
Locking the storage spaces
The storage spaces are centrally locked
when you lock the vehicle from the out-
side.
You can also lock the storage spaces
separately, see “Locking the storage com-
partments separately” (
�page 194).Rear storage compartments
The CD changer is located in the left stor-
age compartment.
For instructions on the CD changer, see
separate COMAND Operator’s Manual.
1Release button
2Lid
�
Press the release button.
The lid opens upwards.
Page 194 of 376

194 Controls in detailUseful featuresLocking the storage compartments
separately
You can lock the storage compartments
separately, e.g. when the vehicle is in the
shop for service.
1Separately unlock storage compart-
ments
2Centrally lock/unlock storage com-
partments
3Separately lock storage compartments�
Slide mechanical key out of key hous-
ing (
�page 290).
�
Insert the mechanical key into the
glove box lock and turn it to position3.
The following storage areas will be
locked. They can then not be opened
with the key or with the KEYLESS-GO*
card:�
Glove box
�
Armrest storage spaces
�
Rear storage compartmentsUnlocking the storage compartments
separately
�
Turn the mechanical key in the glove
box lock to position1.
You can now open the storage com-
partments.
Parcel net in passenger footwell
iThe separate locking status of these
storage compartments can only be
canceled by means of the mechanical
key.
The storage compartments in the doors
cannot be locked.
Warning!
G
Do not place heavy or fragile objects, or ob-
jects having sharp edges, in the parcel net.
In an accident, during hard braking or sud-
den maneuvers, they could be thrown
around inside the vehicle, and cause injury
to vehicle occupants.
Page 198 of 376

198 Controls in detailUseful featuresSwitching on�
Make sure that the ignition is switched
on.
All the lamps in the instrument cluster
should light up.
�
Turn lever in the direction of arrow1.
The steering wheel is heated. Indicator
lamp2 lights up.
Switching off
�
Turn lever in the direction of arrow3.
The steering wheel heating is turned
off. Indicator lamp2 goes out.
Easy-Pack load assist in the trunk
To facilitate trunk loading after opening the
lid, use the Easy-Pack feature to raise the
retracted hardtop from its storage position
in the trunk.
1Retracted hardtop
2Luggage cover
3Easy-Pack buttonRaising the hardtop
The hardtop can only be raised when the
luggage cover is closed and the trunk lid is
completely opened.
�
Press button3.
The hardtop rises a short distance.
Button3 lights up brightly. You can
now open the luggage cover.
iThe steering wheel heating does not
turn off automatically.
Warning!
G
To prevent injuries, make sure that there is
no possibility of body parts getting caught in
moving parts. If potential danger exists,
press the switch again. This will immediately
stop the movement of the hardtop.
Page 288 of 376

288 Practical hintsWhere will I find ...?
Where will I find ...?First aid kit
The first aid kit is located in storage space
under the passenger seat.
1Handle
2Lid�
Pull the handle 1 up.
�
Fold the lid 2 down.
You can now remove the first-aid kit.
Vehicle tool kit
The vehicle tool kit is stored in the space
underneath the trunk floor.�
Lift up the trunk floor cover.
You can now remove the tools and ac-
cessories.
The vehicle tool kit includes�
One pair of universal pliers
�
Two open-end wrenches
�
One hex-socket wrench
�
One interchangeable slot/Phillips
screwdriver
�
One towing eye bolt
�
One wheel wrench
�
One alignment bolt
�
One fuse extractor
�
One fuse chart for the main fuse
box
�
Spare fusesThe jack is exclusively designed for lifting
the vehicle during a wheel change. Always
lower the vehicle on sufficient capacity
jack stands before working under the vehi-
cle.
iCheck expiration dates and contents
for completeness at least once a year
and replace missing/expired items.
Page 291 of 376

291 Practical hints
Locking/unlocking in an emergency
Unlocking the trunk
If you are unable to unlock the trunk with
the key, open the trunk with the mechani-
cal key as follows:Trunk lid lock1Unlocking�
Insert the mechanical key into the
trunk lid lock.
�
Perform the following two steps simul-
taneously:�
Turn the key counterclockwise to
position 1.
�
Pull the trunk lid handle and lift lid.Unlocking interior storage compart-
ments
Locking storage areas in the passenger
compartment include:
�
the glove box
�
the storage space under the armrest
�
the rear storage compartments
If these cannot be unlocked by means of
the key, the KEYLESS-GO* card or the cen-
tral locking button, use the mechanical key
to open the glove box.1Separately unlock storage compart-
ments
2Centrally lock/unlock storage com-
partments
3Separately lock storage compartments
�
Slide mechanical key out of key hous-
ing (
�page 290).
�
Insert the mechanical key into the
glove box lock and turn it to position 2.
All storage compartments are now un-
locked.
iThe storage space under the armrest
and the rear storage compartments
can only be unlocked using the me-
chanical key at the glove box lock.
Page 312 of 376
.
�
Turn spare wheel bracket counter-
clockwise to loosen.
�
Take the whe")
312 Practical hintsFlat tireMounting the spare wheel Preparing the vehicle
Prepare the vehicle as described above
(
�page 302).
�
Turn spare wheel bracket counter-
clockwise to loosen.
�
Take the wheel out of the trunk.
Lifting the vehicle
�
Prevent the vehicle from rolling away
by blocking wheels with wheel chocks
(not included) or other sizable objects.
When changing wheel on a level sur-
face:�
Place one chock in front of and one
behind the wheel that is diagonally
opposite to the wheel being
changed.
When changing wheel on a hill:
�
Place chocks on the downhill side
blocking both wheels of the other
axle.
�
Take the vehicle tool kit and the jack
out of the storage compartment under
the trunk floor (
�page 289).
Warning!
G
The dimensions of the spare wheel are dif-
ferent from those of the road wheels. As a
result, the vehicle handling characteristics
change when driving with a mounted spare
wheel. Adapt your driving style accordingly.
The spare wheel is for temporary use only.
When driving with spare wheel mounted, en-
sure proper tire pressure and do not exceed
vehicle speed of 50 mph (80 km/h).
Drive to the nearest Mercedes-Benz Center
as soon as possible to have the spare wheel
replaced with a regular road wheel.
Never operate the vehicle with more than
one spare wheel mounted.
Warning!
G
The jack is designed exclusively for jacking
up the vehicle at the jack tubes built into
both sides of the vehicle. To help avoid per-
sonal injury, use the jack only to lift the ve-
hicle during a wheel change. Never get
beneath the vehicle while it is supported by
the jack. Keep hands and feet away from the
area under the lifted vehicle. Always firmly
set parking brake and block wheels before
raising vehicle with jack.
Do not disengage parking brake while the
vehicle is raised. Be certain that the jack is
always vertical (plumb line) when in use, es-
pecially on hills. Always try to use the jack
on level surface. Be sure that the jack arm is
fully inserted in the jack tube. Always lower
the vehicle onto sufficient capacity jack-
stands before working under the vehicle.