Page 77 of 376

77 Safety and Security
Anti-theft systems
Tow-away alarm
Once the tow-away alarm is armed, a visual
and audible alarm will be triggered when
someone attempts to raise the vehicle.
Arming tow-away alarm
When you lock your vehicle, the tow-away
alarm is automatically armed after about
30 seconds.
When you unlock your vehicle, the
tow-away protection disarms automatical-
ly.Disarming tow-away alarm
To prevent triggering the tow-away alarm
feature, switch off the tow-away alarm be-
fore towing the vehicle, or when parking on
a surface subject to movement, such as a
ferry or auto train.
The switch is on the center console be-
tween the driver’s seat and the passenger
seat.
1Tow-away alarm off switch
2Indicator lamp
�
Turn off the ignition and remove the
key.
�
Press switch1.
The indicator lamp2 in the switch
lights up briefly.
�
Lock your vehicle with the key or (vehi-
cles with KEYLESS-GO*) the lock but-
ton at each door handle.
The tow-away alarm remains disarmed un-
til you lock your vehicle again.
iThe tow-away protection alarm is trig-
gered, for example, if the vehicle is lift-
ed on one side.
If the alarm stays on for more than
20 seconds, an emergency call is initi-
ated automatically by the Tele Aid sys-
tem (
�page 202) provided Tele Aid
service was subscribed to and properly
activated.
iYou cannot disarm the tow-away alarm
if the ignition is turned on.
Page 85 of 376

85 Controls in detail
Locking and unlocking
Important notes on using KEYLESS-GO*�
Always carry the KEYLESS-GO card
with you.
�
Never store the KEYLESS-GO card to-
gether with:�
electronic items such as a cellular
phone or another KEYLESS-GO card
�
metallic objects such as coins or
metal foil
Doing so could impair the function of
the KEYLESS-GO system.
�
Always take a SmartKey with you in
case of a malfunction of the KEY-
LESS-GO system.
�
To lock or unlock the vehicle, the card
must be located outside the vehicle
within approximately 3 ft. (1 m) of a
door or the trunk lid.
�
In order to start the engine with the
KEYLESS-GO card�
the KEYLESS-GO card must be lo-
cated in the vehicle
�
all the doors must be closed
�
If you have started the engine with the
KEYLESS-GO start/stop button, you
can only turn it off again with this but-
ton, even if you have put the key in the
starter switch in the meantime.
�
This does not apply if, after starting, the
selector lever is still in positionP. The
key will then have priority over the card
and the vehicle’s electrical system will
operate according to the position of
the key in the starter switch, even stop-
ping the engine.
�
If the KEYLESS-GO card is positioned
farther away from the vehicle (e.g. in-
side clothing or briefcase) and can no
longer be recognized by the system,
the vehicle cannot be locked or the en-
gine started via the KEYLESS-GO sys-
tem.
�
If the KEYLESS-GO card is removed
from the vehicle while the ignition is
switched on (e.g. if passenger exits the
vehicle with the card), the message Chip card not recognized!
will ap-
pear in the multifunction display.
Find the card or change its present lo-
cation immediately (e.g. place it on the
front passenger seat or insert it in shirt
pocket).
�
Remember that the engine can be
started by anyone with a KEYLESS-GO
card that is left inside the vehicle. If you
leave the card behind when exiting and
locking the vehicle, the message
Chip
card still in vehicle!
will appear in
the multifunction display.
Page 91 of 376

91 Controls in detail
Locking and unlocking
Closing the trunk lid
1Handle�
Lower trunk lid by pulling firmly on
handle1.
Automatic central locking
The doors and the trunk lid automatically
lock when the vehicle is set into motion.
You can open a locked door from the in-
side. Open door only when conditions are
safe to do so.
You can deactivate the automatic locking
using the control system (
�page 128).
Warning!
G
To prevent possible personal injury, always
keep hands and fingers away from the trunk
opening when closing the trunk lid. Be espe-
cially careful when small children are
around.
iTo prevent an inadvertent lockout, do
not place the key in the trunk.
Vehicles with KEYLESS-GO*: To pre-
vent a possible inadvertent lockout, the
trunk lid will open automatically if a
KEYLESS-GO card is recognized inside
the trunk.
When the hardtop is retracted, it must
be completely lowered in the trunk be-
fore the trunk lid can be closed
(�page 199).
Warning!
G
Only drive with the trunk closed as, among
other dangers such as visibility blockage,
exhaust fumes may enter the vehicle interi-
or.
iThe doors unlock automatically after an
accident if the force of the impact ex-
ceeds a preset threshold.
The vehicle automatically locks when
the ignition is switched on and the
wheels are turning at vehicle speeds of
approximately 9 mph (15 km/h) or
more. You could therefore lock yourself
out when the vehicle �
is pushed
�
is on a test stand
Page 93 of 376
93 Controls in detail
Seats
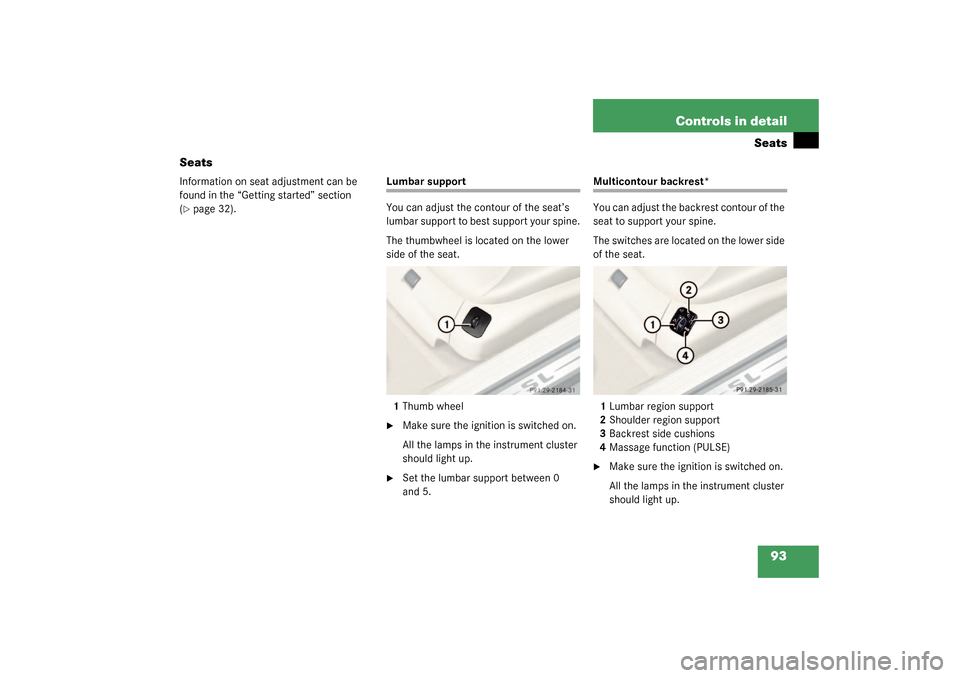
Seats
Information on seat adjustment can be
found in the “Getting started” section
(�page 32).
Lumbar support
You can adjust the contour of the seat’s
lumbar support to best support your spine.
The thumbwheel is located on the lower
side of the seat.
1Thumb wheel�
Make sure the ignition is switched on.
All the lamps in the instrument cluster
should light up.
�
Set the lumbar support between 0
and 5.
Multicontour backrest*
You can adjust the backrest contour of the
seat to support your spine.
The switches are located on the lower side
of the seat.
1Lumbar region support
2Shoulder region support
3Backrest side cushions
4Massage function (PULSE)�
Make sure the ignition is switched on.
All the lamps in the instrument cluster
should light up.
Page 96 of 376

96 Controls in detailSeatsSeat ventilation*
The switch is located on the door. The blue
indicator lamps on the switch show the
ventilation level selected:
1Seat ventilation switch�
Make sure the ignition is switched on.All the lamps in the instrument cluster
light up.
Switching on the seat ventilation
�
Press switch1.
Three blue indicator lamps on the
switch light up.
Switching off the seat ventilation
�
Press switch1 repeatedly until all indi-
cator lamps go out.
Level 3
Three indicator lamps on
Level 2
Two indicator lamps on
Level 1
One indicator lamp on
Ventilation off
No indicator lamp on
iIn normal operation the seat ventilation
will switch off automatically after about
30 minutes.
!If one or all of the lamps blink on the
seat ventilation* switch, there is insuf-
ficient voltage since too many electri-
cal consumers are switched on. The
seat ventilation* switches off automat-
ically.
The seat ventilation* will switch back
on again automatically as soon as suffi-
cient voltage is available.
Page 97 of 376

97 Controls in detail
Seats
Seat heater
Vehicles without seat ventilation*
The switch is located on the door.
1Normal heating
2Rapid heating�
Make sure the ignition is switched on.
All the lamps in the instrument cluster
light up.Switching on the seat heater
�
Press lower switch position1.
A red indicator lamp on the switch
lights up.
Switching off the seat heater
�
Press lower switch position1 again.
Rapid seat heating mode
�
Press upper switch position2.
Both red indicator lamps on the switch
light up. Switching off rapid seat heating mode
�
Press upper switch position2 again.
iThe seat heater will be automatically
switched off after approximately
30 minutes. iThe system switches over to normal
heating mode after approximately five
minutes. Only the right-hand indicator
lamp remains lit.
!If one or both of the lamps on the seat
heater switch are blinking, there is in-
sufficient voltage available since too
many electrical consumers are turned
on. The seat heater switches off auto-
matically.
The seat heater will switch back on
again automatically as soon as suffi-
cient voltage is available.
Page 98 of 376

98 Controls in detailSeatsVehicles with seat ventilation*
The switch is located on the door. The red
indicator lamps on the switch show the
heater level selected:
1Seat heater switch�
Make sure the ignition is switched on.
All the lamps in the instrument cluster
light up.Switching on the seat heater
�
Press upper switch position1 twice.
A red indicator lamp on the switch
lights up.
Switching off the seat heater
�
Press upper switch position1 again.
Rapid seat heating
�
Press upper switch position1 once.
Both indicator lamps on the switch light
up. Switching off rapid seat heating mode
�
Press upper switch position1 twice.
Seat heater off
No indicator lamp on
Level 1
One indicator lamp on
Level 2
Two indicator lamps on
iThe seat heater will be automatically
switched off after approximately
30 minutes. iThe system switches over to normal
heating mode after approximately five
minutes. Only the right-hand indicator
lamp remains lit.
!If one or both of the lamps on the seat
heater switch are blinking, there is in-
sufficient voltage available since too
many electrical consumers are turned
on. The seat heater switches off auto-
matically.
The seat heater will switch back on
again automatically as soon as suffi-
cient voltage is available.
Page 99 of 376

99 Controls in detail
Memory function
Memory function
With the memory switch you can store up
to three different settings per key and KEY-
LESS-GO* card.
The following settings are saved for each
stored position:�
Driver’s seat and backrest position
�
Steering wheel position
�
Inside rear view mirror position
�
Driver’s side exterior rear view mirror
position
�
Passenger side exterior rear view mir-
ror position
These key dependent memory settings can
be deactivated if desired (
�page 130).The memory switch is located on the door.
MMemory button
1, 2, 3Stored positions
�
Be sure that the ignition is switched on
or one door is open.
All the lamps in the instrument cluster
light up when the ignition is switched
on.
!Prior to operating the vehicle, the driv-
er should check and adjust the seat
height, seat position fore and aft, and
seat backrest angle if necessary, to en-
sure adequate control, reach and com-
fort. The head restraint should also be
adjusted for proper height. Also see air-
bag section (
�page 53) for proper seat
positioning.
In addition, adjust the steering wheel to
ensure adequate control, reach, opera-
tion and comfort. Both the inside and
outside rear view mirrors should be ad-
justed for adequate rear vision.
Fasten seat belts. Infants and small
children should be seated in a properly
secured restraint system that complies
with U.S. Federal Motor Vehicle Safety
Standard 213 and Canadian Motor Ve-
hicle Safety Standard 213.
Warning!
G
Do not activate the memory function while
driving. Activating the memory function
while driving could cause the driver to lose
control of the vehicle.