Page 101 of 376
101 Controls in detail
Memory function
You can store a parking position for the
passenger exterior rear view mirror for
each key and each KEYLESS-GO* card us-
ing the memory switch.
1Passenger side exterior rear view mir-
ror
2Adjustment button�
Stop the vehicle.
�
Switch ignition on (if not already on).
�
Press button1 in center console.
The passenger side exterior rear view
mirror is selected.
�
Adjust the exterior rear view mirror
with button2 so that you see the rear
wheel and the road curb.
�
Press memory buttonM on the door.
�
Within three seconds press adjustment
button2 in the center console.
The parking position is stored if the
mirror does not move.iIf the mirror does move, repeat the
above steps. After the setting is stored
you can move the mirror again.
Page 105 of 376
105 Controls in detail
Lighting
High beam flasher �
Pull the combination switch briefly in
direction2.
Hazard warning flasher
The hazard warning flasher can be activat-
ed with the ignition switched on or off. It is
activated automatically when an airbag is
deployed.
The switch is located above and between
the center air vents.
1Hazard warning flasher switchSwitching on the hazard warning
flasher
�
Press the hazard warning flasher
switch.
All the turn signals will blink.
Switching off the hazard warning
flasher
�
Press hazard warning flasher switch
again.iWith the hazard warning flasher acti-
vated and the combination switch set
for either left or right turn, only the re-
spective left or right turn signals will
operate.
Page 108 of 376
.
The instrument")
108 Controls in detailInstrument cluster
Instrument clusterA full view illustration of the instrument
cluster can be found in the “At a glance”
section of this manual (
�page 20).
The instrument cluster is activated when
you:
�
open a door
�
turn on the ignition
�
press the reset knob (
�page 20)
�
switch on the exterior lamps
Only opening a door will activate the in-
strument cluster for approximately
30 seconds.
You can change the instrument cluster set-
tings in the Instrument cluster submenu of
the control system (
�page 122).
Instrument cluster illumination
Use the reset knob to adjust the illumina-
tion brightness for the instrument cluster
and the switches on the center console.
To brighten illumination�
Turn the reset knob in the instrument
cluster (
�page 20) clockwise.
The instrument cluster illumination will
brighten.To dim illumination
�
Turn the reset knob in the instrument
cluster (
�page 20) counterclockwise.
The instrument cluster illumination will
dim.
Coolant temperature gauge
Under normal driving conditions, the cool-
ant temperature may rise to 248°F
(120°C). The coolant temperature may
rise to 266°F (130°C) at high outside tem-
peratures or when driving in hilly terrain.
The engine should not be operated with
the coolant temperature above 266°F
(130°C). Doing so may cause serious en-
gine damage which is not covered by the
Mercedes-Benz Limited Warranty.
iThe instrument cluster illumination is
dimmed or brightened to suit ambient
light conditions.
Page 145 of 376
 and for setting the rear view
mirrors (
�page 35) is found in the “Get-
ting started” secti")
145 Controls in detail
Good visibility
Good visibility
Information on the windshield wipers
(�page 44) and for setting the rear view
mirrors (
�page 35) is found in the “Get-
ting started” section.
Rear view mirror
Automatic antiglare rear view mirror
The reflection brightness of the exterior
rear view mirror on the driver’s side and
the inside rear view mirror will respond au-
tomatically to glare when�
the ignition is switched on, and
�
incoming light from headlamps falls on
the sensor in the inside rear view mir-
ror.
The rear view mirror will not react if
�
reverse gear is engaged
�
the interior lighting is turned on
Warning!
G
The automatic antiglare function does not
react if incoming light is not aimed directly
at sensors in the inside rear view mirror.
The inside rear view mirror and the exterior
rear view mirror on the driver’s side do not
react, for example, if the wind screen is in-
stalled.
Glare can endanger you and others.Warning!
G
Exercise care when using the passenger
side exterior rear view mirror. The mirror
surface is convex (outwardly curved surface
for a wider field of view). Objects in mirror
are closer than they appear. Check your in-
side rear view mirror or glance over your
shoulder before changing lanes.
Warning!
G
In the case of an accident liquid electrolyte
may escape from the mirror housing if the
mirror glass breaks.
Electrolyte has an irritating effect. Do not al-
low the liquid to come into contact with
eyes, skin, clothing, or respiratory system.
In case it does, immediately flush affected
area with water, and seek medical help if
necessary.!Electrolyte drops coming into contact
with the vehicle paint finish can be
completely removed only while in the
liquid state by applying plenty of water.
Page 146 of 376
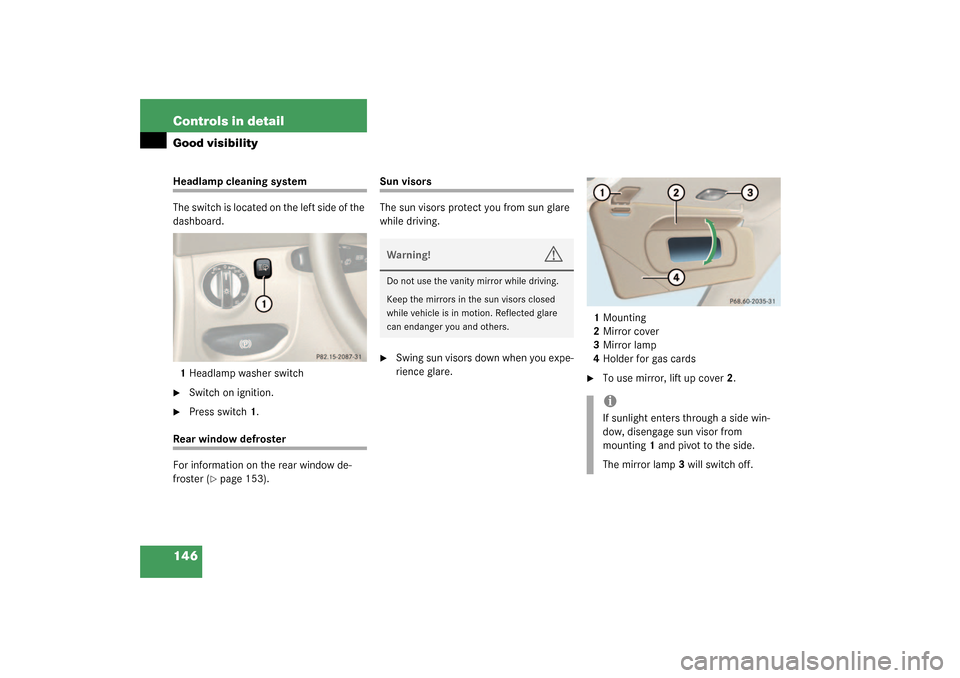
146 Controls in detailGood visibilityHeadlamp cleaning system
The switch is located on the left side of the
dashboard.
1Headlamp washer switch�
Switch on ignition.
�
Press switch1.
Rear window defroster
For information on the rear window de-
froster (
�page 153).
Sun visors
The sun visors protect you from sun glare
while driving.�
Swing sun visors down when you expe-
rience glare.1Mounting
2Mirror cover
3Mirror lamp
4Holder for gas cards
�
To use mirror, lift up cover2.
Warning!
G
Do not use the vanity mirror while driving.
Keep the mirrors in the sun visors closed
while vehicle is in motion. Reflected glare
can endanger you and others.
iIf sunlight enters through a side win-
dow, disengage sun visor from
mounting1 and pivot to the side.
The mirror lamp3 will switch off.
Page 154 of 376

154 Controls in detailAutomatic climate controlResidual heat and ventilation
With the engine switched off, it is possible
to continue to heat or ventilate the interior
for up to 30 minutes. This feature makes
use of the residual heat produced by the
engine.
Activating�
Turn the key in the starter switch to
position1 o r r e m ov e i t f r o m t h e s t a r t e r
switch.
�
Press button
T
(�page 148).
The indicator lamp on button
T
comes on.Deactivating
�
Press button
T
(�page 148).
The indicator lamp on button
T
goes out.
The residual heat is automatically turned
off:
�
when the ignition is switched on
�
after about 30 minutes
�
if the battery voltage dropsDeactivating the automatic climate
control system
Deactivating
It is possible to completely deactivate the
automatic climate control system. �
Press button
M
(�page 148).
The indicator lamp on button
M
comes on.
iHow long the system will provide heat-
ing depends on the coolant tempera-
ture and the temperature set by the
operator. The blower will run at speed
setting1 regardless of the air distribu-
tion control setting.
iThis setting is only recommended when
the retractable hardtop is open.
Page 160 of 376

160 Controls in detailRetractable hardtopLuggage cover
The luggage cover is located in the trunk.
1Handle
2Holders
Closing luggage cover�
Pull out the luggage cover using the
handle1.
�
Hook the luggage cover into the left
and right side holders2.Opening luggage cover
�
Unhook luggage cover from side hold-
ers.
�
While holding onto the handle1, guide
luggage cover back into its storage
compartment. Opening the retractable hardtop with
the switch
Hardtop switchBefore pulling on the hardtop switch, you
must make sure that:�
the parking brake is engaged
(�page 41)
�
the luggage cover is closed, see Lug-
gage cover
�
the trunk lid is closed
�
the ignition is switched on (key in start-
er switch position2)
!To prevent damage to the hardtop or
luggage/cargo when lowering the roof:�
load trunk only to the height of the
luggage cover
�
do not permit luggage/cargo to
push up the closed luggage cover
�
do not load anything on top of or in
front of the luggage cover
�
do not place anything on the shelf
behind the roll bar
Page 161 of 376

161 Controls in detail
Retractable hardtop
�
Pull up on the hardtop switch as indi-
cated by the arrow until the hardtop is
completely lowered into its trunk stor-
age compartment and the indicator
lamp in the hardtop switch goes out.
The multifunction display will briefly
show the message
Hardtop open
.Closing the retractable hardtop with
the switch
Before pressing the hardtop switch, you
must make sure that:
�
the parking brake is engaged
(�page 41)
�
the luggage cover is closed
(�page 160)
�
the trunk lid is closed
�
the ignition is switched on (key in start-
er switch position2)
�
Press the hardtop switch as indicated
by the arrow until the hardtop is com-
pletely closed and locked and the indi-
cator lamp in the hardtop switch goes
out.
The multifunction display will briefly
show the message
Hardtop closed
.
iBe sure that the roof is dry before you
open it. Otherwise water may enter the
trunk interior.
Warning!
G
If the retractable hardtop is not fully opened
or closed, a warning will sound after 15 sec-
onds, pressure in the hardtop’s hydraulic
system will drop and the hardtop will lower.
Be sure to keep the hardtop switch pulled or
pressed until the hardtop is fully opened or
closed. The hydraulic pump will then shut
off.
To prevent possible accidents, drive the ve-
hicle only with the hardtop either completely
closed and locked, or fully lowered into its
storage compartment.