Page 312 of 416
312 Practical hintsWhat to do if …?Display
Possible cause
Suggested solution
.
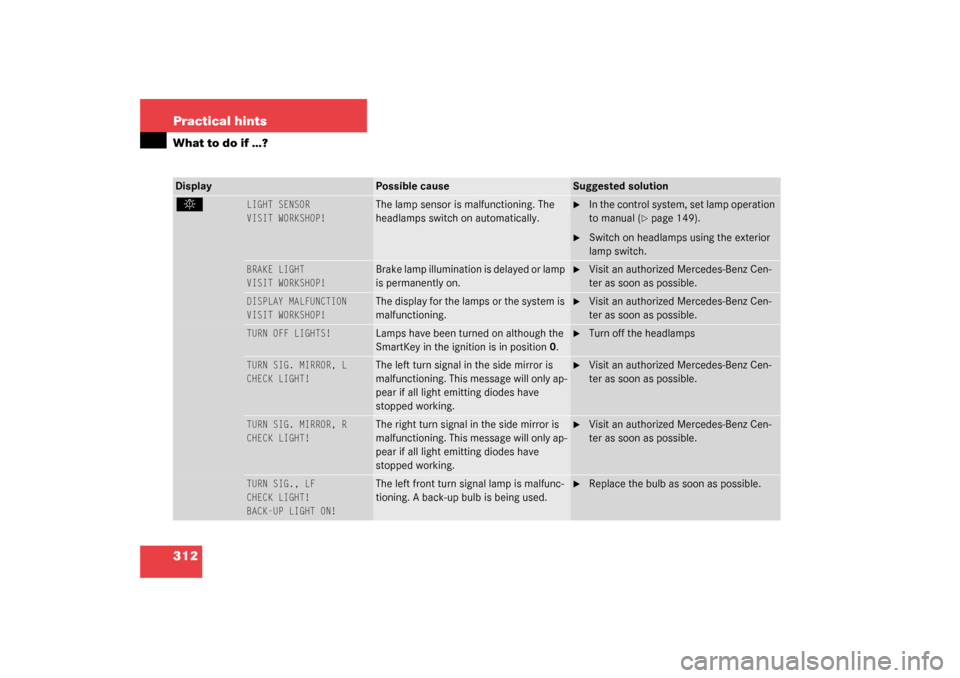
LIGHT SENSOR
VISIT WORKSHOP!
The lamp sensor is malfunctioning. The
headlamps switch on automatically.
�
In the control system, set lamp operation
to manual (
�page 149).
�
Switch on headlamps using the exterior
lamp switch.
BRAKE LIGHT
VISIT WORKSHOP!
Brake lamp illumination is delayed or lamp
is permanently on.
�
Visit an authorized Mercedes-Benz Cen-
ter as soon as possible.
DISPLAY MALFUNCTION
VISIT WORKSHOP!
The display for the lamps or the system is
malfunctioning.
�
Visit an authorized Mercedes-Benz Cen-
ter as soon as possible.
TURN OFF LIGHTS!
Lamps have been turned on although the
SmartKey in the ignition is in position 0.
�
Turn off the headlamps
TURN SIG. MIRROR, L
CHECK LIGHT!
The left turn signal in the side mirror is
malfunctioning. This message will only ap-
pear if all light emitting diodes have
stopped working.
�
Visit an authorized Mercedes-Benz Cen-
ter as soon as possible.
TURN SIG. MIRROR, R
CHECK LIGHT!
The right turn signal in the side mirror is
malfunctioning. This message will only ap-
pear if all light emitting diodes have
stopped working.
�
Visit an authorized Mercedes-Benz Cen-
ter as soon as possible.
TURN SIG., LF
CHECK LIGHT!
BACK-UP LIGHT ON!
The left front turn signal lamp is malfunc-
tioning. A back-up bulb is being used.
�
Replace the bulb as soon as possible.
Page 313 of 416
313 Practical hints
What to do if …?
.
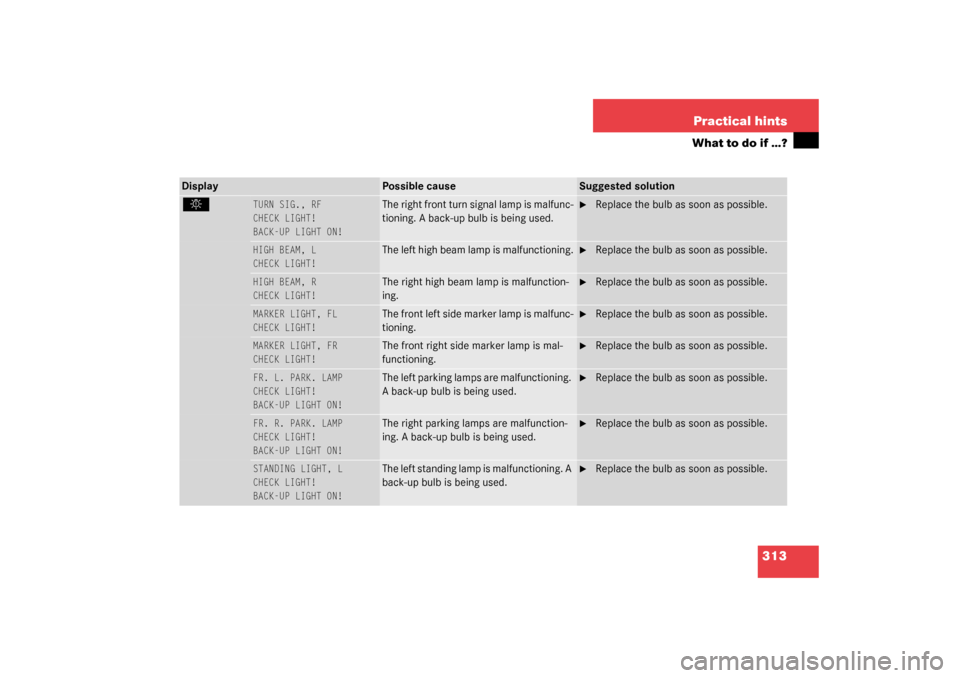
TURN SIG., RF
CHECK LIGHT!
BACK-UP LIGHT ON!
The right front turn signal lamp is malfunc-
tioning. A back-up bulb is being used.
�
Replace the bulb as soon as possible.
HIGH BEAM, L
CHECK LIGHT!
The left high beam lamp is malfunctioning.
�
Replace the bulb as soon as possible.
HIGH BEAM, R
CHECK LIGHT!
The right high beam lamp is malfunction-
ing.
�
Replace the bulb as soon as possible.
MARKER LIGHT, FL
CHECK LIGHT!
The front left side marker lamp is malfunc-
tioning.
�
Replace the bulb as soon as possible.
MARKER LIGHT, FR
CHECK LIGHT!
The front right side marker lamp is mal-
functioning.
�
Replace the bulb as soon as possible.
FR. L. PARK. LAMP
CHECK LIGHT!
BACK-UP LIGHT ON!
The left parking lamps are malfunctioning.
A back-up bulb is being used.
�
Replace the bulb as soon as possible.
FR. R. PARK. LAMP
CHECK LIGHT!
BACK-UP LIGHT ON!
The right parking lamps are malfunction-
ing. A back-up bulb is being used.
�
Replace the bulb as soon as possible.
STANDING LIGHT, L
CHECK LIGHT!
BACK-UP LIGHT ON!
The left standing lamp is malfunctioning. A
back-up bulb is being used.
�
Replace the bulb as soon as possible.
Display
Possible cause
Suggested solution
Page 331 of 416
331 Practical hints
Replacing bulbs
Replacing bulbs
Safe vehicle operation depends on proper
exterior lighting and signaling. It is there-
fore essential that all bulbs and lamp as-
semblies are in good working order at all
times.
Correct headlamp adjustment is extremely
important. Have headlamps checked and
readjusted at regular intervals and when a
bulb has been replaced. See your autho-
rized Mercedes-Benz Center for headlamp
adjustment.
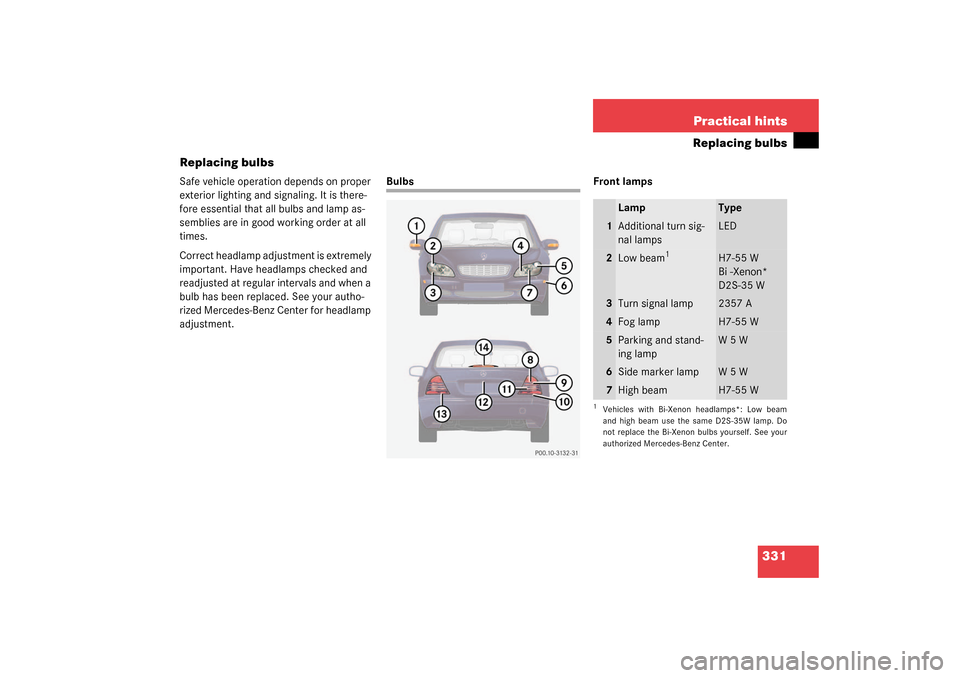
Bulbs Front lamps
Lamp
Type
1
Additional turn sig-
nal lamps
LED
2
Low beam
1
1Vehicles with Bi-Xenon headlamps*: Low beam
and high beam use the same D2S-35W lamp. Do
not replace the Bi-Xenon bulbs yourself. See your
authorized Mercedes-Benz Center.
H7-55 W
Bi -Xenon*
D2S-35 W
3
Turn signal lamp
2357 A
4
Fog lamp
H7-55 W
5
Parking and stand-
ing lamp
W5W
6
Side marker lamp
W5W
7
High beam
H7-55 W
Page 332 of 416
332 Practical hintsReplacing bulbsRear lamps Notes on bulb replacement
�
Use only 12 volt bulbs of the same type
and with the specified watt rating.
�
Switch lights off before changing a bulb
to prevent short circuits.
�
Always use a clean lint-free cloth when
handling bulbs.
�
Your hands should be dry and free of oil
and grease.
�
If the newly installed bulb does not light
up, visit an authorized Mercedes-Benz
Center.
�
Have the LEDs and bulbs for the follow-
ing lamps replaced by an authorized
Mercedes-Benz Center.�
Additional turn signal lamps in the
exterior rear view mirrors
�
High mounted brake lamp
�
Bi-Xenon lamps*
�
Front fog lamps
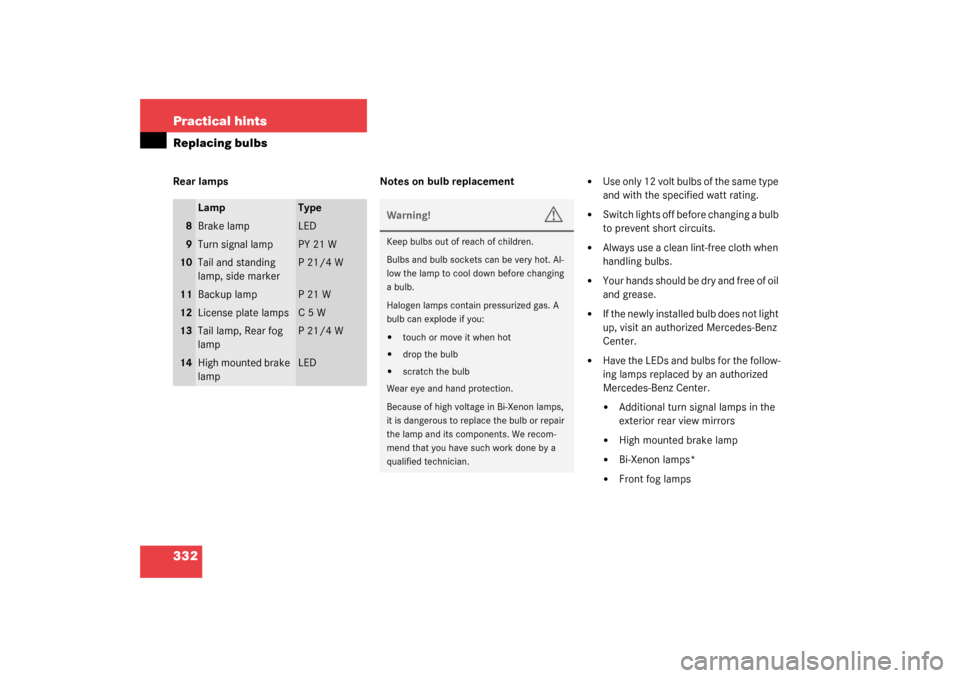
Lamp
Type
8
Brake lamp
LED
9
Turn signal lamp
PY 21 W
10
Tail and standing
lamp, side marker
P21/4W
11
Backup lamp
P21W
12
License plate lamps
C5W
13
Tail lamp, Rear fog
lamp
P21/4W
14
High mounted brake
lamp
LED
Warning!
G
Keep bulbs out of reach of children.
Bulbs and bulb sockets can be very hot. Al-
low the lamp to cool down before changing
a bulb.
Halogen lamps contain pressurized gas. A
bulb can explode if you:�
touch or move it when hot
�
drop the bulb
�
scratch the bulb
Wear eye and hand protection.
Because of high voltage in Bi-Xenon lamps,
it is dangerous to replace the bulb or repair
the lamp and its components. We recom-
mend that you have such work done by a
qualified technician.
Page 333 of 416
333 Practical hints
Replacing bulbs
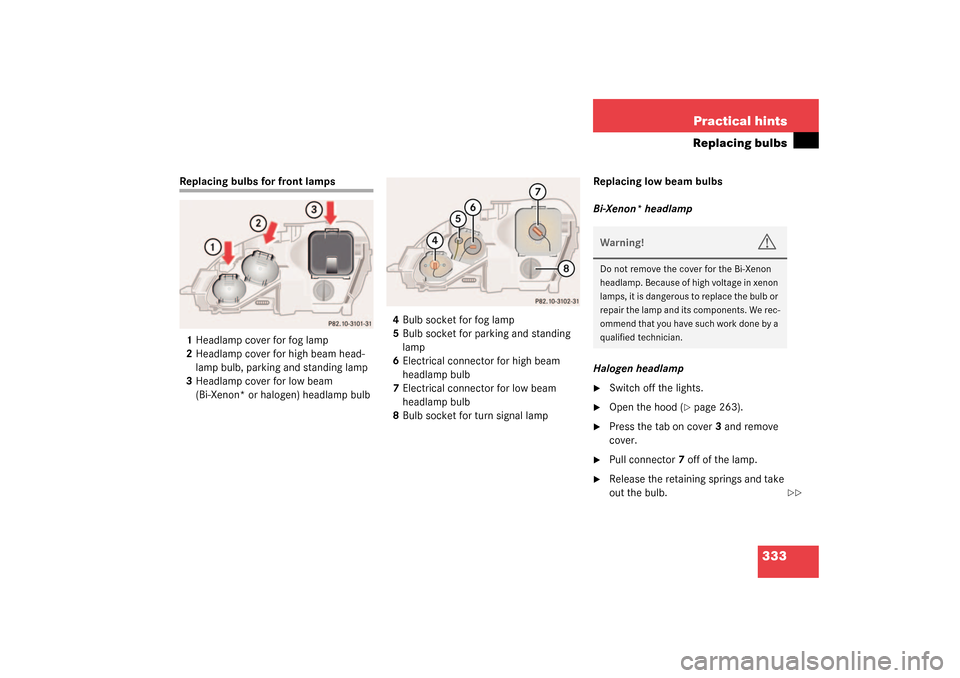
Replacing bulbs for front lamps
1Headlamp cover for fog lamp
2Headlamp cover for high beam head-
lamp bulb, parking and standing lamp
3Headlamp cover for low beam
(Bi-Xenon* or halogen) headlamp bulb4Bulb socket for fog lamp
5Bulb socket for parking and standing
lamp
6Electrical connector for high beam
headlamp bulb
7Electrical connector for low beam
headlamp bulb
8Bulb socket for turn signal lampReplacing low beam bulbs
Bi-Xenon* headlamp
Halogen headlamp
�
Switch off the lights.
�
Open the hood (
�page 263).
�
Press the tab on cover3 and remove
cover.
�
Pull connector7 off of the lamp.
�
Release the retaining springs and take
out the bulb.Warning!
G
Do not remove the cover for the Bi-Xenon
headlamp. Because of high voltage in xenon
lamps, it is dangerous to replace the bulb or
repair the lamp and its components. We rec-
ommend that you have such work done by a
qualified technician.
��
Page 336 of 416
336 Practical hintsReplacing bulbsReplacing bulbs for rear lamps
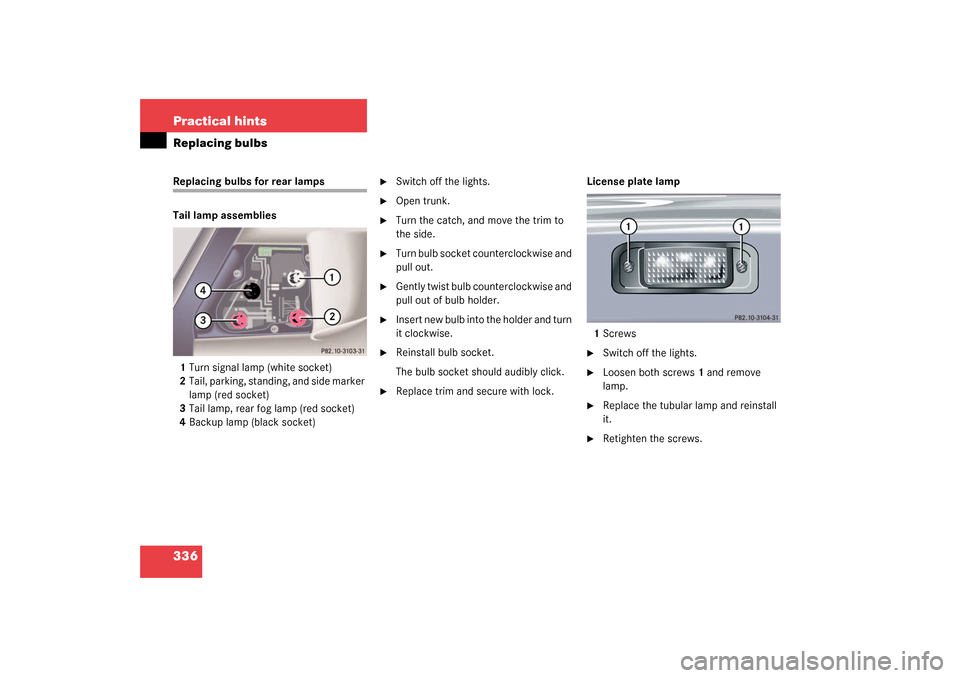
Tail lamp assemblies
1Turn signal lamp (white socket)
2Tail, parking, standing, and side marker
lamp (red socket)
3Tail lamp, rear fog lamp (red socket)
4Backup lamp (black socket)
�
Switch off the lights.
�
Open trunk.
�
Turn the catch, and move the trim to
the side.
�
Turn bulb socket counterclockwise and
pull out.
�
Gently twist bulb counterclockwise and
pull out of bulb holder.
�
Insert new bulb into the holder and turn
it clockwise.
�
Reinstall bulb socket.
The bulb socket should audibly click.
�
Replace trim and secure with lock. License plate lamp
1Screws
�
Switch off the lights.
�
Loosen both screws1 and remove
lamp.
�
Replace the tubular lamp and reinstall
it.
�
Retighten the screws.
Page 344 of 416
344 Practical hintsBattery
Battery
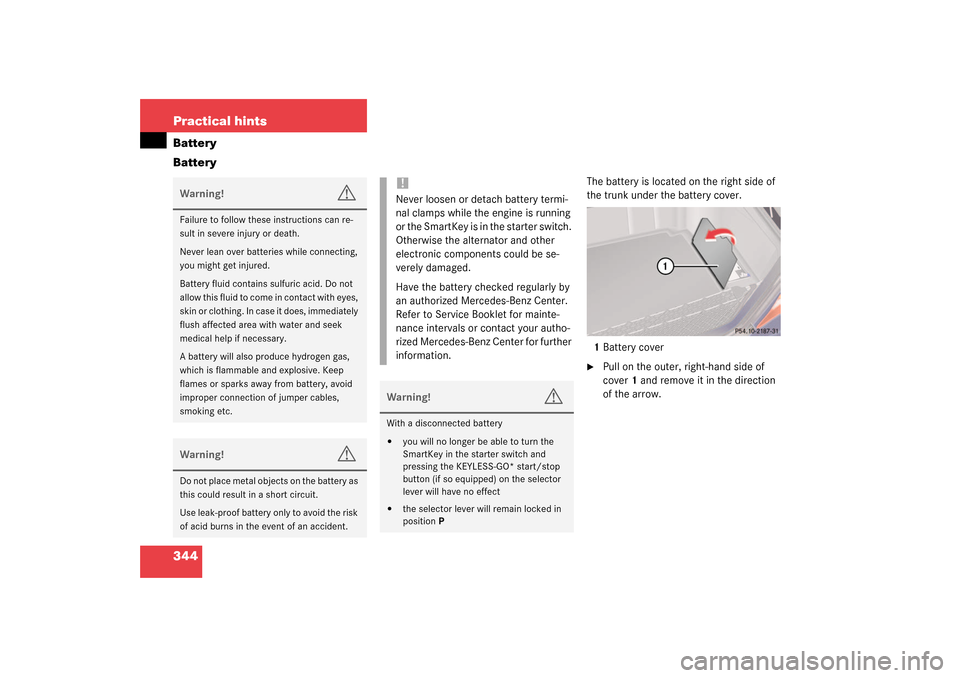
The battery is located on the right side of
the trunk under the battery cover.
1Battery cover �
Pull on the outer, right-hand side of
cover1 and remove it in the direction
of the arrow.
Warning!
G
Failure to follow these instructions can re-
sult in severe injury or death.
Never lean over batteries while connecting,
you might get injured.
Battery fluid contains sulfuric acid. Do not
allow this fluid to come in contact with eyes,
skin or clothing. In case it does, immediately
flush affected area with water and seek
medical help if necessary.
A battery will also produce hydrogen gas,
which is flammable and explosive. Keep
flames or sparks away from battery, avoid
improper connection of jumper cables,
smoking etc.Warning!
G
Do not place metal objects on the battery as
this could result in a short circuit.
Use leak-proof battery only to avoid the risk
of acid burns in the event of an accident.
!Never loosen or detach battery termi-
nal clamps while the engine is running
or the SmartKey is in the starter switch.
Otherwise the alternator and other
electronic components could be se-
verely damaged.
Have the battery checked regularly by
an authorized Mercedes-Benz Center.
Refer to Service Booklet for mainte-
nance intervals or contact your autho-
rized Mercedes-Benz Center for further
information.Warning!
G
With a disconnected battery�
you will no longer be able to turn the
SmartKey in the starter switch and
pressing the KEYLESS-GO* start/stop
button (if so equipped) on the selector
lever will have no effect
�
the selector lever will remain locked in
positionP
Page 347 of 416
347 Practical hints
Jump starting
Jump starting
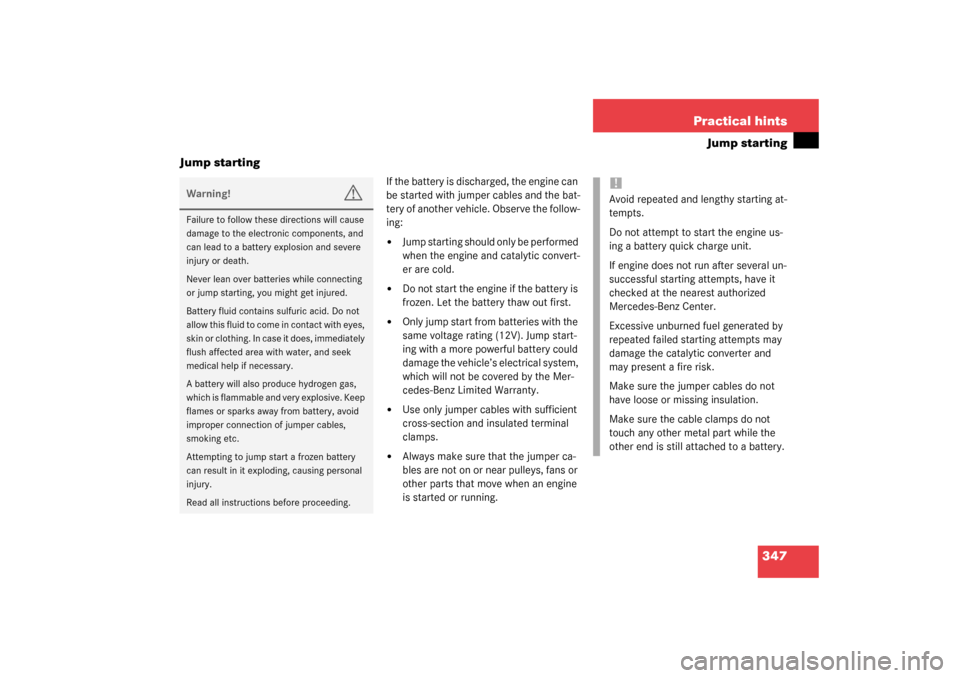
If the battery is discharged, the engine can
be started with jumper cables and the bat-
tery of another vehicle. Observe the follow-
ing:�
Jump starting should only be performed
when the engine and catalytic convert-
er are cold.
�
Do not start the engine if the battery is
frozen. Let the battery thaw out first.
�
Only jump start from batteries with the
same voltage rating (12V). Jump start-
ing with a more powerful battery could
damage the vehicle’s electrical system,
which will not be covered by the Mer-
cedes-Benz Limited Warranty.
�
Use only jumper cables with sufficient
cross-section and insulated terminal
clamps.
�
Always make sure that the jumper ca-
bles are not on or near pulleys, fans or
other parts that move when an engine
is started or running.
Warning!
G
Failure to follow these directions will cause
damage to the electronic components, and
can lead to a battery explosion and severe
injury or death.
Never lean over batteries while connecting
or jump starting, you might get injured.
Battery fluid contains sulfuric acid. Do not
allow this fluid to come in contact with eyes,
skin or clothing. In case it does, immediately
flush affected area with water, and seek
medical help if necessary.
A battery will also produce hydrogen gas,
which is flammable and very explosive. Keep
flames or sparks away from battery, avoid
improper connection of jumper cables,
smoking etc.
Attempting to jump start a frozen battery
can result in it exploding, causing personal
injury.
Read all instructions before proceeding.
!Avoid repeated and lengthy starting at-
tempts.
Do not attempt to start the engine us-
ing a battery quick charge unit.
If engine does not run after several un-
successful starting attempts, have it
checked at the nearest authorized
Mercedes-Benz Center.
Excessive unburned fuel generated by
repeated failed starting attempts may
damage the catalytic converter and
may present a fire risk.
Make sure the jumper cables do not
have loose or missing insulation.
Make sure the cable clamps do not
touch any other metal part while the
other end is still attached to a battery.