Page 219 of 416

219 Controls in detail
Driving systems
Range of the sensors
To function properly, the sensors must be
free of dirt, ice, snow and slush. Clean the
sensors regularly, being careful not to
scratch or damage the sensors.Front sensors
Rear sensorsMinimum distance
If the system detects an obstacle in this
range, all the warning lamps light up and
you hear a warning signal. If the obstacle is
closer than the minimum distance, the ac-
tual distance might no longer be indicated
by the system.
Center
approx. 40 in (100 cm)
Corners
approx. 24 in (60 cm)
Center
approx. 48 in (120 cm)
Corners
approx. 32 in (80 cm)
!During parking maneuvers, pay special
attention to objects located above or
below the height of the sensors (e.g.
planters or trailer hitches). The Park-
tronic system will not detect such ob-
jects at close range and damage to
your vehicle or the object may result.
Ultrasonic signals from outside sourc-
es (e.g. truck air brakes or jackham-
mers) may impair the operation of the
Parktronic system.
Center
approx. 8 in (20 cm)
Corners
approx. 6 in (15 cm)
Page 221 of 416
221 Controls in detail
Driving systems
As your vehicle approaches an object, one
or more segments will light up, depending
on the distance between your vehicle and
the object. When the eighth segment lights
up, you have reached the minimum dis-
tance.�
Front area: An intermittent acoustic
warning will sound as the first red seg-
ment lights up and a constant acoustic
warning, both lasting a maximum of
three seconds, will sound for the eighth
segment, i.e. the second red segment.
�
Rear area: An intermittent acoustic
warning will sound as the first red seg-
ment lights up and a constant acoustic
warning, both lasting a maximum of
three seconds, will sound for the eighth
segment, i.e. the second red segment.
The signal is canceled when the selec-
tor lever is placed in position D orP.Switching the Parktronic system
on/off
You can switch off the Parktronic system
manually.
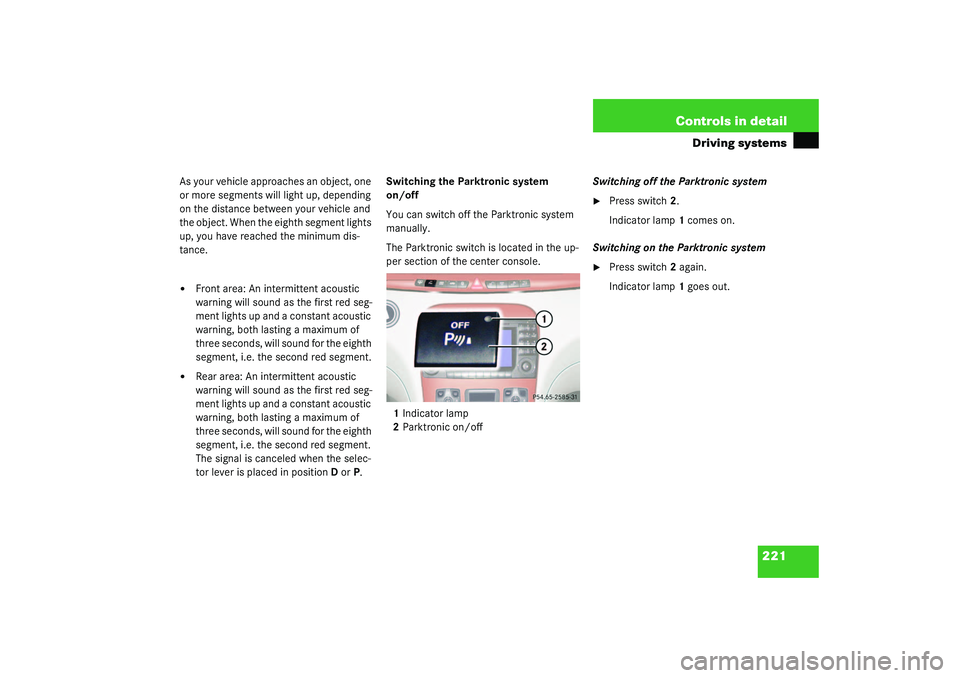
The Parktronic switch is located in the up-
per section of the center console.
1Indicator lamp
2Parktronic on/offSwitching off the Parktronic system
�
Press switch2.
Indicator lamp1 comes on.
Switching on the Parktronic system
�
Press switch2 again.
Indicator lamp1 goes out.
Page 224 of 416
224 Controls in detailUseful features
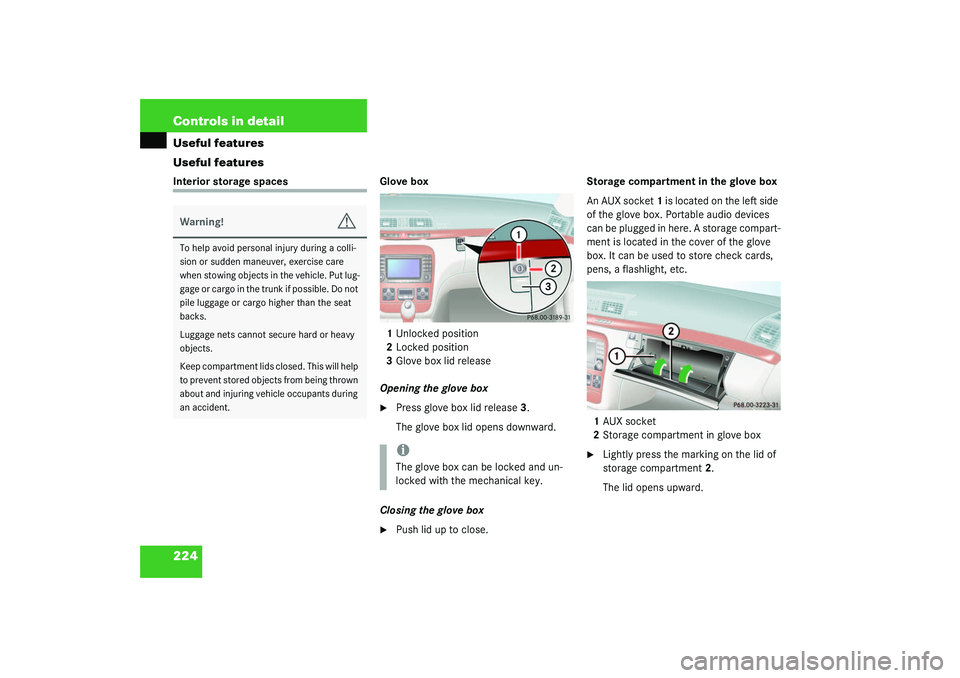
Useful featuresInterior storage spaces Glove box
1Unlocked position
2Locked position
3Glove box lid release
Opening the glove box
�
Press glove box lid release3.
The glove box lid opens downward.
Closing the glove box
�
Push lid up to close.Storage compartment in the glove box
An AUX socket 1 is located on the left side
of the glove box. Portable audio devices
can be plugged in here. A storage compart-
ment is located in the cover of the glove
box. It can be used to store check cards,
pens, a flashlight, etc.
1AUX socket
2Storage compartment in glove box
�
Lightly press the marking on the lid of
storage compartment2.
The lid opens upward.
Warning!
G
To help avoid personal injury during a colli-
sion or sudden maneuver, exercise care
when stowing objects in the vehicle. Put lug-
g a g e o r c a r g o i n t h e t r u n k i f p o s s i b l e . D o n o t
pile luggage or cargo higher than the seat
backs.
Luggage nets cannot secure hard or heavy
objects.
Keep compartment lids closed. This will help
to prevent stored objects from being thrown
about and injuring vehicle occupants during
an accident.
iThe glove box can be locked and un-
locked with the mechanical key.
Page 232 of 416
232 Controls in detailUseful featuresParcel net in front passenger footwell
A small convenience parcel net is located
in the front passenger footwell. It is for
small and light items, such as road maps,
mail, etc.Parcel net in trunk
You can hang a parcel net in the trunk. The
hooks and the parcel net in the trunk can
hold a load of up to 29.8 lbs (13.5 kg).
�
Hang the parcel net on hooks1 on the
left and right sides of the trunk.
Ashtrays
Center console ashtray
Opening ashtray�
Briefly touch cover plate1.
The ashtray opens automatically.
Warning!
G
Do not place heavy or fragile objects, or ob-
jects having sharp edges, in the parcel net.
In an accident, during hard braking, or sud-
den maneuvers they could be thrown
around inside the vehicle and cause injury to
vehicle occupants.
!The parcel net cannot protect or suffi-
ciently secure goods in the event of an
accident.
Page 233 of 416
233 Controls in detail
Useful features
Removing ashtray insert�
Secure vehicle from movement by set-
ting the parking brake. Move the selec-
tor lever to positionN.
Now you have more room to take out
the insert.
�
Push sliding button2 to the right.
The ashtray is disengaged and slides
out a short way.
�
Remove insert from ashtray frame.
Reinstalling the ashtray insert
�
Install insert by pushing it back into the
frame until it engages.Rear door ashtray
Opening ashtray
�
Lightly touch the back of the ashtray.
Removing ashtray insert
�
Pull the ashtray back slightly and re-
move the insert (see arrows).
Reinstalling the ashtray insert
�
Position the insert and press down
while sliding forward.
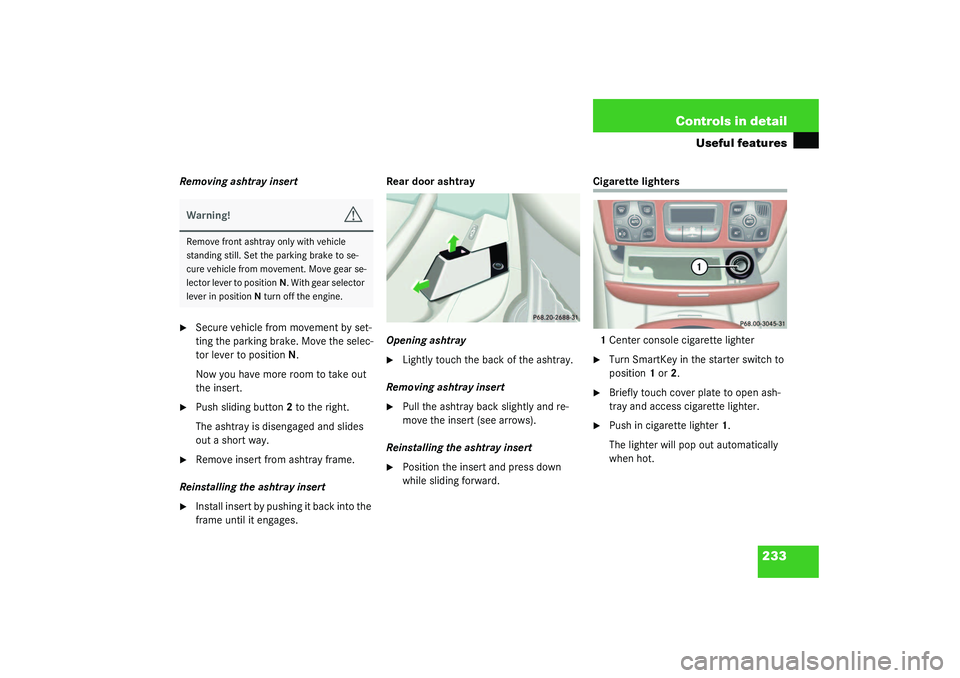
Cigarette lighters
1Center console cigarette lighter�
Turn SmartKey in the starter switch to
position1 or2.
�
Briefly touch cover plate to open ash-
tray and access cigarette lighter.
�
Push in cigarette lighter1.
The lighter will pop out automatically
when hot.
Warning!
G
Remove front ashtray only with vehicle
standing still. Set the parking brake to se-
cure vehicle from movement. Move gear se-
lector lever to positionN. With gear selector
lever in positionN turn off the engine.
Page 234 of 416
234 Controls in detailUseful features
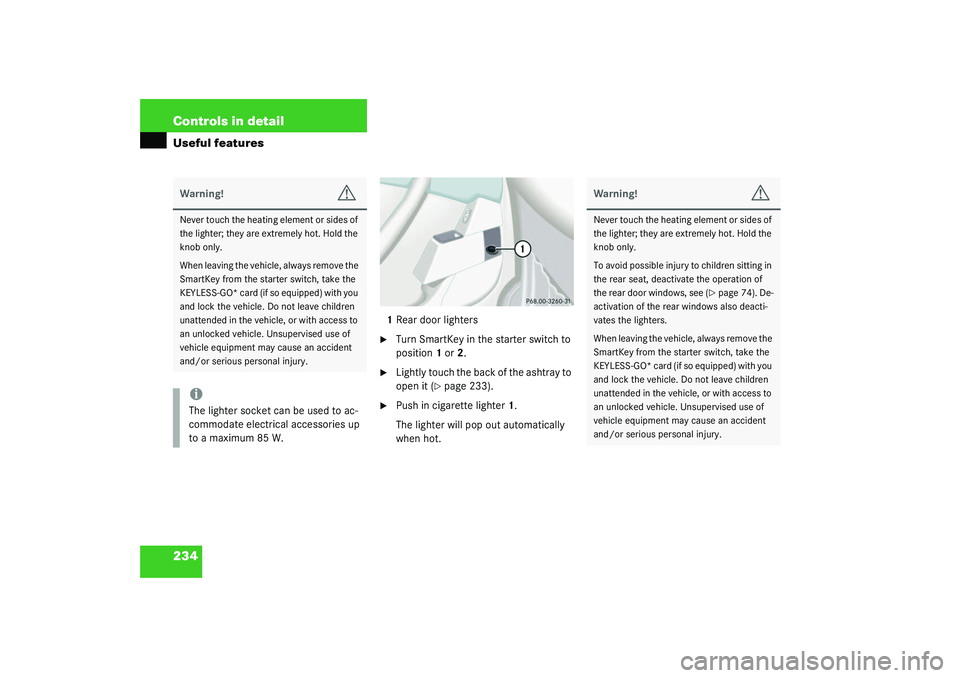
1Rear door lighters�
Turn SmartKey in the starter switch to
position1 or2.
�
Lightly touch the back of the ashtray to
open it (
�page 233).
�
Push in cigarette lighter1.
The lighter will pop out automatically
when hot.
Warning!
G
Never touch the heating element or sides of
the lighter; they are extremely hot. Hold the
knob only.
When leaving the vehicle, always remove the
SmartKey from the starter switch, take the
KEYLESS-GO* card (if so equipped) with you
and lock the vehicle. Do not leave children
unattended in the vehicle, or with access to
an unlocked vehicle. Unsupervised use of
vehicle equipment may cause an accident
and/or serious personal injury.iThe lighter socket can be used to ac-
commodate electrical accessories up
to a maximum 85 W.
Warning!
G
Never touch the heating element or sides of
the lighter; they are extremely hot. Hold the
knob only.
To avoid possible injury to children sitting in
the rear seat, deactivate the operation of
the rear door windows, see (
�page 74). De-
activation of the rear windows also deacti-
vates the lighters.
When leaving the vehicle, always remove the
SmartKey from the starter switch, take the
KEYLESS-GO* card (if so equipped) with you
and lock the vehicle. Do not leave children
unattended in the vehicle, or with access to
an unlocked vehicle. Unsupervised use of
vehicle equipment may cause an accident
and/or serious personal injury.
Page 257 of 416
257 Operation
Driving instructions
Road salts and chemicals can adversely af-
fect braking efficiency. Increased pedal
force may become necessary to produce
the normal braking effect.
We therefore recommend depressing the
brake pedal periodically when traveling at
length on salt-strewn roads.
This can bring road salt impaired braking
efficiency back to normal. Be very careful
that you carry out these braking maneu-
vers without endangering any other road
users.
If the vehicle is parked after being driven
on salt treated roads, the braking efficien-
cy should be tested as soon as possible af-
ter driving is resumed while observing the
safety rules in the previous paragraph.
For more information, see “Winter driving”
(
�page 278).
Standing water
Warning!
G
If the vehicle becomes stuck in snow, make
sure that snow is kept clear of the exhaust
pipe and from around the vehicle with the
engine running. Otherwise, deadly carbon
monoxide (CO) gases may enter vehicle in-
terior resulting in unconsciousness and
death.
To assure sufficient fresh air ventilation,
open a window slightly on the side of the ve-
hicle not facing the wind.Warning!
G
The outside temperature indicator is not de-
s i g n e d t o s e r v e a s a n i c e - w a r n i n g d e v i c e a n d
is therefore unsuitable for that purpose. In-
dicated temperatures just above the freez-
ing point do not guarantee that the road
surface is free of ice.
!Do not drive through flooded areas or
water of unknown depth.
If you must drive through standing wa-
ter, drive slowly to prevent water from
entering the passenger compartment
or the engine compartment. Water in
these areas could cause damage to
electrical components or wiring of the
engine or transmission, or could result
in water being ingested by the engine
through the air intake causing severe
internal engine damage. Any such dam-
age is not covered by the
Mercedes-Benz Limited Warranty.
Page 273 of 416
273 Operation
Tires and wheels
Life of tires
The service life of a tire is dependent upon
varying factors including but not limited to:�
driving style
�
tire pressure
�
distance driven
Direction of rotation
Unidirectional tires offer added advantag-
es, such as better hydroplaning perfor-
mance. To benefit, however, you must
ensure that the tires rotate in the direction
specified.
An arrow on the sidewall indicates the in-
tended direction of tire rotation.
Checking tire inflation pressure
Correct the tire pressure only when tires
are cold.
Regularly check your tire pressure at inter-
vals of no more than 14 days.
If the tires are warm, you should only cor-
rect the tire pressure if it is too low for cur-
rent operating conditions.
A table on the fuel filler flap lists the spec-
ified tire inflation pressures for warm and
cold tires as well as for various operating
conditions.
Warning!
G
Tires and spare tire should be replaced after
six years, regardless of the remaining tread.!Keep unmounted tires in a cool, dry
place with as little exposure to light as
possible. Protect tires from contact
with oil, grease and gasoline.
Warning!
G
If the tire pressure repeatedly drops:�
Check the tires for punctures from
foreign objects.
�
Check to see whether air is leaking from
the valves or from around the rim.