Page 225 of 321

225 Practical hints
What to do if …
Problem
Possible cause
Suggested solution
-
The yellow ABS malfunction indi-
cator lamp comes on while driv-
ing.
ABS has detected a malfunction and has
switched off. The BAS, ESP, 4-ETS and EBP
are also switched off.
The brake system is still functioning normally
but without ABS available.
�
Continue driving with added caution.
Wheels will lock during hard braking
reducing steering capability.
�
Have the system checked at an autho-
rized Mercedes-Benz Light Truck Cen-
ter as soon as possible.
Failure to follow these instructions in-
creases the risk of an accident.
The charging voltage has fallen below
10 volts. The ABS has switched off.
When the voltage is above this value
again, the ABS is operational again.�
If necessary, have the generator and
the battery checked.
¿
The yellow malfunction indicator
lamp comes on while driving.
The ESP is no longer synchronized following
a voltage supply interuption (e.g. battery dis-
connected or discharged).
Synchronize the ESP:�
Turn the steering wheel from stop lim-
it to stop limit.
The indicator lamp goes out.
The charging voltage has fallen below
10 volts. The BAS and ESP have switched off.
When the voltage is above this value
again, the BAS and ESP are operational
again.�
If necessary, have the generator and
the battery checked.
Page 236 of 321
236 Practical hintsWhere will I find ...?
Where will I find ...?First aid kit
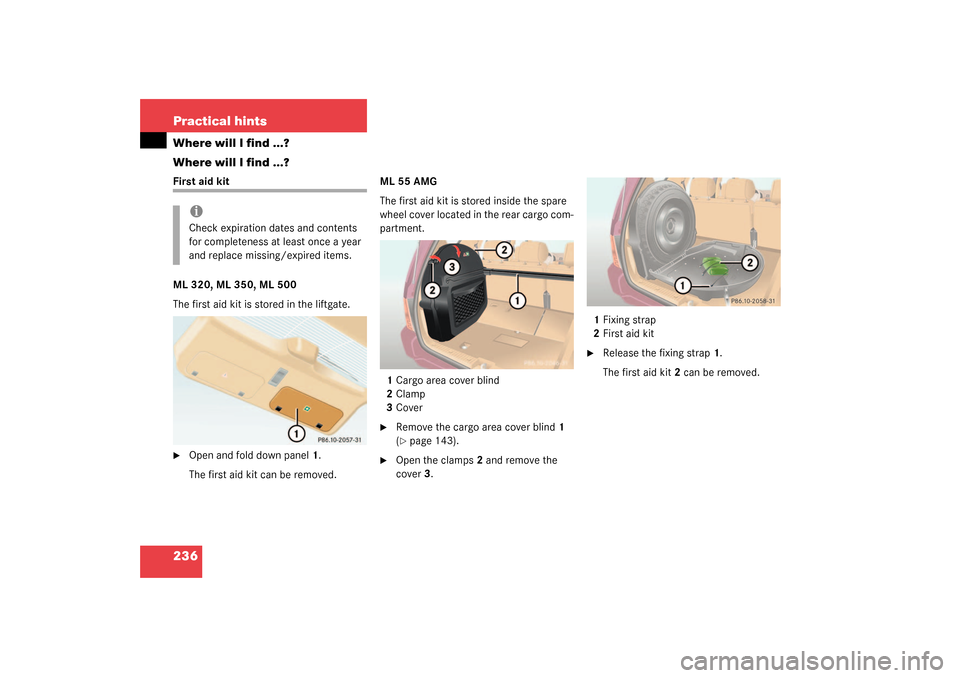
ML 320, ML 350, ML 500
The first aid kit is stored in the liftgate.�
Open and fold down panel1.
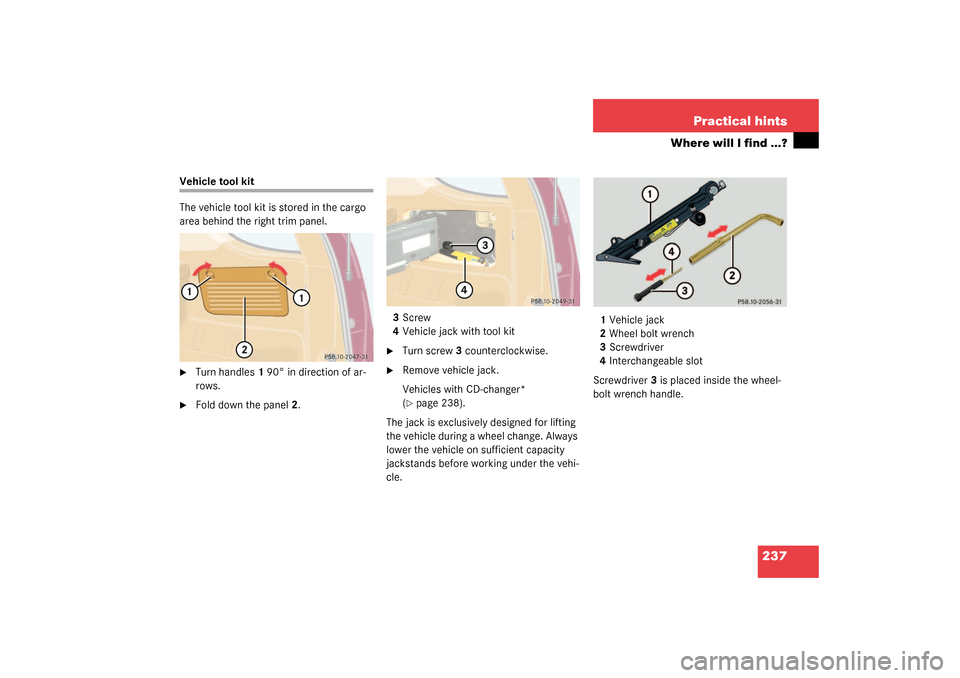
The first aid kit can be removed.ML 55 AMG
The first aid kit is stored inside the spare
wheel cover located in the rear cargo com-
partment.
1Cargo area cover blind
2Clamp
3Cover
�
Remove the cargo area cover blind1
(�page 143).
�
Open the clamps2 and remove the
cover3.1Fixing strap
2First aid kit
�
Release the fixing strap1.
The first aid kit2 can be removed.
iCheck expiration dates and contents
for completeness at least once a year
and replace missing/expired items.
Page 237 of 321
237 Practical hints
Where will I find ...?
Vehicle tool kit
The vehicle tool kit is stored in the cargo
area behind the right trim panel.�
Turn handles1 90° in direction of ar-
rows.
�
Fold down the panel2.3Screw
4Vehicle jack with tool kit
�
Turn screw3 counterclockwise.
�
Remove vehicle jack.
Vehicles with CD-changer*
(�page 238).
The jack is exclusively designed for lifting
the vehicle during a wheel change. Always
lower the vehicle on sufficient capacity
jackstands before working under the vehi-
cle.1Vehicle jack
2Wheel bolt wrench
3Screwdriver
4Interchangeable slot
Screwdriver3 is placed inside the wheel-
bolt wrench handle.
Page 238 of 321

when using the jack.
Vehicle with CD-changer*
To access th")
238 Practical hintsWhere will I find ...?Vehicle jack
Please also observe the safety guidelines
in the “Flat tire” section (
�page 255)
when using the jack.
Vehicle with CD-changer*
To access the vehicle tool kit, swing the
CD-changer out of the panel.
1Screw
2CD-changer
�
Turn screw1 counterclockwise.
�
Swing the CD-changer2 out of the pan-
el.
Electric air pump (ML 55 AMG)
The electric air pump is located behind the
spare wheel.�
Remove the spare wheel (
�page 240).
1Electric air pump
�
Open the strap and remove the electric
air pump.
Warning!
G
The jack is designed exclusively for jacking
up the vehicle at the jack take-up brackets
built into both sides of the vehicle. To help
avoid personal injury, use the jack only to lift
the vehicle during a wheel change. Never
get beneath the vehicle while it is supported
by the jack. Keep hands and feet away from
the area under the lifted vehicle. Always
firmly set parking brake and block wheels
before raising vehicle with jack.
Do not disengage parking brake while the
vehicle is raised. Be certain that the jack is
always vertical (plumb line) when in use, es-
pecially on hills. Always try to use the jack
on level surface.
Make sure that the jack arm is fully seated
in the jack take-up bracket. Always lower
the vehicle onto sufficient capacity jack-
stands before working under the vehicle.
Page 239 of 321

Use the spare wheel only temporarily,
while observing the following restrictions:�
Do not exceed vehicle speed of
50 mph (80")
239 Practical hints
Where will I find ...?
Spare wheel (space-saver tire)
Use the spare wheel only temporarily,
while observing the following restrictions:�
Do not exceed vehicle speed of
50 mph (80 km / h).
�
Drive to the nearest repair facility to
have the flat tire repaired or replaced
as appropriate.
�
Do not operate vehicle with more than
one spare wheel mounted.Removing spare wheel (except
ML 55 AMG)
The spare wheel is located behind the rear
bumper.
1Cover
�
Hold left and right side of cover1 and
pull away from bumper.2Screw
3Spare wheel carrier
4Lever
�
Turn screw2 counterclockwise using
the wrench (
�page 237).
Screw2 remains in spare wheel
carrier3.
�
Lift spare wheel carrier slightly and
push lever4 to the right using screw-
driver (
�page 237).
�
Swing spare wheel carrier down and
pull it out from under the bumper.
Warning!
G
The dimensions of the spare wheel are dif-
ferent from those of the road wheels. As a
result, the vehicle handling characteristics
change when driving with a mounted spare
wheel.iPlease comply with the instructions for
“Mounting the spare wheel”
(�page 255).
Warning!
G
Exercise care when removing or installing
spare wheel to prevent personal injury.
Page 240 of 321
240 Practical hintsWhere will I find ...?5Bayonet lock�
Turn the bayonet lock 90° to the left.
�
Pull off bayonet lock5.
�
Remove the spare wheel cover and the
spare wheel.
�
Store bayonet lock5 and spare wheel
cover in cargo area.
�
Replace the spare wheel carrier and se-
cure it in place.
�
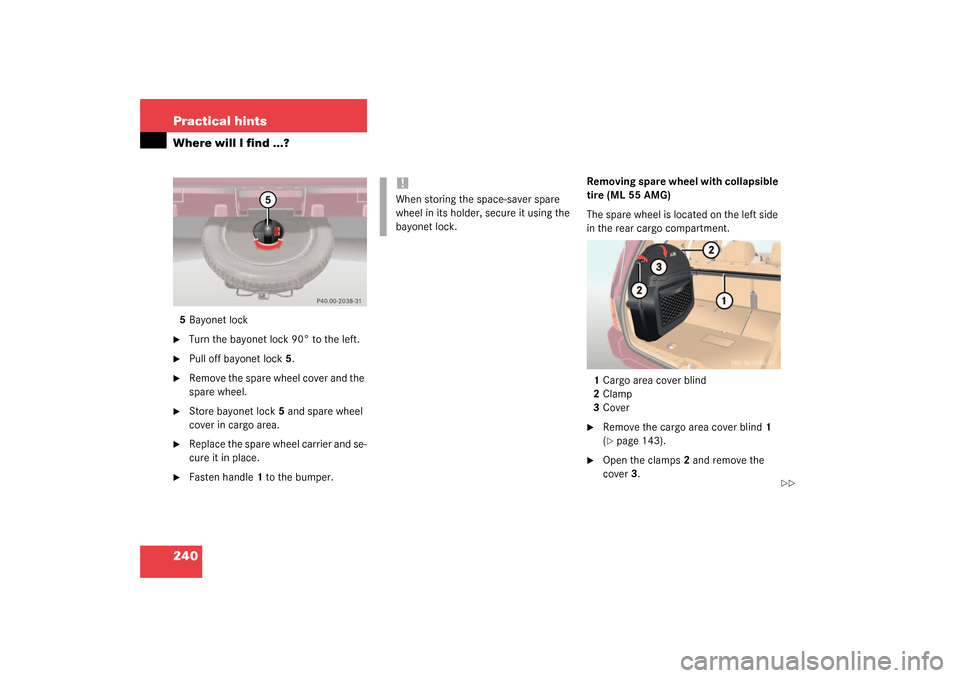
Fasten handle1 to the bumper.Removing spare wheel with collapsible
tire (ML 55 AMG)
The spare wheel is located on the left side
in the rear cargo compartment.
1Cargo area cover blind
2Clamp
3Cover
�
Remove the cargo area cover blind1
(�page 143).
�
Open the clamps2 and remove the
cover3.
!When storing the space-saver spare
wheel in its holder, secure it using the
bayonet lock.
��
Page 241 of 321
241 Practical hints
Where will I find ...?
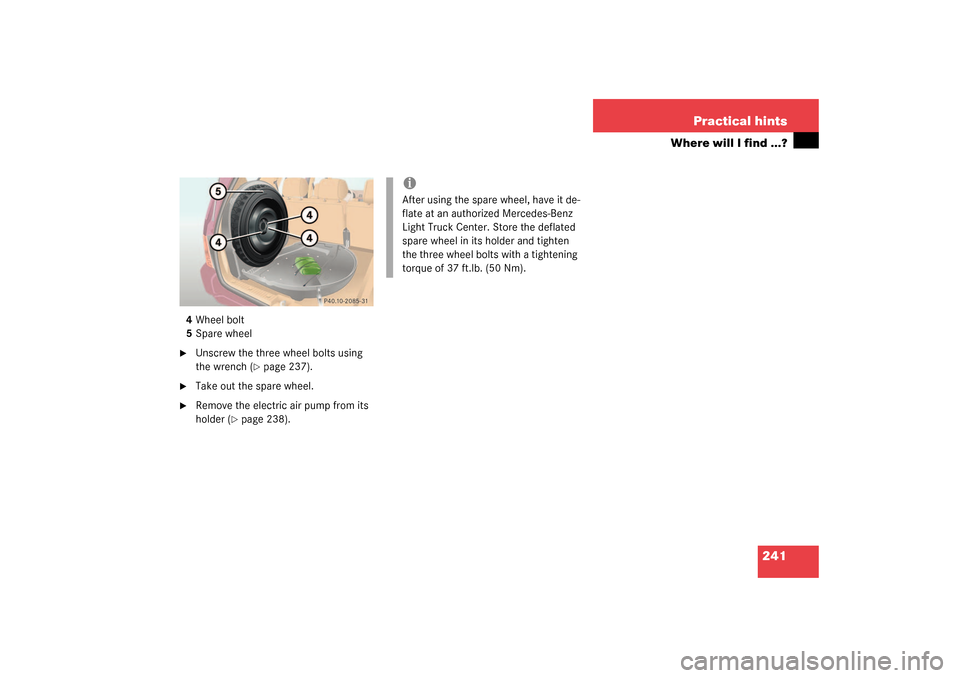
4Wheel bolt
5Spare wheel�
Unscrew the three wheel bolts using
the wrench (
�page 237).
�
Take out the spare wheel.
�
Remove the electric air pump from its
holder (
�page 238).
iAfter using the spare wheel, have it de-
flate at an authorized Mercedes-Benz
Light Truck Center. Store the deflated
spare wheel in its holder and tighten
the three wheel bolts with a tightening
torque of 37 ft.lb. (50 Nm).
Page 244 of 321

244 Practical hintsUnlocking/locking in an emergency�
Pull off battery cover2 in direction of
arrow.
�
Remove the batteries.
�
Using a lint-free cloth, insert new bat-
teries under the contact spring with the
plus (+) side facing up.
�
Press battery cover onto housing until
locked in place.
�
Push each button to assure proper op-
eration of the remote control.
If remote control does not function cor-
rectly after replacing the batteries, the
system may have to be resynchronized.Synchronizing remote control
�
Turn key in steering lock to position2,
then to position0 and remove.
�
Within 10 seconds, push and hold
button
‹
while pushing
button
Œ
five times.
�
Release the button, and press
‹
,
Œ
or
Š
once.
The remote control is resynchronized.
�
Recheck all of the remote control func-
tions.
Fuel filler flap
1Cover
2Lock rod�
Open cover1 in cargo area behind the
left trim panel.
�
Turn lock rod2 clockwise (arrow) to
the end stop.
�
Open the fuel filler flap.
iIf it is not possible to resynchronize the
remote control, have the system
checked at your authorized
Mercedes-Benz Light Truck Center.
iML 55 AMG:
First remove the spare wheel from its
holder (
�page 240).