Page 111 of 321
. The coolant temperature may
climb to the r")
111 Controls in detail
Instrument cluster
Coolant temperature gauge
Under normal driving conditions, the cool-
ant temperature may rise to 248°F
(120°C). The coolant temperature may
climb to the red marking:�
at high outside temperatures
�
during stop-and-go city traffic
�
when driving on hilly terrain
The engine should not be operated with
the coolant temperature in the red zone.
Doing so may cause serious engine dam-
age which is not covered by the
Mercedes-Benz Limited Warranty.
Display in the speedometer
Changing display�
Press the left knob1 in the instrument
cluster (
�page 110).
The display changes between main
odometer and trip odometer.
�
Press the left knob1 twice.
The next scheduled service is displayed
(�page 215).
Warning!
G
Driving when your engine is badly overheat-
ed can cause some fluids which may have
leaked into the engine compartment to
catch fire. You could be seriously burned.
Steam from an overheated engine can cause
serious burns and can occur just by opening
the engine hood. Stay away from the engine
if you see or hear steam coming from it.
Turn off the engine, get out of the vehicle
and do not stand near the vehicle until it
cools down.
Page 125 of 321
125 Controls in detail
Automatic climate control
Automatic climate control panel in the front
Item
1
Thumbwheel center air outlet
2
Center air outlet, adjustable
3
Defroster air outlet windshield
4
Thumbwheels side air outlet
5
Side air outlet, adjustable
6
Footwell air outlet
7
Automatic climate control
Item
1
Air volume control
2
Defrosting
3
Air recirculation
4
Temperature control
5
Automatic control (temperature, air
distribution, air volume)
6
AC
OFF
(AC cooling on/off), econo-
my mode
Residual heat/ventilation
7
Interior temperature sensor
8
Air distribution control
9
Rear window defroster
10
Rear passenger compartment venti-
lation on/off
Page 126 of 321

126 Controls in detailAutomatic climate controlThe automatic climate control is operation-
al whenever the engine is running. You can
operate the climate control system in ei-
ther the automatic or manual mode. The
system cools or heats the interior depend-
ing on the selected interior temperature
and the current outside temperature.
Nearly all dust particles, pollutants and
odors are filtered out before outside air en-
ters the passenger compartment through
the air distribution system.
Automatic mode
Switching on�
Briefly press button
U
(
�page 125).
The indicator lamp lights up. The tem-
perature, air volume and distribution
are controlled automatically.
�
Adjust the temperature with the tem-
perature control4 (
�page 125).
Temperature control is switched off in
the extreme position (blue or red dot).
Warning!
G
Follow the recommended settings for heat-
ing and cooling given on the following pag-
es. Otherwise the windows could fog up,
impairing visibility and endangering you and
others.
iSevere conditions (e.g. strong air pollu-
tion) may require replacement of the fil-
ter before its scheduled interval. A
clogged filter will reduce the air volume
to the interior.
If the vehicle interior is hot, ventilate
the interior before driving off.
Keep the air intake grille in front of the
windshield free of snow and debris.
Do not touch the interior temperature
sensor to maintain a precise tempera-
ture.
The set value is indicated by a lighted
segment on the control wheels.
Page 128 of 321
 to one the following sym-
bols:
Windshield fogged on the outside
�
Switch the win")
128 Controls in detailAutomatic climate controlAdjusting air distribution�
Turn air distribution control8
(�page 125) to one the following sym-
bols:
Windshield fogged on the outside
�
Switch the windshield wipers on.
�
Turn air distribution control8 to
h
or
k
.
Defrosting
Activating�
Press button
P
(�page 125).
The indicator lamp on the button lights
up.
Deactivating
�
Press button
P
again.
or
�
Press button
U
(�page 125).
The indicator lamp on the button lights
up.
The indicator lamp on the button lights up.
Air recirculation mode
Switch to air recirculation mode to prevent
unpleasant odors from entering the vehicle
from the outside. This setting cuts off the
intake of outside air and recirculates the
air in the passenger compartment.
Symbol
Function
h
Directs air to the center
and side air outlets
j
Directs air to the wind-
shield and side air outlets
V
Directs air into the entire
vehicle interior
k
Directs air to the foot-
wells and side air outlets
iThese settings should only be selected
for a short time.
When the defrost setting has been se-
lected, only the rear window defroster
can be switched on. No other settings
are possible.
Warning!
G
When the outside temperature is below
41°F (5°C), only switch to air recirculation
mode for short periods to prevent window
fogging.
Page 131 of 321

131 Controls in detail
Automatic climate control
Rear window defroster
The rear window defroster uses a large
amount of power. To keep the battery
drain to a minimum, switch off the defrost-
er as soon as the rear window is clear. The
defroster is automatically deactivated af-
ter approximately 6 to 17 minutes of oper-
ation depending on the outside
temperature.
Activating�
Switch ignition on.
�
Press button
F
(�page 125).
The indicator lamp on the button lights
up.
Deactivating
�
Press button
F
again.
The indicator lamp on the button goes
out.Rear passenger compartment ventila-
tion and rear automatic climate control
Deactivating
For an improved cooling or heating output
in the front passenger compartment, you
can switch off the rear passenger compart-
ment ventilation.�
Press button
§
(�page 125).
The indicator lamp on the button lights
up.
The operation of the rear automatic cli-
mate control and the fresh air supply to
the rear compartment is shut off.
Activating
�
Press button
§
again.
The indicator lamp on the button goes
out.
The rear automatic climate control
switches to automatic mode and fresh
air enters the rear compartment.
Warning!
G
Any accumulation of snow and ice should be
removed from the rear window before driv-
ing. Visibility could otherwise be impaired,
endangering you and others.!If the rear window defroster switches
off too soon and the indicator lamp
starts blinking, this means that too
many electrical consumers are operat-
ing simultaneously and there is insuffi-
cient voltage in the battery. The system
responds automatically by deactivating
the rear window defroster.
As soon as the battery has sufficient
voltage, the rear window defroster au-
tomatically turns itself back on.
Page 133 of 321
133 Controls in detail
Automatic climate control
Adjusting side air outlets�
Turn thumbwheel4 (
�page 125), to
one of the following positions:Center air outlets
Opening
�
Turn thumbwheel center air outlet 1
(�page 125) upward to position
h
.
Closing
�
Turn thumbwheel center air outlet 1
downward to position
M
.
Use the left thumbwheel to adjust the cen-
ter air outlets on the left and in the center.
Use the right thumbwheel to adjust the
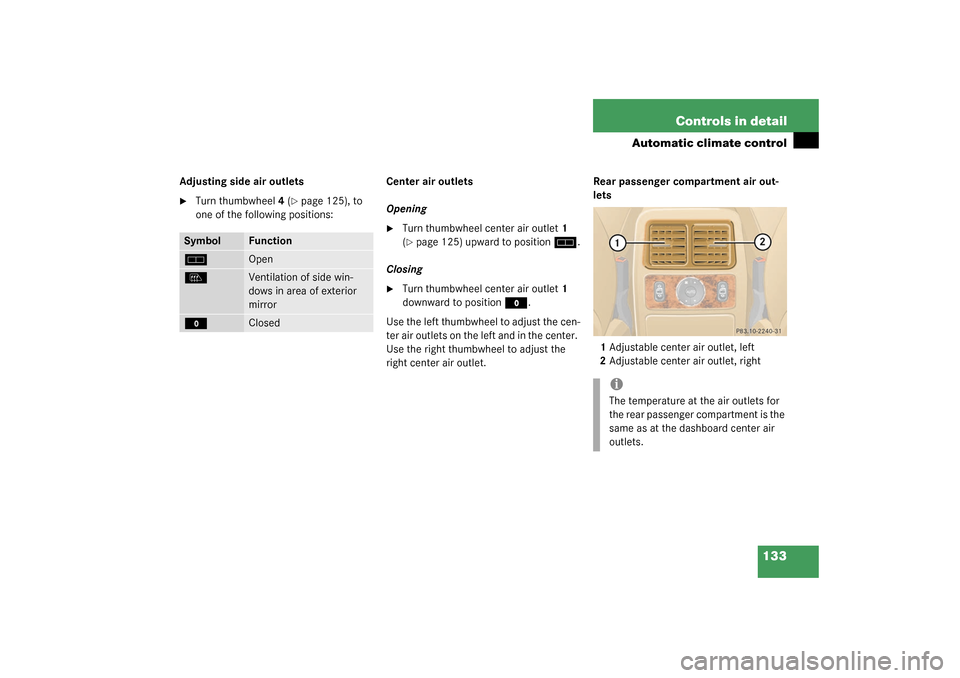
right center air outlet.Rear passenger compartment air out-
lets
1Adjustable center air outlet, left
2Adjustable center air outlet, right
Symbol
Function
h
Open
l
Ventilation of side win-
dows in area of exterior
mirror
M
Closed
iThe temperature at the air outlets for
the rear passenger compartment is the
same as at the dashboard center air
outlets.
Page 140 of 321
140 Controls in detailLoadingCargo tie-down rings
The cargo area is provided with four
tie-down rings. Additional two rings are lo-
cated at the rear of front seats.Cargo tie-down ring
Carefully secure cargo by applying even
load on all rings with rope of sufficient
strength to hold down the cargo.Hooks
Four hooks located on the rear compart-
ment trim panels, two on each side.
HooksUse the hooks to secure light weight items.
The maximum permissible weight per hook
is 9lbs.(4kg).
iThe trunk is the preferred place to carry
objects. The enlarged cargo area
should only be used for items which do
not fit in the trunk alone.
iWhile the partition net (
�page 141)
will help protect you from smaller ob-
jects, it cannot prevent the movement
of large, heavier objects into the pas-
senger area in an accident. Such items
must be properly secured using the
cargo tie-down rings in the cargo area
floor.
Page 150 of 321

150 Controls in detailDriving systemsMonitoring reach of sensors
The sensors must be free of dirt, ice and
snow or they will be unable to function
properly. Clean the sensors regularly with-
out scratching or damaging them.Front sensors
Rear sensors
Minimum distance
When an obstacle is located in this area, all
warning displays will light up and a warning
tone will sound. If the vehicle moves closer
than the minimum distance to an object,
the distance may no longer be displayed.Warning indicators
The warning indicators show the distance
between the sensor and the obstacle. The
warning indicators for the front area are lo-
cated above the center air outlets in the
dashboard. The warning indicator for the
rear area is located in the rear passenger
compartment lamp.
1Segments, left side of vehicle
2Segments, right side of vehicle
Each warning indicator has 6 yellow and 2
red segments.
Center
40 in (100 cm)
Corner
24 in (60 cm)
Center
48 in (120 cm)
Corner
32 in (80 cm)
Center
6 in (15 cm)
Corner
8 in (20 cm)