Page 10 of 321

10 IntroductionOperator’s Manual
Operator’s ManualThis Operator’s Manual contains a great
deal of useful information. We urge you to
read it carefully and familiarize yourself
with the vehicle before driving.
For your own safety and longer service life
of the vehicle, we urge you to follow the in-
structions and warnings contained in this
manual. Ignoring them could result in dam-
age to the vehicle or personal injury to you
or others. Vehicle damage caused by fail-
ure to follow instructions is not covered by
the Mercedes-Benz Limited Warranty.
Your vehicle may have some or all of the
equipment described in this manual.
Therefore, you may find explanations for
optional equipment not installed in your
vehicle. If you have any questions about
the operation of any equipment, your au-
thorized Mercedes-Benz Light Truck Cen-
ter will be glad to demonstrate the proper
procedures.We continuously strive to improve our
product, and ask for your understanding
that we reserve the right to make changes
in design and equipment. Therefore, infor-
mation, illustrations and descriptions in
this Operator’s Manual might differ from
your vehicle.
Optional equipment is also described in
this manual, including operating instruc-
tions wherever necessary. Since they are
special-order items, the descriptions and
illustrations herein may vary slightly from
the actual equipment of your vehicle.
If there are any equipment details that are
not shown or described in this Operator’s
Manual, your authorized Mercedes-Benz
Light Truck Center will be glad to inform
you of correct care and operating proce-
dures.
The Operator’s Manual and Service Book-
let are important documents and should be
kept with the vehicle.
Service and warranty information
The Service and Warranty Information
Booklet contains detailed information
about the warranties covering your
Mercedes-Benz, including:�
New Light Truck Limited Warranty,
�
Emission System Warranty,
�
Emission Performance Warranty,
�
California, Maine, Massachusetts, and
Vermont Emission Control System
Warranty
(California, Maine, Massachusetts, and
Vermont only),
�
State Warranty Enforcement Laws
(Lemon Laws).
Page 23 of 321
23 At a glance
Cockpit
Item
Page
1
Hood lock release
202
2
Parking brake pedal
50
3
Parking brake release
50
4
Left cup holder
154
5
Combination switch�
Turn signals
�
High beam
46
6
Cruise control lever
146
7
Instrument cluster
110
8
Hazard warning flasher
switch
106
9
Lever for voice control
system*, see separate
operating instructions
Item
Page
10
Windshield wiper/washer
switch
122
11
Front Parktronic* warning
indicator
150
12
Glove box
152
13
Right cup holder
154
14
Storage compartment
15
Electrical outlet
158
16
Horn
17
Headlamp washer button*
121
18
Steering lock with ignition
33
19
Steering wheel adjustment
stalk
37
Page 26 of 321
26 At a glanceInstrument cluster
Item
Page
5
Photo sensor
(adjusts the brightness of
the digital displays located
in 1, 4 and 8)
6
Right indicator lamps
with:W
Low wind-
shield/headlamp
washer system fluid
level warning lamp
234
7
Front passenger air-
bag switched off
232
‡
Front fog lamp
switched on
105
Item
Page
_
Steering wheel ad-
justment not locked
229
<
Seat belt nonusage
warning lamp
234
1
Supplemental Re-
straint System
(SRS) indicator
227
É
Brake warning lamp
228
229
#
Charge indicator
lamp
233
A
High beam head-
lamp switched on
47
Item
Page
7
Knob for setting clock
112
8
Tachometer with:
Selector lever
position
114
Clock
112
9
K
Turn signal
indicator lamp right
10
L
Turn signal
indicator lamp left
Page 27 of 321
27 At a glance
Center console
Center console
Upper part
Item
Page
1
Air outlets, automatic
climate control
132
2
MCS, see separate
operating instructions
3
Automatic climate control
124
Rear window defroster
switch
131
4
Seat heater switch*,
passenger side
91
5
Rear quarter window
switch*, right
136
6
ESP control switch
75
Item
Page
7
Rear window wiper/wash-
er switch
123
8
Rear quarter window
switch*, left
136
9
Seat heater switch*,
driver’s side
91
10
Front and rear fog lamp
switch
105
11
Indicator lamp for antitheft
alarm system
78
12
Transmission control
switch, LOW RANGE mode
118
Page 28 of 321
28 At a glanceCenter consoleLower part
Item
Page
1
Ashtray with cigarette
lighter
156
2
Selector lever for
automatic transmission
44
3
Power window switch, right
front door
134
4
Power window switch, right
rear door
134
5
Parking assist* (Parktron-
ic) deactivation switch
149
6
Storage compartment with
cup holder
154
Item
Page
7
Exterior rear view mirror
adjustment switch
38
Exterior rear view mirror
electrically folding*
120
8
Central locking switch
89
9
Power window switch, left
rear door
134
10
Switch for rear door win-
dow override
69
11
Power window switch, left
front door
134
Page 29 of 321
29 At a glance
Overhead control panel
Overhead control panel
Item
Page
1
Front left interior lighting
107
2
Signal transmitter keys for
garage door opener
168
3
Front right interior lighting
107
4
Roadside Assistance
button
163
Information button
165
5
Interior lighting control
107
6
Trip computer* display
172
7
Rear view mirror
119
Item
Page
8
Right reading lamp on/off
108
9
Automatic antiglare func-
tion* on/off
119
10
Left reading lamp on/off
108
11
Glass breakage sensor
79
12
Trip computer* control
172
Tow-away alarm switch
80
13
Tele Aid (emergency call
system) button
163
14
Sliding/pop-up roof*
switch
137
Page 34 of 321

34 Getting startedAdjusting
AdjustingSeats
Depending on the vehicle’s equipment,
you can adjust the seats manually or elec-
trically.Warning!
G
All seat, head restraint, steering wheel, and
rear view mirror adjustments, as well as fas-
tening of seat belts, must be done before
the vehicle is put into motion.Warning!
G
Do not adjust the driver’s seat while driving.
Adjusting the seat while driving could cause
the driver to lose control of the vehicle.
Never ride in a moving vehicle with the seat
back reclined. Sitting in an excessively re-
clined position can be dangerous. You could
slide under the seat belt in a collision. If you
slide under it, the belt would apply force at
the abdomen or neck.
That could cause serious or fatal injuries.
The seat back and seat belts provide the
best restraint when the wearer is in an up-
right position and belts are properly posi-
tioned on the body. Your seat must be
adjusted so that you can correctly fasten
your seat belt (
�page 40).
Never place hands under the seat or near
any moving parts while a seat is being ad-
justed.
Warning!
G
When leaving the vehicle always remove the
key from the steering lock and lock your ve-
hicle.
Do not leave children unattended in the ve-
hicle or with access to an unlocked vehicle.
Unsupervised use of vehicle equipment may
cause an accident and/or serious personal
injury.
Warning!
G
Children 12 years old and under must never
ride in the front seat, except in a
Mercedes-Benz authorized BabySmart
TM
compatible child seat, which operates with
the BabySmart
TM system installed in the ve-
hicle to deactivate the passenger side front
airbag when it is properly installed. Other-
wise they will be struck by the airbag when
it inflates in a crash. If this happens, serious
or fatal injury will result.
According to accident statistics, children
are safer when properly restrained in the
rear seating positions than in the front seat-
ing positions. Infants and small children
must ride in back seats and be seated in an
appropriate infant or child restraint system,
which is properly secured with the vehicle's
seat belt and top tether strap, or secured via
lower anchors and top tether strap, fully in
accordance with the child seat manufactur-
er’s instructions.
Page 39 of 321
39 Getting started
Adjusting
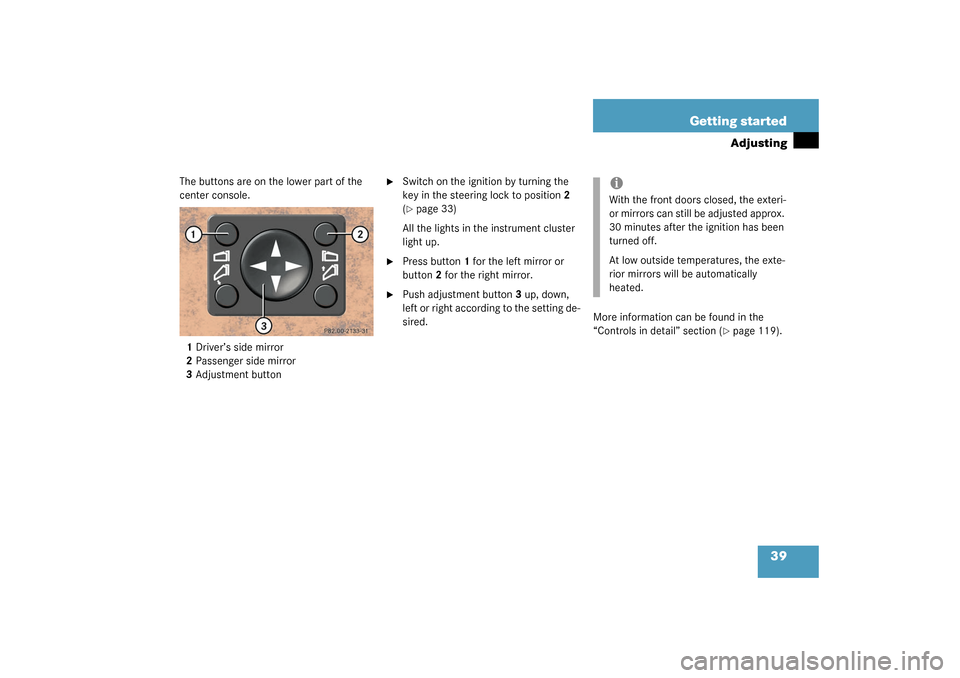
The buttons are on the lower part of the
center console.
1Driver’s side mirror
2Passenger side mirror
3Adjustment button
�
Switch on the ignition by turning the
key in the steering lock to position2
(�page 33)
All the lights in the instrument cluster
light up.
�
Press button1 for the left mirror or
button2 for the right mirror.
�
Push adjustment button3 up, down,
left or right according to the setting de-
sired.More information can be found in the
“Controls in detail” section (
�page 119).
iWith the front doors closed, the exteri-
or mirrors can still be adjusted approx.
30 minutes after the ignition has been
turned off.
At low outside temperatures, the exte-
rior mirrors will be automatically
heated.


6
Right indicator lamps
with:W
Low wind-
shield/headlamp
washer sys")