Page 103 of 321

103 Controls in detail
Lighting
Automatic headlamp mode
The parking lamps, low beam headlamps
and license plate lamps switch on and off
automatically depending on the brightness
of the ambient light.�
Turn the combination switch to
U
.Daytime running lamp mode
Canada only:
�
Turn combination switch to
position
M
or
U
.
When the engine is running, the low
beam headlamps are automatically
switched on. In low ambient light con-
ditions the parking lamps will also
switch on.
When you shift from a driving position to
positionN orP, the low beam switches off
(3 minutes delay).
For nighttime driving you should turn the
combination switch to position
õ
to
permit activation of the high beam head-
lamps.
Warning!
G
In automatic headlamp mode, the head-
lamps will not be automatically switched on
under foggy conditions. To minimize risk to
you and to others, activate headlamps by
turning combination switch to
õ
.
The driver is responsible for the operation of
the vehicle’s lights at all times. The automat-
ic headlamp feature is only an aid to the driv-
er. Switch on the vehicle lights manually
when driving or when traffic conditions re-
quire you to do so.
iIf the automatic headlamp mode is ac-
tivated, the fog lamps can also be
switched on (
�page 105). The low
beam headlamp and parking lamps are
activated simultaneously.
iIf you drive in countries where vehicles
drive on the other side of the road than
the country where the vehicle is regis-
tered, you must have the headlamps
modified for symmetrical low beams.
Relevant information can be obtained
at your authorized Mercedes-Benz
Light Truck Center.
iThe high beam flasher is always avail-
able.
Page 107 of 321

107 Controls in detail
Lighting
Interior lighting
1Left front interior lamp
2Right front interior lamp
3Automatic function off
4Automatic function on
5Rear interior lightingAutomatic control
Activating
�
Bring the rocker switch in center
position4.
Interior lamps (except cargo compart-
ment lamp) are switched on in dark-
ness when you�
unlock the vehicle
�
open a door
�
remove the key from the steering
lock
In addition, the entry/exit lamps in the
d oor tra ys wi ll com e on when y ou ope n
a door.
When all doors are closed and no key is
inserted in the steering lock, the interi-
or lamps are switched off after a brief
delay.Deactivating
�
Press lower part3 of rocker switch .
The interior lighting and the entry/exit
lamps remain switched off in darkness,
even when you�
unlock the vehicle
�
open a door
�
remove the key from the steering
lock
iIf the door remains open, the interior
lamps (except cargo compartment
lamp) switch off automatically after ap-
proximately 30 minutes.
Page 110 of 321
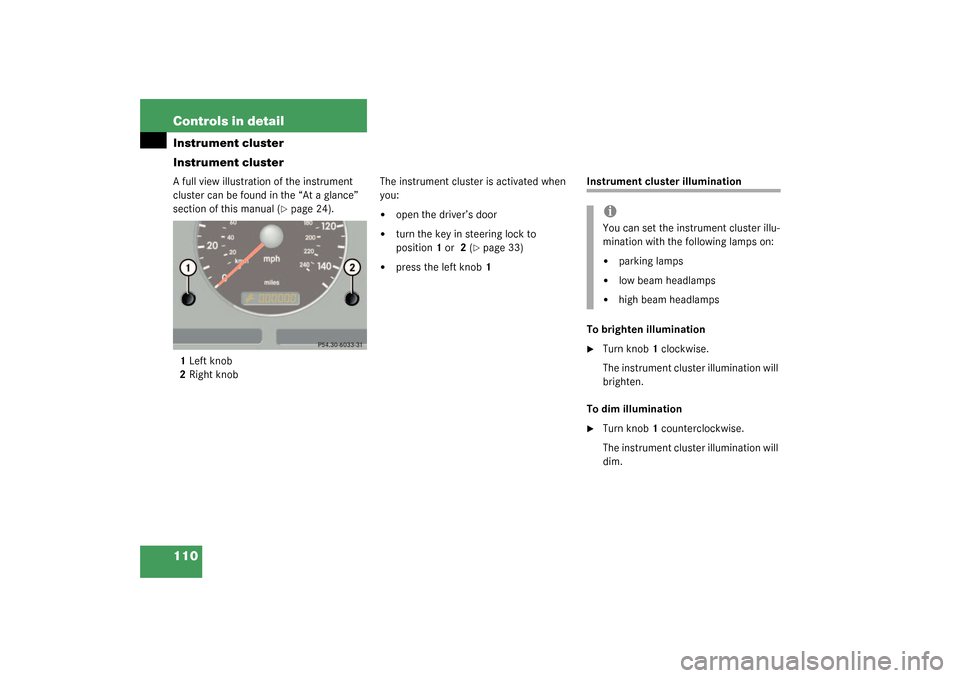
110 Controls in detailInstrument cluster
Instrument clusterA full view illustration of the instrument
cluster can be found in the “At a glance”
section of this manual (
�page 24).
1Left knob
2Right knobThe instrument cluster is activated when
you:
�
open the driver’s door
�
turn the key in steering lock to
position1 or 2 (
�page 33)
�
press the left knob1
Instrument cluster illumination
To brighten illumination�
Turn knob1 clockwise.
The instrument cluster illumination will
brighten.
To dim illumination
�
Turn knob1 counterclockwise.
The instrument cluster illumination will
dim.iYou can set the instrument cluster illu-
mination with the following lamps on:�
parking lamps
�
low beam headlamps
�
high beam headlamps
Page 112 of 321
 re-
peatedly until you see the trip odome-
ter display.
�
Press and hold the left knob1 until the
tr")
112 Controls in detailInstrument clusterResetting trip odometer�
Press the left knob1 (
�page 110) re-
peatedly until you see the trip odome-
ter display.
�
Press and hold the left knob1 until the
trip odometer is reset.
Tachometer
To help protect the engine, the fuel supply
is interrupted if the engine is operated
above its specified limit.
Outside temperature indicator
When moving the vehicle into colder ambi-
ent temperatures (e.g. when leaving your
garage), you will notice a delay before the
lower temperature is displayed.
A delay also occurs when ambient temper-
atures rise. This prevents inaccurate tem-
perature indications caused by heat
radiated from the engine during idling or
slow driving.
Setting the clock
Hour�
Pull out the right knob2 in the instru-
ment cluster (
�page 110) and turn it
counterclockwise.
Minutes
�
Pull out the right knob2 in the instru-
ment cluster (
�page 110) and turn it
clockwise.
Warning!
G
The outside temperature indicator is not de-
signed to serve as an ice-warning device and
is therefore unsuitable for that purpose.
Indicated temperatures just above the freez-
ing point do not guarantee that the road sur-
face is free of ice. The road may still be icy,
especially in wooded areas or on bridges.
iTo set the clock by a single hour or a
few minutes, turn knob2 just a few de-
grees in the direction indicated for
hours or minutes.
Page 113 of 321
.
Your transmiss")
113 Controls in detail
Automatic transmission
Automatic transmission
Information for driving with an automatic
transmission is found in the “Getting start-
ed” section (
�page 44).
Your transmission adapts its gear shifting
process to your individual driving style by
continually adjusting the shift points up or
down. These shift point adjustments are
performed based on current operating and
driving conditions.
If the operating conditions change, the au-
tomatic transmission reacts by adjusting
its gear shift program.
The automatic transmission selects indi-
vidual gears automatically, dependent
upon
�
the selector lever positionD with gear
ranges4, 3, 2, 1
�
the position of the accelerator pedal
(�page 117)
�
the vehicle speedWhen the selector lever is in positionD,
you can influence transmission shifting by
�
limiting the gear range
�
changing gears yourself
One-touch gearshifting
Even with an automatic transmission you
can change the gears yourself when the
selector lever is in positionD.
Downshifting�
Briefly press the selector lever to the
left in the D–direction.
The transmission will shift from the cur-
rent gear to the next lower gear. This
action simultaneously limits the gear
range of the transmission
(�page 114).
Warning!
G
It is dangerous to shift the selector lever out
ofP orN if the engine speed is higher than
idle speed. If your foot is not firmly on the
brake pedal, the vehicle could accelerate
quickly forward or reverse. You could lose
control of the vehicle and hit someone or
something. Only shift into gear when the en-
gine is idling normally and when your right
foot is firmly on the brake pedal.
Warning!
G
On slippery road surfaces, never downshift
in order to obtain braking action. This could
result in drive wheel slip and reduced vehi-
cle control. Your vehicle’s ABS will not pre-
vent this type of loss of control.
Page 114 of 321

114 Controls in detailAutomatic transmissionUpshifting�
Briefly press the selector lever to the
right in the D+direction.
The transmission will shift from the cur-
r e n t g e a r t o t h e n e x t h i g h e r g e a r a s p e r -
mitted by the shift program. This action
simultaneously extends the gear range
of the transmission.Canceling gear range limit
�
Press and hold the selector lever in the
D+direction until D reappears in the
tachometer display field.
Shifting into optimal gear range
�
Press and hold the gear selector lever
in the D– direction.
The transmission will automatically se-
lect the gear range suited for optimal
acceleration and deceleration. This will
involve shifting down one or more
gears.
Gear ranges
With the selector lever in positionD, you
can limit the transmission’s gear range by
pressing the lever to the left (D-), and re-
verse the gear range limit by pressing the
lever to the right (D+).
The selected gear range will appear in the
tachometer display field. If you press on
the accelerator when the engine has
reached its rpm limit, the transmission will
upshift beyond any gear range limit
selected.
iTo avoid overrevving the engine when
the selector lever is moved to the D– di-
rection, the transmission will not shift
to a lower gear if the engine’s max.
speed would be exceeded.
Page 119 of 321
 and for adjusting the rear view
mirrors (
�page 38) is found in the “Get-
ting started” sec")
119 Controls in detail
Good visibility
Good visibility
Information on the windshield wipers
(�page 47) and for adjusting the rear view
mirrors (
�page 38) is found in the “Get-
ting started” section.
Rear view mirror
Manually dimming inside rear view mir-
ror
1Lever�
Press lever1 backward.
The interior rear view mirror is dimmed.Automatic antiglare rear view mirror*
The reflection brightness of the exterior
rear view mirror on the driver’s side and
the inside rear view mirror will respond au-
tomatically to glare when:
�
the automatic antiglare function is acti-
vated (
�page 120)
�
the ignition is switched on
�
incoming light from headlamps falls on
the sensor in the inside rear view mir-
ror
The rear view mirror will not react if
�
reverse gear is engaged
�
the interior light is turned on
Warning!
G
The automatic antiglare function does not
react if incoming light is not aimed directly
at sensors in the inside rear view mirror.
The inside rear view mirror and the exterior
rear view mirror on the driver’s side do not
react, for example, if the cargo area is fully
loaded.
Glare can endanger you and others.Warning!
G
Exercise care when using the passenger
side exterior rear view mirror. The mirror
surface is convex (outwardly curved surface
for a wider field of view). Objects in mirror
are closer than they appear. Check your in-
side rear view mirror or glance over your
shoulder before changing lanes.
Page 121 of 321

121 Controls in detail
Good visibility
Folding in�
Briefly press button 1.
The mirrors fold in.Folding out
�
Briefly press button 2.
The mirrors fold out.
Headlamp cleaning system*
The switch is located on the right side of
the dashboard.Headlamp washer switch�
Switch on ignition.
�
Briefly press the upper part of switch.
iWith the front doors closed, the exteri-
or mirrors can still be folded in and out
approximately 30 minutes after the ig-
nition has been turned off.!Before you drive the vehicle through an
automatic car wash, fold the exterior
mirrors in, otherwise they may get
damaged.iIf you are driving at more than 9 mph
(15 km/h), you will not able to fold the
exterior mirrors in.
!If an exterior mirror housing is forcibly
pushed forward (hit from the rear), re-
position it manually by applying firm
pressure until it snaps back into place.
If an exterior mirror is forcibly pushed
rearward (hit from the front) press
button1 to fold mirrors in, then press
button2 to fold mirrors out. Do not
force mirror by hand.
The mirror housing is now properly po-
sitioned and you can adjust the mirror
normally.