Page 94 of 321

94 Controls in detailSeatsFolding up the backrest�
Pull lock button1 up and unfold back-
rest until it locks in place.
Make sure that the seat belt is not
caught in the seat.
�
Check for secure locking by pulling and
pushing on the backrest.
The red backrest lock indicator at lock
button1 is not visible in the locked po-
sition.
�
Install head restraint (
�page 92).
�
Slide seat rearward to desired position
(�page 93).
�
Adjust front seats to desired position.
Manual seats (
�page 35) and power
seats (
�page 37). Lowering the rear seat
1Release button
2Lever
3Release lever
�
Close cup holder in rear center console
(�page 155).
�
Move front seats forward. Manual seat
(�page 35) or power seat (
�page 37).
�
Press and hold release button1 to un-
lock lever2.
�
Pull lever2 in direction of arrow.
�
Pull release lever3 and push down rear
seat until it locks in place.
�
Fold down the backrest (
�page 93).
�
Adjust front seats to desired position.
Manual seats (
�page 35) and power
seats (
�page 37).
Folding up the rear seat
�
Move front seats forward. Manual seat
(�page 35) or power seat (
�page 37).
�
Pull release lever3 and raise rear seat
until it locks in place.Warning!
G
Failure to assure that seats are locked into
place could result in an increased chance of
injury in an accident.
Page 95 of 321
.
Folding rear seat fo")
95 Controls in detail
Seats
Easy entry/exit feature*
The easy entry/exit feature allows access
to the third row seats*. The right cargo
floor plate must be removed (
�page 144).
Folding rear seat forward
1Lever
�
Move right seat forward. Manual seats
(�page 35) and power seats
(�page 37).
�
Move rear seat forward (
�page 93).
�
Push head restraint fully down and tilt
it forward.
�
Fold backrest forward (
�page 93).
�
Pull lever1 up and fold the rear seat
forward.
Resetting rear seat
�
Pull down on seat bench until it locks
into place.
�
Pull lock button1 (
�page 93) up and
unfold backrest until it locks into place.
�
Pull down on seat bench until it locks
into place.
�
Check for secure locking by pulling and
pushing on the backrest.
The red backrest lock indicator at lock
button1 (
�page 93) is not visible in
the locked position.
�
Move the rear and front seats in de-
sired position.
�
Pull up and adjust head restraint
(�page 36).
Warning!
G
Never drive with the second row right seat
folded forward (easy entry/exit feature). It
could open and fold back unintentionally.
Page 96 of 321
.
�
Remove head restraint1 from seat
c")
96 Controls in detailSeatsThird row seats* Folding down single seat
1Head restraint
2Hook
3Tensioner
4Hook and loop strip
�
Remove cargo floor plate
(�page 144).
�
Remove head restraint1 from seat
cushion.
�
Lift tensioner3 upward to a horizontal
position to release tension of the belt.
�
Disengage hook2 while holding onto
the seat firmly with one hand.
�
Attach belt at hook and loop strip4 on
underside of seat.
5Backrest release
6Seat release
�
Fold seat down until it locks securely in
place.
The red marking on the seat release
should6 not be visible.
�
Store cargo floor plates inside the
backrest (
�page 144).
�
Pull backrest release5 and unfold
backrest until it locks securely in place.
�
Install head restraint1 in backrest
(�page 92).
Warning!
G
For your protection, drive only with properly
positioned head restraints.
Adjust head restraint to support the back of
the head approximately at ear level.
Failure to assure that seats are locked into
place could result in an increased chance of
injury in an accident.
Never place hands under seat or near any
moving parts while a seat is being adjusted.
Page 97 of 321
97 Controls in detail
Seats
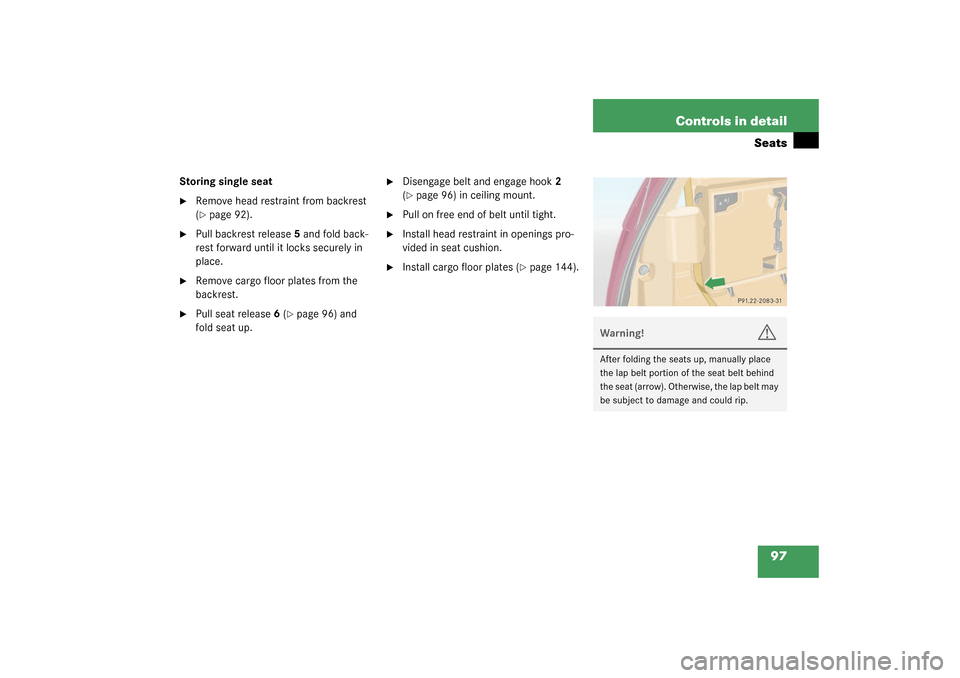
Storing single seat�
Remove head restraint from backrest
(�page 92).
�
Pull backrest release5 and fold back-
rest forward until it locks securely in
place.
�
Remove cargo floor plates from the
backrest.
�
Pull seat release6 (
�page 96) and
fold seat up.
�
Disengage belt and engage hook2
(�page 96) in ceiling mount.
�
Pull on free end of belt until tight.
�
Install head restraint in openings pro-
vided in seat cushion.
�
Install cargo floor plates (
�page 144).
Warning!
G
After folding the seats up, manually place
the lap belt portion of the seat belt behind
the seat (arrow). Otherwise, the lap belt may
be subject to damage and could rip.
Page 99 of 321

99 Controls in detail
Memory function*
Memory function*
With the memory button you can store up
to three different settings for the driver-
and passenger seat.
Together with the driver’s seat you can
store the exterior rear view mirrors.
For the front passenger seat you can store
the seat position.
1Position buttons
2Memory button
!Prior to operating the vehicle the driver
should check and adjust the seat
height, seat position fore and aft, and
seat backrest angle if necessary, to en-
sure adequate control, reach and com-
fort. The head restraint should also be
adjusted for proper height. Also see air-
bag section (
�page 55) for proper seat
positioning.
In addition, adjust the steering wheel to
ensure adequate control, reach, opera-
tion and comfort. Both the inside and
outside rear view mirrors should be ad-
justed for adequate rear vision.
Fasten seat belts. Infants and small
children should be seated in a properly
secured restraint system that complies
with U.S. Federal Motor Vehicle Safety
Standard 213 and 225 and Canadian
Motor Vehicle Safety Standard 213 and
210.2.
Warning!
G
Do not activate the memory function while
driving. Activating the memory function
while driving could cause the driver to lose
control of the vehicle.
Page 102 of 321
102 Controls in detailLighting
LightingFor notes on how to switch on the head-
lamps (
�page 46) and use the turn signals
(
�page 47), see the “Getting started” sec-
tion.
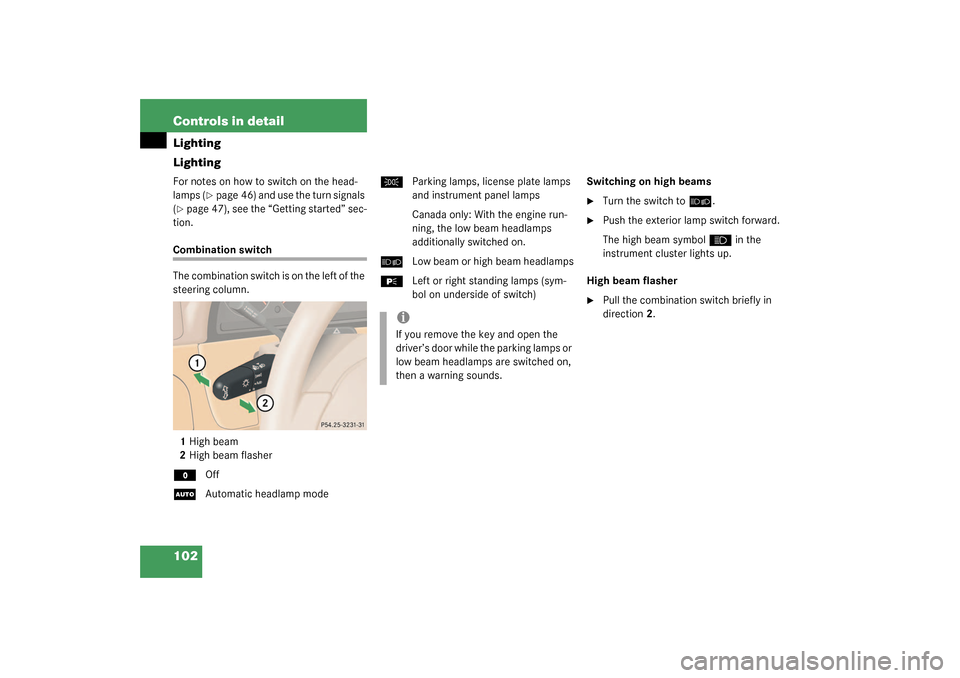
Combination switch
The combination switch is on the left of the
steering column.
1High beam
2High beam flasherM
Off
U
Automatic headlamp mode
C
Parking lamps, license plate lamps
and instrument panel lamps
Canada only: With the engine run-
ning, the low beam headlamps
additionally switched on.
õ
Low beam or high beam headlamps
ƒ
Left or right standing lamps (sym-
bol on underside of switch)Switching on high beams
�
Turn the switch to
õ
.
�
Push the exterior lamp switch forward.
The high beam symbol
A
in the
instrument cluster lights up.
High beam flasher
�
Pull the combination switch briefly in
direction2.
iIf you remove the key and open the
driver’s door while the parking lamps or
low beam headlamps are switched on,
then a warning sounds.
Page 103 of 321

103 Controls in detail
Lighting
Automatic headlamp mode
The parking lamps, low beam headlamps
and license plate lamps switch on and off
automatically depending on the brightness
of the ambient light.�
Turn the combination switch to
U
.Daytime running lamp mode
Canada only:
�
Turn combination switch to
position
M
or
U
.
When the engine is running, the low
beam headlamps are automatically
switched on. In low ambient light con-
ditions the parking lamps will also
switch on.
When you shift from a driving position to
positionN orP, the low beam switches off
(3 minutes delay).
For nighttime driving you should turn the
combination switch to position
õ
to
permit activation of the high beam head-
lamps.
Warning!
G
In automatic headlamp mode, the head-
lamps will not be automatically switched on
under foggy conditions. To minimize risk to
you and to others, activate headlamps by
turning combination switch to
õ
.
The driver is responsible for the operation of
the vehicle’s lights at all times. The automat-
ic headlamp feature is only an aid to the driv-
er. Switch on the vehicle lights manually
when driving or when traffic conditions re-
quire you to do so.
iIf the automatic headlamp mode is ac-
tivated, the fog lamps can also be
switched on (
�page 105). The low
beam headlamp and parking lamps are
activated simultaneously.
iIf you drive in countries where vehicles
drive on the other side of the road than
the country where the vehicle is regis-
tered, you must have the headlamps
modified for symmetrical low beams.
Relevant information can be obtained
at your authorized Mercedes-Benz
Light Truck Center.
iThe high beam flasher is always avail-
able.
Page 106 of 321
106 Controls in detailLightingSwitching off rear fog lamp�
Press upper part1 of switch.
The yellow indicator lamp2 in the
switch goes out.
Switching off front fog lamps
�
Press upper part1 of switch.
The green indicator lamp
‡
in the
instrument cluster goes out.
Hazard warning flasher
The hazard warning flasher can be activat-
ed with the ignition switched on or off. It is
activated automatically when an airbag is
deployed.
The switch is located on top of the steering
column.Hazard warning flasher switch
Switching on hazard warning flasher�
Press the hazard warning flasher
switch.
All the turn signals will blink.
Switching off hazard warning flasher
�
Press hazard warning flasher switch
again.iIf the hazard warning flasher was acti-
vated automatically, press the hazard
warning flasher switch twice to deacti-
vate.