Page 76 of 321
.
In t")
76 Safety and SecurityDriving and safety systemsLOW RANGE – ESP
During off-road driving a special low range
system for the ESP is operational with
transmission in LOW RANGE mode
(�page 118).
In the LOW RANGE mode ESP operates in
a traction improving fashion specifically
adapted for off-road driving. At speeds be-low 27 mph (45 km / h), the ESP assists in
over-/understeering, thus improving vehi-
cle traction.
Switching off the ESP
To improve the vehicle’s traction, turn off
the ESP in driving situations where it would
be advantageous to have drive wheels spin
and thus cut into surfaces for better grip
such as:
�
starting out on slippery surfaces and in
deep snow in conjunction with snow
chains
�
in sand or gravel
�
when driving off-roadWhen the ESP is turned off
�
engine torque is not limited.
�
the drive wheels can spin.
This helps the wheels cut into surfaces
for a better grip.
!The engine must be shut off when�
the parking brake is being tested on
a brake test dynamometer.
�
the vehicle is being towed with the
front axle raised.
Otherwise, the ESP will engage the
brakes and seriously damage the brake
system.
The ESP will only function properly if
you use wheels of the recommended
tire size (
�page 279).
Warning!
G
The ESP should not be switched off during
normal driving other than in the circum-
stances described below. Disabling of the
system will reduce vehicle stability in stan-
dard driving maneuvers.
!Avoid spinning of a drive wheel for an
extended period with the ESP switched
off. This may cause serious damage to
the drivetrain which is not covered by
the Mercedes-Benz Limited Warranty.iTurn ESP on immediately if the afore-
mentioned circumstances do not apply
anymore.
Page 77 of 321

77 Safety and Security
Driving and safety systems
The button is located in the upper center
console.
1ESP on/off�
Press upper half of button.
The 4-ETS/ESP warning lamp
v
in
the speedometer dial comes on.Even if the ESP has been turned off, it is
still active in the following situations:
�
when braking
�
at vehicle speeds between approxi-
mately 24 mph (40 km/h) and 50 mph
(80 km/h), if one drive wheel loses
traction and begins to spin.
The brake is applied until the wheel re-
gains sufficient traction.
The 4-ETS/ESP warning lamp
v
, locat-
ed in the speedometer dial, starts to flash
at any speed as soon as the tires lose trac-
tion.Switching on the ESP
�
Press lower half of button.
The 4-ETS/ESP warning lamp
v
in
the speedometer goes out. You are
now again in normal driving mode.
More information can be found in the
“Practical hints” section (
�page 224).
Warning!
G
When the 4-ETS / ESP warning lamp
v
is
illuminated continuously, the ESP is
switched off.
Adapt your speed and driving to the prevail-
ing road conditions and to the non-operating
status of the ESP.
Page 85 of 321

85 Controls in detail
Locking and unlocking
Unlocking
Unlocking the driver’s door and fuel
filler flap�
Press button
Œ
once.
All turn signal lamps blink once to indi-
cate that the driver’s door and the fuel
filler flap are unlocked.Global unlocking
�
Press button
Œ
twice.
All turn signal lamps blink once to indi-
cate that all doors, fuel filler flap and
liftgate are unlocked.
Unlocking the liftgate
�
Press button
Š
.
Only the liftgate unlocks.
Locking
�
Press button
‹
once
All turn signal lamps blink three times
to indicate that all doors, the liftgate
and the fuel filler flap are unlocked.
iUnlocking the vehicle with the remote
control deactivates the anti-theft
alarm.
The vehicle will lock again automatical-
ly and reactivate the anti-theft system
within approximately 40 seconds of un-
locking if neither door nor liftgate is
opened.
iLocking the vehicle with the remote
control activates the anti-theft alarm.
iIf the turn signal lamps do not blink
three times, one of the following ele-
ments may not be properly closed:�
a door
�
the liftgate
�
the hood
Close the respective element and lock
the vehicle again.
Warning!
G
When leaving the vehicle, always remove the
key from the steering lock, and lock your ve-
hicle. Do not leave children unattended in
the vehicle, or with access to an unlocked
vehicle. Unsupervised use of vehicle equip-
ment may cause an accident and/or serious
personal injury.
Page 87 of 321
87 Controls in detail
Locking and unlocking
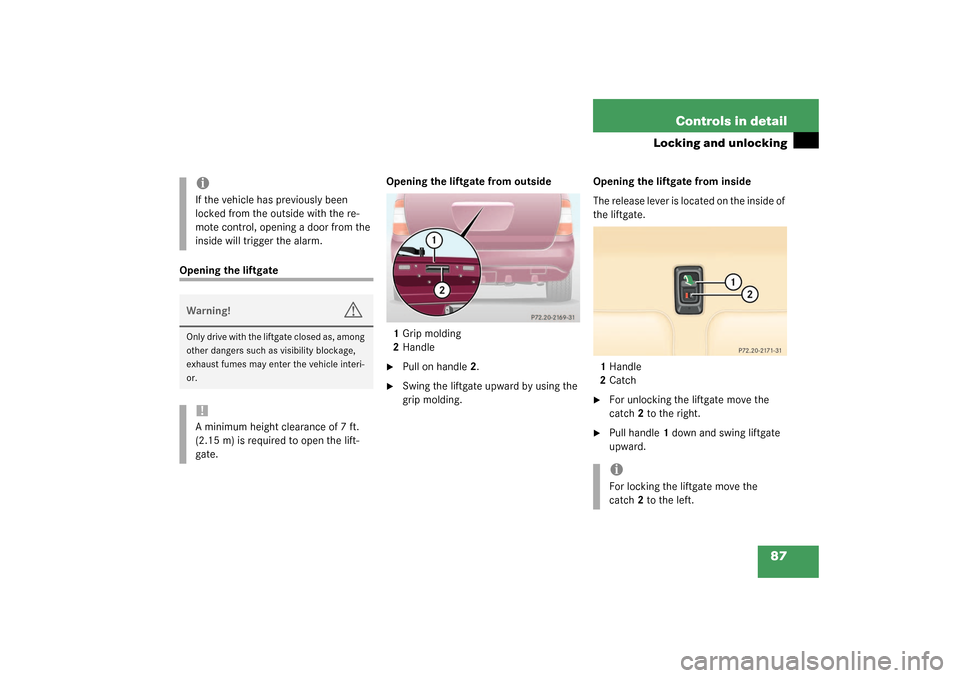
Opening the liftgateOpening the liftgate from outside
1Grip molding
2Handle
�
Pull on handle2.
�
Swing the liftgate upward by using the
grip molding.Opening the liftgate from inside
The release lever is located on the inside of
the liftgate.
1Handle
2Catch
�
For unlocking the liftgate move the
catch2 to the right.
�
Pull handle1 down and swing liftgate
upward.
iIf the vehicle has previously been
locked from the outside with the re-
mote control, opening a door from the
inside will trigger the alarm. Warning!
G
Only drive with the liftgate closed as, among
other dangers such as visibility blockage,
exhaust fumes may enter the vehicle interi-
or.!A minimum height clearance of 7 ft.
(2.15 m) is required to open the lift-
gate.
iFor locking the liftgate move the
catch2 to the left.
Page 88 of 321
88 Controls in detailLocking and unlocking
Closing the liftgate
1Recessed grip
2Grip molding
�
Pull down on recessed grip1.
�
Close liftgate by using grip molding2.
Warning!
G
When leaving the vehicle, always remove the
key from the steering lock and lock the vehi-
cle. Do not leave children unattended in the
vehicle. Children could open the liftgate
from inside, which could result in an acci-
dent and/or serious personal injury.
Warning!
G
When closing the liftgate, use extreme cau-
tion not to catch hands or fingers. Be espe-
cially careful when small children are
around.
Do not close the liftgate from the inside by
pulling on the handle.
Page 90 of 321

90 Controls in detailLocking and unlockingLocking and unlocking from the inside
You can lock or unlock the vehicle from in-
side using the central locking switches.
This can be useful, for example, if you want
to unlock the passenger door from the in-
side or want to lock the vehicle before
starting to drive.Locking
�
Press upper part1 of central locking
button (
�page 89).
If all the doors are closed, the vehicle
locks.
Unlocking
�
Press lower part2 of central locking
button (
�page 89).
The vehicle unlocks, if the vehicle was
not previously centrally locked with the
remote control.
iYou can open a locked door from the
inside. Open door only when conditions
are safe to do so.
If you have locked the vehicle with the
remote control, the central locking
switch does not work.
Warning!
G
When leaving the vehicle, always remove the
key from the steering lock and lock the vehi-
cle. Do not leave children unattended in the
vehicle, or with access to an unlocked vehi-
cle. Unsupervised use of vehicle equipment
may cause an accident and/or serious per-
sonal injury.
Page 92 of 321
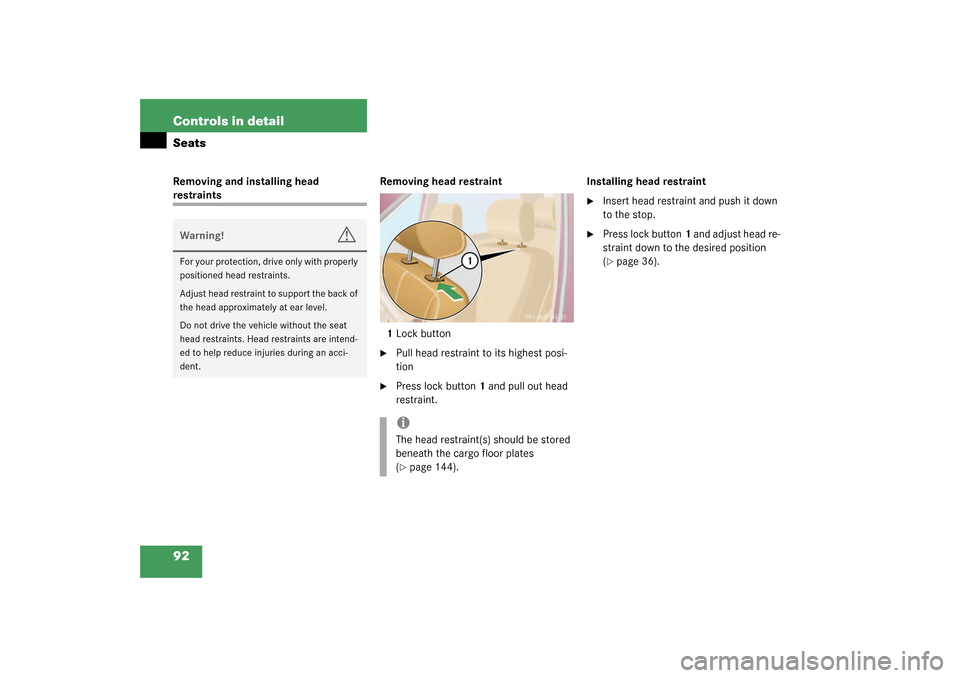
92 Controls in detailSeatsRemoving and installing head restraintsRemoving head restraint
1Lock button
�
Pull head restraint to its highest posi-
tion
�
Press lock button1 and pull out head
restraint.Installing head restraint
�
Insert head restraint and push it down
to the stop.
�
Press lock button1 and adjust head re-
straint down to the desired position
(�page 36).
Warning!
G
For your protection, drive only with properly
positioned head restraints.
Adjust head restraint to support the back of
the head approximately at ear level.
Do not drive the vehicle without the seat
head restraints. Head restraints are intend-
ed to help reduce injuries during an acci-
dent.
iThe head restraint(s) should be stored
beneath the cargo floor plates
(�page 144).
Page 93 of 321

93 Controls in detail
Seats
Rear seats
The rear seats are divided asymetrically.
To enlarge the cargo area you can adjust
the left and right part separately. The fol-
lowing changes are possible:�
moving the seat fore and aft
�
folding down the backrest
�
lowering the seatAdjusting rear seat fore and aft
1Release lever
�
Pull release lever1 in direction of ar-
row.
�
Slide seat to the desired position until
it locks in place.Folding down the backrest
1Lock button
�
Close cup holder in rear center console
(�page 155).
�
Move front seats forward. Manual seat
(�page 35) or power seat (
�page 37).
�
Slide seat forward.
�
Remove head restraint(s) (
�page 92).
�
Pull lock button1 up and fold backrest
forward until it locks in place.
The red backrest lock indicator at lock
button1 is not visible in the locked po-
sition.
Warning!
G
Do not adjust the rear seats while driving.
Always seat in an upright position and the
seat belts are properly positioned on the
body. Your seat must be adjusted so that
you can correctly fasten your seat belt.
Adjust head restraint to support the back of
the head approximately at ear level.
Never place hands under the seat or near
any moving parts while a seat is being ad-
justed.
Warning!
G
Failure to assure that seats are locked into
place could result in an increased chance of
injury in an accident.