Page 104 of 321

104 Controls in detailLightingNight security illumination
When you turn off the engine and the last
door has been closed, the following lamps
will remain lit:�
Parking lamps
�
Tail lamps
�
License plate lamps
�
Front fog lamps
The combination switch must be set to
position
U
(�page 102).Deactivating night security illumination
temporarily
�
Before leaving the vehicle turn the key
in the steering lock to position0 then
turn it to position2 and back to0.
The night security illumination is deac-
tivated. It will reactivate as soon as you
reinsert the key in the steering lock.
Setting illumination time
1Switch for fog lamps
�
Stop the vehicle.
�
Make sure that the ignition is switched
on.
All the lamps in the instrument cluster
light up.
�
Turn combination switch to
position
M
.
�
Press upper part1 of switch until the
clock, located in the instrument clus-
ter, displays the actual illumination
time.
�
Press upper part1 of switch again.
Each time the switch is pressed, the il-
lumination time increases by
15 seconds. You can set the illumina-
tion time between 0 (off) and
60 seconds.
Approximately five seconds after pressing
the switch, the illumination time is set and
the clock is displayed again.
iYou can reactivate this function within
ten minutes by opening a door or the
liftgate.
If you do not open a door or the liftgate
after turning off the engine, the lamps
will automatically switch off after
60 seconds.
Page 107 of 321

107 Controls in detail
Lighting
Interior lighting
1Left front interior lamp
2Right front interior lamp
3Automatic function off
4Automatic function on
5Rear interior lightingAutomatic control
Activating
�
Bring the rocker switch in center
position4.
Interior lamps (except cargo compart-
ment lamp) are switched on in dark-
ness when you�
unlock the vehicle
�
open a door
�
remove the key from the steering
lock
In addition, the entry/exit lamps in the
d oor tra ys wi ll com e on when y ou ope n
a door.
When all doors are closed and no key is
inserted in the steering lock, the interi-
or lamps are switched off after a brief
delay.Deactivating
�
Press lower part3 of rocker switch .
The interior lighting and the entry/exit
lamps remain switched off in darkness,
even when you�
unlock the vehicle
�
open a door
�
remove the key from the steering
lock
iIf the door remains open, the interior
lamps (except cargo compartment
lamp) switch off automatically after ap-
proximately 30 minutes.
Page 110 of 321
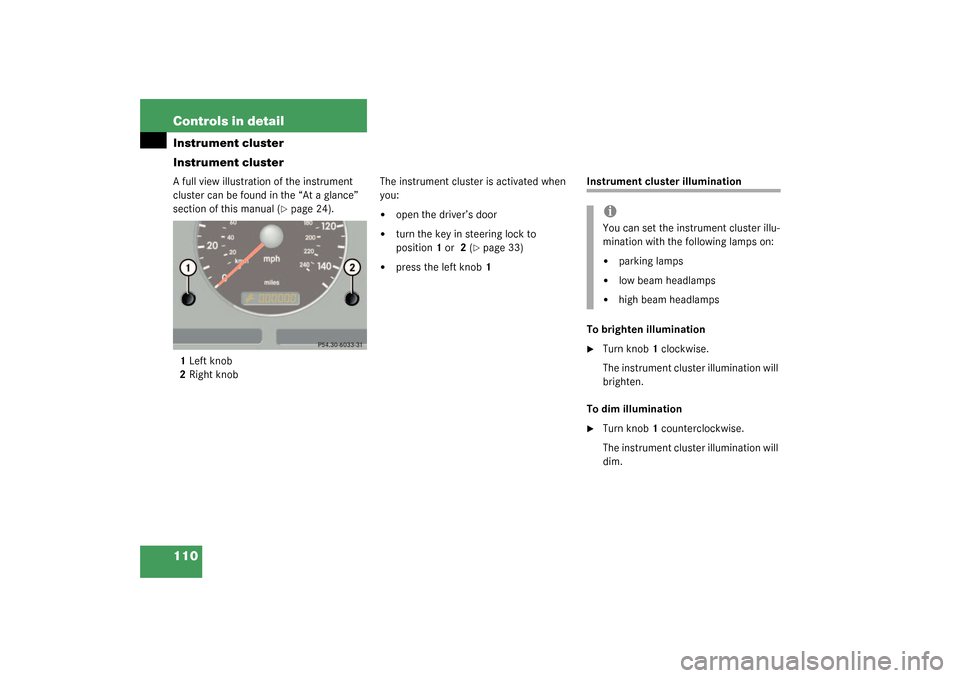
110 Controls in detailInstrument cluster
Instrument clusterA full view illustration of the instrument
cluster can be found in the “At a glance”
section of this manual (
�page 24).
1Left knob
2Right knobThe instrument cluster is activated when
you:
�
open the driver’s door
�
turn the key in steering lock to
position1 or 2 (
�page 33)
�
press the left knob1
Instrument cluster illumination
To brighten illumination�
Turn knob1 clockwise.
The instrument cluster illumination will
brighten.
To dim illumination
�
Turn knob1 counterclockwise.
The instrument cluster illumination will
dim.iYou can set the instrument cluster illu-
mination with the following lamps on:�
parking lamps
�
low beam headlamps
�
high beam headlamps
Page 115 of 321

115 Controls in detail
Automatic transmission
Gear selector lever position
Gear
range
Effect
é
The transmission shifts
through fourth gear only.
è
The transmission shifts
through third gear only.
With this selection you can
use the braking effect of the
engine.
Gear
range
Effect
ç
The transmission shifts
through second gear only.
Allows the use of engine’s
braking power when driving�
on steep downgrades
�
in mountainous regions
�
under extreme operating
conditions
æ
The transmission operates
only in first gear
For maximum use of engine’s
braking effect on very steep
or lengthy downgrades.
Effect
P
Park position
Selector position when the vehicle is
parked. Only place selector lever in
positionP when vehicle is stopped.
The park position is not intended to
serve as a brake when the vehicle is
parked. Rather, the driver should al-
ways set the parking brake in addi-
tion to placing the selector lever in
positionP to secure the vehicle.
The key can only be removed from
the steering lock with the selector le-
ver in positionP. With the key re-
moved the selector lever is locked in
positionP.
If the vehicle electrical system is mal-
functioning, the selector lever could
remain locked in positionP
(�page 245).
R
Place selector lever in positionR only
when vehicle is stopped.
Page 116 of 321

116 Controls in detailAutomatic transmission
Effect
N
Neutral
No power is transmitted from the en-
gine to the drive axle. When the
brakes are released, the vehicle can
be moved freely (pushed or towed).
To avoid damage to the transmission,
never engageN while driving.
If the ESP is deactivated or malfunc-
tioning:
Only move selector lever toN if the
vehicle is in danger of skidding (e.g.
on icy roads).
D
The transmission shifts automatical-
ly. All five forward gears are avail-
able.
!Coasting the vehicle, or driving for any
other reason with selector lever inN
can result in transmission damage that
is not covered by the Mercedes-Benz
Limited Warranty.Warning!
G
Getting out of your vehicle with the selector
lever not fully engaged in positionP is dan-
gerous. Also, positionP alone is not intend-
ed to or capable of preventing your vehicle
from moving, possibly hitting people or ob-
jects.
Always set the parking brake in addition to
shifting to positionP (
�page 50).
When parked on an incline, turn the front
wheels towards the road curb.
Warning!
G
When leaving the vehicle always remove the
key from the steering lock and lock the vehi-
cle. Do not leave children unattended in the
vehicle, or with access to an unlocked vehi-
cle. Children could move the selector lever
from positionP, which could result in an ac-
cident and/or serious personal injury.
Page 118 of 321

118 Controls in detailTransmission control – LOW RANGE mode
Transmission control – LOW RANGE modeIn the following situations you should
switch to LOW RANGE mode: �
during off-road driving
�
when crossing water
�
when towing up or down on steep gra-
dients
Switching on LOW RANGE modeLOW RANGE mode switch�
Stop the vehicle.
�
Move the selector lever to positionN.
�
Press on the upper part of the switch.
During the changeover the indicator
lamp (
�page 25) blinks three times.
Once the changeover is complete, the
indicator lamp lights up continuously.
Switching off LOW RANGE mode�
Stop the vehicle.
�
Move the selector lever to positionN.
�
Press on the upper part of the switch.
During the changeover the indicator
lamp (
�page 25) blinks three times.
Once the changeover is complete, the
indicator lamp goes out.
For information on driving safety systems
during LOW RANGE mode see the “Safety
and Security” section (
�page 71).
!Only switch the LOW RANGE mode on
or off, when the vehicle is�
at a complete standstill
�
the engine speed is less than
1500 rpm
Failure to do so may result in transmis-
sion or engine damage which is not
covered by the Mercedes-Benz Limited
Warranty.
!You should only operate the vehicle on
a single axle dynamometer for briefly
testing the brakes.
The key must be in steering lock
position1.
Page 122 of 321
 is found in the “Getting start-
ed” section. Intermittent wiping
Windshield wipers without r")
122 Controls in detailGood visibilityWindshield wipers
Information on the windshield wipers
(�page 47) is found in the “Getting start-
ed” section. Intermittent wiping
Windshield wipers without rain sensor
At speeds of approximately 105 mph
(170 km/h) the wiper switches automati-
cally to continuous wiping. Always obey lo-
cal speed limits.
Windshield wipers with rain sensor*
The rain sensor controls the windshield
wipers automatically according to the
amount of water on the windshield.
�
Switch ignition on.
�
Set the wiper switch to position1
(�page 47).
One initial wipe, pauses between wipes
are automatically controlled by the rain
sensor monitoring wetness of wind-
shield.
!If leaves, snow, etc. block the wind-
shield wipers, the wiper motor turns
off.�
For safety reasons, withdraw key
from steering lock. Remove block-
age.
�
Turn the windshield wipers on
again.
If windshield wipers fail to function at
all in switch position1,
�
set the wiper switch to the next
highest wiper speed.
�
have the windshield wipers
checked at the nearest authorized
Mercedes-Benz Light Truck Center.
iIntermittent wiping is interrupted when
the vehicle is at standstill and a front
door is opened.
!To prevent damage of the windshield
wipers, do not leave the wiper switch in
intermittent setting, when the vehicle
is taken to an automatic car wash or
when cleaning the windshield.
The switch should not be left in inter-
mittent setting as the wipers will wipe
the windshield once every time the en-
gine is started. Dust that accumulates
on the windshield might scratch the
glass when wiping occurs on a dry
windshield!iWhen intermittent wiping is on and the
key is turned from position1 to
position2 in the steering lock
(�page 33), and kept in that position
for longer than 2 seconds, the wipe in-
terval will be set to approximately
5seconds.
Page 123 of 321

123 Controls in detail
Good visibility
Rear window wiper
The rear window wiper will also automati-
cally engage if the windshield wiper is en-
gaged and the gear selector lever is placed
in reverse.
Rear window wiper with rain sensor*
Rear window wiper intervals are controlled
automatically according to the amount of
water on the windshield and the speed of
the vehicle, if:�
rear window wiper is switched on
�
front windshield wipers are switched to
intermittent wiping
The interval for the rear window wiper re-
mains constant when the windshield wiper
interval is ten seconds or more.
Sun visor
The sun visors protect you from sun glare
while driving.
1Mirror cover
2Mounting
�
Swing sun visors down when you expe-
rience glare.
�
To use mirror, lift cover1 up.
Illuminated vanity mirrors
�
Turn the key in steering lock to
position1 (
�page 33).
�
Lift cover up.
The lamp switches on.
Warning!
G
Do not use the vanity mirror while driving.
Keep the mirrors in the sun visors closed
while vehicle is in motion. Reflected glare
can endanger you and others.
iIf sunlight enters through a side win-
dow, disengage sun visor from
mounting2 and pivot to the side.