Page 140 of 321
140 Controls in detailLoadingCargo tie-down rings
The cargo area is provided with four
tie-down rings. Additional two rings are lo-
cated at the rear of front seats.Cargo tie-down ring
Carefully secure cargo by applying even
load on all rings with rope of sufficient
strength to hold down the cargo.Hooks
Four hooks located on the rear compart-
ment trim panels, two on each side.
HooksUse the hooks to secure light weight items.
The maximum permissible weight per hook
is 9lbs.(4kg).
iThe trunk is the preferred place to carry
objects. The enlarged cargo area
should only be used for items which do
not fit in the trunk alone.
iWhile the partition net (
�page 141)
will help protect you from smaller ob-
jects, it cannot prevent the movement
of large, heavier objects into the pas-
senger area in an accident. Such items
must be properly secured using the
cargo tie-down rings in the cargo area
floor.
Page 196 of 321

196 OperationDriving instructions�
If the engine coolant rises to an ex-
tremely high temperature (coolant tem-
perature needle approaching the red
zone) when the air conditioning is on,
turn off the air conditioning system.
Engine coolant heat can be additionally
vented by opening the windows,
switching the climate control fan speed
to high and setting the temperature
control to the maximum hot position.
�
Extreme care must be exercised since
your vehicle with a trailer will require
additional passing distance ahead than
when driving without a trailer.
Because your vehicle and trailer is
longer than your vehicle alone, you will
also need to go much farther ahead of
the passed vehicle before you can re-
turn to your lane.Parking
Passenger compartment
Warning!
G
To reduce the risk of personal injury, or
damage to the vehicle powertrain, as a re-
sult of vehicle/trailer movement, always:�
Keep right foot on brake pedal.
�
Shift gear selector lever to positionN.
�
Have a second person place wheel
chocks on downhill side of left and right
trailer wheels.
�
Slowly release brake pedal and let vehi-
cle and trailer roll into chocks until
stopped.
�
Firmly depress parking brake pedal.
�
Move gear selector lever to position P.
�
When parked on an incline, turn front
wheel towards the road curb.
Warning!
G
Always fasten items being carried as secure-
ly as possible.
In an accident, during hard braking or sud-
den maneuvers, loose items will be thrown
around inside the vehicle, and cause injury
to vehicle occupants unless the items are
securely fastened in the vehicle.
The trunk is the preferred place to carry ob-
jects. Always use partition net when trans-
porting cargo. Partition net cannot secure
hard or heavy objects.
Page 253 of 321

253 Practical hints
Replacing bulbs
�
Insert reflector from the left so that it
engages on the right.
�
Position tabs of cover in slots and rein-
stall cover until properly seated.
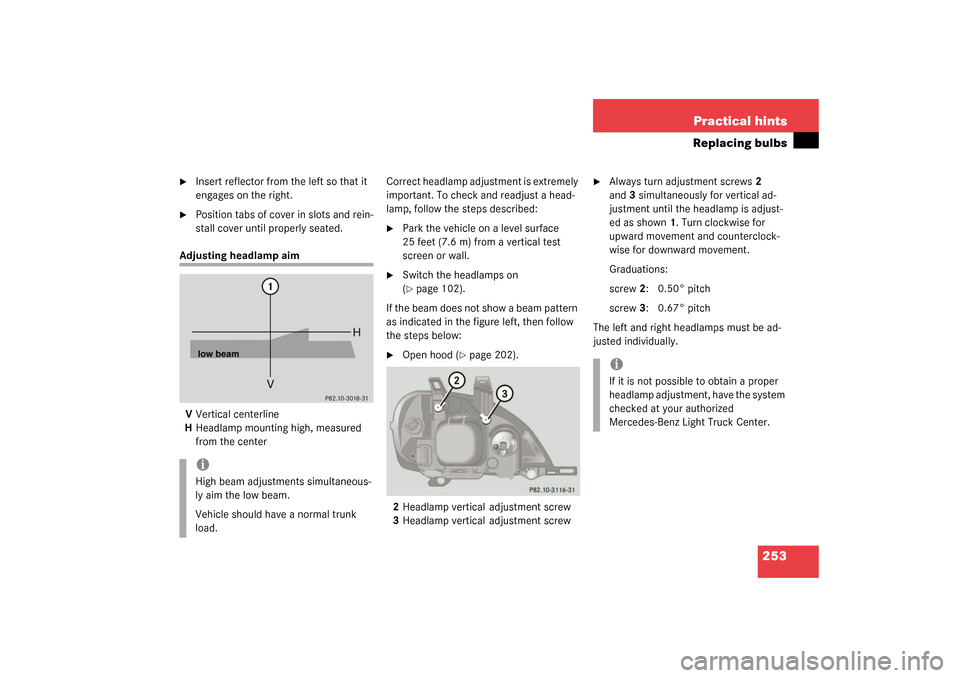
Adjusting headlamp aim
VVertical centerline
HHeadlamp mounting high, measured
from the center Correct headlamp adjustment is extremely
important. To check and readjust a head-
lamp, follow the steps described:
�
Park the vehicle on a level surface
25 feet (7.6 m) from a vertical test
screen or wall.
�
Switch the headlamps on
(�page 102).
If the beam does not show a beam pattern
as indicated in the figure left, then follow
the steps below:
�
Open hood (
�page 202).
2Headlamp vertical adjustment screw
3Headlamp vertical adjustment screw
�
Always turn adjustment screws2
and3 simultaneously for vertical ad-
justment until the headlamp is adjust-
ed as shown1. Turn clockwise for
upward movement and counterclock-
wise for downward movement.
Graduations:
screw2:0.50° pitch
screw3:0.67° pitch
The left and right headlamps must be ad-
justed individually.
iHigh beam adjustments simultaneous-
ly aim the low beam.
Vehicle should have a normal trunk
load.
iIf it is not possible to obtain a proper
headlamp adjustment, have the system
checked at your authorized
Mercedes-Benz Light Truck Center.
Page 318 of 321

318 IndexTrip odometer display 111
Trunk see Cargo compartment 85
Turn signal lamps
Replacing bulbs 247, 248, 250
Turn signals 47
Additional in mirrors 247
Cleaning lenses 220
Front bulbs 247
Indicator lamps 25
Rear bulbs 248, 251
Turning off
Engine 51
U
Unlocking 32, 84
Centrally from inside 90
Driver’s door in an emergency 242
Driver’s door, fuel filler flap 85
Fuel filler flap 200
In an emergency 242
Transmission selector lever
manually 245
Vehicle in an emergency 167
With the remote control 32
Upgrade signals
Tele Aid* 166Uphill driving
Cruise control 147
Upholstery
Cleaning 222
Upshifting 114
Useful features 152
Ashtrays and cigarette lighter 156
Cup holder 154
Electrical outlet 158
Garage door opener 168
Interior storage spaces 152
Tele Aid* 159
Telephone* 158
Trip computer* 172
V
Vehicle
Locking 28
Locking in an emergency 243
Lowering 258
Proper use of 17
Service battery 261
Towing 267
Unlocking 28
Unlocking in an emergency 242
Vehicle and trailer weights and ratings 193
Vehicle battery 261Vehicle care 217
Cup holder 221
Engine cleaning 219
Gear selector lever 221
Hard plastic trim items 221
Headlamps 220
Instrument cluster 221
Leather upholstery 222
Light alloy wheels 221
MB Tex upholstery 222
Ornamental moldings 220
Paintwork 219
Parktronic* system sensor 220
Plastic and rubber parts 222
Power washer 218
Seat belts 221
Steering wheel 221
Tail lamps 220
Tar stains 218
Turn signals 220
Upholstery 222
Vehicle washing 219
Window cleaning 220
Wiper blades 220
Vehicle identification number (VIN) 276
Vehicle jack 238